Product Settings
Product settings allow you to configure the option sets available in your Product Templates for selecting product features like payment schedules, types of collateral, insurance perils, types of fees, interest indexes, etc.
Payment Schedule Type
A payment schedule represents the complete table of periodic loan payments, showing the amount of principal and interest that comprise each level payment until the loan is paid off at the end of its term.
The payment schedules are a quintessential part of a loan. Below you can see how to configure the installments, dates and calculations.
In FintechOS Studio, payment schedule types come with a business workflow attached in order to block changes to schedule types that are actively used on banking products. Read more about Business Workflows.
Follow the steps below to create a new payment schedule type:
- In the main menu, select Products > Settings > Payment Schedule Type, and the Payment Schedule Types List page opens, showing all the already created schedule types.
- Click Insert to add a new type.
- In the newly opened Add Payment Schedule Type page, fill in the following fields:
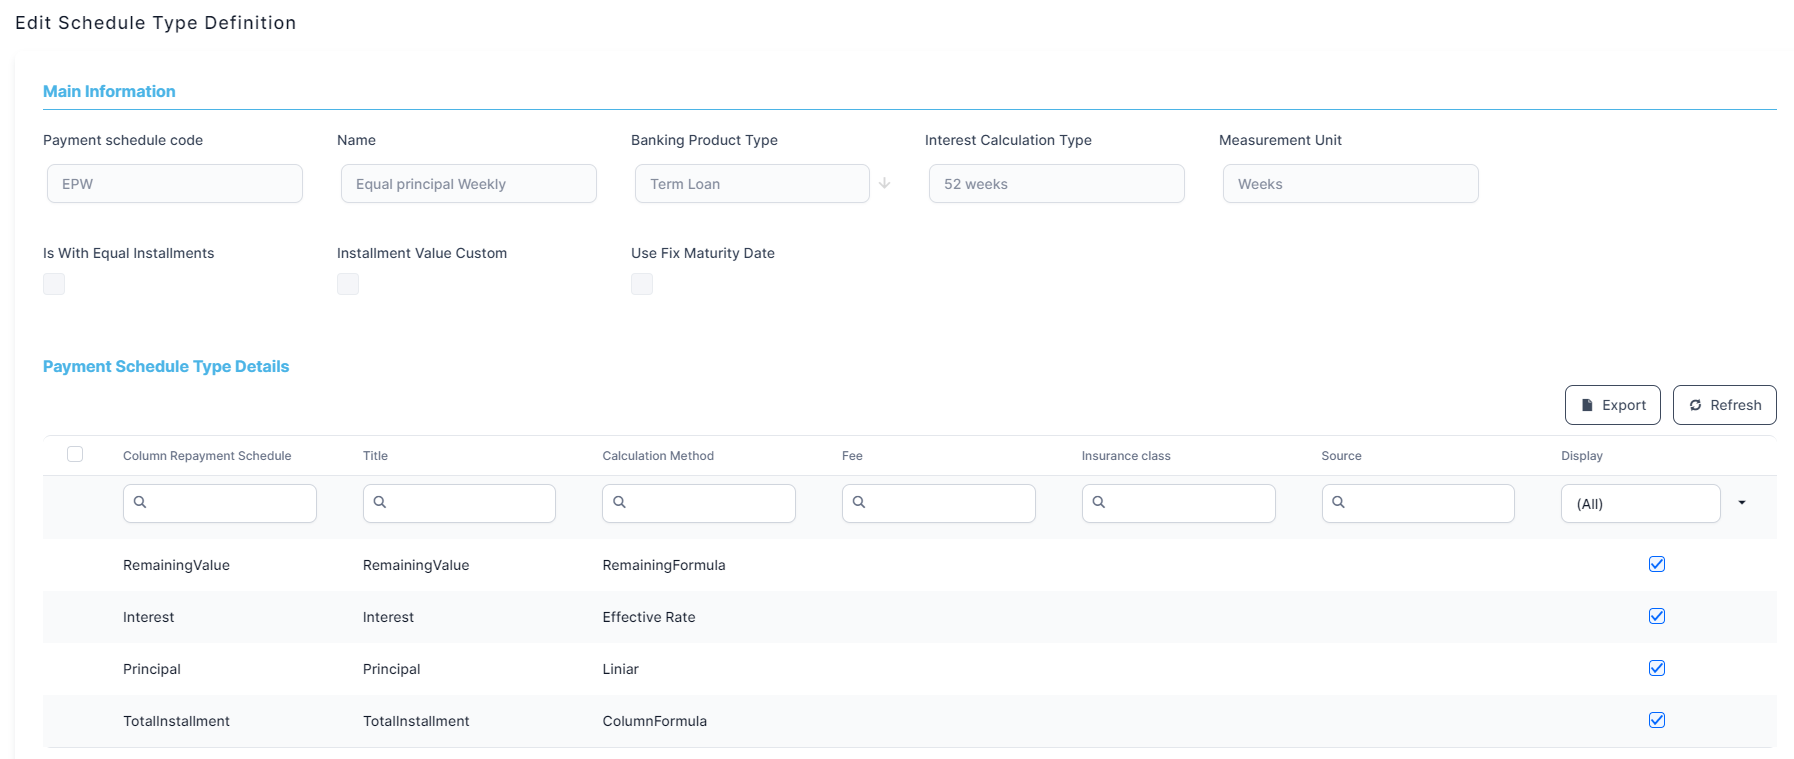
- Name: Insert a suggestive name for the type.
- Payment schedule code: Insert a code for the type to keep track of them.
- Banking Product Type: Select a product type to associate with the payment schedule type. Depending on the Product Type, different calculation rules are triggered. For example, the product type
Overdrafthas only the payment at maturity. - Interest Calculation Type: Select from the list a type of calculation for the interest.
When an annual interest rate is specified, in order to calculate the Installment for an interval of days, first the annual interest rate should be transformed into a daily base. To make this transformation, there are some accepted conventions. FintechOS Studio implemented the following conventions: 30/360, 30/365, Actual/ Actual, where Actual for years can be either 365 or 366. Other schedule interest calculation types can also be defined, as needed. In practice may be also encountered the Actual/ 360 or Actual/ 365. Here are some of the implemented schedule interest calculation types:- Equal Installment Monthly 30/360 - this generates a payment schedule of equal installments where every period is a month of 30 days, and every year has 360 days;
- Equal Installment Monthly 30/365 - this generates a payment schedule of equal installments where every period is a month of 30 days, and every year has 365 days;
- Equal Installment Monthly 30/366 (30/Actual) - this generates a payment schedule of equal installments where every period is a month of 30 days, and every year has 366 days;
- Equal Installment Monthly Actual/365 - this generates a payment schedule of equal installments where every period is a month with actual days (28,29, 30, or 31 days), and every year has 365 days;
- Equal Installment Monthly Actual/366 (Actual/Actual) - this generates a payment schedule of equal installments where every period is a month with actual days (28,29, 30, or 31 days), and every year has 366 days;
- Equal Principal Monthly 30/360 - this generates a payment schedule of equal principal where every period is a month of 30 days, and every year has 360 days;
- Equal Principal Monthly 30/365 - this generates a payment schedule of equal principal where every period is a month of 30 days, and every year has 365 days;
- Equal Principal Monthly 30/366 (30/Actual) - this generates a payment schedule of equal principal where every period is a month of 30 days, and every year has 366 days;
- Equal Principal Monthly Actual/365 - this generates a payment schedule of equal principal where every period is a month with actual days (28,29, 30, or 31 days), and every year has 365 days;
- Equal Principal Monthly Actual/366 (Actual/Actual) - this generates a payment schedule of equal principal where every period is a month with actual days (28,29, 30, or 31 days), and every year has 366 days.
- NOTE
The payment schedule projection takes into consideration both the payment schedule type defined at the banking product level, and whether to collect the interest accrued on the contract until the date of an early repayment event, thus repaying the accrued interest, or not, thus adding the accrued interest to the repayment amount. Set theCollect accrued interestfield in the Event page at the contract level toFalseto add the accrued interest to the repayment amount.
- Measurement Unit: Select from the list the type of measurement unit applicable for the payment schedule type: Days, Weeks, Months, Years, Once. The default value: Months.
- Is With Equal Installments: Select the checkbox if the installments are equal, so the annuity (also known as PMT) value calculation is needed, and the Principal is calculated with formula
Annuity minus Interest. If there are Commissions that appear on the Payment Schedule, these Commissions are not included in annuity calculation. - Installment Value Custom: If you select the checkbox, with multiple disbursements, the Principal component of the installments is the one calculated for the entire Financed Amount, even if it was not entirely disbursed.
For example, if Financed Amount is 10,000 EURO and the value calculated for Principal component of the Installments is 800 EURO, and the customer disburses only 5,000 EURO, the Principal component remains 800, but the Interest is calculated for 5,000 EURO that were disbursed.
IfInstallment Value Custom = False, then theIs Manual ValueandRoyalty/ Initial Principal Valuefields at the contract level are read only.
IfInstallment Value Custom = True, then theIs Manual Valuefield at the contract level is editable, withFalsedefault value. - Use Fix Maturity Date (from Activation Date): If you select the checkbox, then the Maturity Date equals to Activation Date plus the Contractual Period in Months, i.e. the number of installments depends on the Activation Date.
If the checkbox remains unselected, the number of installments are fixed, the Maturity Date is equal to the First Installment plus the Contractual Period in Months, e.g. Installment date is on the first day of the month, this results in the Maturity day to be the first day of the month.NOTE
This is only valid forPeriod Type = Months.
- Click Save and reload.
- In the newly displayed Payment Schedule Type Details section, fill in the fields below. Note that the fields change according to the selection of Column Type and Calculation Method.
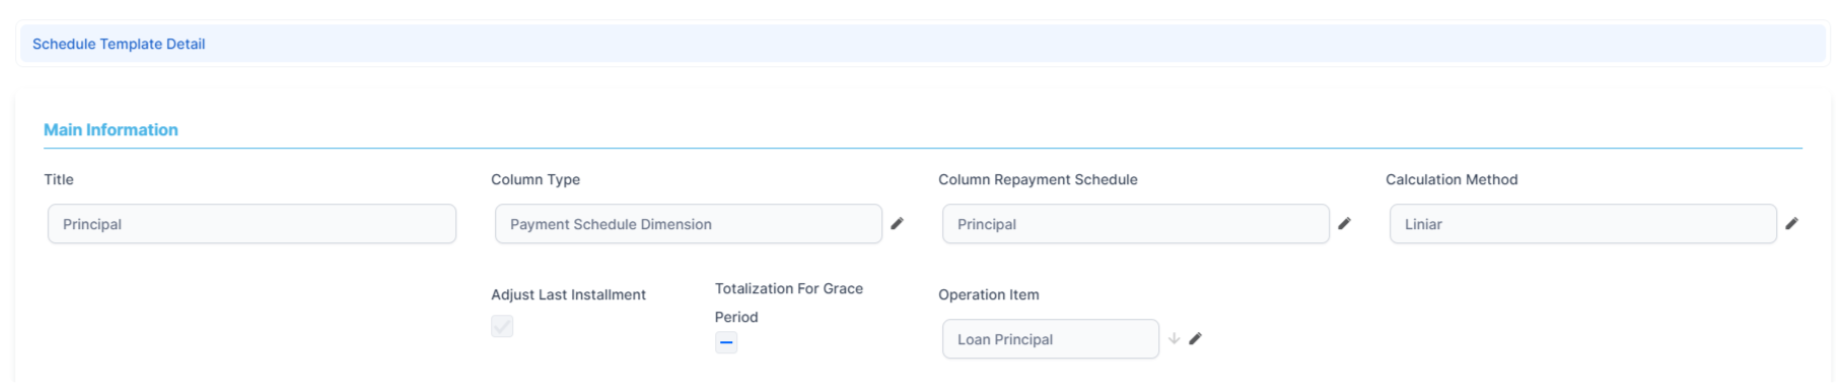
- Title: Insert a suitable title for the detail.
- Column type: Select one of the following types: Payment Schedule Dimension, Fee Dimension or Insurance Dimension. Note that the selected type triggers changes in the displayed fields.
- Column Repayment Schedule: Select one of the columns that is assigned in the Payment Schedule.
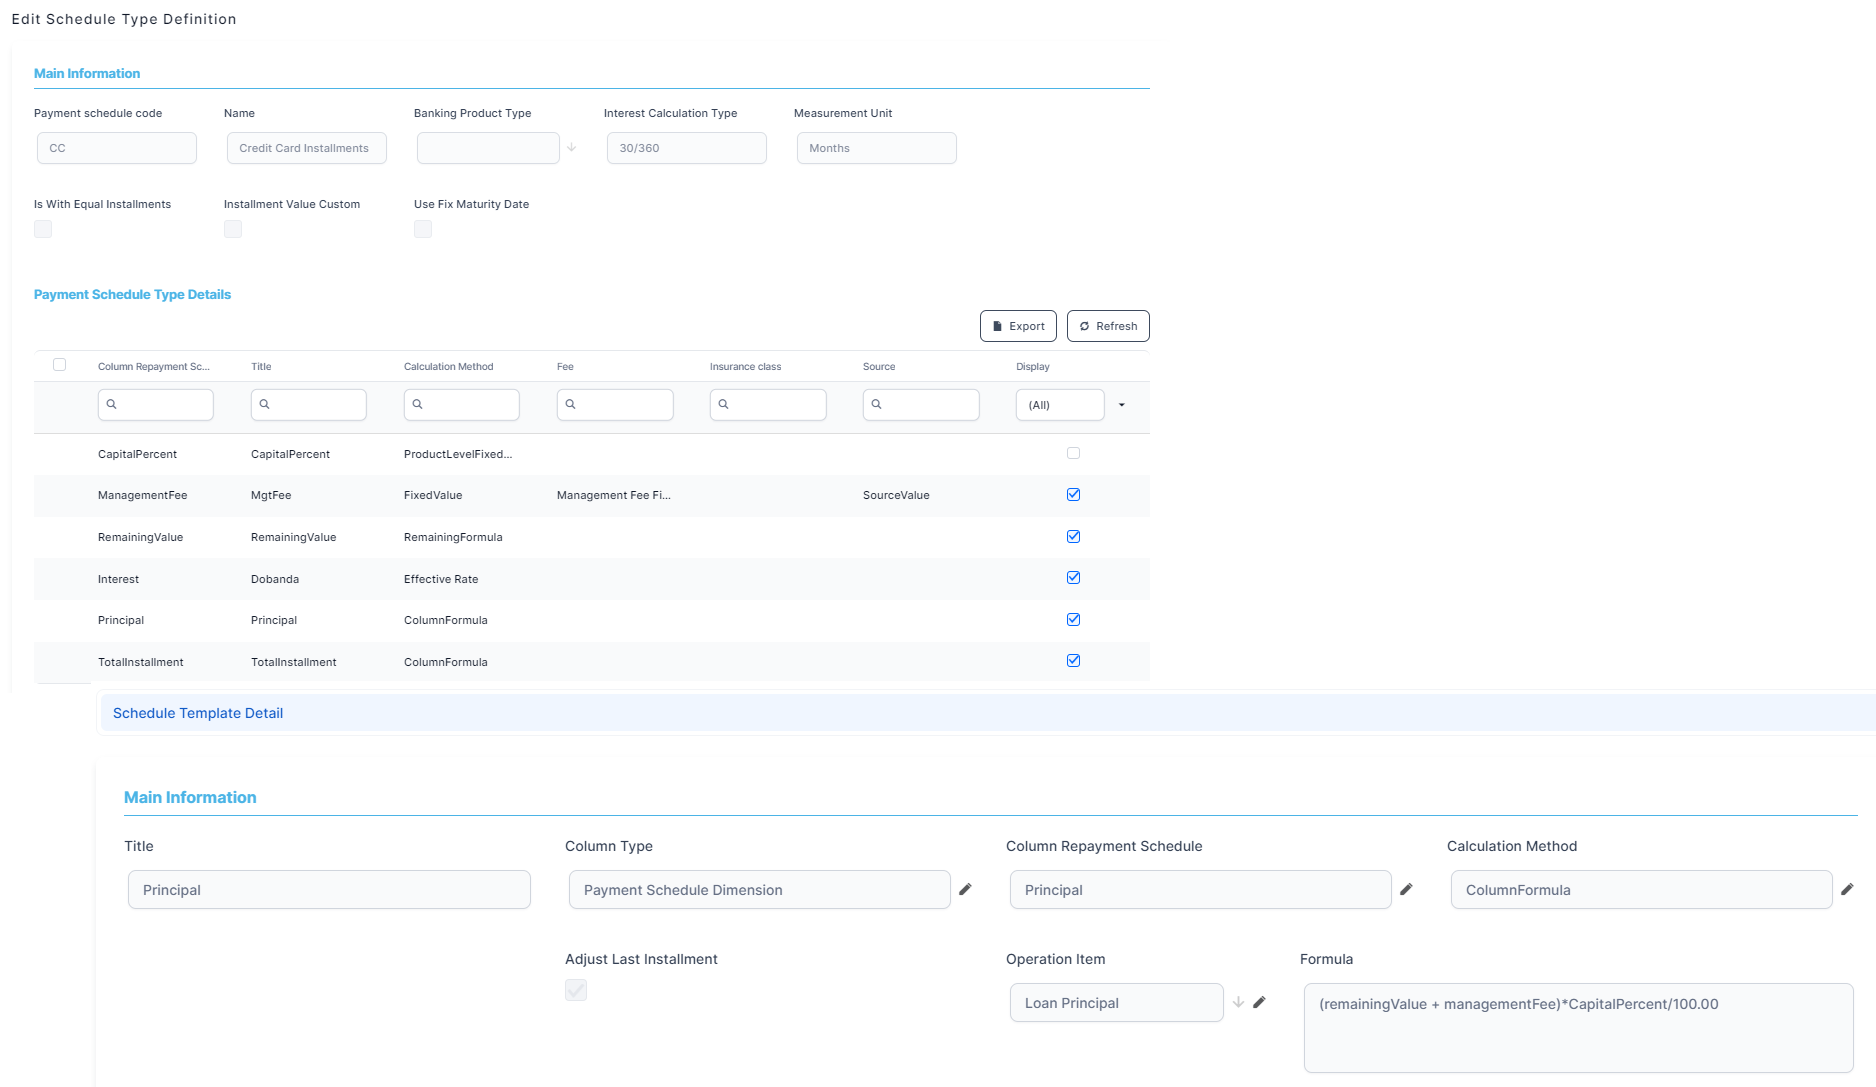
- Calculation Method: Select a method. It triggers changes in the fields. There are the predefined values that are taken into consideration when calculating the Interest:
- Linear: calculated as Amount / Number of Installments.
- Effective Rate: percent applied to the Source field (see below), usually to the Remaining Value.
- Fixed Value: a constant value that is completed in the Payment Schedule.
- Column Formula: formulas having other columns as parameters. Formula used is specified in the field Formula that is displayed when this option is set.
- Remaining Formula: specific to a column of Remaining.
- Once: the value is paid once.
- LinearOnYear: a value calculated based on the Remaining Value at the beginning of the credit year and a given percentage, divided in installments with the specified periodicity.
- FeeOnce: takes into account a fee that is paid once.
- ProductLevelFixedValue: method that calculates the capital percent defined for cards and credit cards type of products.
- Operation Item: It is the item allocated to a column in the Payment Schedule on which the amount calculated at this step is allocated. Select an item from the list.
- Fee: Select a fee configured in the Product Dimensions.
- Fee Type: Select a fee type configured in the Product Dimensions. This is helpful when, for different banking products, there are different values applicable for the same type of fee.
- Source: It is the source element from the JSON file returned by the Payment Schedule calculation from where to take the value.
- Insurance type: Select an insurance type.
- Is Calculated In Advance?: Select the checkbox if the calculation is done in advance.
- Is calculated Upfront: Option available for Insurance Dimension and Fee Dimension. Select the checkbox for insurance or commissions that need to be paid at the activation of the lending contract.NOTE
This is only valid for products with Period Type = Months. - Totalization For Grace Period: This checkbox is available when the Calculation method is set to Effective Rate or Fixed Value. If you select it, then the values that are not applied during Grace period are added to the first non-grace installment.
- Adjust Last Installment: This checkbox should be checked most of the time, as rounding loses of precision can exist, and the sum of Principal paid monthly should be the same as the Financed Amount.
- Operation Item: Select the operation item from the list for which this schedule type details should apply.
- Formula: This checkbox is available when the Calculation method is set to Column Formula or Remaining Formula or Once or LiniarOnYear. The formula can use other Schedule Details Names. For example, for a total installment calculated as Principal+Interest+ManagementFee that were added to Payment Schedule Type Details earlier.
- If you selected Fee Dimension, then fill in the following fields: Fee, Fee Type or Source.
- If you selected Insurance Dimension, then fill in the following fields: Insurance class or Source.
- Click Save and close. Repeat to add more details.
The first installment can be adjusted in situations when the algorithm forces an equal installment, by adjusting the Principal paid in the first interval.
For a Payment Schedule with equal installments, the first installment interest is calculated for the number of days between Activation Date and First Installment Date.
In general, for this first installment, the number of days can be lower or higher than the normal interval, so the Interest calculated makes the first installment to be different than the others.
The following picture illustrates the payment schedule type and the details defined for Credit Card Installments calculation:
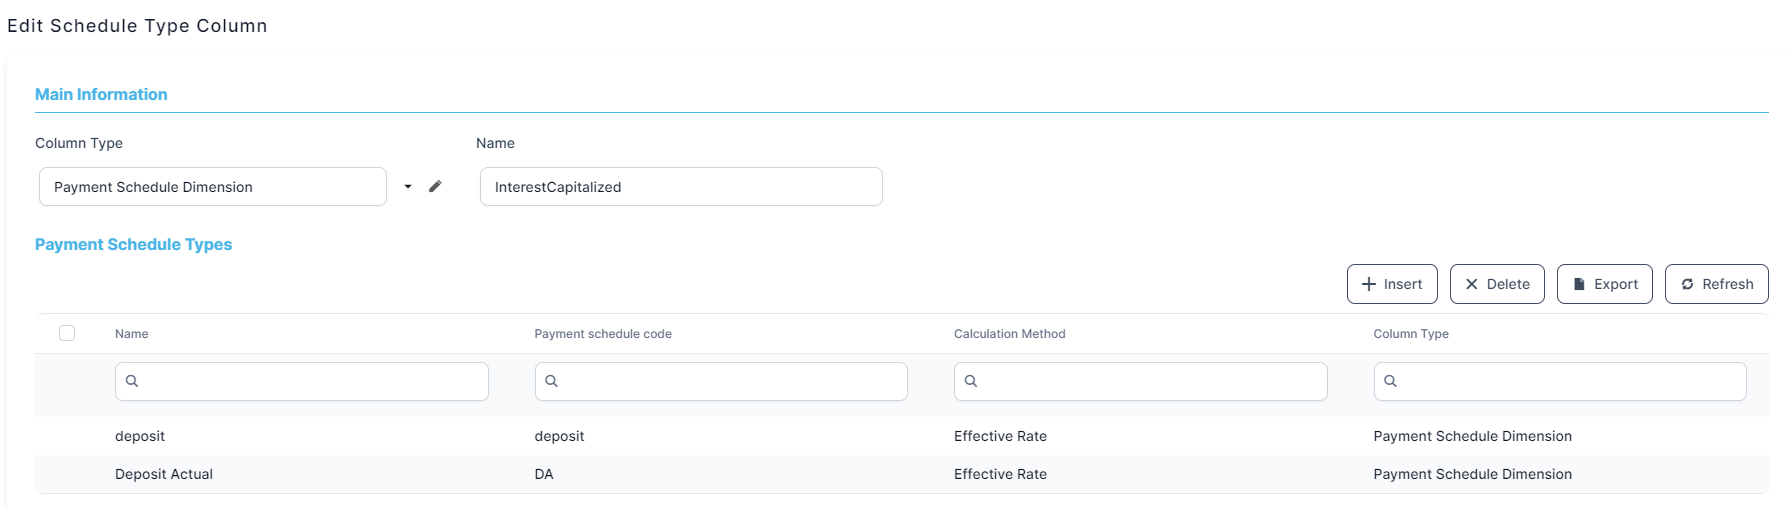
To configure the calculation steps, use the Schedule Type Column option in the Settings menu. The order of the steps is determined by the Calculation column.
- In the main menu, click Products > Settings > Schedule Type Columns, and the Schedule Type Column List page opens, showing all the already created schedule type columns.
- Click Insert to add a new column type.
- In the newly opened Add Schedule Type Column page, select a Column Type from the list: Payment Schedule Dimension, Fee Dimension or Insurance Dimension.
- Enter a Name for the column.
- Click Save and reload.
- The Payment Schedule Types section is displayed after saving, showing all the payment schedule types using this column, with the following information:
- Name: The name of the Payment Schedule element.
- Column Type: The column type: Payment Schedule Dimension, Fee Dimension or Insurance Dimension.
- Payment Schedule Code: The code of the payment schedule.
- Calculation: The calculation method.
- Operation Item: Select an operation item for this schedule type.
- In the main menu, click Products > Settings > Schedule Element Class, and the Schedule Element Classes list page opens.

- Click Insert to add a new class.
- In the newly opened Add Scheduled Element Class, select an Element Type: Insurance or Commission.

- Add a name for the element class.
- Select an Operation Item.
- Modify the default values filled in for the following fields:
- Mandatory for Applicant - If selected, the schedule element class is applicable to the applicant customer. Default value:
True. - Mandatory for Debtor - If selected, the schedule element class is applicable to the debtor. Default value:
False.
- Mandatory for Applicant - If selected, the schedule element class is applicable to the applicant customer. Default value:
- Click Save and close. Repeat as many times as needed.
FintechOS Studio uses the values of a saved schedule element class record to automatically fill in the fields of an insurance during the creation of a new record.
Loan Periodicity
Loan periodicity is the dictionary used to define the regularity of payments. For example, payments related to loan contracts, commissions, or installments can be performed once, daily, monthly, yearly, and so on.
To manage loan periodicity records:
- In the main menu, click Products > Settings > Loan Periodicity, and the Loan Periodicity page opens.

- On the Loan Periodicity page, you can add new loan periodicity record or search, edit, and delete existing ones.
You can insert, update, or delete records if you have the associated role of Banking Product Admin.
Create Loan Periodicity Records
- Click Insert on the Loan Periodicity page. The Add Loan Periodicity page is displayed.
- Fill in the following fields from the Loan Periodicity section:

- Name: Enter the name of the periodicity.
- Periodicity: Enter the number of measurement units for the periodicity.
- Measurement Unit: Select the measurement unit applicable for the periodicity from the drop-down. Possible values:
Days, Weeks, Months, Years, andOnce.
- Click Save and Reload. The new loan periodicity is created and ready to be used.
Collateral Type
The Collateral Type dictionary is used to define the types of collateral used in the banking products' definition.
To manage collateral type records:
- In the main menu, click Products > Settings > Collateral Type, and the Collateral Type List page opens.
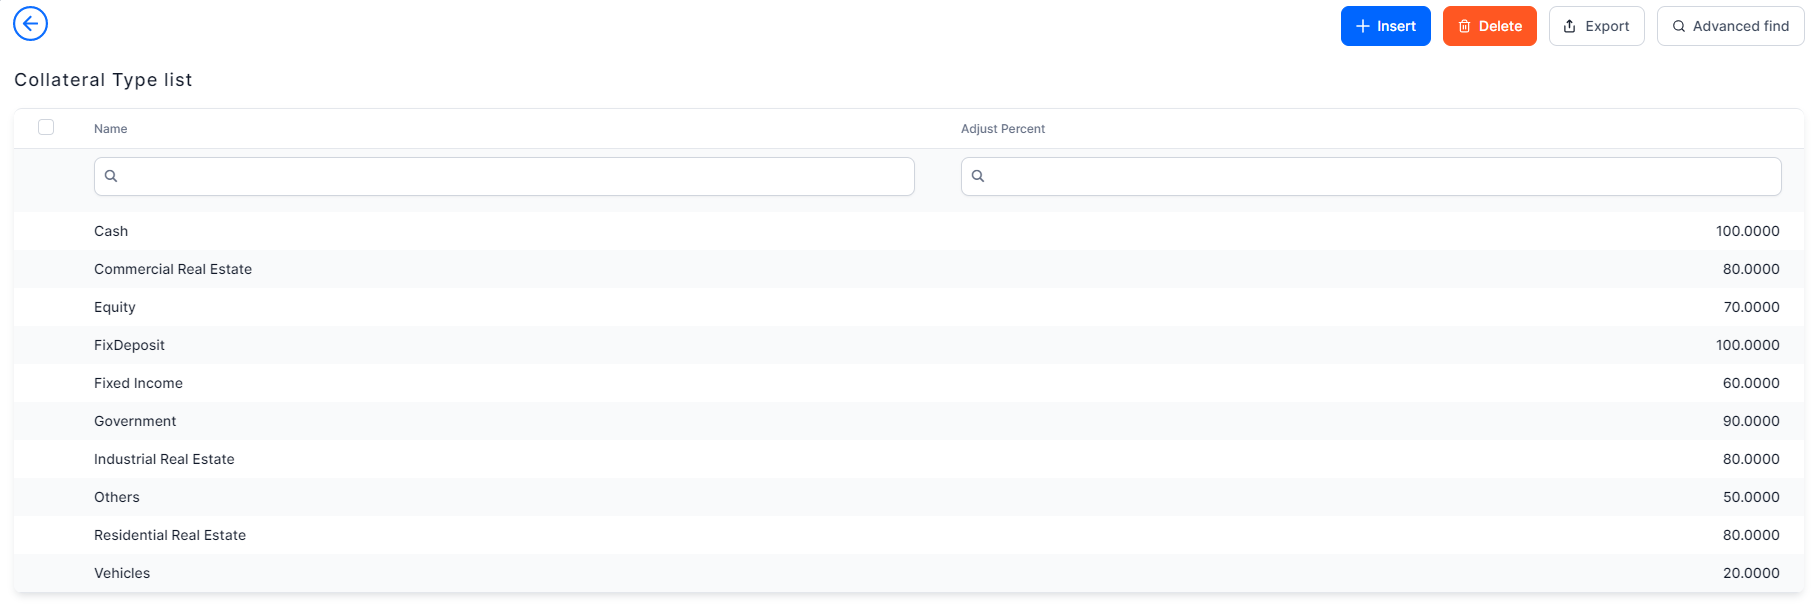
Or you can manage collateral types from FintechOS Portal's Core Banking Operational > Collateral Type menu. - On the Collateral Type List page, you can add new allocation methods or search, edit, and delete existing ones.
You can insert, update, or delete records if you have the associated role of Banking Product Admin.
Follow these steps to create new collateral type records:
- Click Insert on the Collateral Type List page, and the Add Collateral Type page is displayed.
- Fill in the following fields:

- Name: Enter the name of the collateral type.
- Code: Enter the code of the collateral type.
- Adjust Percent: Enter the adjusted value of the collateral type.NOTE
When a collateral type is defined, you can set an adjustment percent. The adjustment percent is a customization applied for that collateral. Further, when a collateral is linked to a secured loan contract, its market value is automatically adjusted by Loan Management using the adjustment percent. - Priority: Enter the priority of the collateral type to be considered within a contract.
- Click Save and Reload.
In the newly displayed Banking Products section, you can see the banking products that have this collateral type associated.
Banking Product Document
This section allows you to track all the documents that have been set up in various banking Product Templates to be requested from or provided to banking customers, such as identification documents or Terms and Conditions.
Insurance Peril
An Insurance Peril, or condition - for example earthquake, car accident, tornados, theft, death, or disability, informs about the type of coverage for a particular insurance product, or product item (coverage). You can define perils independently from products, so that they can be used in conjunction with multiple insurance product templates. Depending on your product, you can attach one or multiple perils, or conditions to it.
Add Perils
In FintechOS Studio, you can find an overview of all the insurance perils registered in your system - your nomenclature of perils, or conditions. You can also create and configure new records. Follow the steps below to add a new peril record.
- In the main menu, navigate to Products > Settings > Insurance Peril. The Insurance Peril List is displayed, containing all the existing records.

- Click Insert to add a new peril.
- Fill in the following fields to configure the peril:
- Insurance Peril Name: Name of the insurance peril.
- Max Notify Period: Maximum period for the notification of the peril.
- Event Count Limit: Number of events covered by the policy.
- Implicit Reserve: Amount of the prudential reserve to be deposited for the current policy.
- Implicit Reserve Currency: Currency of the prudential reserve.
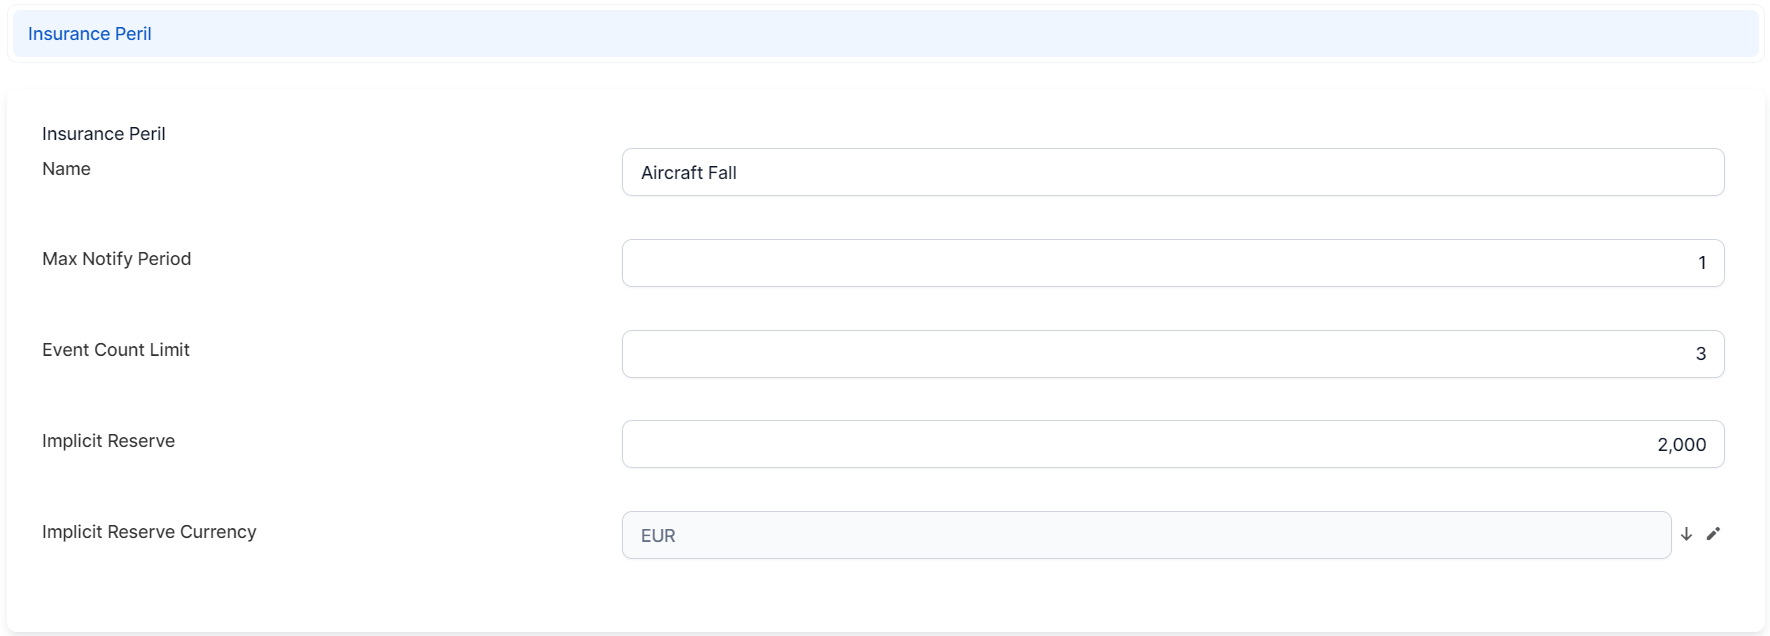
- Click Save and Close. You can view the newly created record in the Insurance Peril List.
Insurance Document
This section allows you to track all the documents that have been set up in various insurance Product Templates to be requested from or provided to insurance customers, such as identification documents or Terms and Conditions.
Lexicon Term
Lexicon terms are parameters (like the debt-to-income ratio, credit score, current credit amount, risk zone, etc.) used in the context of specific Product Templates for rules, data sets, or formulas. Lexicon terms are the building blocks of product evaluations, such as requiring an insurance, calculating a price, offering a discount, or determining eligibility.
To set up the lexicon terms that are available for your products, in FintechOS Studio, go to Main Menu > Products > Settings > Lexicon Term.
Each lexicon term has the following parameters:
| Parameter | Description |
|---|---|
| Name | Name of the lexicon term. |
| Type | Data type of the lexicon term.
|
| Status |
|
| Description | Enter a description of the lexicon term. This explanation is visible when designing a product and selecting the lexicon term. |
| Context Enriched Before |
|
| Context Enriched After |
|
| Lexicon Term Values | Value list lexicon terms only. Use this grid to configure the values that are available in the list. |
| Lexicon Context | Use this list to set up the Product Templates where the lexicon term is available. |
Fee Types
To set up the fee types that are available for your products, in FintechOS Studio:
- Go to Main Menu > Products.
- Click Settings.
- Select Fee Types.
Each type of fee has the following parameters:
| Parameter | Description |
|---|---|
| Commission Schema |
Indicates the conditions under which the fee is applied.
|
| Name | Type a name for the fee. |
| Periodicity Type | How often the fee is charged. Either only once or at regular intervals (annually, bimonthly, trimestrial, weekly, etc.). |
| Mandatory for Applicant | This fee must be payed by the applicant. |
| Automatic Load on Contract | If selected, this fee is automatically loaded on contracts. |
| Is for Contract Version | Fee applied when creating a new contract version. |
| Is for Unusage | Fee for when an account or credit line remains unused or inactive for an extended period of time. |
| Is Returnable | Fee is refundable if the loan application is denied. |
|
Is Return |
Fee applied for Return Amount or Goods transactions on contracts. |
Interest Indexes
The Interest Indexes option allows you to track all the individual interests that have been set up in various banking Product Templates. To see the interests, in the FintechOS Studio main menu, go to Products > Settings > Interest Indexes.
Insured Objects
For future use. Do not change.
This item allows you to see the insured objects![]() Item or entity that is covered by an insurance policy. that can be covered in various insurance product templates.
Item or entity that is covered by an insurance policy. that can be covered in various insurance product templates.
Underwriting Data Set Values
This item allows you to define lists of terms that constitute valid terminology for the Approved, Derogation, and Rejected underwriting outcomes. For each outcome, you can provide the corresponding terms separated by commas:
| Outcome | Data Set Values Examples |
|---|---|
| Approved | Approved, Passed |
| Derogation | Derogation, Manual Analysis |
| Rejected | Rejected, Not Passed |