Advanced Code Editor
The Advanced Code Editor provides FintechOS developers with a simple and powerful interface that allows them to insert and edit HTML, CSS and JavaScript forms' content using code.
The table below lists the attributes that can be inserted or edited using the Advanced Code Editor.
| Entity | Attribute |
|---|---|
| EntityForm | After Events |
| EntityForm | Before Events |
| EntityForm | Template |
| Entity Form Field | Attribute Change Event |
| Entity Form Section | After Events |
| Entity Form Section | After Section Save |
| Entity Form Section | Before Section Save |
| Entity Form Section | Template |
| EntityView | Fetch Object Expression |
| EntityView | After Generate Js |
| EntityView | Display Options |
| Automation Script | Code |
| Automation Script Libraries | Code |
| Client Script Library | Definition |
| Client Script Library | Code |
| Custom Form (Custom Flow) | After Generate Js |
| Custom Form (Custom Flow) | Template |
| Html Widget | JavaScript |
| Html Widget | Html |
| Style Sheet | Code |
Features
- Browsing files and nodes
- Searching for specific nodes or specific content in files
- Simplified code editing using code snippets
- Live preview of HTML files
- Debugging right from the editor
- Insert and customize Code Blocks
Access the Advanced Code Editor
You can access the Advanced Code Editor in two ways:
- From the menu, click Advanced > Advanced Code Editor. By doing so, you will see all files and nodes available in FintechOS Studio.
- When editing one of the entities listed in the table above, click the Open in Code icon at the top-right corner of the page. By doing so, you will be able to browse the files of the current entity.
General Layout
The Advanced Code Editor user interface is comprised of the following panels: an explorer on the left, showing all of the folders and files you have access to, main editor in the center, showing the content of the files you have opened, a property list on the right, showing the values of the attributes from the file you have opened, a toolbar on top and two search tabs at the bottom.
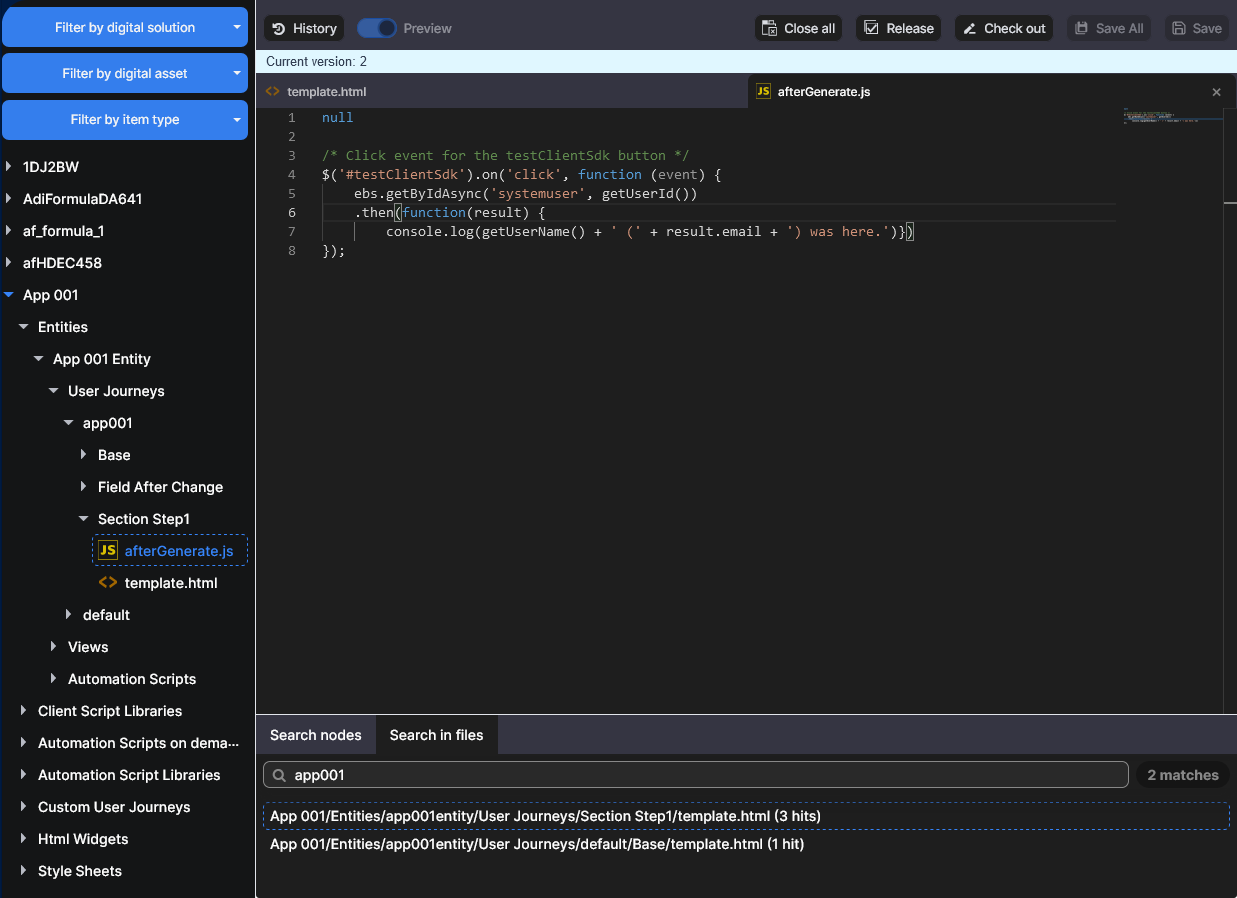
Files Explorer
Displays in a tree-view the files you have access to, and you can browse and select the attribute files you want to edit. The files are organized in folders, each in its own Digital Asset, if available. The filters also allow you to display independent items (i.e. digital assets not set as context). If locked in a digital asset, that digital asset will have the drop-down arrow highlighted in blue in the list. The files can be filtered on three levels, as follows:
Digital Solutions allow you to group multiple digital assets for easy distribution and deployment. For more information on how to create, edit, and delete digital solutions, see Digital Solutions.
Digital Assets group together configuration items (entities, attributes, libraries, digital journeys, etc.) that belong to a common context. For more information on digital assets, see Configuration Management.
The Item Type filter lists all the configuration item types of a digital asset, that are editable with the Advanced Code Editor functionality (Customer User Journeys and HTML Widgets cannot be edited).
If an entity belonging to one digital asset has configuration items shared with another digital asset, the entity will be displayed also in the second digital asset tree, so that its configuration items can be shown in its context.
Toolbar
The toolbar displayed on top provides the controls to perform basic operations like saving or closing file(s) and also debugging the code directly in the editor or live previewing the HTML files. The following controls are available.
| Control | Description |
|---|---|
| History | Displays the version history of the currently opened file. See Debug Files using File History for information on how you can use the file history to debug your code. |
| Preview | Available only for HTML files, allows you to toggle between the source code or the live preview of the HTML file. When choosing live preview, below the HTML source code, a panel is displayed within the main editor showing how the HTML file will look like in the UI. For more information, see Previewing HTML Files. |
| Close all | Closes all opened files. When you open multiple files, they are displayed as tabs. |
| Release | Releases the file and disables file editing (see Manage Locked Files for details). |
| Check out | Locks the file and enables editing (see Manage Locked Files for details). |
| Save all | Saves all opened files. You can also save all opened files by pressing CTRL+SHIFT+S. |
| Save | Saves the file you’re currently working on. You can also save the file you’re working on by pressing CTRL+S. |
Search Nodes
The tab allows you to search available nodes by name. Enter the name of the node you want to search for and press Enter. The search returns the list of nodes partially matching the name of the node you provided.
Search in Files
The tab allows you to search for specific content within the available files. Enter the content to search for (e.g., an attribute or a function name) and press Enter. The search returns the list of nodes which contain the content you provided.
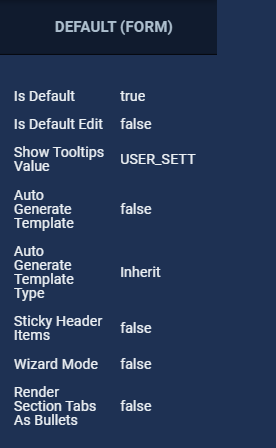
Properties List
For some of the nodes a list of properties is displayed, on node selection, on the right-side panel.
Previewing HTML Files
To preview an open HTML file, from the toolbar toggle the Preview button on.
Below the preview panel, a toolbar with three colored icons is available. The icons allow you to perform specific actions, as follows:
- Green icon - maximize the live preview to the main editor panel.
- Orange icon - minimize the live preview.
- Red icon – close the live preview. The Preview Mode button is automatically toggled off.
To maximize the preview panel even more (by hiding the search tabs), click the down-arrow.
Code Editing Supporting Features
Browse or search for the files you want to edit and open them by clicking on the files. Edit the code which defines how and what the files should do and save the changes. You can also insert predefined Code Blocks and change them to best suit your needs.
To write the code faster and typo-free, use the built-in IntelliSense suggestions and the Code Snippets Support.
HTML Syntax Guidelines
- The
<head>and<style>tags are restricted. <!-- Write your comments here -->tags are removed.- Preferably use
<br>instead of<br />for the line break tag and<img>instead of<img />for insert image. - Only inline CSS is supported.HINT
You can use an external CSS inliner tool in order to restructure your HTML code to inline CSS.
Debug Files using File History
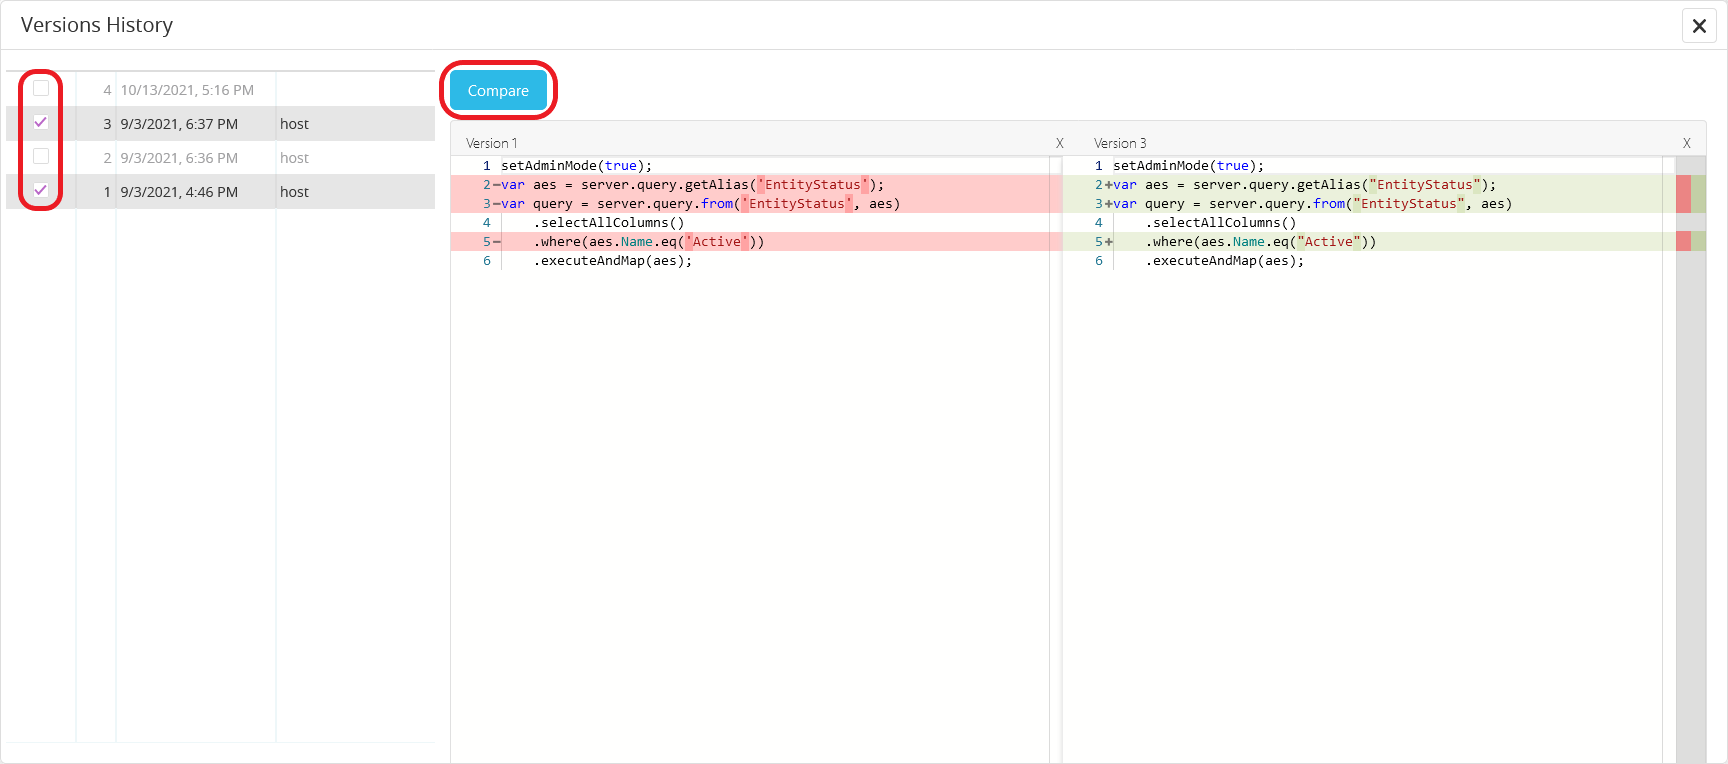
To debug a file, open it and click the History button in the toolbar. The panel on the left shows the saved file versions in descending order, who made the changes, and the date and time of the change. To compare two versions of your code, select the checkboxes next to the desired versions and click the Compare button. The panel on the right will show a side-by-side comparison of the two versions with changes highlighted for easy tracking.