Onboarding Companies
Make sure your organizational structure is properly defined in the application. This is typically done during the application’s installation. For details on how to set up your business unit structure, see the Create the Organizational Structure page.
Follow the steps below to add new legal entity customers:
-
Click Main menu > General > Legal Entities, and the Customer List page opens.
-
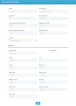
Click the Insert button to open the Add Legal Entity Account page.
-
Fill in the following fields:
-
Name: Enter the customer's name.
-
Account type: Select the account type from the following options: Legal Person or Self Employed Individual.
For details on how to define the account type, see the Define Account Types section.
-
Legal Form: Select the legal form of the customer's business:
- S.R.L. - for limited liability companies
- S.A. -for joint stock companies
-
Foundation Date: Enter the foundation date of the business.
-
Unique Taxpayer Reference (UTR): Enter the company’s fiscal registration number.
-
Registration Number: Enter the company's commercial registration number.
-
Personal Identification Number (PIN): For legal entities, this field is displayed only for Self Employed Individual account types and when the is Person field is
true. For additional details see the Define Account Types section. -
Registration Date: Enter the registration date of the legal entity.
-
Industry: Select the company’s industry sector, such as manufacturing, retail, aircraft, or mining.
-
Address type: Select the address type from the following options: Primary Address, Secondary Address, Billing Address, Social Address, Delivery Address, Home Address or Residence Address.
-
Main address: If you select this checkbox, then the record is set as the main address.
-
Country: Select the country from the customer's address.
-
City: Select the city from the customer's address.
-
County: Select the county from the customer's address.
-
Street Type: Select the street type from the customer's address. Select from the existing records or insert a new one.
-
Enter the Street Name, Street Number, Building Number, Entrance, Floor Number, Apartment Number and Postal Code from the customer's address.
-
-
Click the Next button, and the Add Legal Entity Account - Additional Data page opens.
-
Fill in the following fields:

-
Division: Select the business division to which the customer belongs. For additional details see the Define Business Divisions section.
-
Branch responsible: Select the business branch to which the customer belongs to. For additional details see the Define Business Unit Type section.
-
Business Line: Select the division’s business line to which the customer belongs. For additional details see the Define Lines section.
-
Account Responsible: Select the employee responsible for the customer's account. For details on how to create system users, see the System Users and the Adding System User Information documentation.
-
- Click the Save button. The customer's detailed account information is displayed. To view, add, and edit company details, see the Managing Detailed Company Information page.

