Creating a Current Account
A current account is a bank account where you can store and withdraw money, enable it for debit/ credit transactions internally (disburse/ repay loan, transfer between accounts) or via integrated solution for card management or payments.
A current account with an attached overdraft functionality allows customers to withdraw funds from the account even if the available balance goes below zero. If there is a prior agreement with the account provider for an overdraft, and the amount overdrawn is within the authorized overdraft limit, then interest is normally charged at the agreed rate. If the negative balance exceeds the agreed terms, then additional fees may be charged and higher interest rates may apply. The customer may use the account beyond their available balance (credit balance) and may have a debit balance as low as the approved overdraft/ limit. The overdraft can be added on top of existing current accounts.
The overdraft feature of the current account may expire, in which case the contract continues to function as a current account. If needed, the overdraft feature can be reactivated in the future within the same contract by editing the contract and creating a new version. If the overdraft feature is extended by creating a new version of the contract, the repayment schedule is also updated. In cases when the feature is extended after a period of expiry, then the repayment schedule has a missing period equivalent with the period when overdraft was expired. All overdue amounts from previous overdraft notifications generated for the same current account contract are covered automatically, decreasing the balance and available limit amount of the new overdraft. The overdraft amount can fluctuate seasonally or be reduced or increased according to a schedule, defined in the Contract Reevaluation Plans section of the contract.
Before creating a current account contract, make sure that the customer is recorded in Core Banking.
To create a new contract:
-
Open the Contracts page as described in the Managing Contracts section.
-
Click the Insert button to display the Add Contract page is displayed, the initial page when you insert any type of contract.
-
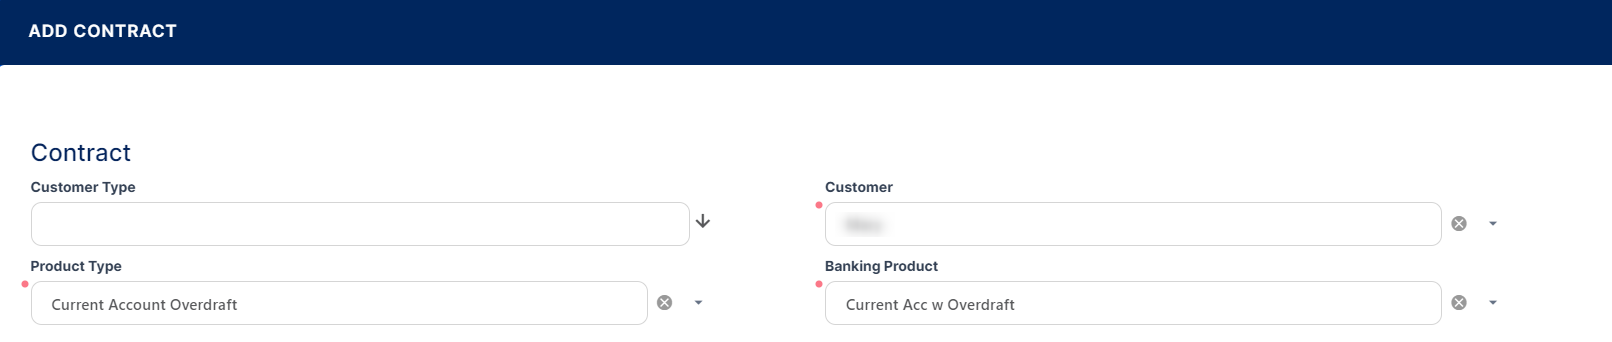
Fill in the following fields:
-
Customer Type - Optionally, select the type of the customer for the contract, to filter the displayed customers in the next field.
-
Customer - Select from the list the customer for whom you are creating a contract.
-
Product Type - Select from the list the product type to filter the list of banking products accordingly.
-
Banking Product - Select from the list the desired banking product.
Be careful when choosing the values for the previously mentioned fields because you can't modify them after saving the contract!
Make sure that you select
Current Account in the Product Type field and a Current Account banking product in the Banking Product field. If you want to use the overdraft functionality now or sometime in the future for this current account contract, select Current Account Overdraft in the Product Type field and a Current Account with Overdraft banking product in the Banking Product field.-
Click the Save and Reload button.
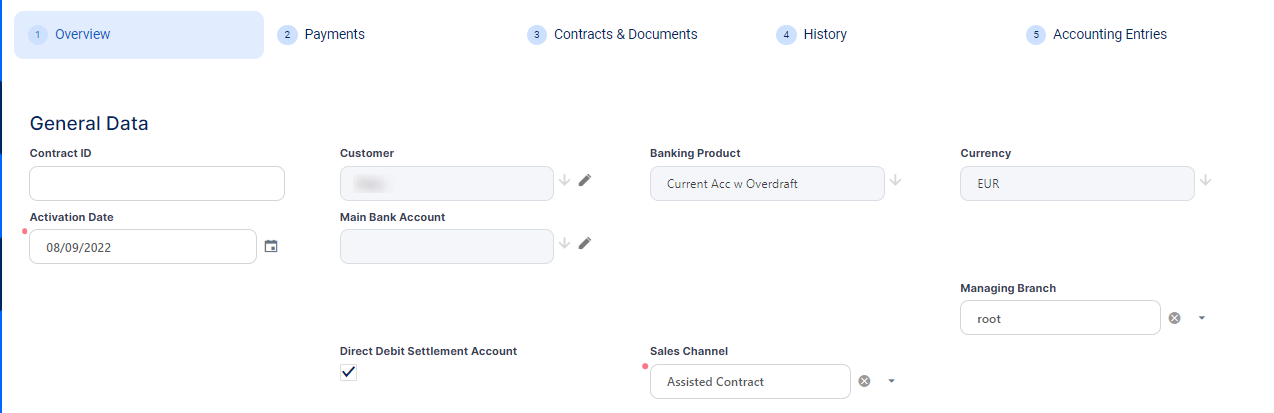
Core Banking saves the contract in Draft status, with minimum default information, such as an auto-generated contract number, created by, version and version number. The previously provided details are kept on screen in the General Data section, but they are no longer available for update. The Currency has been updated from the banking product level.
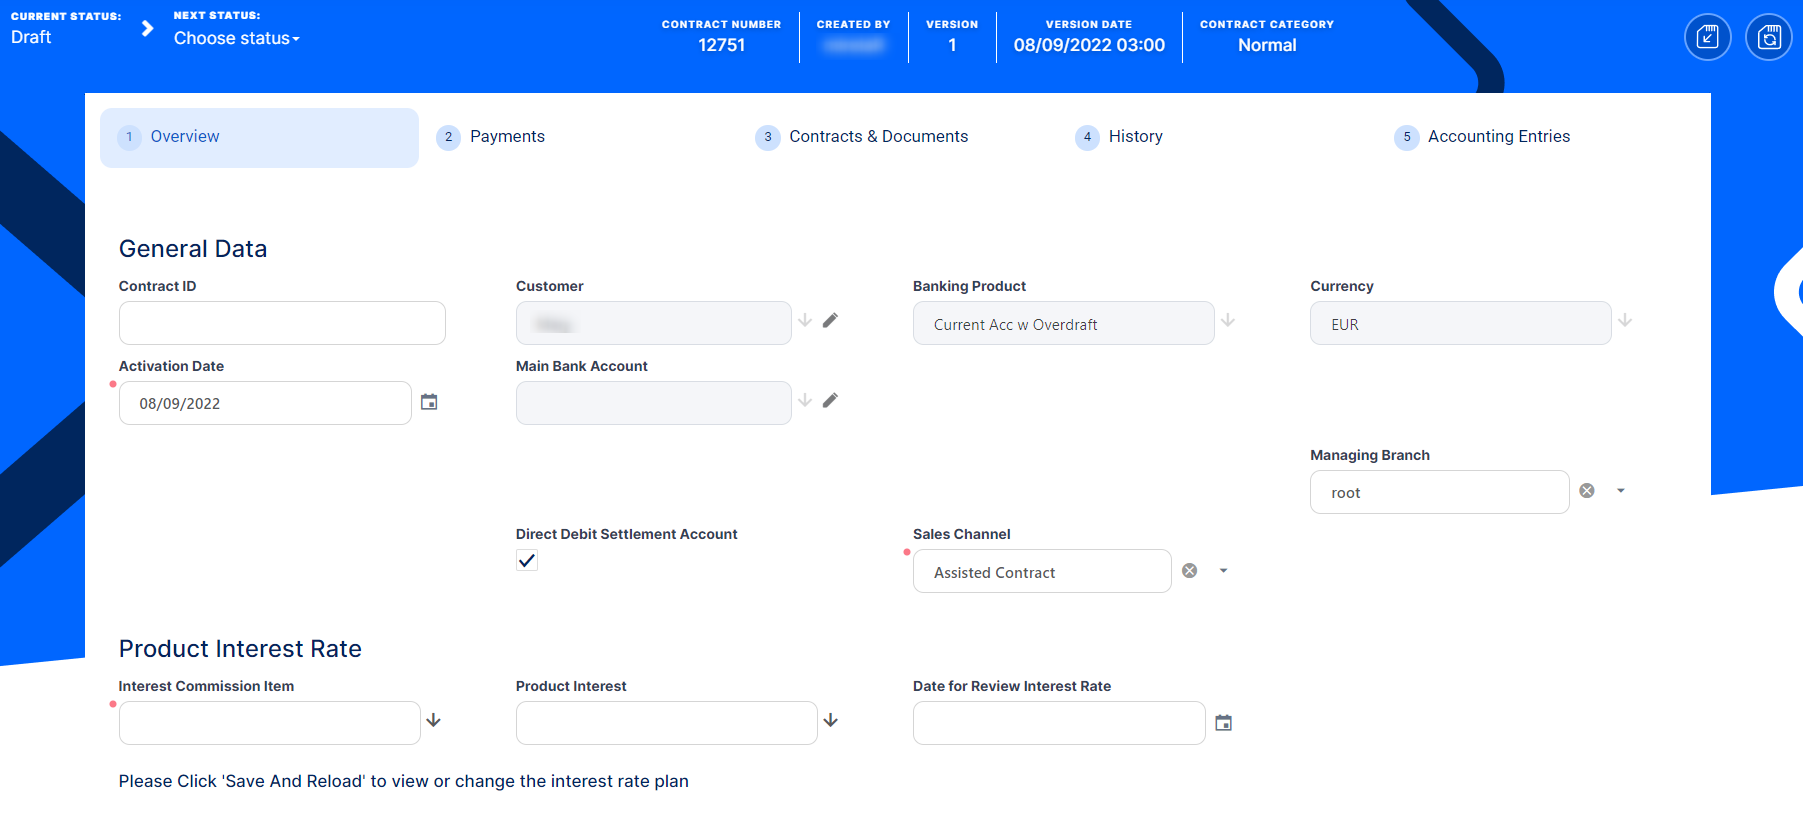
Proceed to the next steps where the details about the contract are captured and validated against the underlying product, setting the basic elements for the creation of a contract such as customer, banking product, activation date, interest rate, fees, and contract classification, within the newly displayed Overview tab.
-
Fill in or modify, or view the following information:
-
Contract ID - Enter a contract ID other than the contract number generated automatically by Core Banking when you saved the contract.
-
Main Bank Account - When the contract is approved, this account is created automatically for the bank defined as
Mainin Core Banking, within the Core Banking Operational > Bank menu. In order to generate an account number, a rule must be defined during the Core Banking implementation phase (example: branch code + incremental sequence number). Until contract approval, no information is displayed here, and you can't edit the field. -
Managing Branch - This represents the branch of the organization where the contract was created. Suppose you work in a branch or credit center, and you need cases to be linked to a specific location so that you can properly allocate them for further actions. It is automatically completed at contract saving time, but you can select another branch from the list.
-
Direct Debit Settlement Account - Select this checkbox if the automated settlement of repayment notifications (the direct debit settlement account) functionality is turned on at the contract level. The value of the checkbox was set at the banking product level, but it can be modified at the contract level. The checkbox can be edited in all the statuses of a contract except
Version Closed,Closed, andCanceled.NOTE TheDirect Debit Settlement Accountsetting at the customer level takes precedence over the setting at the contract level when creating new contracts. For existing contracts, Core Banking applies the setting configured within theCustomerToContractDirectDebitSettlementAccsystem parameter. -
Sales Channel - Select the channel through which the contract is created.
-
-
Click the Save and Reload button.
Enter the details about the Product Interest Rate applied to the contract. Depending on the product definition again, you have a list of interest definitions that you can bring along to the contract.

To manage the product interest rate as it must be applied to this contract:
-
Fill in or modify the following fields:
-
Interest Commission Item - This field is automatically completed with the interest & commission item defined at the product level, if only one item is found at the product level. If the selected product has more items, you must select one from the list.
-
Product Interest - Select from the interest to be applied for this contract. Only the interests associated to the selected banking product are displayed within the list. Penalty interests cannot be selected here.
-
Date for Review Interest Rate - Enter the date for reviewing the interest rate applicable. For variable interest, this field is automatically completed with the
Reference Rate Date+Reference Interest Periodof the underlying interest definition, from the base type interest attached to variable interest. You can edit this field. For months where the date is overlapped, the last day of the month is used for the calculation.
-
Click the Save and Reload button.
Fill in any other mandatory fields from the General Data and Repayment Overview sections, otherwise you can't successfully save the contract.
Define the information about the contract interest rate (or rates, if you selected a Collection type interest rate in the previous Product Interest Rate section) in a table format, in the section Contract Interest Rate section, which appears only after saving the selected product interest rates.
You can edit the tables cells, so you can customize the interest rates selected at the product level, if the interest and commission list was defined as negotiable, to obtain the desired interest rates configuration at the contract level. You can also add or delete interest rates, using the Add Interest Rate,

The information disappears if you change the product interest, tenor, first due date, maturity date, contract period, or activation date. In this case, save the contract again to display the updated information.
To customize the information specific to each of the contract's interest rates:
-
In the Contract Interest Rate section, edit the existing information that was automatically completed based on your product interest rate selections:
-
Interest - Automatically completed with the interest (or interests, for
Collectiontype product interest rate) selected in the previous Product Interest Rate section. You can select from the drop-down list the interest to be applied for this contract. Only the interests associated to the selected banking product are displayed within the list. Penalty and overdraft interests cannot be selected here. Depending on the selected interest, other fields can be displayed to be filled in. -
Start Date - The interest's start date, automatically completed with the contract's activation date.
-
End Date - The interest's end date, automatically completed with the contract's maturity date.
-
From Installment - The first installment for which this interest is applied to the contract.
-
To Installment - The last installment for which this interest is applied to the contract.
-
Minimum Interest Rate - This read-only cell is automatically completed with the minimum interest rate applicable for the contract, defined at the banking product level.
-
Fixed Rate - The fixed rate of the interest. You can only change it if the interest at the banking product level was marked as
Is Negociable. -
Margin - This cell is automatically completed with the margin of the previously selected product interest. You can only change it if the interest at the banking product level was marked as
Is Negociable. If the product interest was not selected, you can manually enter the margin. -
Reference Rate - This read-only cell is automatically completed with the interest type's definition's reference rate valid at the previously selected date.
-
Total Interest Rate - This read-only cell is automatically completed with the calculated total interest rate of the previously selected product interest and any values entered for margin and reference rate. If the product interest was not selected or if the interest at the banking product level was marked as
Is Negociable, you can manually enter the interest rate. -
Notified - This is a read-only checkbox. For contracts in
Version Draftstatus, it shows you whether the installments range shown on this table line was already notified or not. -
Past Unnotified - This is read-only cell read-only checkbox. For contracts in
Version Draftstatus, it shows whether there are days that already passed from the current month's not yet notified installment, days for which you can't change the interest rate.
-
After performing the desired changes, make sure that the interest rate(s) cover the entire tenor of the contract, from activation date until maturity date, and there are no overlapping intervals, otherwise an error prevents you from approving the contract.
-
Click the Save and Reload button.
To customize the information specific to each of the contract's penalty interest rates:
-
In the Contract Penalty Interest Rate section, edit the existing information that was automatically completed based on your product interest rate selections:


-
Interest Name - Automatically completed with the penalty interests selected in the previous Product Interest Rate section. Only the penalty interests associated to the selected banking product are displayed within the list.
-
Start Date and End Date - The penalty interest's start and end dates, automatically completed with the contract's activation, respectively maturity date.
-
Fixed Rate - The fixed rate of the penalty interest. You can only change it if the interest at the banking product level was marked as
Is Negociable. -
Margin - This cell is automatically completed with the margin of the previously selected product interest. You can only change it if the interest at the banking product level was defined as variable and marked as
Is Negociable. -
Reference Rate - This read-only cell is automatically completed with the interest type's definition's reference rate valid at the previously selected date.
-
Total Interest Rate - This read-only cell is automatically completed with the calculated total penalty interest rate as Fixed Rate or Margin + Reference Rate.
-
Operation Item - The contract's operation item to which the penalty interest is applied.
-
After performing the desired changes, make sure that the penalty interest rate(s) cover the full contract period, from activation date until maturity date, and there are no overlapping intervals, otherwise an error prevents you from approving the contract.
-
Click the Save and Reload button.
Later, after contract approval, you can change the penalty interest rate by versioning the contract and editing the information in this section. Thus, the new penalty rate becomes effective after approving the contract version, only impacting future calculations and notifications.
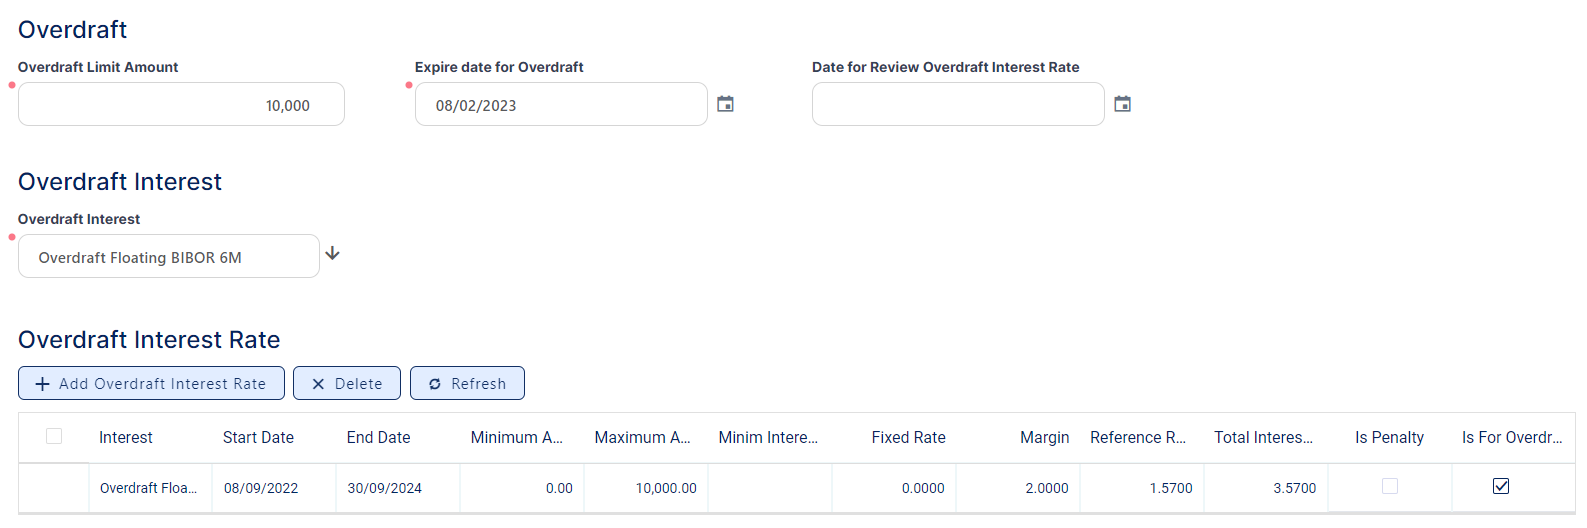
For current accounts with overdraft functionality, in the Overdraft section you should enter the overdraft limit amount and expiation date, in the Overdraft Interest section select an interest applicable for the overdraft amount, and then in the Overdraft Interest Rate section amend the overdraft interest rates applicable for this contract, so that Core Banking can properly build the repayment schedule.
-
In the Overdraft section, fill in or modify the following information specific to the contract's overdraft functionality:
-
Overdraft Limit Amount - Enter the limit for the overdraft amount applicable for this contract. If the overdraft limit amount is greater than 0, then all the fields related to the overdraft interest rate are mandatory to be completed, as well as a newly displayed field, Start Calculation Date For Amount Unused, back in the General data section.
-
Expire Date for Overdraft - Enter the date until when the overdraft functionality is active for this contract. On the expiry of the overdraft limit, any used amount and the underlying interest becomes due. A repayment notification is generated in case the current account does not hold enough balance to cover the interest.
NOTE
The due dates of all installments within the repayment schedule of current account with overdraft contracts fall before the expire date for overdraft. -
Date for Review Overdraft Interest Rate - Optionally, enter the date for reviewing the interest rate applicable for the overdraft.
-
-
In the Overdraft Interest section, select from the list the overdraft interest to be applied for the overdraft amount of this contract. Only the interests marked as
Is For Overdraftare displayed within the list. -
Click Save And Reload to view or change the overdraft interest rate plan.
-
In the Overdraft Interest Rate section, configure the contract's overdraft interest rate in a table format, similar to the one in the Contract Penalty Interest Rate section.
 NOTE
NOTE
The information disappears if you change the overdraft interest. In this case, save the contract again to display the updated information.You can edit the tables cells, so you can customize the overdraft interest rates, if the interest and commission list was defined as
negotiable. You can also add or delete overdraft interest rates, using the Add Overdraft Interest Rate, respectively the Delete buttons above the tables. Thus, the tables enables you to work with multiple overdraft interest rates at the contract level.To customize the information specific to each of the contract's overdraft interest rates, edit the existing information that was automatically completed based on your overdraft interest rate selection:
- Interest - Automatically completed with the interest (or interests, for
Collectiontype product interest rate) selected in the previous Overdraft Interest section. You can select from the drop-down list the overdraft interest to be applied for this contract. Only the overdraft interests associated to the selected banking product are displayed within the list. -
Start Date and End Date - The overdraft interest's start and end date, automatically completed with the contract's activation, respectively maturity date.
-
Minimum and Maximum Amount - The overdraft interval to which the overdraft interest is applicable.
-
Minimum Interest Rate - This read-only cell is automatically completed with the minimum interest rate applicable for overdraft amounts for this contract, defined at the banking product level.
-
Fixed Rate - The fixed rate of the overdraft interest. You can only change it if the interest at the banking product level was marked as
Is Negociable. -
Margin - This cell is automatically completed with the margin of the previously selected overdraft interest. You can only change it if the overdraft interest at the banking product level was marked as
Is Negociable. If the overdraft interest was not selected, you can manually enter the margin. -
Reference Rate - This read-only cell is automatically completed with the overdraft interest type's definition's reference rate valid at the previously selected date.
-
Total Interest Rate - This read-only cell is automatically completed with the calculated total overdraft interest rate of the previously selected overdraft interest and any values entered for margin and reference rate. If the overdraft interest was not selected or if the overdraft interest at the banking product level was marked as
Is Negociable, you can manually enter the overdraft interest rate.
After performing the desired changes, make sure that the overdraft interest rate(s) cover the entire tenor of the contract, and there are no overlapping intervals, otherwise an error prevents you from approving the contract.
- Interest - Automatically completed with the interest (or interests, for
-
Back up in the General Data section, in the newly displayed Start Calculation Date For Amount Unused field, select the date when the amount not drawn from the overdraft limit amount starts to be calculated. This field is displayed and required to be filled in only when the
Overdraft Limit Amountvalue is>0. -
Click the Save and Reload button.

In the Repayment Overview section you should enter term and schedule type so that Core Banking can properly build the repayment schedule.

-
Fill in or modify the following information specific to the contract's repayment schedule:
-
Schedule Type - Select the payment schedule type to be used to calculate the installments of this contract. You can select one of the payment schedule types associated to the underlying banking product in the Details tab > Associated Payment Schedule Types list. Core Banking uses the schedule type to build the repayment plan with equal installments or linear payments, include fees on the schedule and arrive to the day basis to be used for interest calculation (30/360).
-
Contract Period - Edit the term of the contract that was automatically completed with the number defined at banking product level, according to your needs. The contract period is used together with Contract Period Type and Periodicity Type. They all need to be in sync and also in sync with the schedule definition itself, and if there are multiple definitions allowed on the product, make sure to pick those working together.
-
Contract Period Type - This field is automatically completed with the contract period type as it was defined at banking product level. You can't edit this value.
-
Maturity Date - This field is automatically completed with the calculated contract maturity date.
-
Initial Principal Value - This field is automatically completed with the value of the principal within an installment. The field is displayed and can be filled in if the selected schedule type is of type
Equal Principal. You can edit this value. If at the selected payment schedule type's level theInstallment Value Customfield isFalse, then theInitial Principal Valuefield at the contract level is read only. -
Repayment at end of month - If you select this checkbox, then the due day of the contract is automatically set to the last day of the month, and the repayment schedule is calculated with an installment in the last day of month.
-
-
Click the Save and Reload button.
If allowed from the product definition, you can amend the closure settings of the contract, the way Core Banking should behave once any due amounts are repaid and the contract can be closed. Most of the times this is not something that you have to access, but it adds extra flexibility at the contract level. This may prove useful if you suspect there may be reasons to keep a contract open for some time post recovering all amounts for instances when there may appear claims of funds (SEPA DD) or other similar cases.
The Closure Settings section is only displayed for contracts based on banking products having the Closing Is Flexible = True setting.

To amend the closure settings brought from product level here at the contract level:
-
Fill in or modify the following fields:
-
Automatic Closure – If selected, Core Banking automatically closes the contract once all other conditions are met. This field is automatically completed with the value defined at the banking product level, but you can modify it.
-
Select this checkbox to instruct Core Banking to close the contract automatically when the available amount becomes zero and there are no further amounts to be recovered, and after the number of days set as buffer before closure pass and
Closure Date = Current Date. -
Deselect it to instruct Core Banking to keep the contract open, regardless of the fulfillment of its maturity and balance criteria, waiting to be manually closed by changing its status to
Closed.NOTE
You can perform contracts events as specified in the Allowed Transactions section of the banking product, plus manual closure while the contract is pending closure. Performing any other transactions displays an error message.
-
-
Real Time Closure – If you select this checkbox, when the amounts become zero and the product is not a revolving one, the contract is closed automatically. If
Real Time Closure = True, thenBuffer Close Days = 0andAutomatic Closure = True. For more details about the real-time closure, see Close Contracts RealTime(CB) Job. -
Buffer Close Days - Enter the number of days used as buffer before automatically closing the contract. If
Buffer Close Days > 0, thenReal Time Closure = False. Core Banking waits the entered number of days after the contract's balances reach zero, and at the end of that day the contract is closed. -
Balance Off Date – This is a system maintained field and it is populated with the date on top of which Core Banking adds the Buffer Close Days to arrive to the Closure Date.
-
Closure Date – This is a system maintained field and holds the date when the contract is closed. For automatic closure, the date is calculated by Core Banking as Balance Off Date + Buffer Close Days.
-
-
Click the Save and Reload button.
Once you defined the mandatory details, then saved and reloaded the contract, Core Banking updates some of the next sections on the page, based on product definitions:
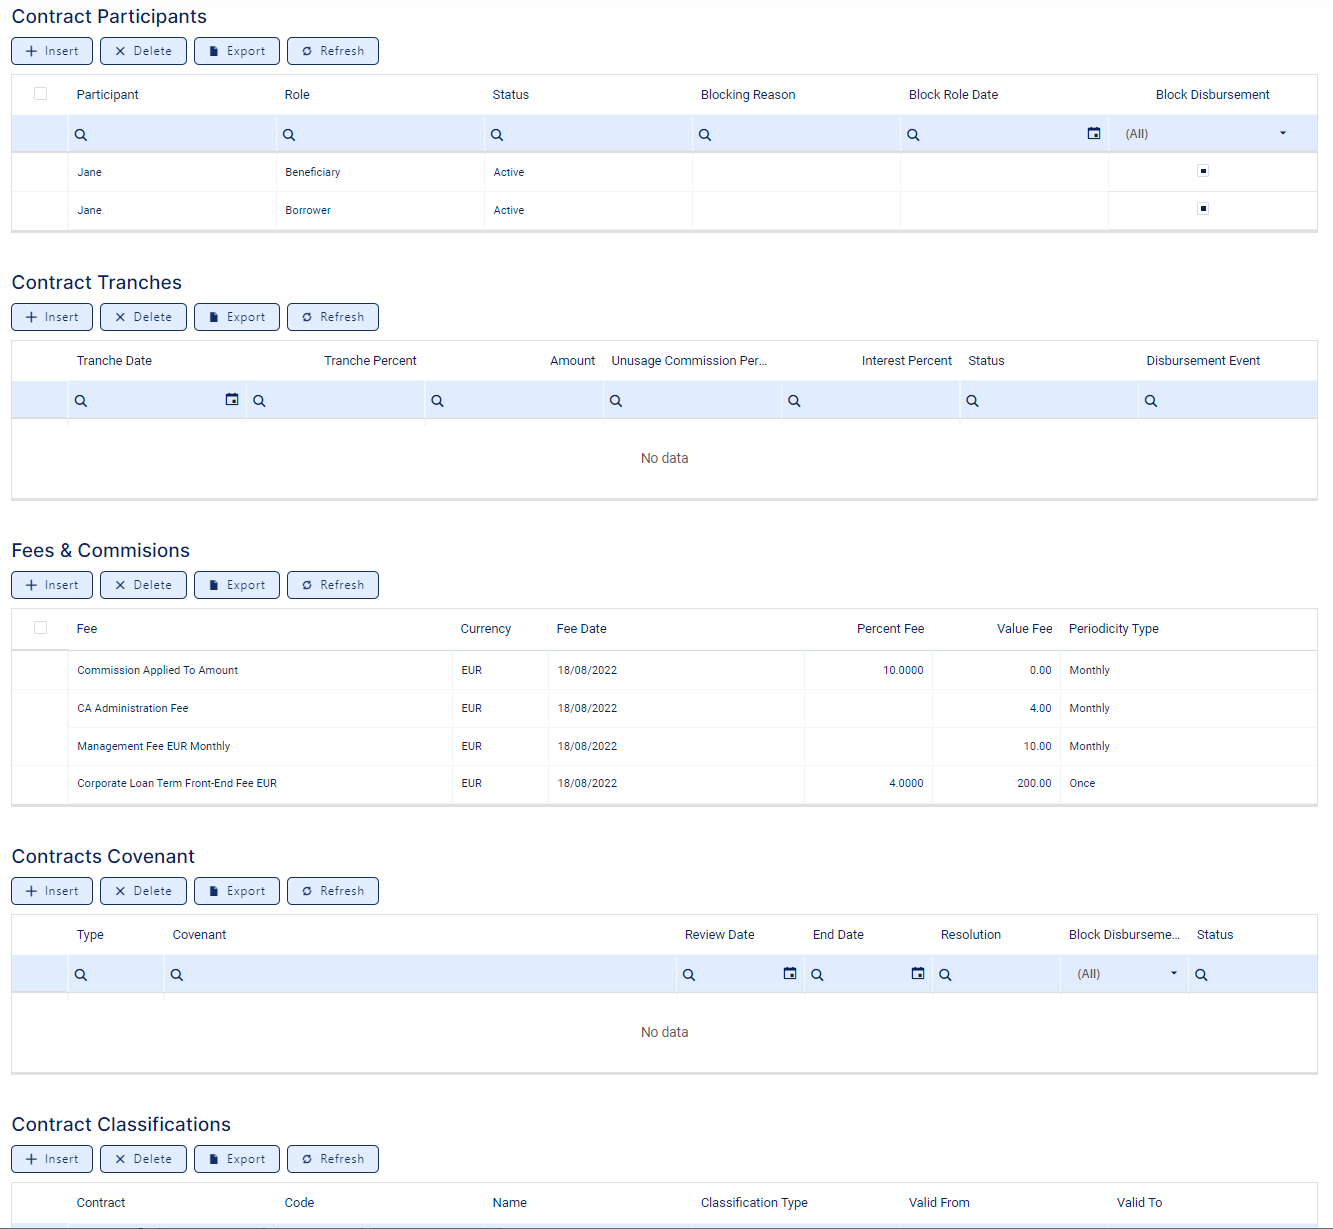
Core Banking brings the Contract Participants, where you can add participants to the contract, like Guarantors, Co-Debtors, etc. There may be cases when some roles are mandatory for a product. Those are detailed in a separate section. If there is a mandatory role defined in the banking product definition, Core Banking displays an error on trying to approve the contract.
Contract Tranches is a section where you can implement progressive access to the funds. This is valuable in case of loans granted for investment projects where you can know upfront that there is a plan for the project and payments need to happen for each stage of the project, those stages being known from the start.
Another important section brought from the product definition is the Fees & Commissions. Depending on the system setup, you are allowed or not to amend fees and commissions in this section.
Contract Covenants section displays the covenants that applicants must abide by after getting the contract, configured at the product level. Such conventions are usually applicable for corporate customers that must meet certain requirements in order to continue to receive disbursements and not only: submit balance sheet every x months, have account turnover of at least x percent from average monthly turnover, provide other relevant documents from authorities. In this section, you can manage covenants for the contract. These covenants would need to be monitored procedurally; Core Banking doesn't have the logic in place to implement automated processes.
You can use the Contract Classifications section to capture various classifications that might be relevant for the financial institution for that loan at a moment in time. It is a placeholder for such details and there is no automated logic in place to update them. In implementation this can be used for other developments if required.
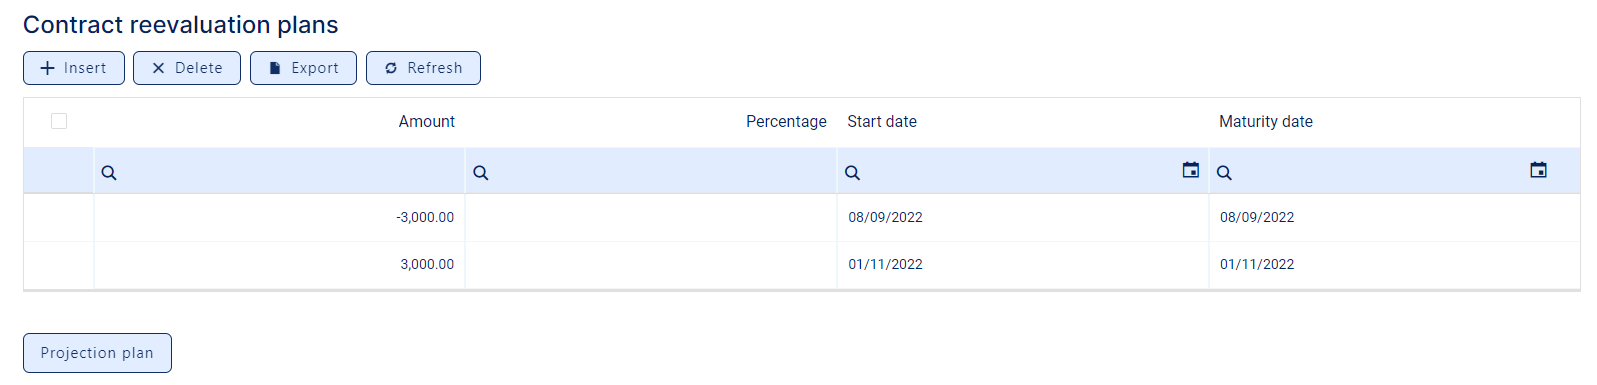
For current account contracts with overdraft functionality, in the Contract Reevaluation Plans section, you can define the increase or decrease of the overdraft limit amount and of the customer limit attached to the contract, according to the customer's seasonal needs. For example, for an approved overdraft limit for 12 months, after 6 months the limit has to be decreased because the customer does not need the entire limit and wants to reduce the costs of the overdraft functionality. Similarly, the overdraft limit can be increased, for example for a working capital requirement, the bank can grant the limit in January, but the company works in tourism and the cash flow needs are higher in summer, thus the bank needs to increase the overdraft.
To add a reevaluation plan to a contract based on a current account with overview, follow these steps:
-
Click Insert to open the Contract Reevaluation Plan page.
-
Fill in the following fields:

-
Amount - Enter the amount with which the overdraft limit has to increase or decrease. Use negative values for decrease and positive values for increase. This field cannot be filled in if the
Percentagefield was completed. -
Percentage - Enter the percentage with which the overdraft limit has to increase or decrease. Use negative values for decrease and positive values for increase. This field cannot be filled in if the
Amountfield was completed. -
Start date - Enter the start date when the overdraft limit increase or decrease should be performed.
-
Periodicity type - Select the periodicity type for applying the overdraft limit increase or decrease. The possible values are: Once, Weekly, Monthly, Bimonthly, 4 Weeks, Trimestrial, Semestrial and Annual.
-
Number of times - Enter how many times the overdraft limit increase or decrease should be performed.
-
Holiday shift method - Select the desired holiday shift method from the possible values: Forward or Backward.
-
-
Click the Save and Close button.
When the utilized amount is greater that the resulted available limit, a new repayment schedule detail is added to the repayment notification, displaying the difference between utilized amounts – available limit amount on the Principal column of the notification. The repayment notification notifies the principal amount and tries to collect it.
-
Click the Projection Plan button to view the projection of the overdraft limit reevaluation plan. A
.pdffile containing a detailed overview of the overdraft limit fluctuations in time is automatically downloaded by your browser.

After defining the relevant details of the contract, proceed to contract approval.