Business Entities
An entity is an object in the system that you want to model and store information about. Entities are recognizable concepts which have relevance to the database. Some specific examples of entities are: Customer, Product, Offer or Contract. An entity is similar to a table in the relational model.
Types of entities
In FintechOS Studio, there are three types of entities:
- Platform Data - Native FintechOS data which is created and stored within FintechOS.
- External Source Data - External persistable data which is created in external systems and replicated within the FintechOS Platform. This is historical data (read-only data) which you can view in detail in analytics. External Data Source entities stores data from external systems replicated in FintechOS through Data Pipes.
- Transient Data - Entities that temporarily store data that has been loaded from or is going to be saved to an external data source. For more information, see Transient Data Entities.
Platform Data entities encompasses:
- System entities - are used by FintechOS to run as an integrated operating system (OS). You can add Attributes on system entities, define specific forms and views, but you cannot delete them.
- ebsMetadata - stores entities' metadata. For example, information about the entities which are level 1S options on the FintechOS Studio main menu.
- ebsLocalization - stores records for entitles Language and Currency Code.
- ebsAudit - stores logging information The ebsAudit schema is comprised of the EbsLogs.UniversalLog and EbsLogs.ApiLog. For more information, see the FintechOS Platform Administration Guide.
- Custom entities - are the entities you define for your application in order to accommodate various business flows. For example: 'Contract', 'Application', 'Legal Agreement'.
System entities are found in the database under the following schemas:
System entities can be used within business processes, if needed. For example, the 'systemuser' entity, which stores information of users authorized to log in the platform can be equally used in 'task management' flows for assigning users to tasks.
Custom entities can be found in the database under the ebs schema or under the schema inserted in the organization table.
View existing business entities
-
Select Evolutive Data Core > Data Model Explorer. The Business Entities List page appears.

The entity details displayed are:
-
Entity Type (Platform Data, External Source Data, and Transient Data)
-
Name (as stored in the database), DisplayName (displayed on views and forms)
-
Is System Entity (if the value is true, it is a system entity)
You can click column headers to order grids ascending or descending.
You can filter entities by all the search fields displayed in grid, including Name and DisplayName. You can apply multiple filtering criteria at the same time.
Create Entities
- Go to the Business Entities List page.
- Click Insert and enter the required fields (attributes). NOTE
Based on the attribute type you select, you need to fill-in fields mandatory for the selected Attributes type. -
The minimum required fields to create an entity are:
Field Description Entity Type - Select one from the list:
- Platform Data - Native FintechOS data which is created and stored within FintechOS.
- External Source Data - External persistable data which is created in external systems and replicated within FintechOS. This is historical data (read-only data) which you can view in detail in analytics. External Data Source entities stores data from external systems replicated in FintechOS though Data Pipes. For more information on how to replicate data from external systems in FintechOS, see Data Pipes.
- Transient Data - Entities that temporarily store data that has been loaded from or is going to be saved to an external data source. For more information, see Transient Data Entities.
Name (only use for add entity) - The unique entity name that will be stored in the database. Provide a self-explanatory name for what the entity stands for, or provide a hint about the business logic it entails.
- Use PascalCaseNames (upper camel) for it. Example: StatementPayment.
- You cannot create two entities with the sameName.
- The entity name is used to identify the entity in the system when working with it (read/ write entity records, define entity relationships, create data models, etc.) This field is used by the system and will be displayed only in the application URL. It is not visible to the end-user.
- The field is also used in implementation when calling all the CRUD operations on the specific entity (getByQuery,getById, etc.).
NOTE
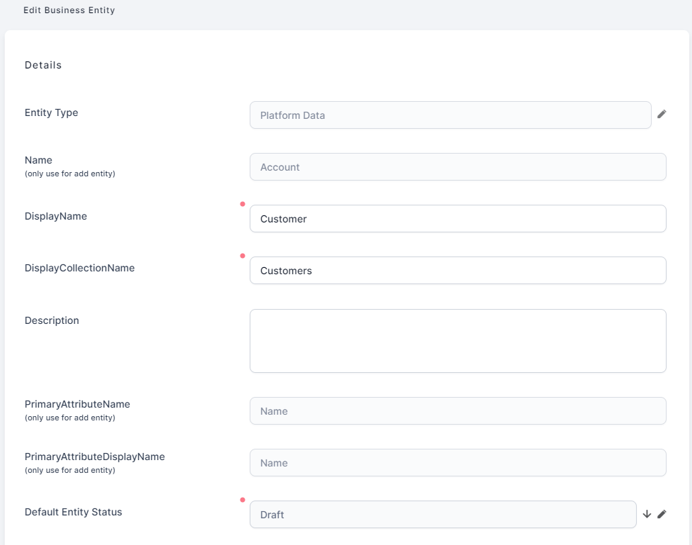
On entity creation, the entity's primary key attribute, that is an unique identifier for each entity instance, is automatically generated by the system following this naming convention:'entityname + Id'. The primary key is displayed in the entity's list of attributes and has the attribute type PK.Display Name The entity name that will be displayed on views and forms. It is also the label to be localized in different languages. The Display Name should appear as a noun in singular format (e.g. “Customer”, or “Physical Address”). DisplayCollectionName - Provide a Collection Name if you want to display the entity on the left-side menu or pin it on the application homepage.
- The DisplayCollectionName attribute stores all the entity records (instances) within the database; therefore, the naming convention for this attribute is the plural data form of noun used for the entity Name.
TableName (only use for add entity) - The name of the table to be generated in the database, associated with the entity, automatically prefilled by the system based on the entity Name.
- To avoid affecting data integrity and consistency, do not change the value prefilled by the system.
- After you save the entity, you cannot edit this field.
PrimaryAttributeName (only use for add entity) - The name of the main attribute that identifies the entity records from a business perspective. It is a text attribute with a maximum length of 100 characters.
- Start the name with a lowercase letter and all additional words (on the right) with uppercase.
- For example, if the Product entity has three attributes: ID, name and price. For each product, the ID will be unique, so it can be the primary attribute for this entity.
IMPORTANT!
Do not confuse the entity's primary key automatically generated by the system to uniquely identify an entity in the database with the Primary Attribute . For example, you can define the Contract Number as a primary attribute but we do not recommend you to define it as a primary key due to the fact that, on data import into another system or version of FintechOS Studio, the contract number might already exist.PrimaryAttributeDisplayName (only use for add entity) The name of the primary attribute, as displayed in the end-user interface on forms and views. PrimaryAttributeTableColumn (only use for add entity) - The name of the attribute which will be automatically generated in the database. It serves as a primary attribute to identify the PrimaryAttributeName (the main table column stored in the database). Use PascalCaseNames (upper camel) for it: provide a a text which starts with an uppercase letter, as do all additional words.
- After you save the entity, you cannot edit this field.
Default Entity Status - Indicates the status corresponding to your work on this entity. To select the entity status, click the drop-down arrow and double-clicking the entity status. The following default entity statuses are available:
- Active – completed work
- Draft – work in progress
- The status selected in this field will appear on entity records when inserting. For instance, if you select by default Active on entity Application, when you insert an Application, the field entityStatusId is set to Active.
- The entity status doesn't impact the entity behavior in any way. It is useful as a way to classify and filter your entities when designing your data models.
- Select one from the list:
- Click Save and reload. The Add Business Entity page is replaced by the Edit Business Entity page, which contains new sections at the bottom that allow you to add entity attributes, forms, views and more. Other fields appear when creating an entity for the first time, but they are not required to be filled in at creation:
isAudited: If selected, the checkbox enables you to track all the changes made on the entity record. An audit icon is displayed on the entity which on click will display the type of changes made on the entity, when the changes have been made, and by whom. You will also see a side-by-side comparison between old and new values. For more information on entities audit, see the Platform Administration Guide.
Business Workflow: The business workflow that was attached to the entity is displayed. At first, it is a blank field, after a workflow is associated, the name is displayed here as read-only. Business workflows allow you to define states and state transitions for your entity records. For more information, see the Business Workflows Processor documentation.
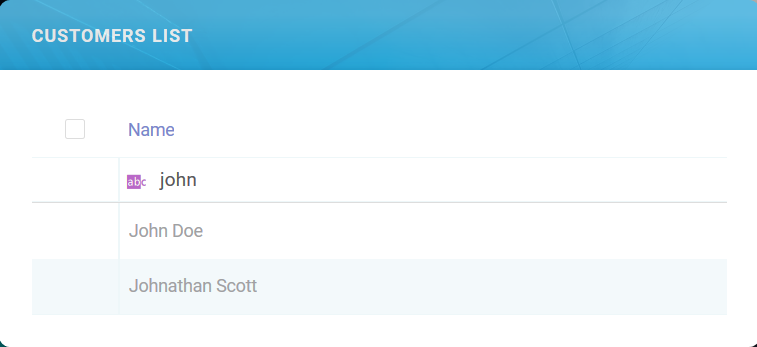
Optimization Search Data (Filter starts with): By default, the checkbox is not selected, filter set to ‘contains’. This means that when Portal users enter only part of a query attribute (text, number) in one of the entity's Data Views, a filtering is done on records which contain the given part of the query. The search returns the filtered records that contain the part of the query.
For example, a portal user does a partial search (“john”) by Name on the Customers list. The search returns all names that contain “john”.

If the checkbox is selected, filter set to ‘starts with’, the partial search will return only the records that start with the part of the query.
A portal user does a partial search (“john”) by Name on the Customers list. The search returns only names that start with “john”.
Edit Entities
You can edit an entity by editing existing attributes, adding more attributes (Data Model section), extend the data model with data extensions (see Extend the Data Model) and defining relationships.
Attributes can be deleted from the Data Model, however if the attribute has records that have been inserted by an end-user, then the records have to be deleted first then delete the attribute.
You cannot edit the following entity attributes: EntityType, Name, PrimaryAttributeName, PrimaryAttributeDisplayName, once you configure it. The Business Workflow is read-only as well, but can be changed from the Buisness Workflows menu.
Delete Entities
To delete entities, in the Data Model Explorer, select the entity or entities that you wish to delete and click Delete.
Deleting entities might have severe impact on the structure of your system's database; therefore, we strongly recommend you to make sure that the data model requires the entity deletion to address changes on existing business concepts.
These are a few consequences you need to consider before deleting an entity without prior analysis: custom actions defined on deleted entities will fail. Widgets linked to a deleted entity will fail. Reverse engineering becomes an exhaustive process by dealing with a broken DB structure.
Referential Integrity Check
When deleting entities that are referenced by another entity, you first need to remove the relationship between the entities (delete the corresponding lookup attribute from the referencing entity).
In the example below, the Investor entity is referenced by the Assets entity.
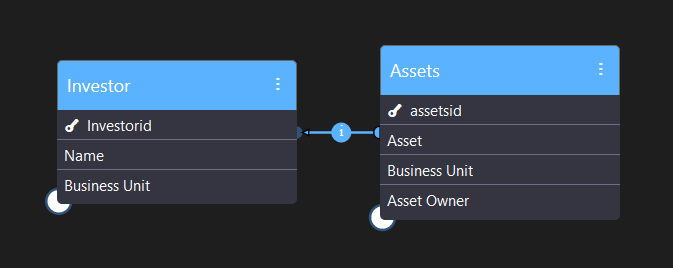
Attempting to delete the Investor entity without deleting the relationship first, generates the following warning:
