Flow Control
Flow control enables you to apply custom navigation rules and/or trigger Form Actions when leaving the form step.
The flow control is available only for Form Driven Flows.
Flow Execution Sequence
For a form driven flow comprised of steps, the default execution order is the following:
- The main form driven flow is executed. First the beforegenerate.js script of the flow is executed and then the aftergenerate.js script.
- For each step of the form driven flow, when the step is activated:
- Step elements (HTML, CSS) are loaded and the form driven flow is rendered.
- The aftergenerate.js script of the step is executed.
The execution order of a digital journey which is comprised of steps is determined by the order index of the steps set in the digital journey map (if not otherwise specified on the steps).
There are two ways in which you can change the execution order of a digital journey. On a step you can:
- Override the default next step navigation.
- Set a flow control rule that enforces a certain next step navigation when specific conditions are met.
Thus, when clicking Next in a digital journey, the flow is:
- BeforeSave script on the step is executed.
- The flow control rules of type Cancel Navigation are evaluated and only the first one is executed.
- The data is saved.
- The remaining flow control rules are evaluated and only the first one that is fulfilled is executed. This overrides the default next step given by the order index with the step specified in the condition.
- The AfterSave script on the step is executed and the digital journey advances to the next step .
Override the Default Navigation
Use the Default Navigation Rule section to override the default next step behavior set in the digital journey's order index.
- Close Flow - Marks the step as the final step of the flow (the flow closes once the step is complete). Use the Navigate to option to set the page to display after closing the flow:
- List - An entity view.
- Dashboard - A portal dashboard.
- Homepage - The portal homepage.
- Previous context - Back to the page that was open when the flow was initiated.
- Navigate to another Step - A step in the current flow.
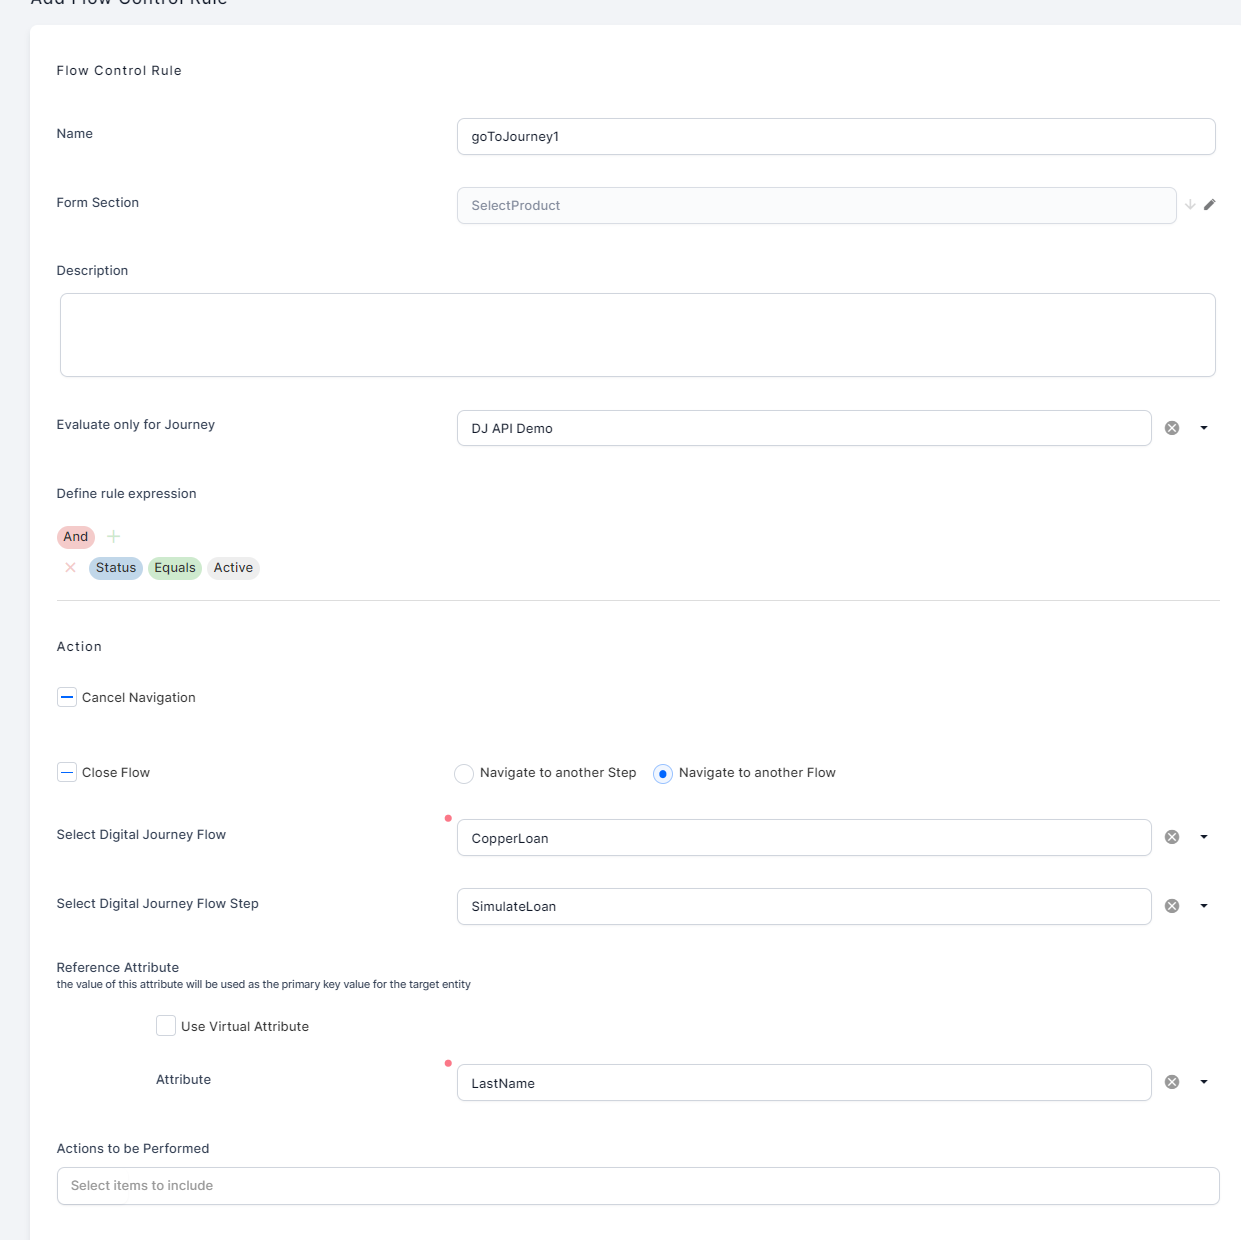
- Navigate to another Flow - A step in a different flow from the same journey.
- Select Digital Journey Flow - Form driven flow name
- Select Digital Journey Flow Step - Step name
- Reference Attribute - Attribute in the current data model that indicates the primary key of the record you wish to open in the destination form (Tick Use Virtual Attribute if you want to select a virtual attribute).HINT
Typically, you want to open a related entity record by selecting the corresponding lookup attribute. If the destination flow uses the same base entity, you may want to reuse the primary key (or, if it self-references, a lookup attribute that points back to the source entity).
Apply Form Actions
Use the Actions to be Performed text box to select Form Actions you wish to apply on the transition to the next step.
Apply Conditional Navigation Rules
Use the Flow Control Rules section to apply navigation rules and/or form actions only when specific conditions are met:
- Click Insert to open the Add Flow Control Rule page.
- Provide a Name for the rule. In the Form Section field, the name of the step you are editing is filled automatically.
- Insert a Description for the rule.
- If you wish to evaluate the rule only in the context of a specific digital journey, select the corresponding journey from the Evaluate only for Journey drop-down box. For information, see Digital Journey Context.
- Use the Define rule expression section to set which criteria must be met for the rule to apply.
- You can change the logical operator used to aggregate your conditions:
- And (default) - All conditions/groups must be true.
- Or - At least one condition/group must be true.
- Not And - At least one condition/group must be false.
- Not Or - All conditions/groups must be false.
- Use the + symbol to add new conditions or groups to the expression. Groups allow you to evaluate the included conditions/groups together using the same logical operators described above (And, Or, Not And, Not Or). You can create multiple levels of subgroups (groups inside other groups) for complex boolean logic.
- Each condition allows you make an evaluation either using a custom processor (see Checking with Custom Processor) or based on an attribute in the data model.
- Some operands are generic and apply to all attributes: Equals, Does not equal, Is blank, Is not blank.
- Some operands are specific to the attribute's data type. E.g.: Text attributes support operands such as Contains, Does not contain, Starts with, or Ends with. Numeric attributes support operands such as Is less than, Is greater than, Is less than or equal to, Is greater than or equal to, Is in between, etc.HINT
You can configure flow control rules to apply only to targeted user profiles (based on demographics, location, age, needs, previous interaction with a business, etc.). Such users can be defined as Customer Personas, and they can be grouped in audiences (see Audiences Management). This comes in handy when creating a personalized, data-driven journey, adapted to specific customer needs and context. - Date/time attributes have a small arrow next to them allowing you to expand and select a derivative value instead of the actual attribute value: Minutes since, Minutes until, Hours since, Hours until, Days since, Days until Day Of, Weekday of, Days until Anniversary, Has anniversary today, etc.
- You can change the logical operator used to aggregate your conditions:
- In the Action section, set up the navigation override and/or the Form Actions you wish to perform if the rule expression is true. Navigation setup is based on the same Override the Default Navigation instructions provided above, with the addition of an option to Cancel Navigation which stops the flow on the current page and allows you to display a custom message.
- Click Save and close to save your flow control rule.
You can add as many flow control rules as needed. Only the first rule that is fulfilled is applied (however, rules that cancel the navigation are evaluated first).
Checking with Custom Processor
It is possible to create a rule that checks the attribute mappings of an endpoint to return the values true or false from the boolean attribute.
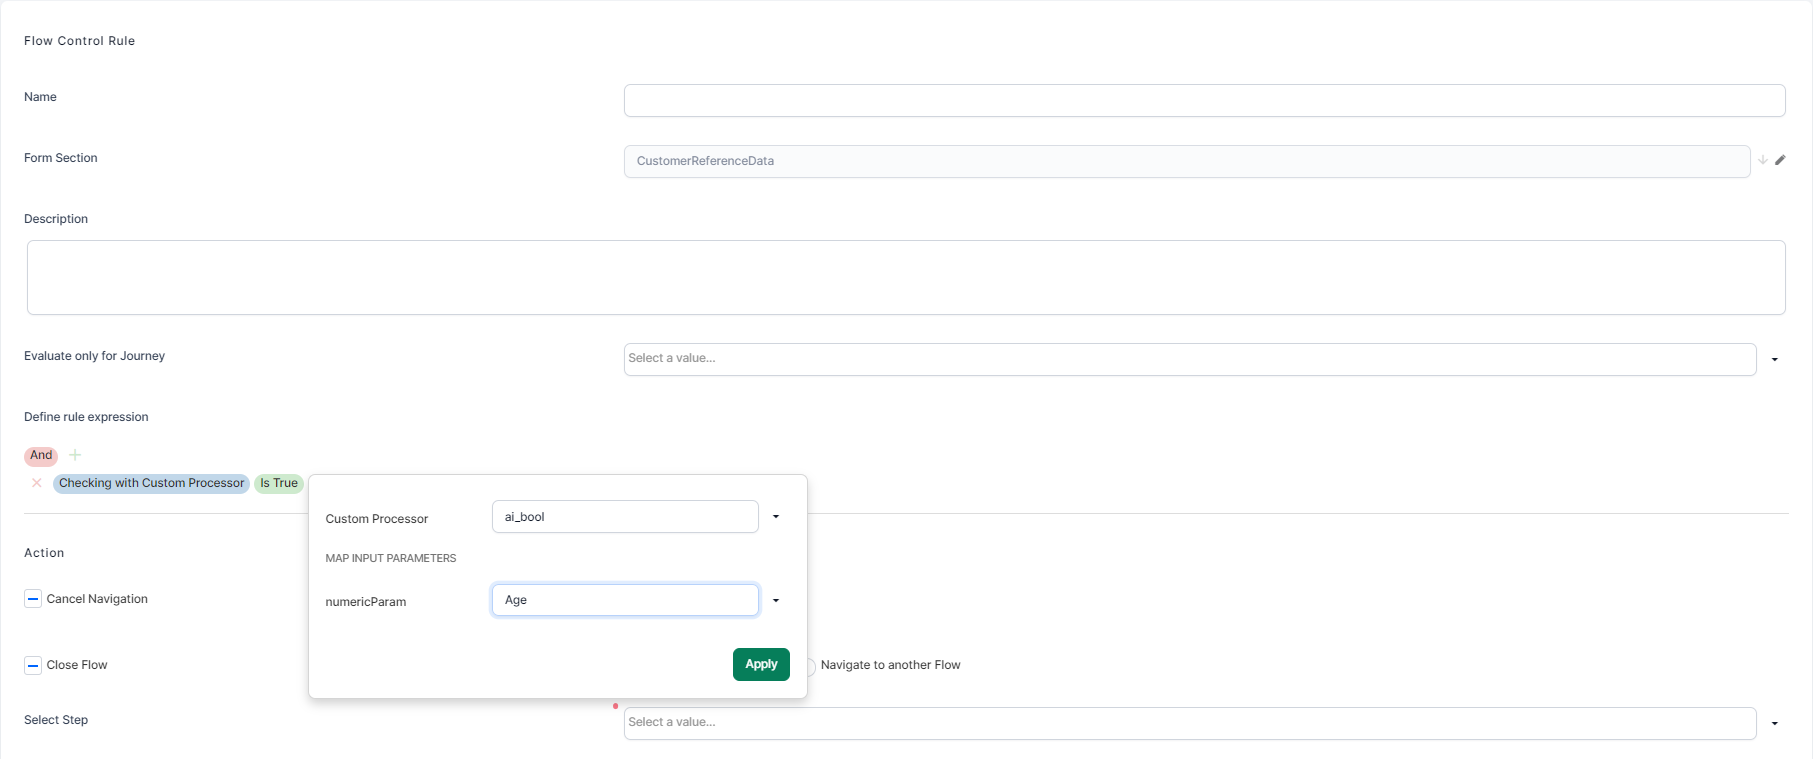
- Create the endpoint with the input and output mappings as bool in Server Automation Scripts. In the code section write the following line:
- Navigate to the Form Driven Flow, to the Flow Control, and click Insert Rule.
- In the rule add the condition with checking the custom processor.
- Select from the option set the name of the endpoint and map the input and output to the bool attributes you wish to have the data in.
- Click Apply.
- Select the next step where to navigate and click Save and close.
context.result = true;This map shows the user the steps in a flow, the rules and transitions. The difference from the Digital Journey Map is that this map only shows one flow, as opposed to the digital journey map that shows all flows in a journey.
The Flow map exhibits the actions performed on a step configured in Flow Control. To do so:
- From the main menu, select Digital Experience > Customer Journeys > Form Driven Flows.
- Select the existing Form driven flow you wish to modify or create a new one.
- After opening the flow, click on ''Flow map''.
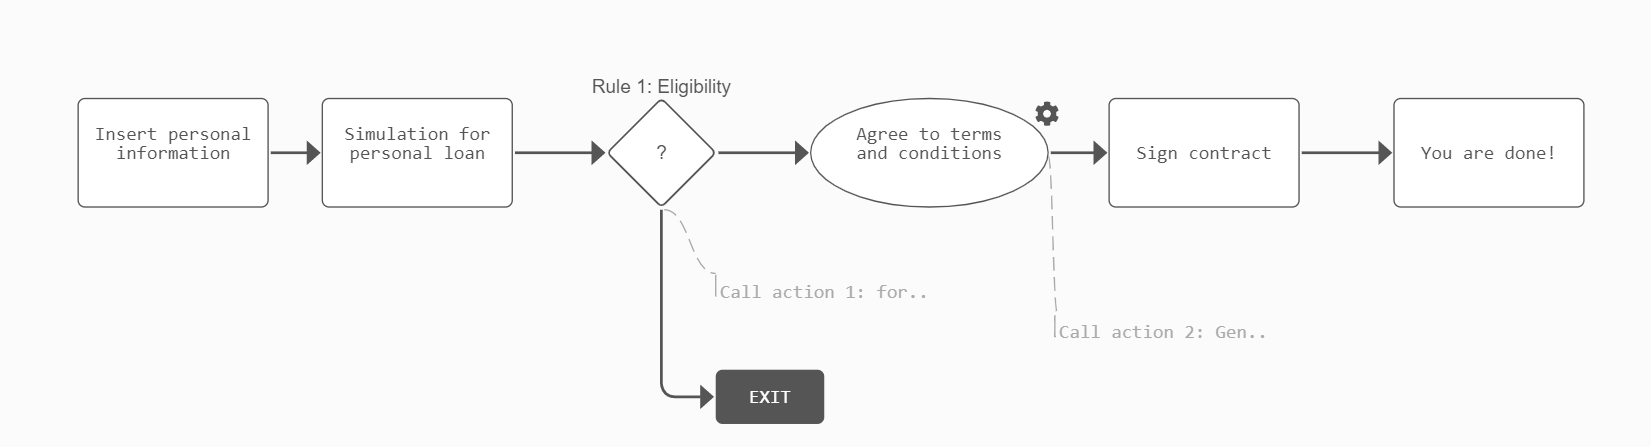
- Click on a step to see the UI configurations or the rule for flow control. Configure to add a step or an action or a transition.
- Click Save and reload to save the changes.
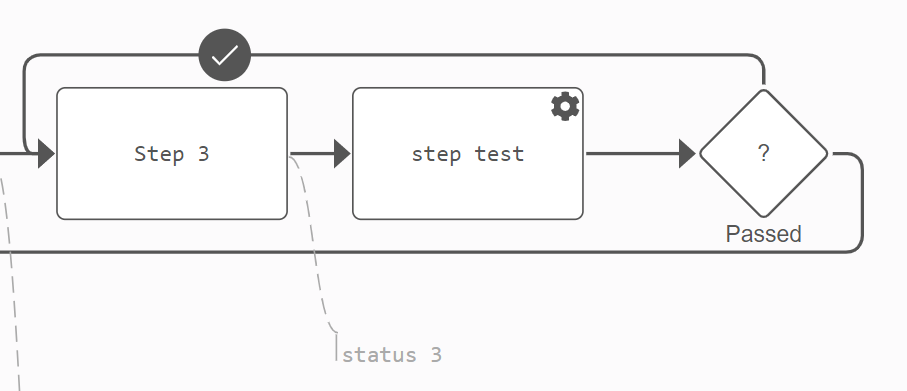
For example, step 3 is a default step, step test is a processor step, the passed step is a rule and the status 3 is an action performed after the step 3 data is saved and the action is triggered.