Deposits, Withdrawals and Transfers
You can find all the existing transactions, bank account operations, and payments for a contract on the Payments tab. The tab has no information to display for contracts in Draft status. Approve the contract to perform any transactions on the contract.

The Bank Account Operations section contains details about each account operation performed on the deposit after its approval, starting with the transfer from the current account to the deposit account of the funds specified for constituting the deposit.

The following sections show you how to perform the usual transactions available on deposit contracts during the duration of the deposit.
For information about liquidating a deposit, either on maturity or before, read the Liquidating a Deposit topic.
A top-up transaction on a deposit represents adding amounts to the deposit to increase the deposit balance.
You can add top-up transactions to an approved contract via Core Banking's user interface or through API calls, using the Core Banking endpoints. Read more about these endpoints in the Core Banking Developer Guide.
In order to add a top-up transaction to a deposit contract through the menus available in Core Banking, follow these steps:
-
In FintechOS Portal, select a contract with Approved status and double-click to open it.
-
Navigate to the contract's Payments tab and click the Insert button above the Transactions section. The Event page is displayed.

-
Fill in the following fields:
-
Event Date - This is pre-filled with the current date.
-
Transaction Type - Select from the list the Top Up Account transaction type. If you can't find it, then the transaction type is not associated with the banking product which is at the base of the contract.
Other values are automatically completed: contract, customer, and currency.
-
-
Click the Save and Reload button.
The event is saved in Draft status and a transaction number is automatically generated for it. The Edit Contract Event page corresponding to the selected transaction type is displayed. The account's actual balance is automatically calculated, and you can't edit it.
-
Fill in the external identifier of the transaction, if available.
-
In the Event Value field, enter the amount that is added to the deposit account.
-
Enter the Source Account for the respective amount, the account from where the funds are taken to perform the top-up.
NOTE
Core Banking actually uses the financial institution's reconciliation account as a source bank account. -
Click the Save and Reload button.
If the event value meets the business requirements defined within Core Banking, the event is saved. Otherwise, an error message appears. Change the values as instructed in the message and try saving the event again.
While the event is in Draft status, you can modify all the event's fields except Transaction Type. The event value is not applied to the contract while the event is still in this status. -
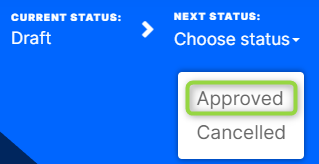
Approve the event by changing its status to Approved in the upper left corner of the Event page.
-
Confirm the change of status in the Confirmation window, clicking Yes. The event is now in Approved status and Core Banking applies the transaction to the contract, moving the funds specified in the event value from the source account into the deposit account.
The transaction is visible in the Transactions section, and you can also see the account operation in the Bank Account Operations section.

-
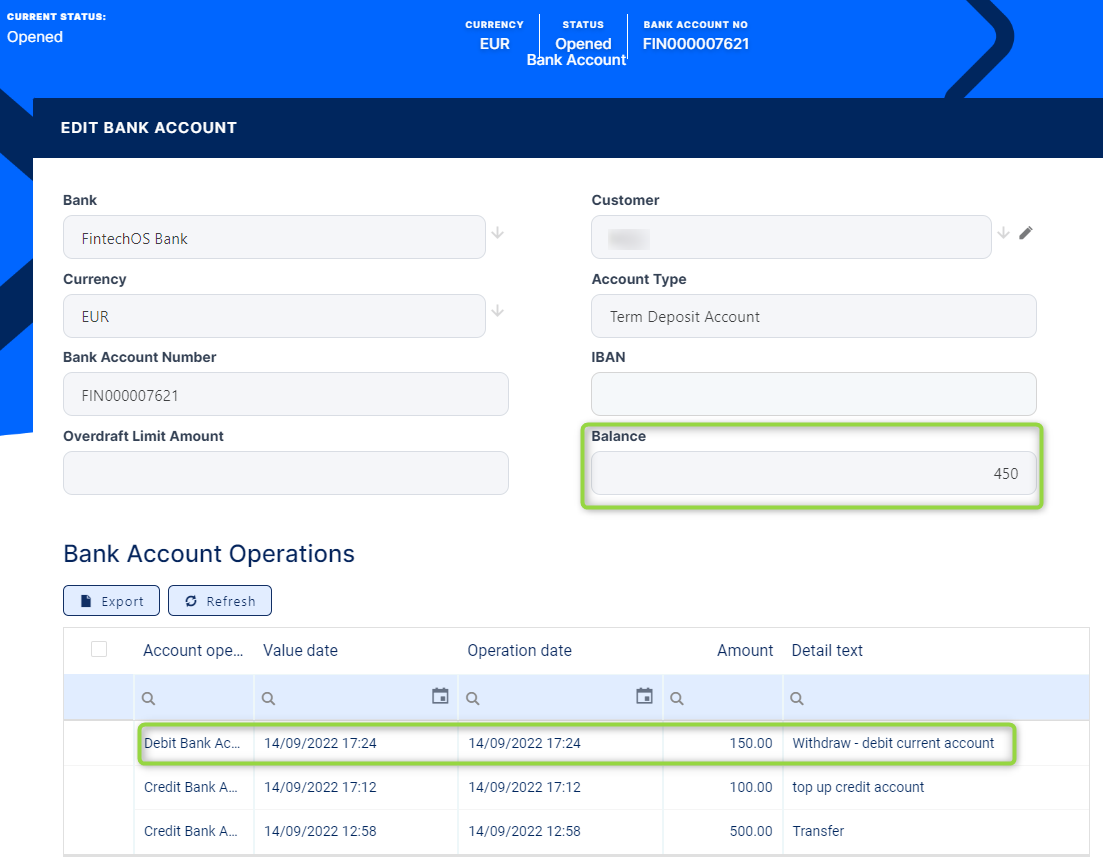
View the balance of the account after approving the transaction, clicking the pencil icon next to the Main Bank Account field in the contract's Overview tab:


All existing versions of the contract in Contract Version Draft status are automatically changed to Contract Version Closed when a payment event is approved for that contract.
A withdrawal transaction on a deposit contract represents removing a part of the funds available on the deposit, without terminating the deposit contract. This operation may affect the interest calculation.
You can add withdrawal transactions to an approved contract via Core Banking's user interface or through API calls, using the Core Banking endpoints. Read more about these endpoints in the Core Banking Developer Guide.
In order to add a withdrawal transaction to a deposit contract through the menus available in Core Banking, follow these steps:
-
In FintechOS Portal, select a contract with Approved status and double-click to open it.
-
Navigate to the contract's Payments tab and click the Insert button above the Transactions section. The Event page is displayed.

-
Fill in the following fields:
-
Event Date - This is pre-filled with the current date.
-
Transaction Type - Select from the list the Withdraw transaction type. If you can't find it, then the transaction type is not associated with the banking product which is at the base of the contract.
Other values are automatically completed: contract, customer, and currency.
-
-
Click the Save and Reload button.
The event is saved in Draft status and a transaction number is automatically generated for it. The Edit Contract Event page corresponding to the selected transaction type is displayed. The account's actual balance, the interest to recover, and available amount on the deposit are automatically calculated, and you can't edit them. -
Fill in the external identifier of the transaction, if available.
-
In the Event Value field, enter the amount that is removed from the account.
 NOTE
NOTE
Core Banking actually uses the financial institution's reconciliation account as a destination bank account. -
Click the Save and Reload button.
If the event value meets the business requirements defined within Core Banking, the event is saved. Otherwise, an error message appears. Change the values as instructed in the message and try saving the event again.
While the event is in Draft status, you can modify all the event's fields except Transaction Type. The event value is not applied to the contract while the event is still in this status. -
Approve the event by changing its status to Approved in the upper left corner of the Event page.
-
Confirm the change of status in the Confirmation window, clicking Yes. The event is now in Approved status and Core Banking applies the transaction to the contract, removing the funds specified in the event value from the current account.
The transaction is visible in the Transactions section, and you can also see the account operation in the Bank Account Operations section.

-
View the balance of the deposit account after approving the transaction, clicking the pencil icon next to the Main Bank Account field in the contract's Overview tab:


All existing versions of the contract in Contract Version Draft status are automatically changed to Contract Version Closed when a payment event is approved for that contract.
A transfer between my bank accounts transaction on a deposit represents the process of moving funds from the deposit contract into another of the customer's bank accounts.
You can add transfer transactions to an approved contract via Core Banking's user interface or through API calls, using the Core Banking endpoints. Read more about these endpoints in the Core Banking Developer Guide.
In order to add a transfer transaction to a deposit contract through the menus available in Core Banking, follow these steps:
-
In FintechOS Portal, select a contract with Approved status and double-click to open it.
-
Navigate to the contract's Payments tab and click the Insert button above the Transactions section. The Event page is displayed.

-
Fill in the following fields:
-
Event Date - This is pre-filled with the current date.
-
Transaction Type - Select from the list the Transfer between my bank accounts transaction type. If you can't find it, then the transaction type is not associated with the banking product which is at the base of the contract.
Other values are automatically completed: contract, customer, and currency.
-
-
Click the Save and Reload button.
The event is saved in Draft status and a transaction number is automatically generated for it. The Edit Contract Event page corresponding to the selected transaction type is displayed. The account's actual balance, the interest to recover, and the available deposit amount are automatically calculated, and you can't edit them. -
Fill in the external identifier of the transaction, if available.
-
In the Event Value field, enter the amount that is added to the account.
-
Select the Destination Account where the respective amount should be transferred into. You can choose from the list of accounts that belong to the contract's customer and have the same currency.

-
Click the Save and Reload button.
If the event value meets the business requirements defined within Core Banking, the event is saved. Otherwise, an error message appears. Change the values as instructed in the message and try saving the event again.
While the event is in Draft status, you can modify all the event's fields except Transaction Type. The event value is not applied to the contract while the event is still in this status. -
Approve the event by changing its status to Approved in the upper left corner of the Event page.
-
Confirm the change of status in the Confirmation window, clicking Yes. The event is now in Approved status and Core Banking applies the transaction to the contract, moving the funds specified in the event value from the current account into the destination account of the same customer.
The transaction is visible in the Transactions section, and you can also see the account operation in the Bank Account Operations section.

-
View the balance of the deposit account after approving the transaction, clicking the pencil icon next to the Main Bank Account field in the contract's Overview tab:

All existing versions of the contract in Contract Version Draft status are automatically changed to Contract Version Closed when a payment event is approved for that contract.