Contract Events
Contract events are transactions/ changes performed at the contract level. Such events are disbursements, early repayments, transfers of funds between the customer's accounts, and so on.
In a contract based on a specific banking product, you can only add events with the transaction types predefined at that banking product level. Other changes may be performed by versioning the contract. This page covers those changes enabled via events, created via the Insert button above the Transactions section in the Contract > Payments tab.
Only contracts with Approved status allow you to perform transactions.
The transactions must be previously defined and associated with the banking product in the Banking Product page > Associated Transactions tab.
Only events with Approved status operate changes at the contract level.
Event Statuses
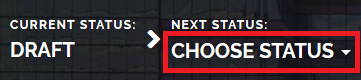
An event record has the following statuses, visible in the top left corner of the Event page:
-
Draft - the status of a newly created event record that was not yet sent for approval. The event value is not applied to the contract while the event is still in this status. While in this status, you can edit some fields. Approve after editing all the necessary details.
-
Approved - the status of an event record after being authorized. The event value is applied to the contract and you cannot edit any of the event's details. There is no further transition from this status.
-
Canceled - the status of an event record after being canceled. The event value is not applied to the contract and you cannot edit any of the event's details. There is no further transition from this status.
As a best practice, new records or new versions of existing records created on a specific day should be approved on the same day.
Adding Events To Approved Contracts
In order to add events to a contract, follow these steps:
-
In FintechOS Portal, on the Contracts List page, select a contract with Approved status.
-
Double-click the contract to open it for editing.
-
Navigate to the contract's Payments tab.
-
Click the Insert button above the Transactions section. The Event page is displayed.
 HINT
HINT
You can also add events through API calls, using the Core Banking endpoints. Read more about these endpoints in the Core Banking Developer Guide. -
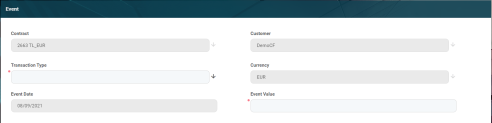
Fill in the following fields, common to every transaction type, noting that the fields that are not mandatory, are read-only:
-
Click the Save and Reload button at the top right corner of the page.
The event is saved in Draft status and a transaction number is automatically generated for it. The Edit Contract Event page corresponding to the selected transaction type is displayed. A series of value fields are automatically calculated and their values are displayed. -
Depending on the selected transaction type, fill in the following fields, noting that the fields that are not mandatory, are read-only:
-
an error message, if
Return Message = Erroron the banking product definition; -
a warning message, if
Return Message = Warningon the banking product definition; -
nothing, if
Return Message = NoMessageon the banking product definition. -
RA = Returned amount/ Returned value of the goods
-
IFRV = Interest for remaining value after returning the amount/ returning the value of the goods
-
IFRA = Interest for returned amount starting from return date
-
RVA = Remaining value after returned amount/ returned value of the good
-
RVBA = Remaining value before returned amount/ return value of the good
-
the principal amount saved on the transaction if
Fee Value To Principal = False; -
the event amount saved on transaction if
Fee Value To Principal = True. Both- take a break from paying the principal and interest amounts of the installments.Principal- take a break from paying the principal amount of the installments.Activity suspended
Major force
Financial restructuring.
-
Click the Save and Reload button at the top right corner of the page.
If the event value meets the business requirements defined within Core Banking, the event is saved. Otherwise, an error message appears. Change the values as instructed in the message and try saving the event again.While the event is in Draft status, all the event's fields except Transaction Type can be modified. The event value is not applied to the contract while the event is still in this status.

-
Approve the event by changing its status to Approved in the upper left corner of the Event page.
| Field | Mandatory | Data Type | Details |
|---|---|---|---|
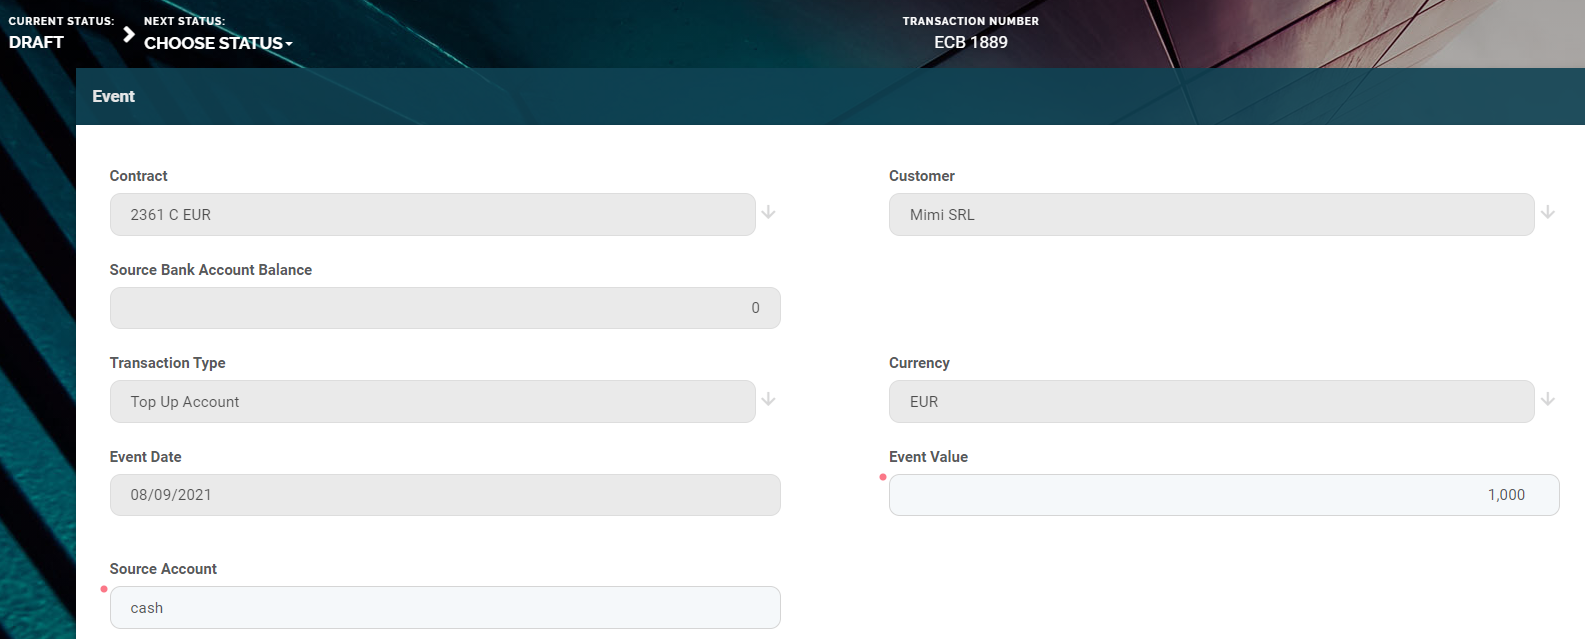
| Contract | No | Lookup | Automatically completed with the selected contract's number. You cannot edit this field. |
| Customer | No | Lookup | Automatically completed with the selected contract's customer. You cannot edit this field. |
| Currency | No | Lookup | Automatically completed with the selected contract's currency. You cannot edit this field. |
| Event Date | No | Invariant Date | Automatically completed with the Core Banking system's current date. You cannot edit this field. |
| Transaction Type | Yes | Lookup |
Select from the list the transaction type. Only the transaction types associated with the banking product which is at the base of the contract are displayed. NOTE
Depending on the selected transaction type, a series of new fields are displayed that require to be filled in. |
It represents adding amounts to the account before the value drains down to zero.
![]()
| Field | Mandatory | Data Type | Details |
|---|---|---|---|
| Actual Balance | No | Numeric | This field displays the available balance of the account associated with the contract. You cannot edit this field. |
| Event Date | No | Invariant Date | Automatically completed with the Core Banking system's current date. You cannot edit this field. |
| External Identifier | No | Text | Enter an external identifier of the transaction, if available. |
| Event Value | Yes | Numeric | Enter the value of the transaction. |
| Source Account | Yes | Text | Enter the source account for the respective amount. |
It represents the process of moving funds between the same customer's bank accounts.
![]()
| Field | Mandatory | Data Type | Details |
|---|---|---|---|
| Actual Balance | No | Numeric | This field displays the available balance of the account associated with the contract. You cannot edit this field. |
| Event Date | No | Invariant Date | Automatically completed with the Core Banking system's current date. You cannot edit this field. |
| External Identifier | No | Text | Enter an external identifier of the transaction, if available. |
| Event Value | Yes | Numeric | Enter the value of the transaction. |
| Destination Account | Yes | Lookup | Select the destination account from the list of accounts that belong to the contract's customer. |
It represents removing funds from a bank account.

| Field | Mandatory | Data Type | Details |
|---|---|---|---|
| Actual Balance | No | Numeric | This field displays the available balance of the account associated with the contract. You cannot edit this field. |
| Event Date | No | Invariant Date | Automatically completed with the Core Banking system's current date. You cannot edit this field. |
| External Identifier | No | Text | Enter an external identifier of the transaction, if available. |
| Event Value | Yes | Numeric | Enter the value of the transaction. |
| Destination Account | Yes | Lookup | Select the destination account from the list of accounts that belong to the contract's customer. |
It represents the actual delivery of funds from a bank account to the customer. The repayment schedule gets calculated or recalculated.
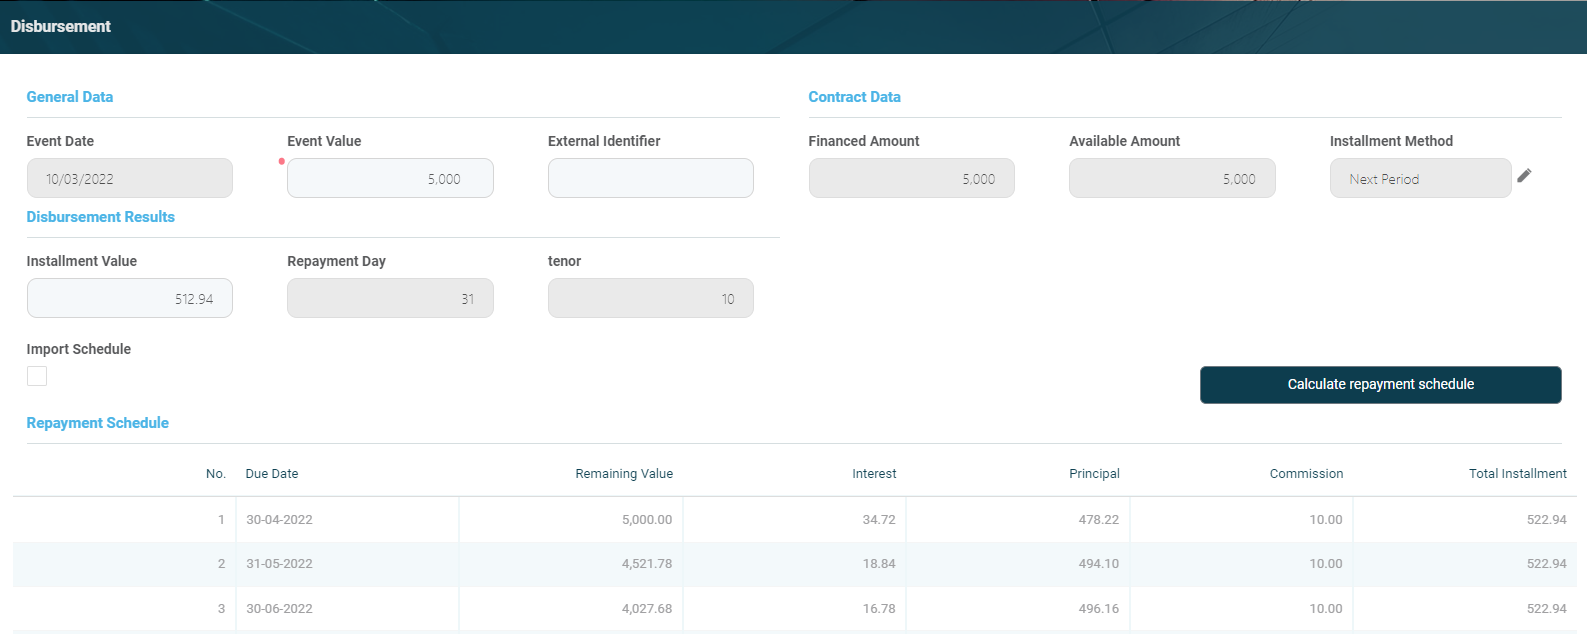
| Field | Mandatory | Data Type | Details |
|---|---|---|---|
| General Data | |||
| Event Date | No | Invariant Date | Automatically completed with the Core Banking system's current date. You cannot edit this field. |
| External Identifier | No | Text | Enter an external identifier of the transaction, if available. |
| Event Value | Yes | Numeric | Enter the value of the transaction. Other value fields are automatically calculated based on the event value and their values are displayed. |
| Contract Data | |||
| Financed Amount | No | Numeric | This field displays the contract's financed amount. You cannot edit this field. |
| Available Value | No | Numeric | This field displays the amount still available within the contract. You cannot edit this field. |
| Installment Method | No | Lookup | This field displays the contract's selected installment method. You cannot edit this field. |
| Disbursement Results | |||
| Installment Value | Yes | Numeric | This field displays the installment value calculated for the entered event value. You can modify this value. |
| Repayment Due Day | No | Whole Number | This field displays the day of the month when the repayment is due, if it was specified previously. You cannot edit this field. |
| Tenor | No | Whole Number | This field displays the duration left in the contract. You cannot edit this field. |
| Import Schedule | |||
| Import Schedule | No | Bool | This field specifies whether you are importing a custom repayment plan (for the selected checkbox), or the schedule generated by the system (for the checkbox left unselected) is to be used further within the contract. The checkbox is unselected by default, meaning that the schedule generated automatically by the system is to be used after approving the event. Select the checkbox to display the Export Schedule Template and the Schedule File - Select File buttons, otherwise, these buttons are not displayed. Read more about importing a custom schedule file in the Import Repayment Plan section of the user guide. |
| Schedule File - Select File | No | File | This field contains the imported custom repayment plan. New events don't contain the file. In order for a file to be displayed here, you should first select the desired file with your custom schedule. Click Select File and, in the newly displayed Explorer window, browse for the .xlsx file that contains the custom schedule, then click Open.NOTE Save the event record in order to save the schedule file to Core Banking, then click Run Import Schedule to perform the import of the new custom schedule to the contract through the event. Remember to approve the event for the new repayment plan to be in effect on the contract.Before selecting the file, make sure you fill in the custom schedule according to the schedule template exported from Core Banking (click the Export Schedule Template button to download an .xslx file with the approved schedule template). Read more about importing a custom schedule file in the Import Repayment Plan section of the user guide. |
It represents the early return of funds previously borrowed from a lender. The repayment schedule is updated. Only for contracts that have an approved disbursement event.
When an approved early repayment event covers a contract's entire outstanding amount resulting in zero amounts on the contract, that contract is automatically closed by Core Banking.
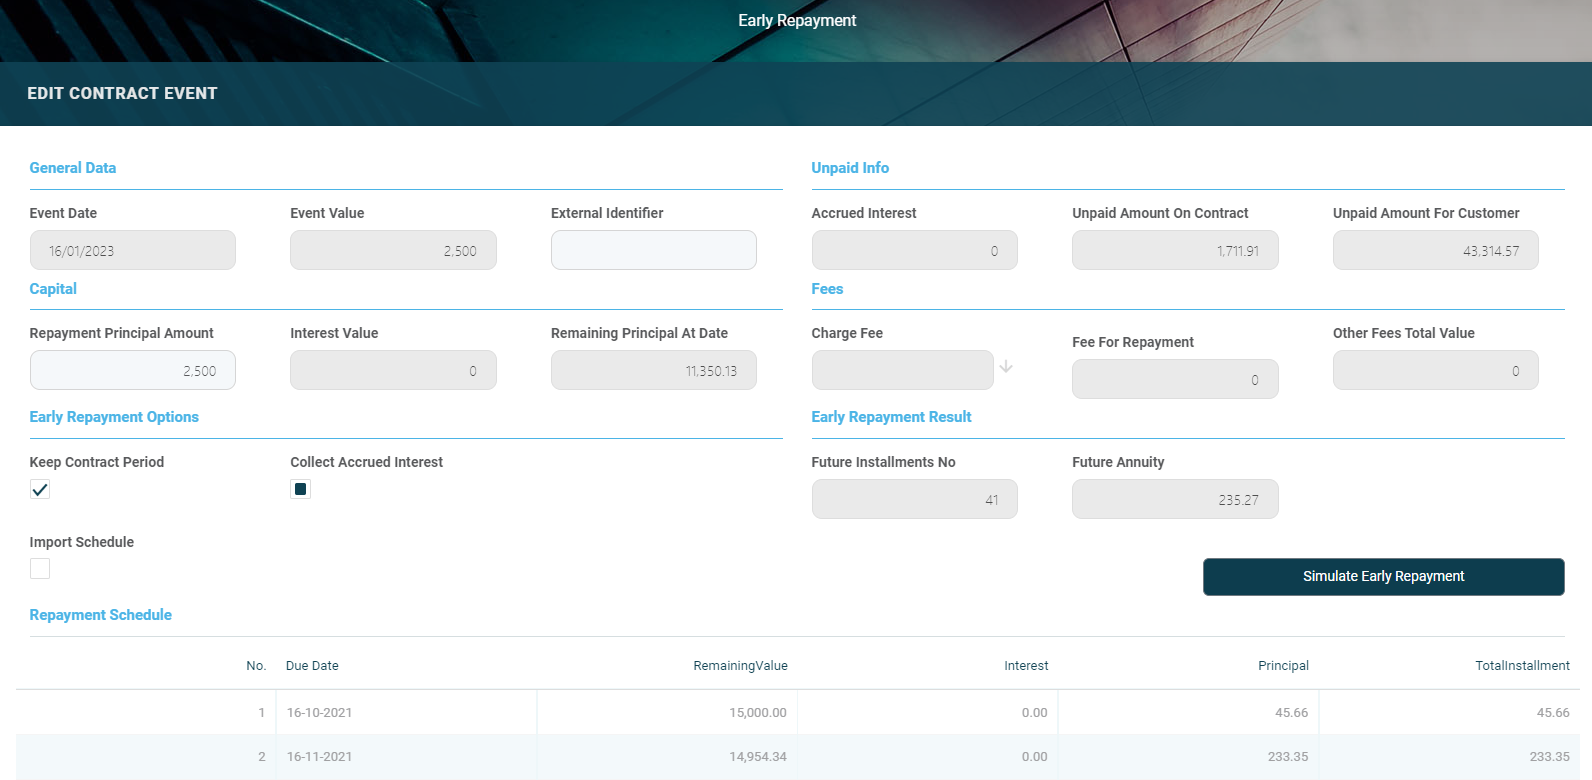
| Field | Mandatory | Data Type | Details |
|---|---|---|---|
| General Data | |||
| Event Date | Yes | Invariant Date | Automatically completed with the Core Banking system's current date. You cannot edit this field. |
| Event Value | Yes | Numeric | This field displays the value of the transaction, calculated and displayed after saving the record, based on the information filled in a series of other fields. You cannot edit this field. For an early repayment transaction, Event Value = Repayment Principal + Accrued Interest + Fees. The Accrued Interest value is added when the Collect Accrued Interest field is selected. |
| External Identifier | No | Text | Enter an external identifier of the transaction, if available. |
| Unpaid Info | |||
| Accrued Interest | No | Numeric | This field displays the interest accrued up until the event date for an early repayment contract event. You cannot edit this field. |
| Unpaid Amount On Contract | No | Numeric | This field is displayed after saving the record. It shows the value of the unpaid amount still on the contract. You cannot edit this field. |
| Unpaid Amount For Customer | No | Numeric | This field is displayed after saving the record. It shows the value of the unpaid amount for the customer. You cannot edit this field. |
| Capital | |||
| Repayment Principal Amount | Yes | Numeric | This field displays the principal amount to be repaid with this event. You can modify this value. |
| Interest Value | Yes | Numeric | This field displays the interest value applicable to the payment. You cannot edit this field. |
| Remaining Principal At Date | Yes | Numeric | This field displays the remaining value of the principal at the current date. You can modify this value. |
| Fees | |||
| Charge Fee | No | Lookup | This field displays the transaction fee applicable for a repayment transaction. See Transaction Fees for more details. You cannot edit this field. |
| Repayment Fee Percent | No | Lookup | This field displays the repayment fee percentage applicable for the contract. Depending on the ManualRepaymentFeeCore Banking system parameter's value, the system may allow you to change the percentage. See Transaction Fees for more details. |
| Fee For Repayment | No | Lookup | This field displays the repayment fee value applicable for the contract. Depending on the ManualRepaymentFeeCore Banking system parameter's value, the system may allow you to change the value. See Transaction Fees for more details. |
| Other Fees Total Value | Yes | Numeric | This field displays other fees and commissions applicable to the payment. You cannot edit this field. |
| Early Repayment Options | |||
| Keep Contract Period | No | Bool | This field displays whether the system should keep the period of the contract (if the checkbox is selected) or recalculate it. You can modify this checkbox. |
| Collect accrued interest | No | Boolean | This field indicates the behavior of the accrued interest on the early repayment contract events, respectively if the payment schedule type calculation should collect the interest accrued up to date or not. If the checkbox is not selected, then Accrued Interest = the value of accrued interest until the event's date. If the checkbox is selected, then the Accrued Interest = 0.00.The payment schedule projection takes into consideration both the payment schedule type defined at the banking product level, and whether to collect the interest accrued on the contract until the date of an early repayment event, thus repaying the accrued interest, or not, thus adding the accrued interest to the next installment due after the early repayment event. |
| Accrued interest | No | Numeric | This field displays the interest accrued up until the event date for an early repayment contract event. You cannot edit this field. |
| Early Repayment Result | |||
| Future Installments No | Yes | Whole Number | This field displays the number of installments to be paid in the future. You cannot edit this field. |
| Future Annuity | Yes | Numeric | This field displays the future value of the installment as recalculated after this payment. You cannot edit this field. |
| Future Principal For Installment | Yes | Numeric | This field displays the future value of the principal as recalculated after this payment. You cannot edit this field. |
| Import Schedule | |||
| Import Schedule | No | Bool | This field specifies whether you are importing a custom repayment plan (for the selected checkbox), or the schedule generated by the system (for the checkbox left unselected) is to be used further within the contract. The checkbox is unselected by default, meaning that the schedule generated automatically by the system is to be used after approving the event. Select the checkbox to display the Export Schedule Template and the Schedule File - Select File buttons, otherwise, these buttons are not displayed. Read more about importing a custom schedule file in the Import Repayment Plan section of the user guide. |
| Schedule File - Select File | No | File | This field contains the imported custom repayment plan. New events don't contain the file. In order for a file to be displayed here, you should first select the desired file with your custom schedule. Click Select File and, in the newly displayed Explorer window, browse for the .xlsx file that contains the custom schedule, then click Open.NOTE Save the event record in order to save the schedule file to Core Banking, then click Run Import Schedule to perform the import of the new custom schedule to the contract through the event. Remember to approve the event for the new repayment plan to be in effect on the contract.Before selecting the file, make sure you fill in the custom schedule according to the schedule template exported from Core Banking (click the Export Schedule Template button to download an .xslx file with the approved schedule template). Read more about importing a custom schedule file in the Import Repayment Plan section of the user guide. |
Only for contracts that have an approved disbursement event. The transaction through which a customer returns all or part of a loan or mortgage in a short while after contract creation and the commissions already paid by the customer as front-end fees marked as returnable are paid back.
It only accepts Return Fee commission types. Upon transaction approval, a new contract version is automatically created.
To manage merchandise return in a contract based on a BNPL-type banking product or even a return of funds in a different kind of loan, no matter if the return is partial or full, Core Banking allows you to perform an early repayment and decide if the repayment amount is excluded from interest calculation, as well as decide how to treat potentially claimed interest at the moment of performing the early repayment.
The recalculation of the repayment schedule covers the recalculation of interest and the mitigation of potentially already charged/ notified interest amounts. Core Banking can capture the return for any amount no matter if the disbursement of the loan was done in one or multiple transactions. Even if there are overdue payments on the contract, the principal can be decreased and also the overdue notifications overdue are adjusted to reflect the early repayment, if the date of processing is before the notification date.
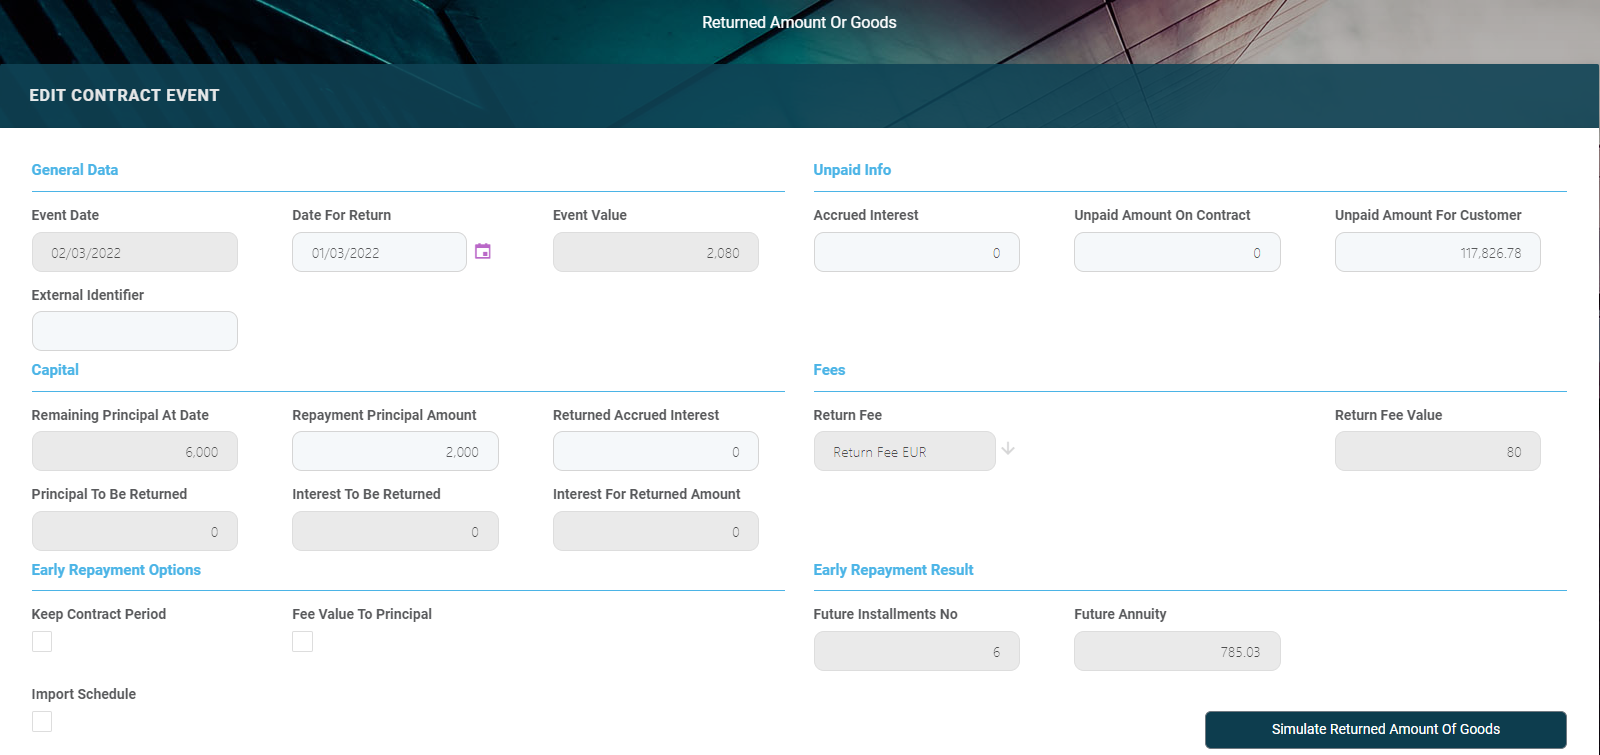
| Field | Mandatory | Data Type | Details |
|---|---|---|---|
| General Data | |||
| Event Date | Yes | Invariant Date | Automatically completed with the Core Banking system's current date. You cannot edit this field. |
| Date For Return | Yes | Invariant Date | The date of the return. By default = Activation Date. You cannot edit this field. It is validated against Activation Date and Current Date (it cannot be before Activation Date and after Current Date). |
| Event Value | Yes | Numeric | The value of the transaction, calculated and displayed after saving the record, based on the information filled in a series of other fields. For a Returned Amount or Goods transaction, Event Value = Principal + Commission Value + Interest To Be Returned. |
| External Identifier | No | Text | An external identifier of the transaction, if available. |
| Unpaid Info | |||
| Accrued Interest | No | Numeric | This field displays the interest accrued up until the event date for an early repayment contract event. You cannot edit this field. |
| Unpaid Amount On Contract | No | Numeric | This field is displayed after saving the record. It shows the value of the unpaid amount still on the contract. You cannot edit this field. |
| Unpaid Amount For Customer | No | Numeric | This field is displayed after saving the record. It shows the value of the unpaid amount for the customer. You cannot edit this field. |
| Capital | |||
| Repayment Principal Amount | Yes | Numeric | This field displays the principal amount to be repaid with this event. You can modify this value. |
| Principal To Be Returned | Yes | Numeric | This field displays the principal to be returned with this event. You cannot edit this field. |
| Remaining Principal At Date | Yes | Numeric | This field displays the remaining value of the principal at the current date. You can modify this value. |
| Returned Accrued Interest | Yes | Numeric | This field displays the returned accrued interest. You can modify this value. |
| Interest For Returned Amount | Yes | Numeric | This field displays the interest for the returned amount. You cannot edit this field. |
| Interest To Be Returned | Yes | Numeric | This field displays the interest to be returned with this event. You cannot edit this field. |
| Fees | |||
| Return Fee | Yes | Lookup | This field displays the transaction fee applicable for a Returned Amount or Goods transaction on this contract. See Transaction Fees for more details. You cannot edit this field. |
| Return Fee Percent | Yes | Lookup | This field displays the return fee percentage applicable for the contract. You cannot edit this field. |
| Return Fee Value | Yes | Lookup | This field displays the repayment fee value applicable for the contract. You cannot edit this field. |
| Early Repayment Options | |||
| Keep Contract Period | No | Bool | This field displays whether the system should keep the period of the contract (if the checkbox is selected) or recalculate it. You can modify this checkbox. |
| Fee Value To Principal | No | Bool | This field displays whether the value of the return fee should be applied to the principal (if the checkbox is selected), using its value to include it in the repayment amount and diminishing the outstanding principal, or not. You can modify this checkbox. |
| Early Repayment Result | |||
| Future Installments No | Yes | Whole Number | This field displays the number of installments to be paid in the future. You cannot edit this field. |
| Future Annuity | Yes | Numeric | This field displays the future value of the installment as recalculated after this payment. You cannot edit this field. |
| Future Principal For Installment | Yes | Numeric | This field displays the future value of the principal as recalculated after this payment. You cannot edit this field. |
| Import Schedule | |||
| Import Schedule | No | Bool | This field specifies whether you are importing a custom repayment plan (for the selected checkbox), or the schedule generated by the system (for the checkbox left unselected) is to be used further within the contract. The checkbox is unselected by default, meaning that the schedule generated automatically by the system is to be used after approving the event. Select the checkbox to display the Export Schedule Template and the Schedule File - Select File buttons, otherwise, these buttons are not displayed. Read more about importing a custom schedule file in the Import Repayment Plan section of the user guide. |
| Schedule File - Select File | No | File | This field contains the imported custom repayment plan. New events don't contain the file. In order for a file to be displayed here, you should first select the desired file with your custom schedule. Click Select File and, in the newly displayed Explorer window, browse for the .xlsx file that contains the custom schedule, then click Open.NOTE Save the event record in order to save the schedule file to Core Banking, then click Run Import Schedule to perform the import of the new custom schedule to the contract through the event. Remember to approve the event for the new repayment plan to be in effect on the contract.Before selecting the file, make sure you fill in the custom schedule according to the schedule template exported from Core Banking (click the Export Schedule Template button to download an .xslx file with the approved schedule template). Read more about importing a custom schedule file in the Import Repayment Plan section of the user guide. |
Returned Amount Or Goods Event Validations:
On event approval, Core Banking verifies if Event Date respects the formula: Activation Date + Accepted Days For Return >= Current Date. If the formula is not respected, Core Banking returns:
Core Banking also checks on event approval if the Return Fee is not greater that the sum of commissions with type Front-End Fee with Is Returnable = True on the contract level.
There is no validation of the event amount on this transaction related to balance of current account.
Automatic Calculations of Value Fields:
Legend:
Principal To Be Returned = if RA > RVBA => RA - RVBA, else 0.
Interest To Be Returned = if IFRA > IFRV=>IFRA -IFRV, else 0.
Interest on the first installment generated by the transaction: if IFRV > IFRA => IFRV - IFRA, else 0.
After Event Validation Information:
After event validation, Core Banking creates a new version of the contract. The contract's current account (customer casa account) is topped-up TOP Up with the Event Value = Amount + Return Fee. The return fee is added to the contract's Fees & Commissions section with a negative value that can't be modified.
In the Contract Repayment Schedule, Core Banking creates an installment with all columns = 0, except Principal, Remaining Value and Total Installment, with Is Early Repayment = True and Is Return = True. The Principal amount is:
Core Banking generates a notification for this installment and performs the allocation. The allocation process affects the main bank account balance as it is now, all the limits with Is Revolving = True and On Repayment = True affected by this contract, and the available amount on the contract if Is Revolving = True at the product level.
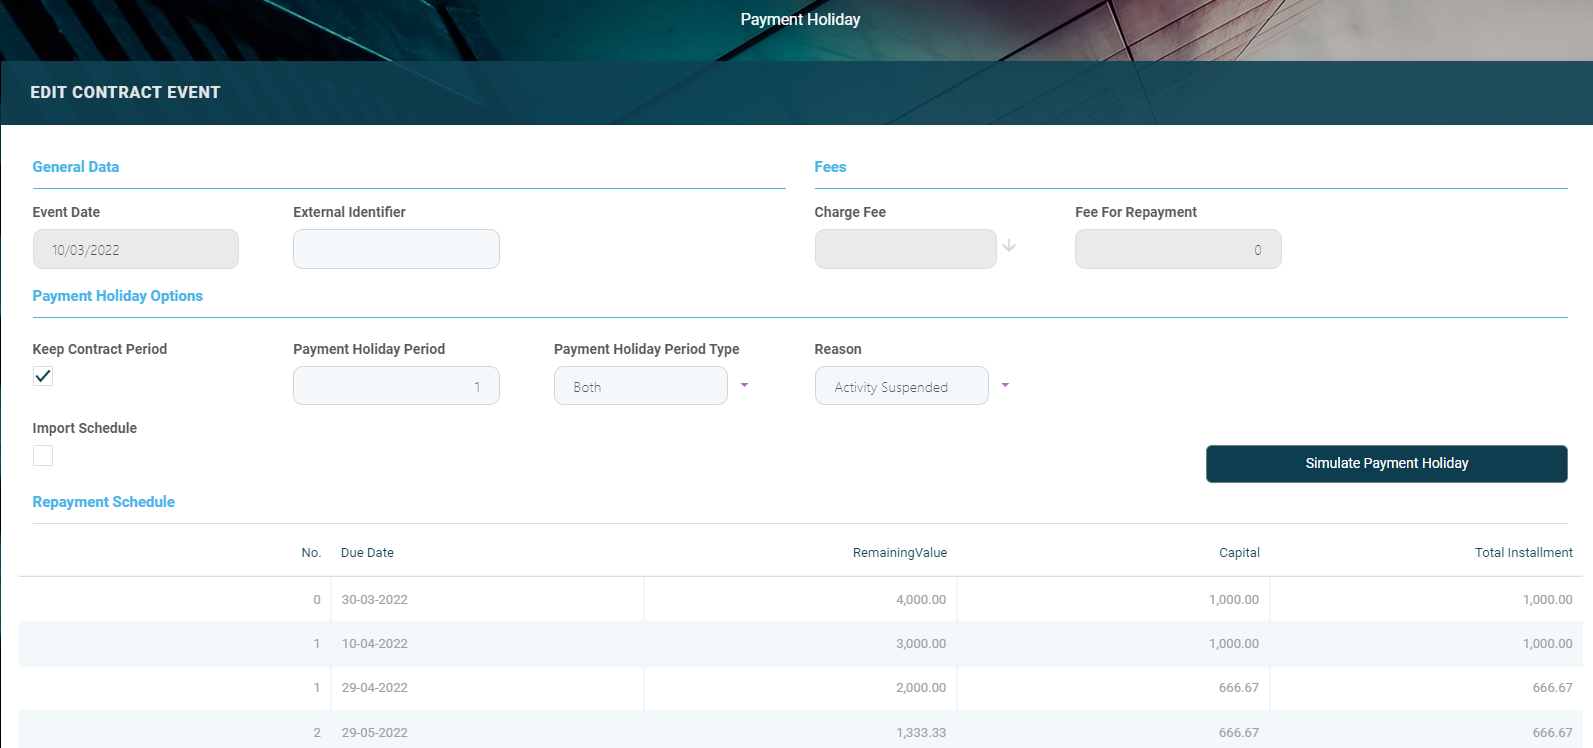
It represents taking a break of any number of installments for the generated schedule.
| Field | Mandatory | Data Type | Details |
|---|---|---|---|
| General Data | |||
| Event Date | Yes | Invariant Date | Automatically completed with the Core Banking system's current date. You cannot edit this field. |
| External Identifier | No | Text | Enter an external identifier of the transaction, if available. |
| Fees | |||
| Charge Fee | No | Lookup | This field displays the transaction fee applicable for the transaction. See Transaction Fees for more details. You cannot edit this field. |
| Repayment Fee Percent | No | Lookup | This field displays the repayment fee percentage applicable for the contract. Depending on the ManualRepaymentFeeCore Banking system parameter's value, the system may allow you to change the percentage. See Transaction Fees for more details. |
| Fee For Repayment | No | Lookup | This field displays the repayment fee value applicable for the contract. Depending on the ManualRepaymentFeeCore Banking system parameter's value, the system may allow you to change the value. See Transaction Fees for more details. |
| Payment Holiday Options | |||
| Keep Contract Period | No | Bool | This field displays whether the system should keep the period of the contract (if the checkbox is selected) or recalculate it. You can modify this checkbox. |
| Payment Holiday Period (Months) | Yes | Whole Number | Enter the number of months for which you request a break from the payments. |
| Payment Holiday Period Type | Yes | Option Set | Select the type of payment holiday to be applied for the contract. Possible values: |
| Reason | Yes | Option Set | Select the reason for requesting the event. Possible values: |
| Import Schedule | |||
| Import Schedule | No | Bool | This field specifies whether you are importing a custom repayment plan (for the selected checkbox), or the schedule generated by the system (for the checkbox left unselected) is to be used further within the contract. The checkbox is unselected by default, meaning that the schedule generated automatically by the system is to be used after approving the event. Select the checkbox to display the Export Schedule Template and the Schedule File - Select File buttons, otherwise, these buttons are not displayed. Read more about importing a custom schedule file in the Import Repayment Plan section of the user guide. |
| Schedule File - Select File | No | File | This field contains the imported custom repayment plan. New events don't contain the file. In order for a file to be displayed here, you should first select the desired file with your custom schedule. Click Select File and, in the newly displayed Explorer window, browse for the .xlsx file that contains the custom schedule, then click Open.NOTE Save the event record in order to save the schedule file to Core Banking, then click Run Import Schedule to perform the import of the new custom schedule to the contract through the event. Remember to approve the event for the new repayment plan to be in effect on the contract.Before selecting the file, make sure you fill in the custom schedule according to the schedule template exported from Core Banking (click the Export Schedule Template button to download an .xslx file with the approved schedule template). Read more about importing a custom schedule file in the Import Repayment Plan section of the user guide. |
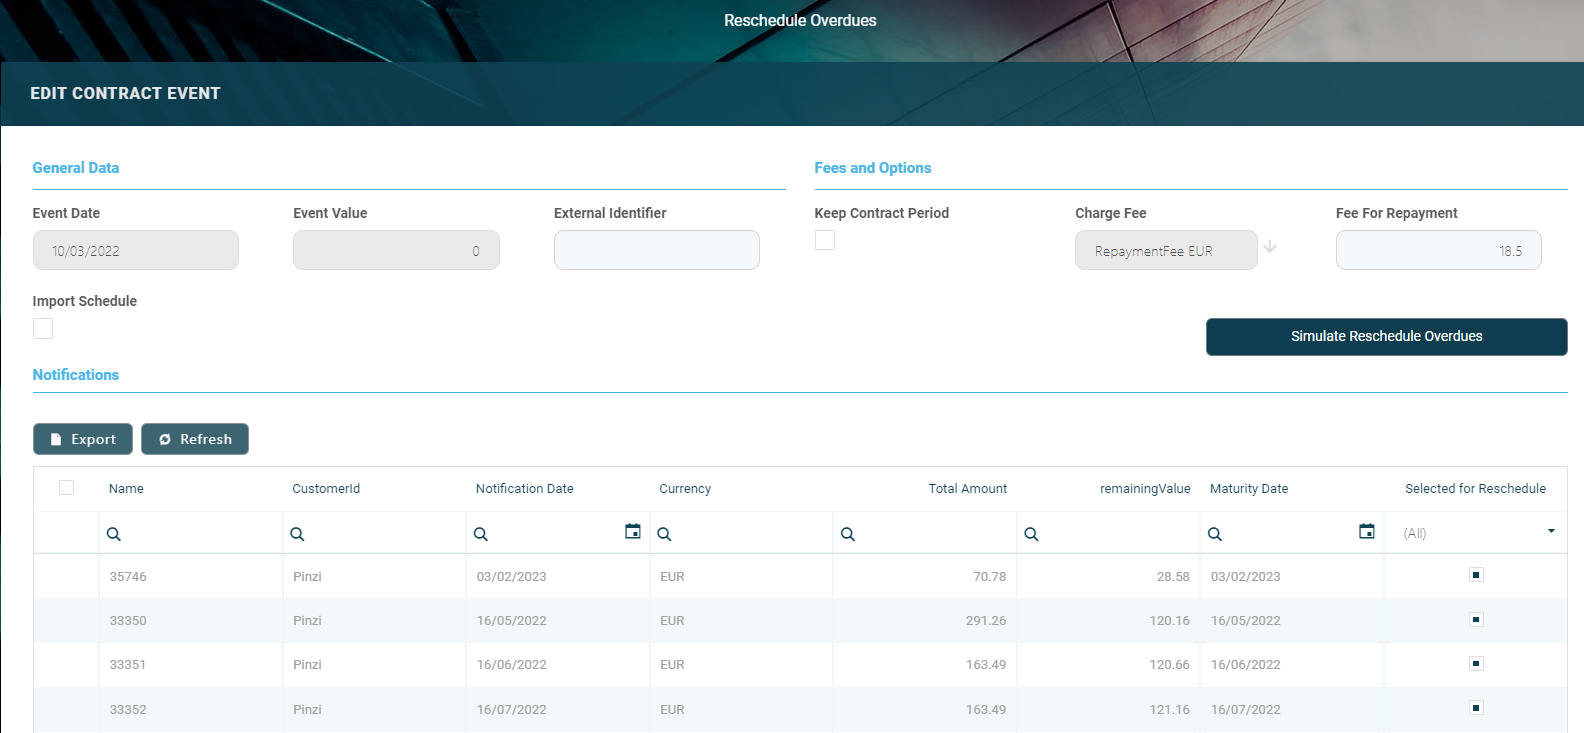
It represents an operation where overdue installments are merged to the following installments and they are no longer collecting penalties. The repayments schedule gets updated.
| Field | Mandatory | Data Type | Details |
|---|---|---|---|
| General Data | |||
| Event Date | Yes | Invariant Date | Automatically completed with the Core Banking system's current date. You cannot edit this field. |
| Event Value | Yes | Numeric | Automatically completed with 0. You cannot edit this field. |
| External Identifier | No | Text | Enter an external identifier of the transaction, if available. |
| Fees and Options | |||
| Keep Contract Period | No | Bool | This field displays whether the system should keep the period of the contract (if the checkbox is selected) or recalculate it. You can modify this checkbox. |
| Charge Fee | No | Lookup | This field displays the transaction fee applicable for the transaction. See Transaction Fees for more details. You cannot edit this field. |
| Fee For Repayment | No | Lookup | This field displays the repayment fee value applicable for the contract. Depending on the ManualRepaymentFeeCore Banking system parameter's value, the system may allow you to change the value. See Transaction Fees for more details. |
| Import Schedule | |||
| Import Schedule | No | Bool | This field specifies whether you are importing a custom repayment plan (for the selected checkbox), or the schedule generated by the system (for the checkbox left unselected) is to be used further within the contract. The checkbox is unselected by default, meaning that the schedule generated automatically by the system is to be used after approving the event. Select the checkbox to display the Export Schedule Template and the Schedule File - Select File buttons, otherwise, these buttons are not displayed. Read more about importing a custom schedule file in the Import Repayment Plan section of the user guide. |
| Schedule File - Select File | No | File | This field contains the imported custom repayment plan. New events don't contain the file. In order for a file to be displayed here, you should first select the desired file with your custom schedule. Click Select File and, in the newly displayed Explorer window, browse for the .xlsx file that contains the custom schedule, then click Open.NOTE Save the event record in order to save the schedule file to Core Banking, then click Run Import Schedule to perform the import of the new custom schedule to the contract through the event. Remember to approve the event for the new repayment plan to be in effect on the contract.Before selecting the file, make sure you fill in the custom schedule according to the schedule template exported from Core Banking (click the Export Schedule Template button to download an .xslx file with the approved schedule template). Read more about importing a custom schedule file in the Import Repayment Plan section of the user guide. |
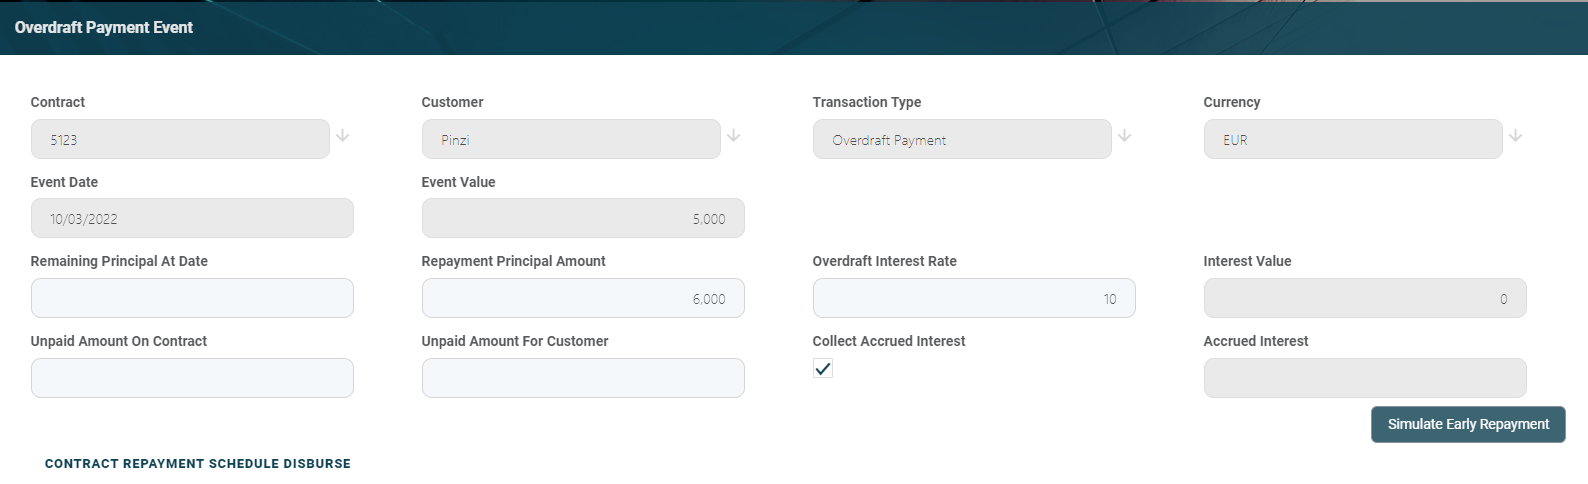
It represents an amount of money that a customer with a bank account is temporarily allowed to owe to the bank.
| Field | Mandatory | Data Type | Details |
|---|---|---|---|
| Contract | No | Lookup | Automatically completed with the selected contract's number. You cannot edit this field. |
| Customer | No | Lookup | Automatically completed with the selected contract's customer. You cannot edit this field. |
| Transaction Type | No | Lookup | Automatically completed with the selected transaction type. You cannot edit this field. |
| Currency | No | Lookup | Automatically completed with the selected contract's currency. You cannot edit this field. |
| Event Date | No | Invariant Date | Automatically completed with the Core Banking system's current date. You cannot edit this field. |
| Event Value | No | Numeric | This field displays the value of the transaction, calculated and displayed after saving the record, based on the information filled in a series of other fields. You cannot edit this field. For an overdraft transaction, Event Value = Repayment Principal + Accrued Interest. The Accrued Interest value is added when the Collect Accrued Interest field is selected. |
| Remaining Principal At Date | Yes | Numeric | This field displays the remaining value of the principal at the current date. You can modify this value. |
| Repayment Principal Amount | Yes | Numeric | This field displays the principal amount to be repaid with this event. You can modify this value. |
| Overdraft Interest Rate | Yes | Numeric | This field displays the value of the interest rate applicable for overdraft payments for the contract. You can modify this value. |
| Interest Value | Yes | Numeric | This field displays the interest value applicable to the payment. You cannot edit this field. |
| Unpaid Amount On Contract | No | Numeric | This field is displayed after saving the record. It shows the value of the unpaid amount still on the contract. You cannot edit this field. |
| Unpaid Amount For Customer | No | Numeric | This field is displayed after saving the record. It shows the value of the unpaid amount for the customer. You cannot edit this field. |
| Collect accrued interest | No | Boolean | This field indicates the behavior of the accrued interest on the contract events, respectively if the payment schedule type calculation should collect the interest accrued up to date or not. If the checkbox is not selected, then Accrued Interest = the value of accrued interest until the event's date. If the checkbox is selected, then the Accrued Interest = 0.00.The payment schedule projection takes into consideration both the payment schedule type defined at the banking product level, and whether to collect the interest accrued on the contract until the date of an event, thus repaying the accrued interest, or not, thus adding the accrued interest to the next installment due after the early repayment event. |
| Accrued interest | No | Numeric | This field displays the interest accrued up until the event date for a contract event. You cannot edit this field. |
It represents the way of closing the deposit account, so the entire amount is transferred in the current account and the deposit account is closed. If the liquidation occurs at the maturity date, the interest will also be paid. If the liquidation occurs on any other day except the maturity date, the customer will receive the sight interest (if a sight interest is configured).

| Field | Mandatory | Data Type | Details |
|---|---|---|---|
| Actual Balance | No | Numeric | This field displays the available balance of the account associated with the contract. You cannot edit this field. |
| Event Date | No | Invariant Date | Automatically completed with the Core Banking system's current date. You cannot edit this field. |
| External Identifier | No | Text | Enter an external identifier of the transaction, if available. |
| Available Deposit Amount | No | Numeric | This field displays the available value in the deposit at the current date. You cannot edit this field. |
| Event Value | Yes | Numeric | This field displays the automatically completed value of the deposit liquidation transaction. You cannot edit this field. |
| Destination Account | Yes | Lookup | Select from the list the account where the available deposit amount has to be moved upon liquidation. The list contains the contract customer's current accounts. |
| Interest to Recover | No | Numeric | This field displays the calculated interest to recover at the current date. You cannot edit this field. |
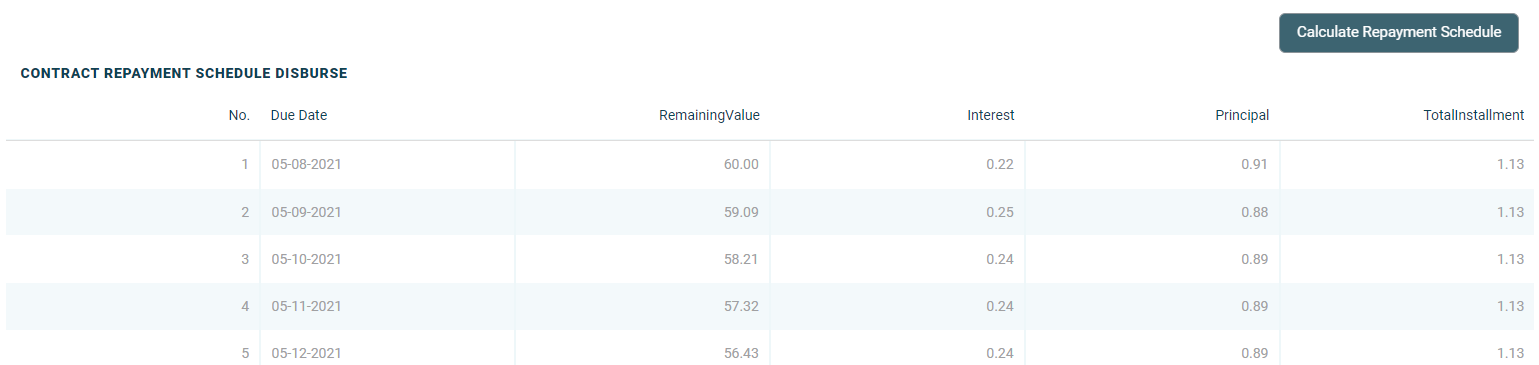
Depending on the selected transaction type, new sections are displayed at the bottom of the page, containing the contract repayment schedule for the event and any generated notifications.
Click the Calculate/ Simulate repayment schedule / Simulate reschedule overdues buttons (the displayed button depends on the selected transaction type) to view the details of each installment. If the Import Schedule checkbox is selected, the Calculate button is not displayed. If the Import Schedule checkbox is unselected, then the repayment schedule is recalculated using the standard Core Banking logic.
For Reschedule Overdue transaction type, select from the list the overdue payment notifications that you wish to reschedule.
-
Confirm the change of status in the Confirmation window, clicking Yes. The event is now in Approved status.
The event value is now applied and visible in the contract's Payments tab -> Transactions section.

All existing versions of the contract in Contract Version Draft status are automatically changed to Contract Version Closed when a payment event is approved for that contract.
Contract events added through API calls also contain an
External Identifier, displayed in the header of the event, next to the Transaction Number.