Direct Debit UK
The Billing & Collection solution helps UK insurers to handle direct debit payment operations - starting with the direct debit mandate activation procedure (in order to notify the bank about the payment arrangement between insurer and insured) up to the moment the payment is collected.
For direct debit payments that respect some rules, such as providing the correct payment details, the process for billing and collecting is completely automated. You can find details about the automated jobs handling the direct debit payments on the Flow Parameters And Scheduled Jobs page.
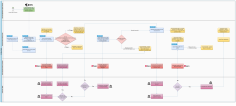
The following is a diagram of how the Billing & Collection solution handles the processing of direct debit payments for the UK area.
Even if rare, there are cases when you need to manually insert a mandate, on behalf of a customer. All mandates inserted manually are registered in Draft status, with mandateStage =N (new) and Begin Date = null. Next, for all the mandates egistered in the system, the FTOS_PYMT_DirectDebitMandateStatus scheduled job moves the mandate in Active status, based on set rules.
Manually, you can only add mandates with the mandate stage set to New. Additionally, a system validation is in place that prevents you from adding a mandate with the same reference (policy or masterpolicy number) as any other mandate already existing in the system.
Follow the below steps to insert a mandate:
-
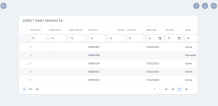
In FintechOS Portal, go to Main Menu > Billing & Collection > DIDE UK > Direct Debit Mandates. The list of all direct debit mandate records is displayed.
-
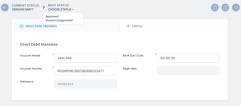
Click Insert. The Insert Mandate form is opened.
-
Input the details in the form:
-
Account Holder: The name of the payer;
-
Bank Sort Code: The bank sort code;
-
Account Number: The account number used for direct debit payments;
-
Begin date: The beginning date of the mandate. It is automatically filled with the current date, the date when the direct debit Instructions File containing the instructions for the current mandate is generated in the system;
-
Reference: The reference for the payments, policy or masterpolicy number.
-
-
Click Save and Reload. The record is now inserted, and you can find it in the Direct Debit Mandates list. In the form, the History tab becomes available, where you can see updates of the record's version.
You can edit any mandate record, except the ones in Cancelled status. After editing, you need to manually approve the new mandate version, and the updates are logged into the system.
Follow the steps below to edit a UK direct debit mandate record:
-
Open a record from the Direct Debit Mandates list.
-
Click Edit Mandate. The following fields become editable: Account Holder, Bank Sort Code, and Account Number.
-
Make the necessary changes in the form.
-
After making sure the changes are in order, use the status picker to approve the changes. Click Approved.
-
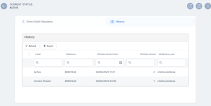
After approval, check the History tab. You can find the logging of the new version that you have just created. The previous version is now Closed.
-
Click Save and Close.
You can also manually cancel a mandate. The cancellation of a mandate triggers the cancellation of all its correlated invoices, which are in Generated status. Once executed, the cancellation is logged into the system.
Follow the steps below to cancel a mandate.
-
Open a record from the Direct Debit Mandates list.
-
In the form, click Cancel Mandate. A message pops up, asking you to confirm the cancellation.
-
Click Yes in the pop-up message. The mandate record is now in Cancelled status, and it's not editable.
-
Check the History tab. The cancellation of the mandate is logged into the system.
Under UK Direct Debit Mandates, different menu items point you to sections that store different reports regarding the mandates management, such as:
-
Notifications sent by BACS regarding the activation of the mandate, or about a status change etc.,
-
Instruction files containing the payment requests for the selected installments,
-
details regarding the success or failure of the direct debit transactions, and more.
In these sections, you can search inside the repositories by File or Date. You can inspect a record by double-clicking it.
The bulk of handling of these operations is done through automatic flows. Uploading direct debit data into the system, triggers automatic changes and tracking of those changes. Updates are made and logged for every mandate record through FintechOS standard versioning mechanism. . You can also insert a file for a particular section.
Learn about the report sections below:
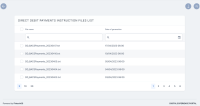
The Payment Instruction Files section contains the Direct Debit Payments Instruction Files List, which displays all the files with instructions for UK direct debit payments generated by the system. All the details from this section are automatically filled in by the system and they are not editable.
Follow the steps below to view a payment instruction file:
-
In FintechOS Portal, go to Main Menu > Billing & Collection > DIDE UK > Payment Instruction Files. The list of all direct debit payments instruction files records is displayed.
-
Double-click a record to inspect it. Here, you can view the file and the date when it has been generated.
-
Click the .txt file to download and inspect it. You can view all the payment details in the file.
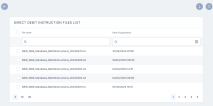
The New Mandates Instruction Files section contains the Direct Debit Instruction Files List, which displays all the files with instructions for the activation of new direct debit mandates. All the details from this section are automatically filled in by the system and they are not editable.
For the new direct debit mandate calls, received through the Generate UK Mandate API, there is a daily job, DIDEUK_Instructions, that is scheduled to generate mandate activation instructions for the BACS![]() BACS Payment Schemes Limited, previously known as Bankers' Automated Clearing System, is responsible for the clearing and settlement of UK automated direct debit and BACS Direct Credit and the provision of third-party services. system, compliant with the BACS standardized .txt file format. This section holds all the files containing the instructions for the activation of direct debit mandates generated by Billing & Collection solution.
BACS Payment Schemes Limited, previously known as Bankers' Automated Clearing System, is responsible for the clearing and settlement of UK automated direct debit and BACS Direct Credit and the provision of third-party services. system, compliant with the BACS standardized .txt file format. This section holds all the files containing the instructions for the activation of direct debit mandates generated by Billing & Collection solution.
Follow the steps below to view a new mandate instruction file:
-
In FintechOS Portal, go to Main Menu > Billing & Collection > DIDE UK > New Mandates Instruction Files. The list of all direct debit instruction files records is displayed.
-
Double-click a record to inspect it. Here, you can view the file and the date when it has been generated.
-
Click the .txt file to download and inspect it. You can view all the payment details in the file.
Once a policyholder agreed to pay the premiums by direct debit, the insurer must regularly send direct debit payment instructions to BACS. These instructions might not be accepted (either by BACS or the Payer’s bank). When this happens, BACS (Bankers Automated Clearing Service) generates an AUDDIS![]() Automated Direct Debit Instruction Service. AUDDIS automates the transfer of Direct Debit Instructions from collecting organisations to the paying financial institutions via Bacs. (Automated Direct Debit Instruction Service) report about the failed direct debit instruction for payment and sends it to the insurer.
Automated Direct Debit Instruction Service. AUDDIS automates the transfer of Direct Debit Instructions from collecting organisations to the paying financial institutions via Bacs. (Automated Direct Debit Instruction Service) report about the failed direct debit instruction for payment and sends it to the insurer.
The following are the Reasons which can be received in the AUDDIS file:
| Reason code | Comments |
|---|---|
| F | Invalid account type |
| 1 | Instruction cancelled by payer |
| 2 | Payer deceased |
| H | Instruction has expired |
| C | Account transferred |
| I | Payer Reference is not unique |
| B | Account closed |
| L | Incorrect payer’s Account Details |
| 5 | No account |
| K | Instruction cancelled by paying bank |
| 6 | No Instruction |
| G | Bank will not accept Direct Debits on account |
Upon importing an AUDDIS report in the system, the following is the corresponding behavior of the Billing & Collection solution:
| Field | Description |
|---|---|
| Record type | No validations, receive the exact value from the file. |
| Reference | Policy number. |
| Reason code | See related table from above. |
| Payer’s name | No validations, receive the exact value from the file. |
| Sort code | Sort code for the initiated mandate. No validations, receive the exact value from the file. |
| Account number | Account number correlated with the initiated mandate No validations, receive the exact value from the file. |
| A/C type | No validations, receive the exact value from the file. |
| Original proc date | No validations, receive the exact value from the file. |
| Effective date | Date when the mandate validation decision has been made. No validations, receive the exact value from the file. |
| Tran code | No validations, receive the exact value from the file. |
| Originator sort code name | No validations, receive the exact value from the file. |
| Details account no | No validations, receive the exact value from the file. |
| Note | No validations, receive the exact value from the file. |
| ADDACS sequence | No validations, receive the exact value from the file. |
An AUDDIS report (file) is produced whenever a payment transfer problem appears to an existing Direct Debit Instruction (mandate). The AUDDIS report contains data that impact the status of the payment collection for an UK Direct Debit Mandate.
You can import an AUDDIS file in .csv or .txt format in order for it to be processed and stored in the system. Follow the steps below to import an AUDDIS file:
-
In FintechOS Portal, go to Main Menu > Billing & Collection > DIDE UK > AUDDIS Files. The list containing all AUDDIS files records is displayed.
-
Click Insert. The Import form is displayed.
-
Click Add file or drag and drop your file to the form to upload it. You can add multiple files in a record, one by one.
-
Click Import Data.
-
Click Save and Reload. The files are now registered in the system, and the Denied Mandates tab becomes available.
-
Go to the Denied Mandates tab. This second tab includes the Mandate Denials list grid. The grid displays every denied mandate, extracted from the imported file. You can see one or more items listed, depending on how many denied mandates are in the imported file.
-
Click View Mandate in order to inspect a particular mandate.
-
Click Save and Close.
When a direct debit instruction changes, the paying bank reports the change to BACS (Bankers Automated Clearing Service). BACS generates an ADDACS![]() Automated Direct Debit Amendment and Cancellation Service. ADDACS is used by payment service providers to notify service users if amendments are made to a customer’s Direct Debit Instruction. (Automated Direct Debit Amendment and Cancellation Service) report about the changes that were made and sends it to the insurer.
Automated Direct Debit Amendment and Cancellation Service. ADDACS is used by payment service providers to notify service users if amendments are made to a customer’s Direct Debit Instruction. (Automated Direct Debit Amendment and Cancellation Service) report about the changes that were made and sends it to the insurer.
The following are the Reasons which can be received in the ADDACS file, and the corresponding behavior of the Billing & Collection solution:
| Code | Mention |
|---|---|
| 0 | Instruction cancelled refer to Payer. If this reason is received, then the mandate status is changed to Cancelled. |
| 1 | Instruction cancelled by Payer. If this reason is received, then the mandate status is changed to Cancelled. |
| 2 | Payer deceased. If this reason is received, then the mandate status is changed to Cancelled. |
| 3 | Account transferred to a new Bank or Building Society If this reason is received, then the mandate status is changed to Cancelled. |
| B | Account closed. If this reason is received, then the mandate status is changed to Cancelled. |
| C | Account/ Instruction transferred to a different branch of Bank/ Building Society. If this reason is received, then the mandate status is changed to Cancelled. |
| D | Advance notice disputed. If this reason is received, then no action is taken. |
| E | Instruction amended. If this reason is received, then update the mandate. |
| R | Instruction re-instated. If this reason is received, then reactivate the mandate. |
You can import an ADDACS file in .csv or .txt format in order for it to be processed and stored in the system. Follow the steps below to import an ADDACS file:
-
In FintechOS Portal, go to Main Menu > Billing & Collection > DIDE UK > ADDACS Files. The list containing all AUDDIS files records is displayed.
-
Click Insert. The Import form is displayed.
-
Click Add file or drag and drop your file to the form to upload it. You can add multiple files in a record, one by one.
-
Click Import Data.
-
Click Save and Reload. The files are now registered in the system, and the Direct Debit Mandates tab becomes available.
-
Go to the Direct Debit Mandates tab. This second tab includes the Direct Debit Mandates Notified list grid. The grid displays every notified mandate, extracted from the imported file. You can see one or more items listed, depending on how many notified mandates were in the imported file.
-
Click View Mandate in order to inspect a particular mandate.
-
Click Save and Close.
An ARUDD![]() Automated Return of Unpaid Direct Debits. ARUDD is the automated system used by banks to return unpaid Direct Debit payments. report (file) is produced whenever a payment failed, for any of your existing direct debit instructions (mandates).
Automated Return of Unpaid Direct Debits. ARUDD is the automated system used by banks to return unpaid Direct Debit payments. report (file) is produced whenever a payment failed, for any of your existing direct debit instructions (mandates).
If a direct debit instruction fails to deliver payments, the Paying Bank reports the change to BACS (Bankers Automated Clearing Service). BACS generates an ARUDD (Automated Return of Unpaid Direct Debits) report about the unpaid premiums and sends it to the insurer.
An ARUDD report (file) is triggered after you have submitted a payments collection file in an attempt to collect from your payers. It becomes available to insurers one day after Direct Debits are due to be collected. This report contains information about any of the payments that could not be collected.
You can import an ARUDD file in .csv or .txt format in order for it to be processed and stored in the system. Follow the steps below to import an ARUDD file:
-
In FintechOS Portal, go to Main Menu > Billing & Collection > DIDE UK > ARUDD Files. The list containing all ARUDD files records is displayed.
-
Click Insert. The Import form is displayed.
-
Click Add file or drag and drop your file to the form to upload it. You can add multiple files in a record, one by one.
-
Click Import Data.
-
Click Save and Reload. The files are now registered in the system, and the Unconfirmed Payments tab becomes available.
-
Go to the Unconfirmed Payments tab. This second tab includes the Payments list grid. The grid displays every unconfirmed payment, extracted from the imported file. You can see one or more items listed, depending on how many unconfirmed payments were in the imported file.
-
Click View Mandate in order to inspect a particular mandate.
-
Click Save and Close.
