Update Sales Information
Data about internal and external sales campaign activities, any agreements signed, or interactions related to the customer's account are stored in the Sales tab.
All the applications related to the customer's account are stored in the Applications section. Applications from external sources are displayed.
To view additional details, double-click on a record from the list.
If a FintechOS application is linked to the customer's account, the flow is continued in the FintechOS instance by clicking the Open Application button from the Application Details window.
The history of all the interactions related to the customer's account is displayed in the Interactions section. This includes the communications sent to the customer through various channels (email, sms, phone call, etc.) and the actions or activities that were taken on the account.
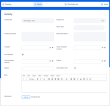
To add a new interaction record, click the Insert button and fill in the information from the following tabs:
Details about the type of planned activity set on the customer's account are stored in the Planning tab. Fill in the below fields:
-
Followed Activity: Enter the followed activity name.
-
Name: Enter the activity name. For example: Credit Card Sale.
-
Type: Enter the activity type: call, meeting, email, and so on.
-
Source Type: Enter the source type.
-
Source Reason Type: Select the Service-level agreement option: the contract between a service provider and the customer that stipulates the services the customer receives and what is expected of the service provider.
-
Plan Start Date and Plan End Date: Enter the activity plan start date and the activity plan end date.
-
Plan Start Hour and Plan End Hour: Enter the activity plan start date and hour, and the activity plan end date and hour.
-
Enter the customer's Account, Account Type, Account Name, Account First Name and Account Last Name.
-
Account PIN: Enter the unique number allocated by the government to an individual used for taxation and other transactions purposes. The length depends on the country that issued the document.
-
Fiscal Registration No: Enter the unique fiscal registration number of a company allocated by the government for taxation and other transactions purposes.
-
Commercial Registration: Enter the company registration number, which is a unique combination of numbers and, in some cases, letters. The company registration number (also known as the company number, registration number, or simply abbreviated to CRN) is used to identify your company and verify the fact that it is an entity registered.
-
Email Address: Enter the customer's email address.
-
Phone Number: Enter the customer's phone number.
-
Assigned User: Enter the employee responsible for the customer's account.
-
Location: Enter the customer's location.
-
Location Comments: Enter additional details about the location.
-
Activity Description: Enter a description about the planned activity.
The result of the planned activity is displayed in the Result tab. From here, you can send communications to the customer. To do so, fill in the below fields:
-
Activity Date: Enter the date the activity started.
-
Duration (h): Enter the activity duration in hours.
-
Result Type: Enter the activity result type.
-
Activity Comments: Enter the activity comments.
-
Result Description: Enter the activity result description.
-
Template: Select the content template.
-
Action Template Content: Enter the action template content.
-
Use Template: If selected, a defined template is used.
-
Communication Channel: Select the communication channel. For additional details, see the Use the Omnichannel Communication Channels page.
-
Culture: Enter the customer's culture.
-
Subject: Enter the subject of the message that's going to be sent to the customer.
-
Account Name: Enter the customer's account name.
-
Send Msg As Text: If selected, the message is sent as a text message.
-
Body: Enter the body of the message that's going to be sent to the customer..
-
Attachment: Attach the file(s) to the customer's message.
Links associated with the customer's account are displayed in the Links tab.
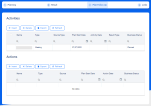
All the internal campaign activities (sales or administrative) related to the account are displayed in the Internal Campaign Activities section. By default, the assigned internal campaign activities are showed.
To view internal campaign activities with a different status, select from the drop-down button one of the following options: unassigned, in progress, completed, or canceled. Double-click on a record to view additional information on internal campaign activities. For additional information on internal campaign activities, see the Internal Campaign Activities page.
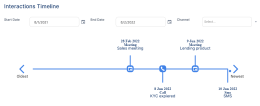
An interactive overview of the customer's interactions at current account level is shown in the Interactions Timeline section. By default, the interactions from the last 12 months made through all communication channels are displayed.
Use the Start Date, End Date and Channel buttons to filter the data displayed on the interactions timeline.
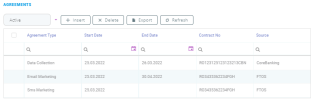
All the agreements associated to the customer's account are listed in the Agreements section. By default, the active agreements are displayed but inactive ones can also be viewed.
To view a specific agreement, double click the desired record from the list.
An agreement is linked to a customer but it can also be associated to a certain contract.
To add a new agreement record, click the Insert button and fill in the following fields:
-
Agreement Type: Select the agreement type from the below options: Data Collection, Email Marketing, Call Marketing or SMS Marketing.
-
Status: This field is read-only and represents the status of the agreement: active or inactive. The status becomes inactive if the agreement end date is set in the past compared with the system date.
-
Start Date: Enter the contract start date.
-
Contract Number: Select the contract from the list or create a new one.
-
End Date: Enter the contract end date.


