Queues
In the case of a loan origination journey, for user applications to be displayed as tasks and assigned to an operator, a queue must be created of a certain type. The first step is to create a queue type, then a queue with that type.
Creating a Queue Type
Queue types can be created for data retrieved from an entity, a data form, or for a certain digital journey linked to a specific banking product. For example, if you have multiple banking products defined, like a credit card and a mortgage loan, you can create queues for each of these individually and assign them to certain operators.
-
In FintechOS Portal, click the main menu and access Task Management > Queue Type. The list of defined queues types opens.
-
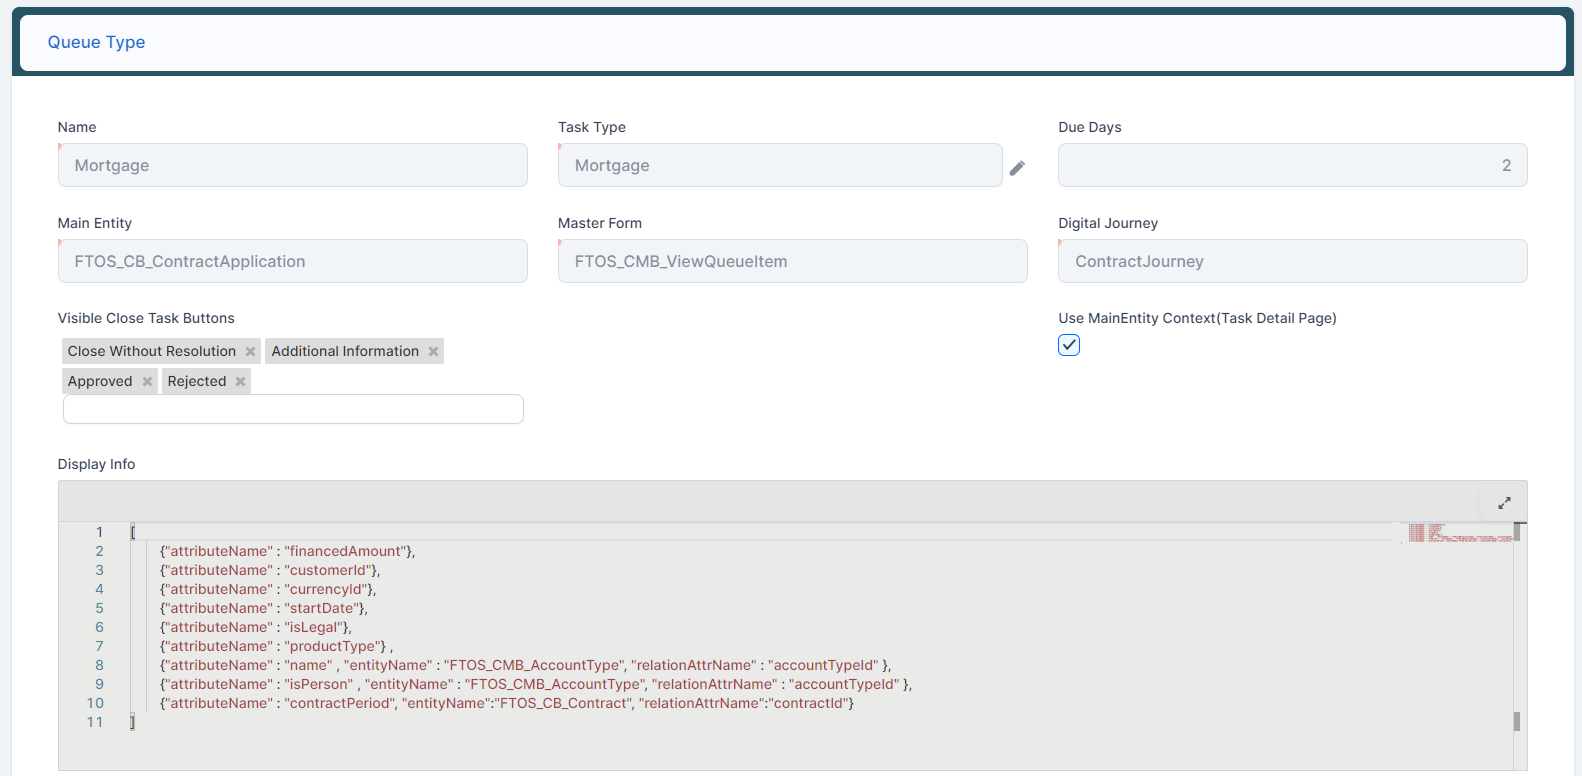
Click the Insert button to add a new queue type and fill in the following information:
-
Name: Enter the name of the queue type.
-
Task Type: Select the type of task, pick between Compliance, UW, Chaser, and Mortgage.
-
Due Days: Enter the number of days until the queue type must receive a resolution.
-
Main Entity: Select the main entity from which tasks are to be assigned to this queue type.
-
Master Form: Select the master form from the main entity.
-
Digital Journey: Select the digital journey for this queue type.
-
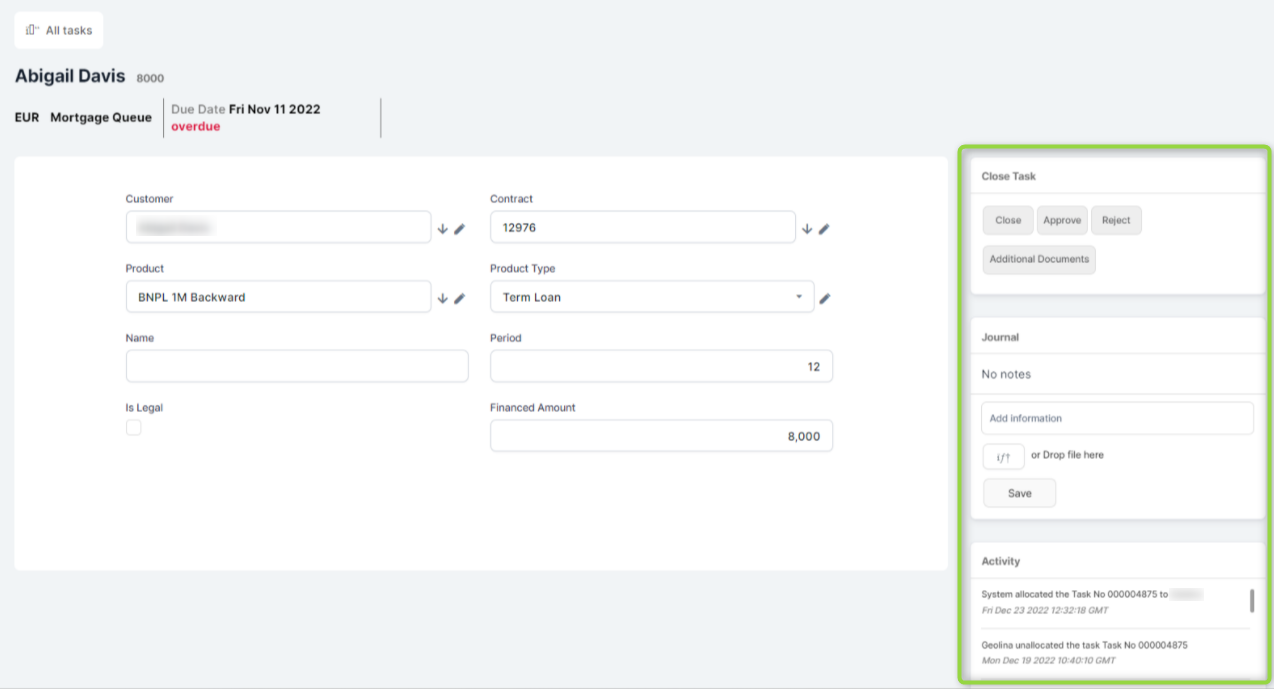
Visible Close Task Buttons: Select which of the task closing buttons should be visible within the queue details pages:
-
Close Without Resolution- The button closes the task without providing a resolution; -
Additional Information- The button closes the task while requiring more information; -
Approved- The button closes the task with theApprovedresolution; -
Rejected- The button closes the task with theRejectedresolution.
-
-
Use MainEntity Context (Task Detail Page): If you select it
Use MainEntity Context (Task Detail Page) = True, then the queue item is displayed in the context of the Main Entity set at the used data form level. Task Management can be displayed embedded in a side panel, on the right side of your pages, sliding in and out of the page as needed, if you add the following code into the first step of your form:CopyPlace this code into the first step of your form to display Task management embedded in a right side panel
formScope.taskWidget = ebs.importClientScript('FTOS_CMB_TaskDetailWidget');
formScope.taskWidget.generateTaskDetailWidget();
If not selected (
Use MainEntity Context (Task Detail Page) = False), then the queue item is displayed in the context of theQueue Itementity. The Task Management-specific information is displayed in the same page, as separate fixed sections on the right side of the form. IMPORTANT!
WhenUse MainEntity Context (Task Detail Page) = False, we recommend that you use the displayed information only for viewing and you don't perform any changes.
Set theUse MainEntity Context (Task Detail Page) = Trueif you wish to perform changes to the information, using the displayed Task Management side panel. -
Display Info: Add a list of attributes to be displayed as columns in the Task Management Dashboards. You can add fields that are attributes of an entity related with the main entity. See the example below where:
-
attributeNameis the name of the attribute from the entity from which the values are taken. -
entityNameis the entity from which the values are taken. Add it if entityName is different from the main entity. -
relationAttrNameis the link attribute to the entity from the Main entity. Add it if entityName is different from the main entity.
CopyExample of display info[
{"attributeName" : "financedAmount"},
{"attributeName" : "customerId"},
{"attributeName" : "currencyId"},
{"attributeName" : "startDate"},
{"attributeName" : "isLegal"},
{""attributeName" : "product_type"},
{"attributeName" : "name","entityName":"<entity_name>","relationAttrName":"accountTypeId" },
{"attributeName" : "isPerson","entityName":"<entity_name>","relationAttrName":"accountTypeId"}
]NOTEIf the operator is allocated on different queues, then the columns displayed in the Task Management Dashboards are the union from all the queue types.
IMPORTANT!
For optimal performance, we don't recommend operators to be allocated to multiple queues of different types. The information within Display Info is displayed as new columns in the dashboard grids and such multiple allocation would result in many columns that clutter the operator's grids. -
-
-
Click Save after adding the information.


Creating a Queue
After the queue type was created, you need to create a queue and assign it to the type.
-
In FintechOS Portal, click the main menu and access Task Management > Queue. The list of defined queues opens.
-
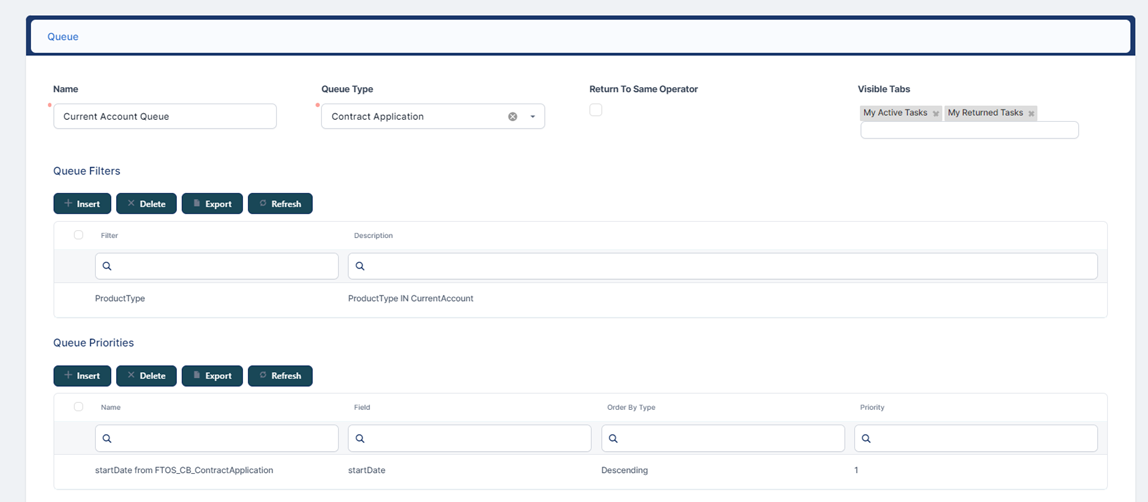
Click the Insert button to add a new queue and fill in the information:
-
Name: Enter the name of the queue.
-
Queue Type: Select the type of the current queue.
-
Return to Same Operator: Tick the box if you want tasks to return to the same operator after exiting another queue.
-
Visible Tabs: Select the filters you want to be the displayed in the Task Management Dashboards. The following options are available: Active Tasks, Returned Tasks, Older Active Tasks, Closed Tasks, Unallocated Tasks, Colleagues Tasks. If you do not make any selection, then all the tabs are displayed. If in <OperatorXQueue> there are at least 2 queues assigned for one Operator, then the display of the tab will be done if at least one queue has the parameter for displaying the Tab, TRUE.
-
- After adding the information, click Save and reload. The Queue Filters and Queue Priorities sections are now editable.
- In the Queue Filters section, click Insert, pick one of the available filters, and add a description depending on the nature of the queue. Click Save and reload.NOTE
If there is only one queue assigned to the queue item, then the filter is not mandatory.
- In the Queue Priorities section, click Insert and fill in the following information:
Name: Enter the name of the queue priority.
Use Queue Main Entity: Tick the box to use the main entity of the queue.
Use Queue Item Entity: Tick the box to use the queue item entity.
Field: Pick a field based on which the priority is to be made.
Order By Type: Select an option between Ascending or Descending for ordering the data.
- In the OperatorXQueue section, click Insert and fill in the following information:
Operator: Pick the operator from the list of all the available operators.
Competence Level: Set the competence level for the operator in this queue
Last Allocation Date: This remains blank.
Max Active Item Allocation Number: Can be used to limit the number of tasks an operator can receive from this queue.
Item Count: This remains blank.
- Click Save and close to return to the Queue table.
- The Queue Items section is automatically populated with items.
- Click Save and close. The Queue window opens. Click Save and close to save your queue.
Managing Queue Items
The list of queue items is automatically populated with applications after Task Management is set up. However, there are cases when certain details about a specific queue item may need to be changed, such as the queue item to be renamed or allocated to a different operator. To manage queue items, follow these steps:
-
In FintechOS Portal, click the main menu and access Task Management > Queue Item. The list of available queue items opens.
-
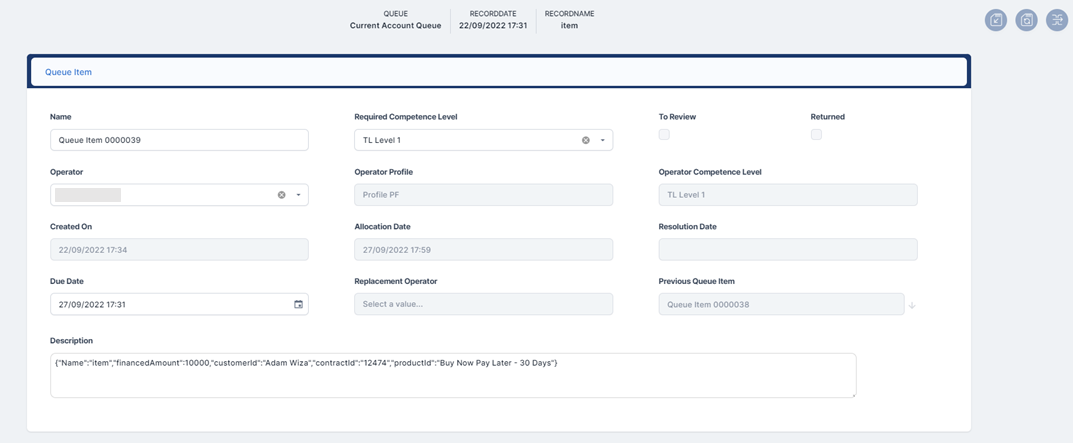
Double-click a queue item and the following options open:
Option Validation Description Name Editable The name of the queue item. Required Competence Level Editable The needed competence level to review the task. This is calculated automatically by the rules set for the allocation process but the admin ca edit the required competence level for specific items. To Review Read-only Tick the box if the queue item needs review from the original competence level in case it was reviewed by a replacing competence level operator. Returned Read-only Tick the box if the queue item was returned to the original operator, in case there were additional documents or information needed to finalize the request. Operator Editable The current operator assigned to that task. The admin can use this field to manually set a different operator for that task. Operator Profile Editable The operator's profile. Operator Competence Level Editable The operator's competence level. Created On Read-only The date and time when the queue item was created. Allocation Date Read-only The date and time when the task was allocated to the operator. Resolution Date Read-only The date and time of the last resolution set on the task. Due Date Editable The date and time of the Replacement Operator Read-only This field is filled if a replacement operator has been assigned with that task. Previous Queue Item Editable This field helps identify previous tasks that were correlated to the current one. For example, if a task was sent back to the originator for further clarification using the Request More Documents feature, when a new task is created, the previous queue item has the name of the related task. Description Editable The description of the queue item. NOTE
If the business status of the queue item is closed, then all fields are read-only. -
Click Save after changing the information.