Working with Documents
Loan Management allows you to manage all the documents related to a contract in one place, in the contract's Contracts & Documents tab. The tab is meant to be the electronic folder of the contract. It displays a list of the document records for the current contract, with details such as document name, type, status, number, whether the record was added through the user interface (Is manual = True) or through API integration (Is manual = False), and download options for the attached files. Contract documents have a dedicated business workflow, thus you can transition them through a series of statuses.
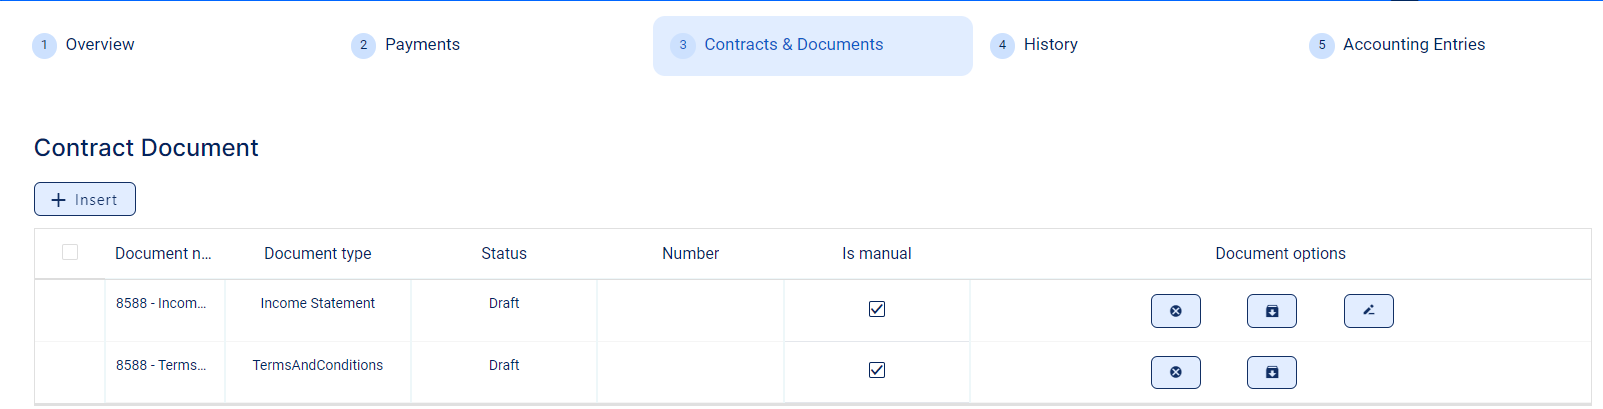
In the Contracts & Documents tab, you can: add a new contract document record, edit or delete a record in Draft status, view the details for records in Signed or Canceled status, or download the initial or the signed document, if it exists, by clicking the Initial document, respectively the Signed document button next to the record. Open the downloaded file to view its content.
Users with the associated predefined security roles of Corporate Credit Officer and Retail Credit Officer can perform contract document-related operations such as adding, updating, and deleting records or changing their statuses.
A contract document record has the following statuses, visible in the top left corner of the Add Contract Document page, after saving the record:
-
Draft - the status of a newly created contract document record that was not yet authorized (marked as Signed). While in this status, you can edit some fields and you can delete the uploaded documents. Change its status to Signed after editing all the necessary details and uploading the
Signed Documentfile. Change its status to Canceled if the document is not to be used within the contract. -
Signed - the status of a contract document record after being authorized. You cannot edit any of the record's details. You can change the status of the record to Canceled, if needed.
-
Canceled - the status of a contract document after being canceled. Once Signed, a contract document should be canceled if the document is not to be used within the contract. You cannot edit any of the record's details. There is no further transition from this status. Contract document records created through integration (having their
Is manualfield =False) can't be canceled.
Adding Contract Documents
-
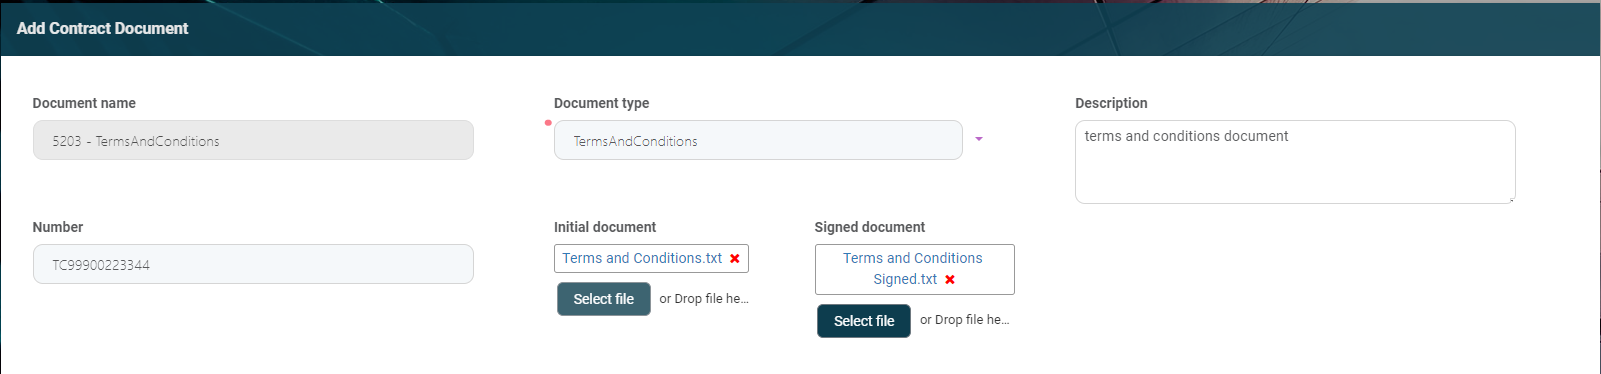
To insert a document to the contract, click the Insert button in the Contract Document section.
The Add Contract Document page is displayed, with the Document Name field automatically completed with the name of the document.NOTE
You can't add documents to contracts in Contract Closed or Contract Version Closed statuses. -
Fill in the following fields:

-
Document type - Select the type of the document.
-
Description - Enter the description of the document.
-
Number - Enter the number of the document, if the document has an external identifier number.
-
Initial document - Insert the file containing the initial, unsigned document.
Click the Select file button under this field, navigate to the desired file, select it and click Open. The selected file's name is displayed here. You can delete it by clicking the x next to the file name. -
Signed Document - Insert the file containing the final, signed document, if available.
Click the Select file button under this field, navigate to the desired file, select it and click Open. The selected file's name is displayed here. You can delete it by clicking the x next to the file name.
NOTE
To change the status of the contract document record to Signed, a signed document file must exist within the record. -
-
Click the Save and Close button.
You can also add, update, and approve contract document records through API integration, using the
AddUpdateContractDocument and ApproveContractDocument endpoints. Read more details in the Loan Management Developer Guide.Contract document files added through integration cannot be deleted and those records can't be canceled!
Loan Management performs the following validations for contract document records:
-
The uploaded files' specifications follow FintechOS Platform's settings and restrictions regarding size and format, allowing .pdf,.doc,.docx,.els,.jpg,.jpeg,.xlsx,.dll,.ppt,.pptx,.txt,.png,.ttf,.xml file formats.
-
If the contract document record is in Signed status, the record can't be deleted or updated, nor can its files be deleted.
-
The name of the contract document record is unique, automatically generated by Loan Management. The naming convention is "the contract name + '-' + the selected document type + '-' + a unique document increment". For example,
5203 - Income Statement - 60. -
The names of the selected files are not validated for uniqueness.