Define User Competences
User competences allow their respective users to perform specific tasks in the system. FintechOS Studio allows you to create user competence hierarchies by defining multiple competence levels for the same user competence type.
In the context of workflow transitions approvals, competencies are used to define the users who approve or reject specific workflow transitions.
1 Define User Competence Types
- In FintechOS Studio, click the main menu icon (
 ) at the top left corner.
 - In the main menu, click Admin > User Competence Settings > User Competence Types. The User Competence Types List page appears.
- Click the Insert button (
 ) at the top right corner of the page. The Add User Competence Type page appears.
- Fill in the Name. This name uniquely identifies the user competence type in the system.
- Fill in the Display Name. This is how the user competence type will be displayed in the user interface.
- Optionally, fill in a Description for the user competence type.
- Click the Save and Close button (
 ) at the top right corner of the page.

Repeat the process for any additional user competence types you would like to add.
2 Define User Competences
- In FintechOS Studio, click the main menu icon () at the top left corner.
- In the main menu, click Admin > User Competence Settings > User Competences. The User Competences List page appears.
- Click the Insert button () at the top right corner of the page. The Add User Competence page appears.
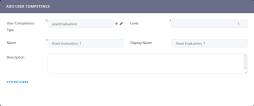
- Select the User Competence Type that this competence belongs to.
- Enter the competence Level for the above user competence type. Users with higher competence levels have access to all the lower competence tasks. For instance, a level 2 approver will also have access to all level 1 approval tasks.
- Fill in the Name or leave the default name in place. This name uniquely identifies the user competence in the system.
- Fill in the Display Name or leave the default display name in place. This is how the user competence will be displayed in the user interface.
- Optionally, fill in a Description for the user competence.
- Click the Save and Reload button (
 ) at the top right corner of the page.
 - In the System Users section, use the Insert Existing and Remove Existing buttons to assign the competence to the desired users.

- Click the Save and Close button () at the top right corner of the page.


Repeat the process for any additional user competences you would like to add.