Using Banking Products in Customer Journeys
There are two methods available to use banking products in customer journeys, as follows:
Display Product Details Using an Endpoint
All the information regarding a banking product is stored in the Banking Products entity, therefore, all the fields of a previously configured banking product are available.
To use a previously created banking product in a form driven flow, you, as a consultant or a developer, have to create an endpoint with a script, while being logged in FintechOS Studio. Later, in the Advanced tab of a customer journey, call the endpoint and add the product to the journey. You can consult an example of the call for the FTOS_BP_GetBankingProductDetails endpoint.
The Banking Product Factory endpoints are configured during the installation process. For more, details see the Creating Endpoints page in the FintechOS StudioUser Guide.
For information about the available endpoints, please consult the Banking Product Factory Developer Guide.
The FTOS_BP_GetBankingProductDetails endpoint returns the product details in the Portal or your own integration.
Input:
-
bakingProductId - from
FTOS_BP_BankingProduct(attribute: FTOS_BP_BankingProductid)
Output:
Section with the following fields:
-
product.Name - from
FTOS_BP_BankingProduct(attribute: Name) -
product.ProductImage - from
FTOS_BP_BankingProduct(attribute: productImage ) -
product.Benefits - from
FTOS_BP_BankingProduct(attribute: Benefits) -
product.DisplayConditions - from
FTOS_BP_BankingProduct(attribute: displayConditions) -
product.NoOfDebtor - from
FTOS_BP_BankingProduct(attribute: NoOfDebtor).
Call example:
Change the banking product id with your own banking product id.
ebs.callActionByNameAsync('FTOS_BP_GetBankingProductDetails', {  bankingProductId : "f625e5e5-bc51-4bf8-8ff0-b8a295694a23"})
.then(function (res) {
    res = res.UIResult;
}).catch(function (err) {
    console.log(err);
})
Display Product Details Using UI Designer
Another method of using a previously created banking product in a form driven flow is to attach a script to a button to display banking product information in the Portal. For example, you can perform a loan simulation in a step of a loan, using the FTOS_BP_Simulate script, as described in these steps:
-
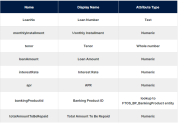
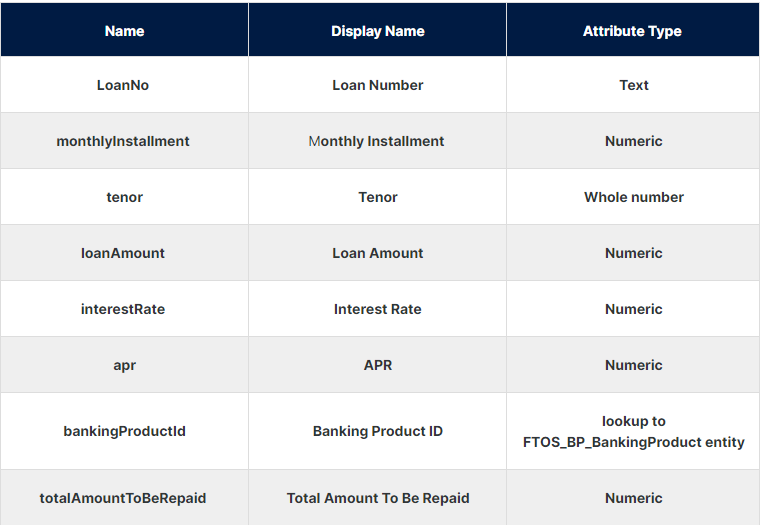
Create and link an entity to a form driven flow. For our example, the entity should contain the following attributes:
 NOTE
NOTE
If you are planning to use this method, make sure that you map the values from the banking product to your own entity, so that you are not affected by any versioning of the banking product record. The attributes you need to create in your entity must follow the same naming convention as in the provided JavaScript code sample below. Read detailed information about entities and attributes in the FintechOS Studio user guide. -
In the desired step of the form driven flow's UI tab, access the UI Designer.
-
Display the attributes needed for your business case, clicking Apply Changes after each attribute.

-
Add a button from the Components section. Click it and select Custom as Button Type. Add the label that shows on the button and set an ID for it. For the below example to work, the ID of the button should be
runLoanSimulationId. Then, click Apply Changes.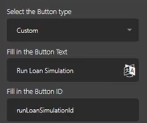
-
In the Advanced tab of your step, in the After Events section, paste the code that you can find below. Click Save and Close.
-
Run the flow in the Portal, enter the values for your attributes, and click the button.

/* Click event for the runLoanSimulationId button */

$('#runLoanSimulationId').on('click', function (event) {

console.log("The button runLoanSimulation was clicked");

let formData = ebs.getFormData();

let bankingProductId = formData.model.bankingProductId;

let loanAmount = formData.model.loanAmount;

let tenor = formData.model.tenor;

ebs.callActionByNameAsync("FTOS_BP_Simulate",

{

"amount":loanAmount,

"loanPeriod":tenor,

"bankingProductId":bankingProductId,

"scheduleType":"Equal Installment Monthly 365",

"interestTypeName":"Fixed"

})

.then(function (result) {

console.table (result);

var setDataObj = {};

setDataObj.monthlyInstallment = result.UIResult.Data.Records[0].FirstInstallment;

setDataObj.interestRate = result.UIResult.Data.Records[0].InterestPercent;

setDataObj.apr = result.UIResult.Data.Records[0].IRR;

setDataObj.totalAmountToBeRepaid = result.UIResult.Data.Records[0].Total;

console.log(setDataObj);

formData.model.monthlyInstallment = setDataObj.monthlyInstallment;

formData.model.interestRate = setDataObj.interestRate;

formData.model.apr = setDataObj.apr;

formData.model.totalAmountToBeRepaid = setDataObj.totalAmountToBeRepaid;

});

});