Define a Campaign End-to-End
The use of a channel provider is to configure the medium via which a company sends a notification, request, notice or an advertisement to a client. Such a provider helps get in touch with your targeted audience in a seamless process that involves creating the campaign, its content, and its viewership. Such a campaign brings you closer to your market and lets them know you are improving for their benefit.
Task at hand
For example, if your company makes changes to a home insurance policy and includes a new risk, the clients must be notified about the change, preferably with a dedicated blog post on the company website. Only a special segment of your clientele would receive a notification with the blog link, let's say those who have a home insurance policy for wooden buildings in the United Kingdom, excluding Cardiff. And lastly, you would wish to send this via email and via SMS to raise awareness, since some people hardly ever read campaign emails. Let's say you are planning on sending it out once on the date of 17th of February, 2021.
In the context of FintechOS, this process would require the use of the Omnichannel Communication Automation for the configuration of the channel, Hyper-personalization to create the template of the email/ SMS, and lastly, the Omnichannel Campaigns for the structuring of the campaign itself.
Before you begin
Before you launch into the present task, configure the following:
- Create the entity on which to base the process such as Customer or Account
- Channel Provider
- Seasons (Omnichannel Campaigns)
-
Campaign types (Omnichannel Campaigns)
- Marketing Team Members (Omnichannel Campaigns)
- Template.
There is no need to configure the campaign before you configure the provider as you will need to select the provider in the creation of the Content Template within Hyper-personalization, then within the Omnichannel Campaigns to associate the created template with the campaign.
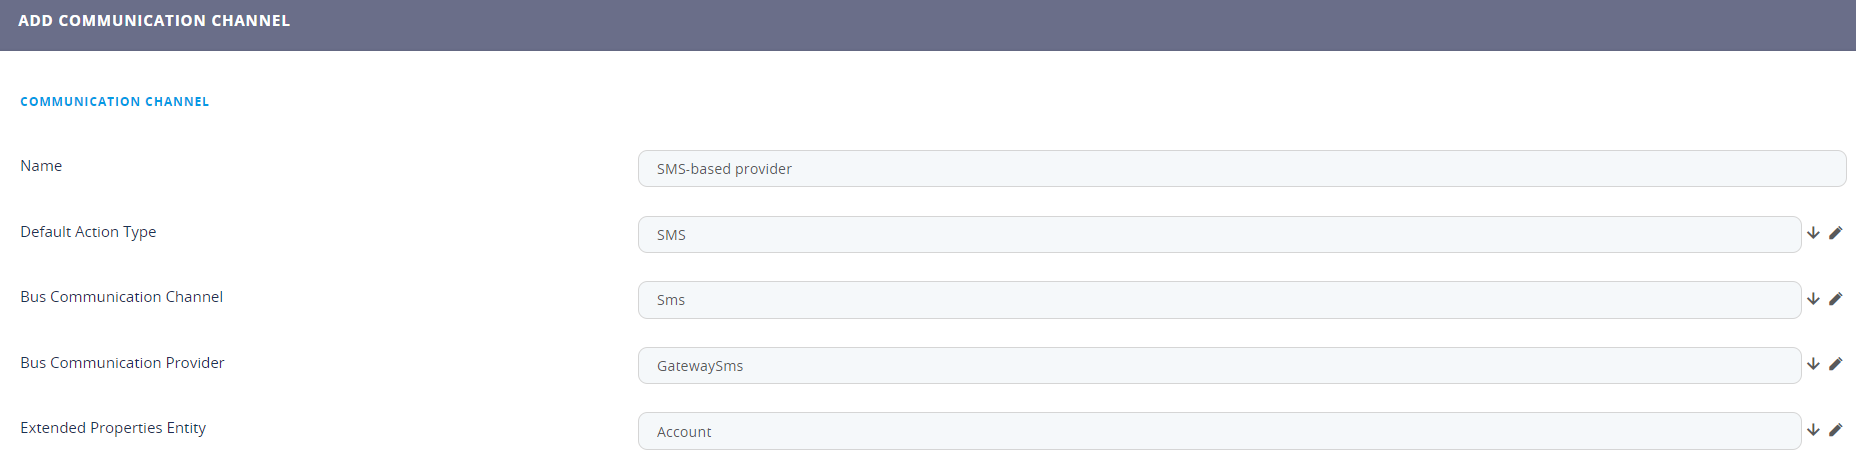
1 Configure Communication Channels
Follow the path: FintechOS Studio > Admin > Omnichannel Communication Automation > Communication Channels.

This list is displayed on the page with the pre-existing providers. To add a new one, click the Insert button on the right-hand corner of the screen. The ADD COMMUNICATION CHANNEL page opens. Fill in the fields:
| Field | Type | Description |
|---|---|---|
| Name | Text | Insert a suggestive name. |
| Default Action Type | Option set |
Select one from the list:
For this example, select email or SMS. To use both, create two different providers. |
| Bus Communication Channel |
Option set |
Select one from the list:
For this example, select email or SMS to correspond with the action type selected earlier. |
| Bus Communication Provider | Option set |
Select one from the list:
|
| Extended Properties Entity | Option set | Select from the list the entity. Through certain channels, it allows sending some properties with the JSON format, using this channel as API. |
Click the Save and reload button to open the Edit Communication Channel page. Click the Save and close button to return to the Communication Channels List page.
For details, see Omnichannel Communication Automation.
2 Create Personalized Content
Follow the path: FintechOS Studio > Hyper-personalization > Personalized Content types.
Insert the type you are to use, e.g. ProductUpdates/HolidaySale/HolidayGreetings/NewService by just creating a name for it.

Follow the path: FintechOS Studio > Hyper-personalization > Personalized Content.
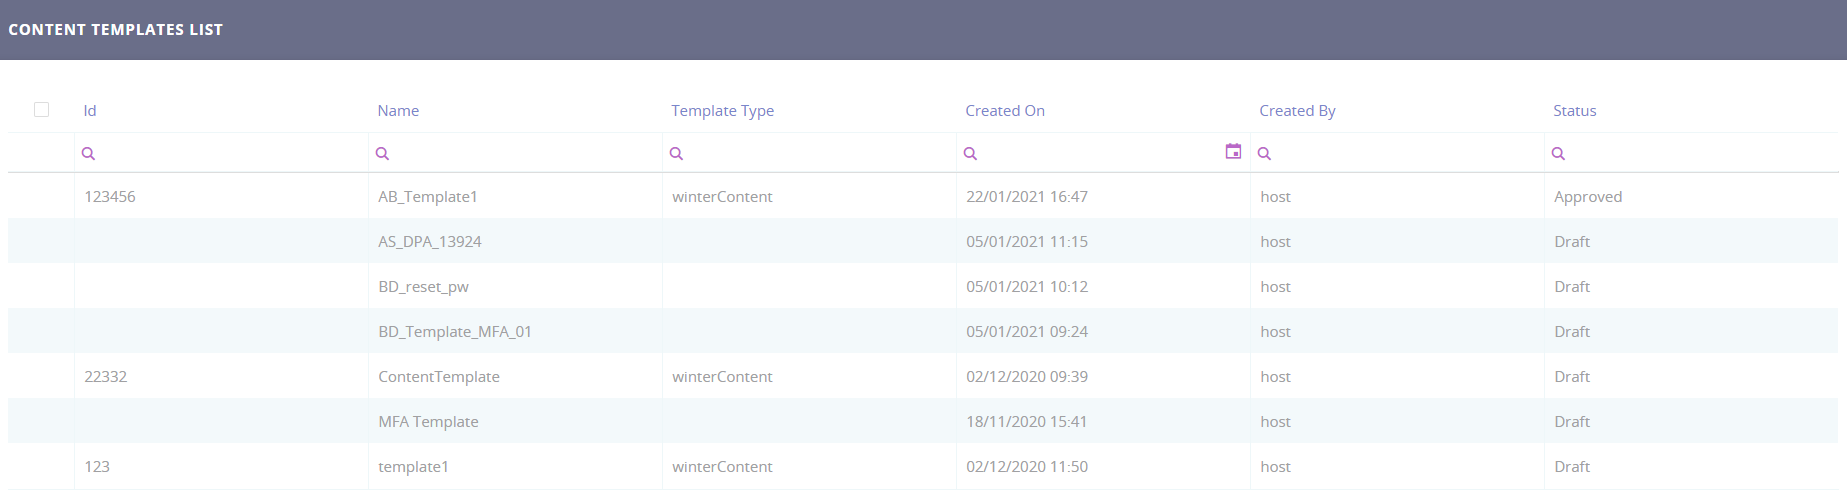
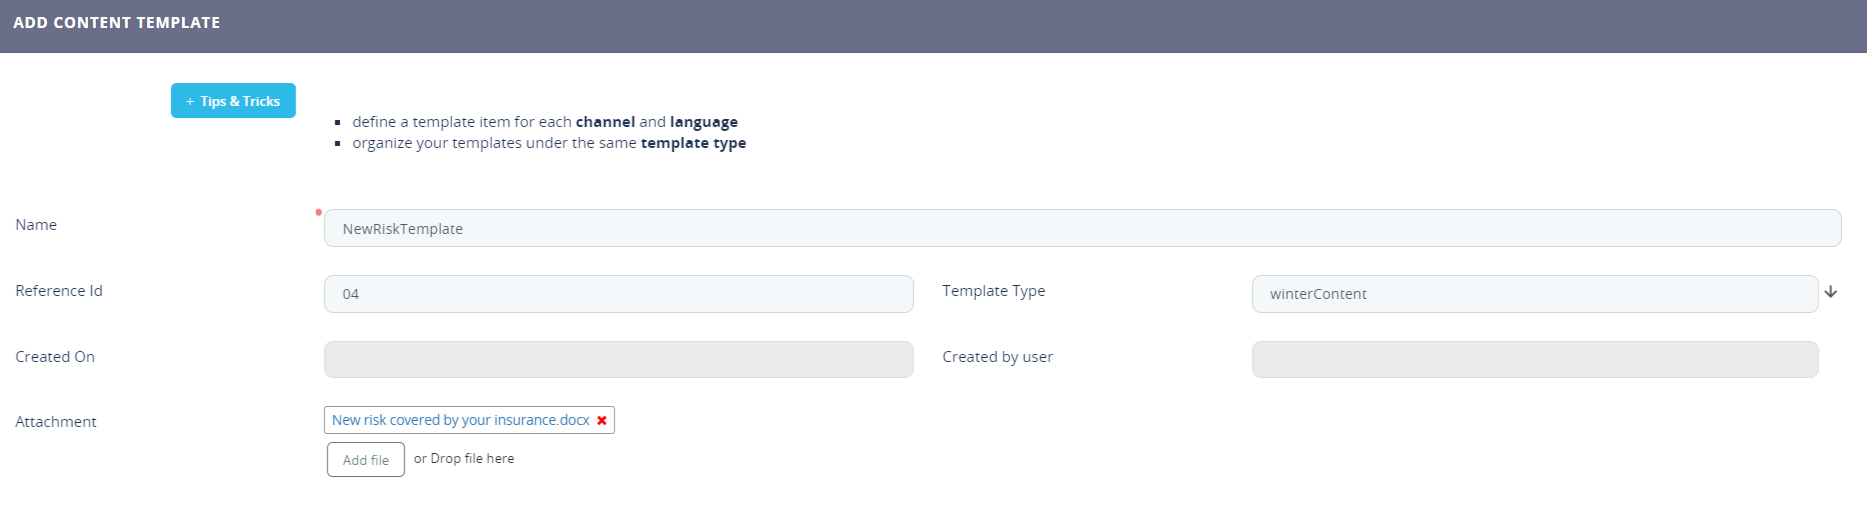
This list is displayed on the page with the pre-existing templates. To add a new one, click the Insert button on the right-hand corner of the screen. The Add Content Template page opens. Fill in the fields:
| Field | Type | Description |
|---|---|---|
| Name | Text | Insert a suggestive name. |
| Reference ID | Text | Insert a suggestive identification serial for your template. |
| Template type | Option set | Select from the list the proper type. |
| Created on | Read-only | This field is automatically filled in by the system once you save and reload the page. |
| Created by user | Read-only | This field is automatically filled in by the system once you save and reload the page. |
| Attachment | File | Attach the file you have created earlier containing the draft of the message. |
Click Manage Template Items to select from the calendar the:
Communication Start Hour (when the message will begin)
- Communication End Hour (when the message will end).
Click the Save and reload button.
For details, see Hyper-Personalization.
4 Create the Audience
Follow the path: FintechOS Studio > Hyper-personalization > Persona data model settings.
The configured entity and attributes here are used later in Customer personas/ Audience Segment. The tokens generated here are found in Content settings as well.
At least one attribute has to be included in the Audience Segment Data otherwise, the whole entity will not be shown in the Customer Personas/ Audience segment.
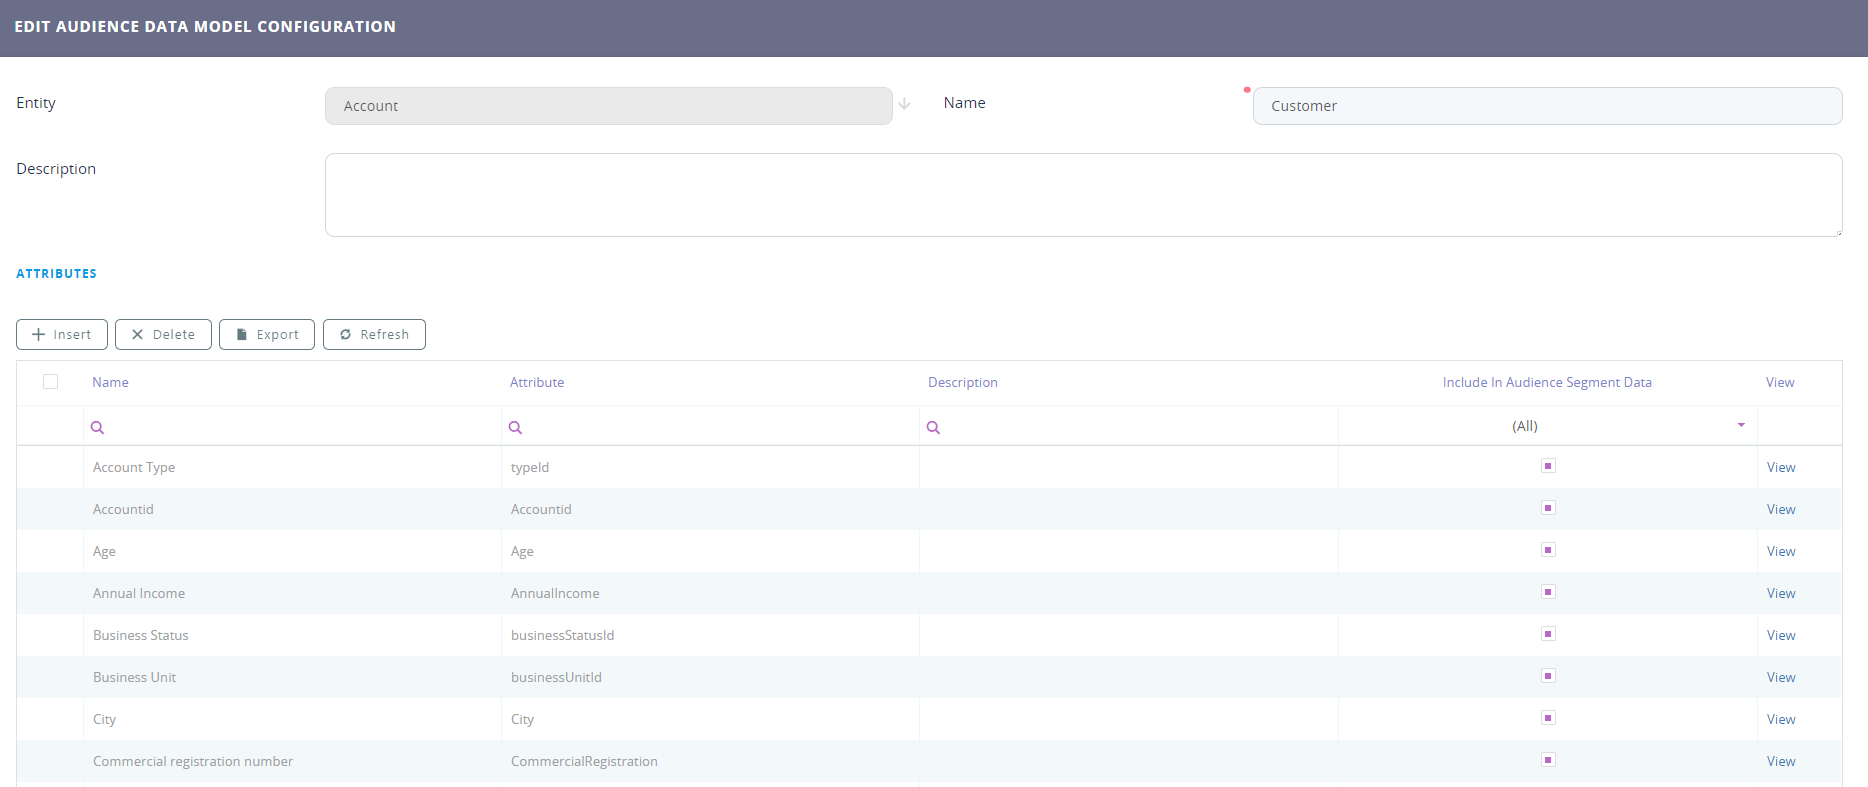
Configure the following:
| Field | Type | Description |
|---|---|---|
| Entity | Option set | Select from the list the entity fro where you wish to use the tokens. |
| Name | Text | Insert a suggestive name. |
| Description | Text area | Insert a suggestive description. |
Click the Save and reload button.
The attributes grid will be displayed. Click the Insert button to add a new attribute.

Configure the fields:
If new attributes are inserted for the existing entity subsequently to this step, They have to be added manually.
| Field | Type | Description |
|---|---|---|
| Entity | Text | Select from the list the entity fro where you wish to use the tokens. |
| Name | Option set | Insert a suggestive name. |
| Description | Text area | Insert a suggestive description. |
| Include in Audience Segment Data | Bool | True, then the attribute will be made available in the Audience segment. It need at least one attribute to have this boolean true, otherwise the entity will not be shown in the Customer personas. |
Click the Save and close button.
Follow the path: FintechOS Studio > Hyper-personalization > Customer Personas.
It is here where you will create an audience segment where the country of our clients is the United Kingdom and where the city does not contain Cardiff.
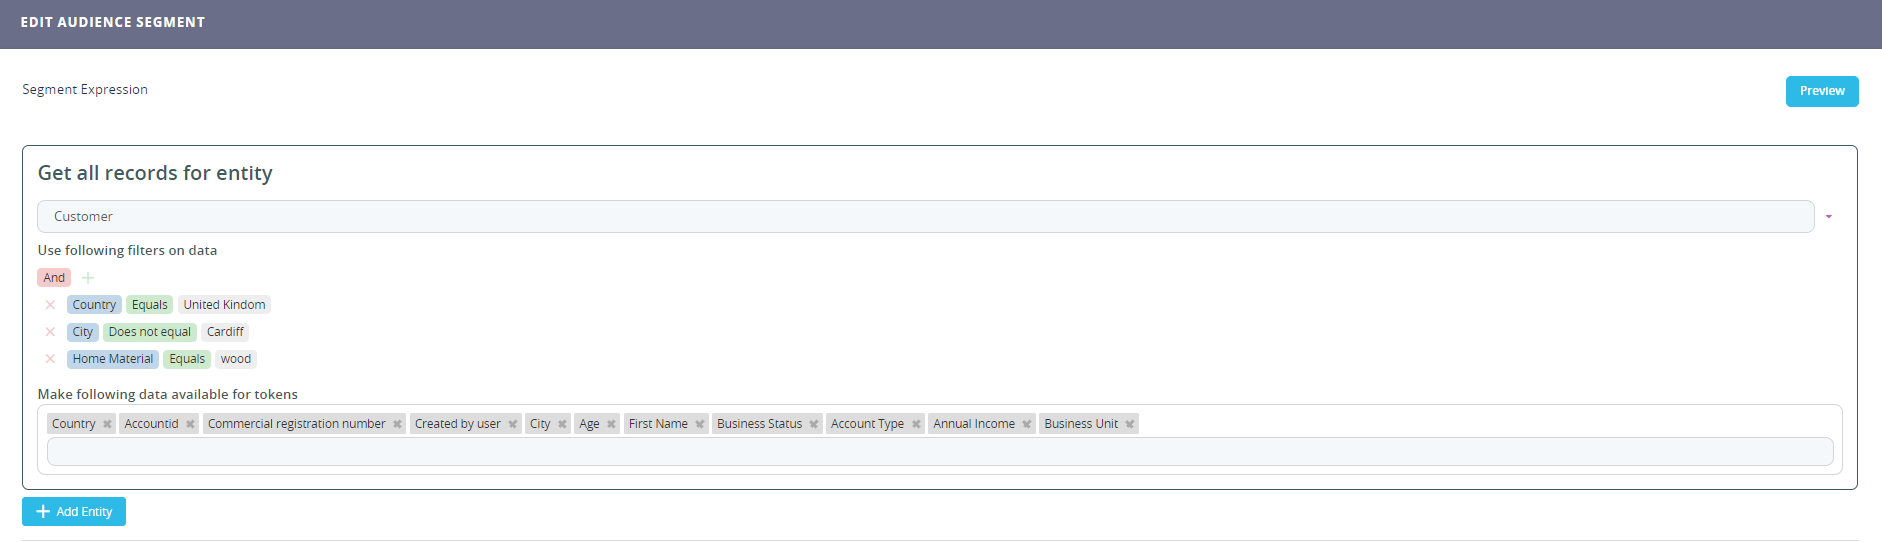
In the Define step, insert a suggestive name.
In the segment expression, select the entity configured in the Persona data model settings. At least these two must be added to be able to save. Furthermore, use the following criteria on data:
- country equals United Kingdom
- city does not equal Cardiff
- material equals wood.
In the make following data available for tokens, select the attributes to be used. For this use case, select all.
Follow the path: FintechOS Studio > Hyper-personalization > Audience.

Configure the following in the Define step:
| Field | Type | Description |
|---|---|---|
| Name | Text | Insert a suggestive name. |
| Context Entity | Option set | Select the entity corresponding. |
| Type | Option set | Select the type as you need. in this case, we will use e.g. citizensofGermany. |
| Description | Text Area | Insert a suggestive description. |
Click the Save and reload button.
The audience will be in draft status after the saving process. To use it in a campaign you will have to activate it after you are done with all configurations.
Configure the following in the Setup step:
- what to include
- what to exclude.
For each of the two there is the possibility to union or intersect a group or an audience segment.
To combine segments, you should select at least one intersect or union operator.
Intersect operator adds only common data from combined segments to audience. Union operator adds all data from all combined segments to audience.
In this case, include the audience segment created earlier in Customer Personas which has:
- country equals United Kingdom
- city does not equal Cardiff
- material equals wood.

Follow the path:FintechOS Studio > Fintech Automation > Omnichannel Campaign.
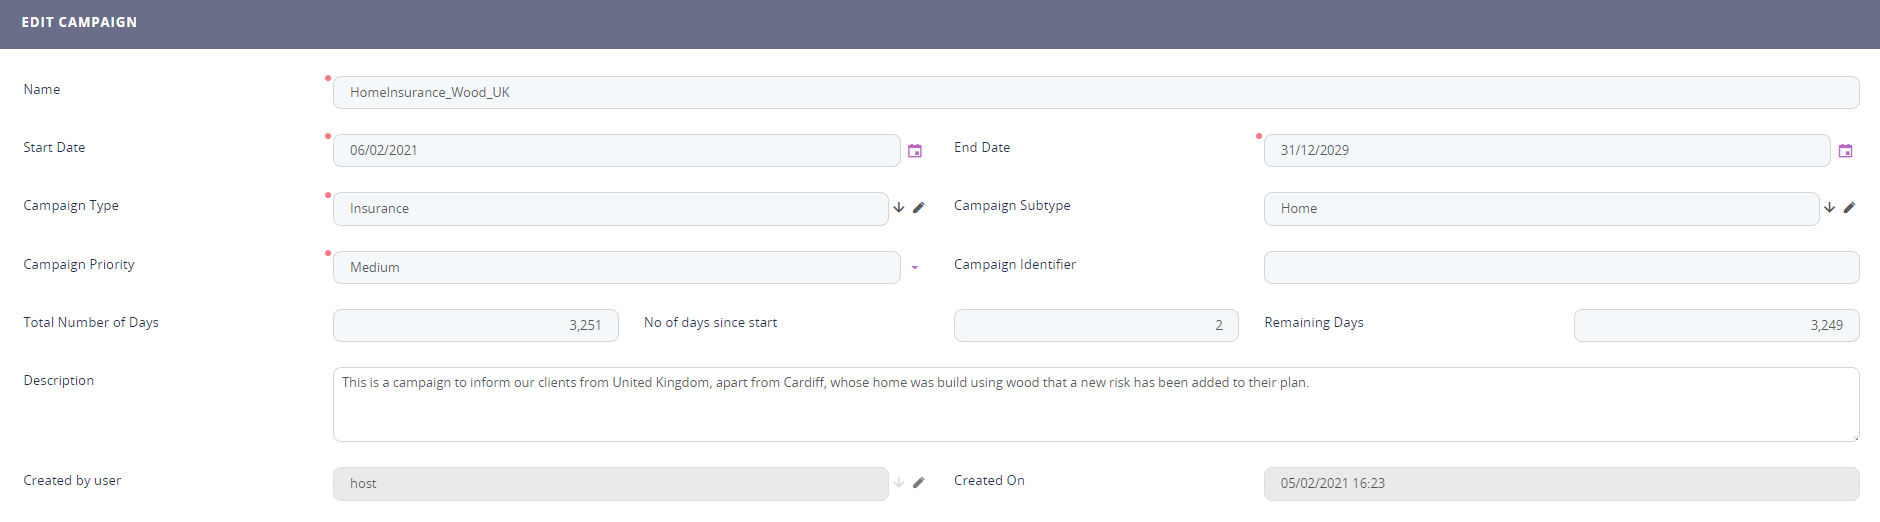
Fill in the following in the Add Campaign page.
| Field | Type | Description |
|---|---|---|
| Name | Text | Insert a suggestive name. |
| Start date | Date | Select the start date of the campaign. |
| End date | Date | Select the end date of the campaign. |
| Campaign type | Option set | Select the type of campaign. In this case, select insurance. |
| Campaign subtype | Option set | Select the subtype of the campaign. In this case, select home. |
| Campaign priority | Option set | Select the priority of the campaign:
|
| Campaign Identifier | Text | Insert a unique code for the campaign. |
| Total Number of days | Whole number | It is automatically filled by the system once you select the start and end dates. |
| No of days since start | Whole number | It is automatically filled by the system once you select the start and end dates. |
| Remaining days | Whole number | It is automatically filled by the system once you select the start and end dates. |
| Description | Text Area | Insert a suggestive description. |
| Created by user | Option set | It is automatically filled by the system once you save the page. |
| Created On | date | It is automatically filled by the system once you save the page. |
Click the Save and reload button. The Edit Campaign page will be displayed.
Select the Content step.
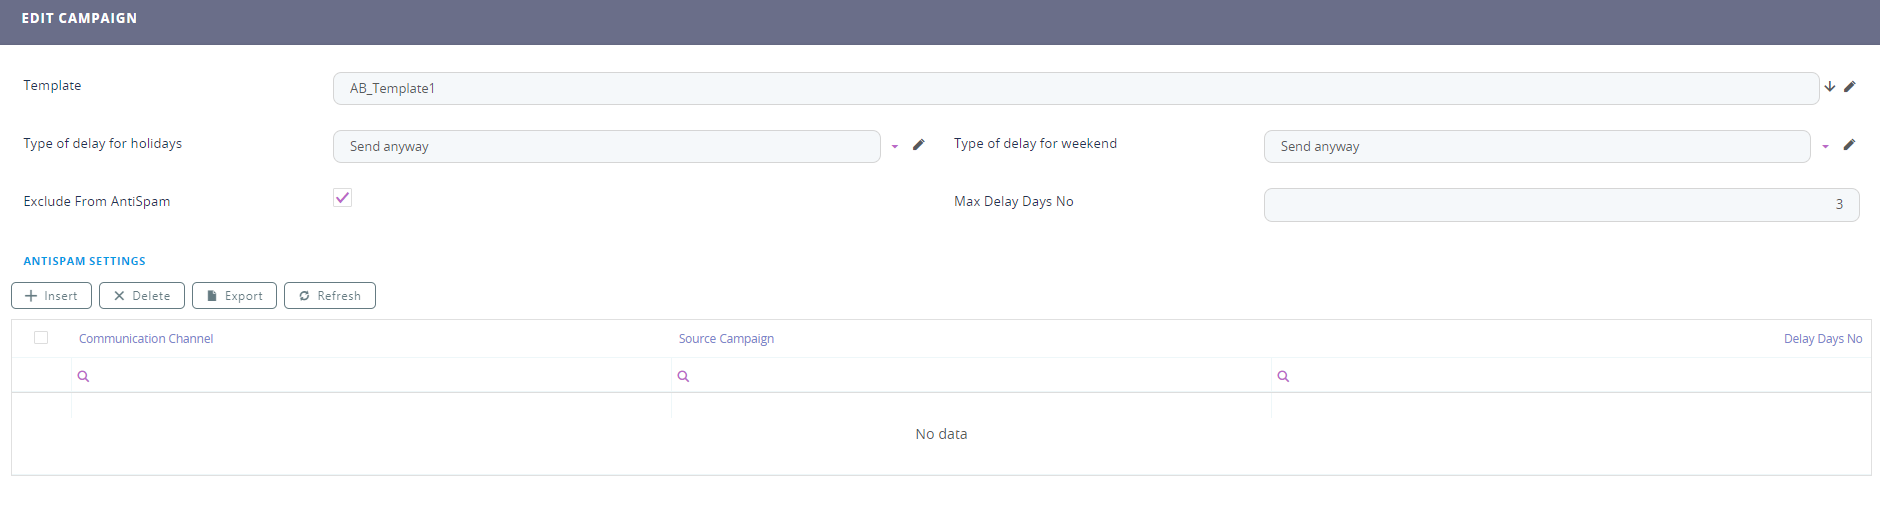
Fill in the following in the Edit Campaign page-Content.
| Field | Type | Description |
|---|---|---|
| Template | Option set | Select the template created earlier. |
| Type of delay for holidays | Option set | Select from the list:
|
| Type of delay for weekends | Option set | Select from the list:
|
| Exclude from anti-spam | Bool | True, then the email is excluded from anti-spam. |
| Max Delay Days No. | Whole number | Insert the maximum number of days possible to delay the sending of the message, e.g. 3. |
Click the Save and reload button. Select the Audience type step. Select from the list:
- static
- dynamic
- imported list.
For this use case, select static list. The fields Audience will open, select the audience created earlier.
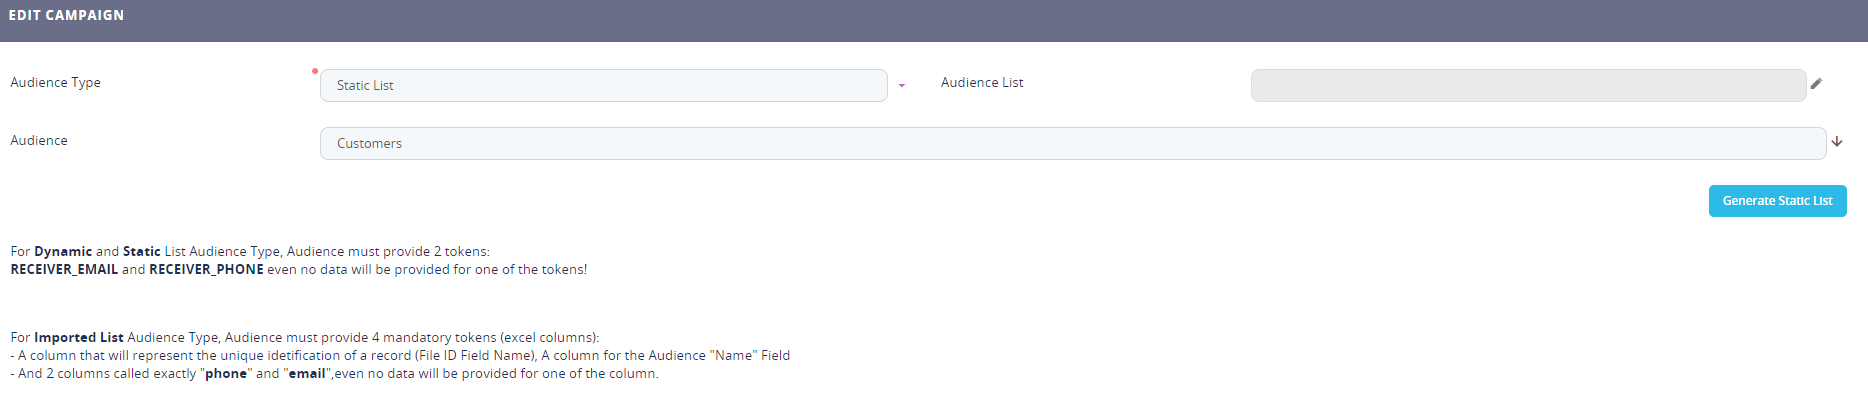
Click the Save and reload button. Select the Schedule step. Click the Insert for campaign stage.
Fill in the name e.g. Stage1 and the time zone e.g. Central European Time.

Click the Save and reload button. The Add campaign stage page will be replaced by the Edit Campaign stage. Click on the Schedule button.
| Field | Type | Description |
|---|---|---|
| Schedule Type | Option set | Select the type as you need. In this case, we will use e.g. Onetime. |
| Start Date | Date | Allows you to define a starting date for the campaign stages, e.g. 17th of February 2021. |
| End Date | Date | Allows you to define an ending date for the campaign stages. |
Click the Save and reload button. Click the A/B variations, there you will see generated the channels for communications. Click the Refining audience to exclude a segment (not needed in this case). Click the Save and close button.
For details, see Omnichannel Campaigns.
Congratulations! Your campaign is ready.