Call External Services via Service Pipes
FintechOS Service Pipes expose integrations as OpenAPI specifications for endpoints that the FintechOS Platform can consume.
To call an external service from a server side script via Service Pipes, make sure the FintechOS Service Pipes are configured on your environment and follow the instructions below:
Set up the endpoint specifications in your Service Pipes project
To ensure consistency, set up the project specifications for the endpoints you wish to expose or invoke based on the following structure.
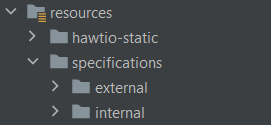
- resources/specifications/external - Use the external-openapi.yaml file for specifications of endpoints exposed by the Service Pipes to external consumers.
- resources/specifications/internal - Use the internal-openapi.yaml file for specifications of Service Pipes endpoints used to invoke the FintechOS Platform and that the FintechOS Platform will consume.
For example:
- An outbound pipe that calls an external service will expose an endpoint based on a specification located in the internal directory (for the FintechOS Platformto invoke).
- An inbound pipe that receives a call from an external system and then invokes the FintechOS Platform will expose a Service Pipes endpoint based on a specification in the external directory.
Create routes and mappings directories
In your Service Pipes project, create the following directories:
- resources/routes - For Service Pipes defined using XML DSL (if XML is used instead of Java DSL)
- resources/mappings - For your transformation files.
Generate the data model artifacts for your Service Pipes project
Use Maven plug-ins to generate the data model based on your OpenAPI specifications. You can use the command line to run the Maven command, e.g.:
mvn camel-restdsl-openapi:generate-with-dto -Dgenerator.openapi.spec=${basedir}\src\main\resources\spec\external\<specname>.yaml -Dgenerator.model.package=com.fintechos.servicepipes.<projectName>.model.external -Dgenerator.route.package=com.fintechos.servicepipes.<projectName>.<packageName> -Dgenerator.route.className=<className>Create the Service Pipes (routes)
Use one of the Domain Specific Languages (DSL) supported by Apache Camel to create your routes. The most used DSLs are Java and XML DSL.
To set up an endpoint API, entity API, or digital journey API as a route destination, use the following route properties:
.setProperty("requestType", constant("endpoint"))
.setProperty("resource", constant("MyEndpoint"))
.to("direct:callFTOSWithDefaultAccount")
Where:
- requestType - Is set to either
endpoint,entity, ordigitalJourney. - resource - Is the name of the corresponding endpoint, entity, or digital journey.
Use Cloud Configuration Manager properties in Service Pipes
To refer endpoints, credentials, or other configurations stored in the Cloud Configuration Manager in your Service Pipes, use the addExchangeProperty method to retrieve them from the Service Pipes cache (vaultCache) add them to the exchange object properties.
For example, to retrieve the configuration parameter, add it to the exchange properties, and use it in the route code to call an endpoint with the .toD pattern:
@Override
public void configure() throws Exception {
  from(uri: "direct:pipe2")
    .bean("cachingService", "addExchangeProperty('vaultCache', ${exchange.getProperties()})")
    .log("exchangeProperty: ${exchangeProperty.")
    .toD("${exchangeProperty.");
}
Import the Endpoint Specifications File in a Web API Client Library
- Download the desired .yaml endpoint specifications file. You can use the Service Pipes's Swagger web app interface to download the file using a web browser.

- Import the .yaml file in a Web API Client Library.
Create a Server Automation Script that Invokes the Web API Client Library
var client = importWebApiClient("ServicePipes","https://myServicePipes.azurewebsites.net/services");

// For releases prior to v22.1.2 choose either Option 1 or Option 2 for authorization.

// Option 1 (prior to v22.1.2): use current user OIDC token
// var token = getCurrentUserAccessToken();
// client.setCustomHeader("Authorization","Bearer "+ token);

// Option2 (prior to v22.1.2): use predefined username/password
// var username = getAppSetting("username");
// var password = getAppSetting("password");
// var credentialsEncoded = server.convert.toBase64StringFromAscii(username+':'+password);
// client.setCustomHeader("Authorization","Basic " + credentialsEncoded);

// Optional: You can add any context properties
// that are to show up in the service pipes logs
// var contextString = [{"customPropertyId":"F1AC195B-EA39-49C9-8750-BD59921E64F4"}];
// client.setCustomHeader("x-context-properties",contextString);

var result = client.callTestGet();
For authorization, depending on your setup, you can either:
- (v22.1.2 or later) Select the Is used for Service Pipes option when configuring the Web API Client Library. This automatically manages the authorization. For details, see Web API Client Libraries.
- (prior to v22.1.2) Use the FintechOS Identity Provider authentication (in which case you can use the getCurrentUserAccessToken function to retrieve your access token).
- (prior to v22.1.2) Use the legacy username/password authentication (in which case you need to use the username and password system parameters to retrieve the Service Pipes credentials).
You can call the server automation script from other FTOS components using the methods available in the Client SDK. For example, to test it from the FintechOS Portal using the browser developer tools, you can use the ebs.callActionByNameAsync method:
ebs.callActionByNameAsync('outboundPipe', {
    "Id": "282772",
    "statusName": "status Name",
    "statusReason": "status Reason",
    "customer": "customer name"
}).then(function(e) {
    console.log(e)
})
Additional Information
For more information about working with Service Pipes, see the Service Pipes tutorial.