Unified Product Operations Engine 8.1
August 28th, 2026
This release expands how you build and manage products, workflows, and integrations across the platform. In Product Factory, you get a more powerful formula editor, custom product sections, multi-object insurance products, Part & Part mortgages, tranched loans, and new APIs for testing and pricing. The Workflow Designer introduces a redesigned UI, custom UI components, Record Link attributes, state transition tracking, and streamlined integration configuration. You can now debug server-side scripts in VS Code, verify users through Vonage or Twilio, and run independent B2C sessions in the same browser without conflicts.
What's New
Manual Vault Update Required for Upgrades
Version v8.1 introduces new requirements for the Workflow Designer feature. Please follow the guidance below based on your installation type:
-
Clean Installations: No action needed. The pipeline automatically configures the Workflow Designer.
-
Environment Upgrades: The pipeline will not update the Vault. You must manually configure the Vault for the feature to function.
The Upgrade/Update documentation must be followed manually to configure the Vault, as these changes are not included in the automated upgrade pipeline.
Product Factory Improvements
Fixed Interest Until Date
You can now set a fixed interest rate that applies until a specific calendar date, in addition to the existing "for the first X instalments" and "until end" options.
What changed:
-
New "Until Date" option in the fixed interest configuration
-
You select a calendar date; after that date, you define the next interest logic
-
APR and loan schedule calculations reflect the date-based segmentation
Key rules:
-
The date must be in the future and after the product start date
-
At least one additional interest entry is required after the "Until Date"
-
Interest configuration must cover the full loan period
-
If disbursement occurs after the selected date, the next available interest value applies
Existing products and configurations are not affected.
Optional Products in Offer Bundles
You can now configure optional products within bundle offers, giving you more control over offer composition. When you build a bundle offer, you can mark individual products as optional. Your end users then see these as deselectable checkboxes and can tailor the offer to their needs. Products not marked as optional remain mandatory.
Key changes:
-
Product Offer UI: You can mark products as optional and define availability rules for each one. Optional products display as checkboxes during offer composition.
-
GetAvailableOffers API: Responses now include an isOptional flag per product in the bundle.
-
PricingCalculation API: Pricing applies only to the products your users select. Unchecked optional products are excluded.
-
Eligibility & Underwriting APIs: These evaluate only the selected products. Unchecked optional products are skipped.
-
Offer Metadata API: Now includes the product optional flag and metadata fields linking lexicon terms to products.
Optional products increase flexibility and personalization during the offer configuration process. For example, if a user selects a "Shared Account" product, a "Credit Card" product can become available based on the defined availability rule. This lets you model real-world product dependencies and deliver a quoting experience that aligns with actual customer needs.
Automatic Renewal Process Improvements
You can now configure automatic renewal options with greater flexibility in the Policy Admin section of Product Factory.
What changed:
-
The "proposal offers" label is now renamed to "new offers" when Renewal is set to yes.
-
You can choose between "new policy" or "same policy" as part of the client decision step when using the "new offers" option.
-
You can select "with automatic issuance" or "without automatic issuance" for renewal offers.
-
Existing products with renewal type "new offers" are updated with default values: "new policy" and "without automatic issuance."
Why this was implemented:
This improvement aligns the renewal process with client needs, giving you more control over how renewals are handled. You can now define whether a renewal generates a new policy or retains the same one, and whether offer approval happens automatically or manually.
Enhanced Formula Editor Capabilities
You can now build more sophisticated product calculations with expanded formula operators, new data type support, and improved editor features.
What's New
-
Conditional operators for if-then logic and combining multiple conditions
-
Comparison operators for evaluating greater than, less than, and equality
-
Math functions for rounding, absolute values, powers, and integer conversions
-
Aggregation functions for calculating sums, counts, averages, minimums, and maximums on arrays
-
Collection functions for filtering and selecting items from arrays
-
Date functions for extracting date parts, adding time periods, and calculating differences between dates
-
Financial functions for loan calculations including rates, payments, periods, and net present value
-
DateTime input type for date and time values
-
Boolean input type for true/false values
-
Numeric and text array input types for collections of values
-
IntelliSense autocomplete with syntax suggestions and examples
-
Syntax validation with clear error messages
-
Backward compatibility ensuring existing formulas continue working without modification
Why This Matters
You can now handle complex pricing, underwriting, and eligibility rules without custom code. Build tiered pricing models, evaluate multiple conditions simultaneously, and perform calculations on collections of values directly in the formula editor. This reduces development time and gives business users more flexibility to configure product logic independently.
Flexible Down Payment Options
You can now configure down payment requirements for secured loan products using minimum and maximum percentage ranges instead of a single fixed value.
What's New
-
Minimum and maximum down payment percentage range (e.g., 10% to 30%)
-
Formula-based down payment calculations using data sets
-
Validation to ensure percentages are between 0% and 100%
-
Applies to auto loans, home loans, commercial property, and asset finance products
Why This Matters
You can tailor loan terms to different customer segments and asset types based on your risk appetite. Define acceptable down payment ranges that give customers flexibility while maintaining your lending criteria. This also supports loan-to-value (LTV) scenarios common in UK and US markets, where an LTV of 90% corresponds to a 10% down payment. No need to create multiple product variants for different down payment scenarios.
Split Your Mortgage Facility
You can now configure Part & Part mortgages in Product Factory, allowing you to split a single facility into a Repayment part and an Interest-Only part. This was implemented to support lenders offering flexible mortgage structures where borrowers can tailor their repayment strategy across both parts of the loan.
What you can configure:
-
Split method for each part: percentage range or fixed amount range
-
Booking model: single account with two internal parts or two linked sub-accounts
-
Interest Only sub-term shorter than the overall mortgage term
-
End-of-term behavior for each part: refinancing, lump-sum repayment, or automatic conversion to repayment
What the system enforces:
-
Exactly one Repayment part and one Interest-Only part per facility
-
Both parts always sum to the total facility amount
-
Shared agreement, secured property, and customer case across parts
-
Application-level overrides validated against product-level limits
Testing:
The Facility Structure input components are also available in the Test your Product mechanism, both on UI and Excel, so you can validate your Part & Part configuration before going live.
Tranched Loans for Mortgages
You can now configure structured mortgage and development finance products with multi-tranche drawdown plans directly in Product Factory.
This was implemented to eliminate manual, spreadsheet-based lending workflows and reduce operational risk for stage-gated products like self-build mortgages and development finance.
What you can configure:
-
Facility type, total limit, and build/availability period
-
Up to 10 tranches per drawdown plan, each with its own sequence, name, and allocation
-
Tranche amounts as a fixed range or a percentage of the facility
-
Release mode per tranche: in advance or in arrears
-
Release conditions: all covenants required, at least one, or manual approval
-
Fixed or variable interest rates per tranche
-
Individual repayment schedules per tranche with a consolidated view across all tranches
-
Booking model as a single account or linked sub-accounts
Edit Datasets in the UI
This feature allows you to create and edit datasets directly within the Product Factory UI, removing the dependency on external tools like Excel for data entry. You can define the structure of a dataset by specifying rows and columns, edit cell values inline, add new rows or columns, and save your changes with built-in validation and unsaved-changes protection.
What you can do:
-
Edit existing dataset values cell by cell using an inline editable grid
-
Create new datasets entirely from the UI by defining rows and columns
-
Add rows and columns dynamically to UI-created datasets
-
Mix copy-paste with manual edits before saving
-
Save or discard changes, with confirmation prompts for unsaved edits
Additional details:
-
Inline validation highlights errors at the cell level before you can save
-
The dataset editor opens in a modal for a focused editing experience
-
Each dataset clearly shows its origin (created in UI or imported)
-
Structural editing controls are available only for UI-created datasets
Multi-Object Insurance Products
You can now build insurance products with multiple insured object types and multiple instances per type. This gives you full flexibility to model complex products like motor insurance with separate vehicle, driver, and items components.
What you can do:
-
Add multiple insured object types in the Main Info section
-
Set a maximum number of instances allowed per insured object type
-
Define coverages, sub-coverages, and perils grouped by insured object
-
Configure underwriting rules at insured object and coverage level
-
Create pricing formulas per insured object, coverage, and sub-coverage
-
View plan coverages organized by insured object
-
Assign a different plan or card per insured object instance for eligibility, underwriting, and pricing
-
Add an optional premium adjustment formula that can reference total premium and number of instances
Why this matters:
-
You can create granular, multi-object products without workarounds
-
Each insured object instance can have independent coverages, rules, and pricing
-
Commercial pricing adjustments (discounts, surcharges) can be applied dynamically across all instances
-
Existing single-object products continue to work without changes
Build Your Own Product Sections
Product Factory lets you extend the product model through configuration, allowing you to model institution- or core-system-specific product attributes without custom development.
Create reusable custom sections with your own fields, datasets, formulas, and business rules, then attach them to one or more Product Types. Every product created from those Product Types automatically includes the configured sections.
For example, if your core banking system requires additional product attributes such as Core Product Code, Accounting Scheme, Settlement Profile, or Portfolio Identifier, you can create a Core Banking Mapping section, define the required fields, and attach it to your Loan and Deposit Product Types. Every product automatically inherits these attributes, which are exposed through the Product Definition JSON for seamless integration with downstream systems.
What you can do
-
Create reusable custom sections from Settings
-
Define custom fields using supported data types
-
Associate datasets, formulas, and business rules with custom fields
-
Attach sections to one or more Product Types
-
Reuse the same sections across multiple products
-
Expose custom attributes through the Product Definition JSON and platform APIs
Why this matters
Previously, extending the product model required custom development. Now, you can model organization- and core-system-specific product attributes through configuration, reducing implementation effort while preserving governance, reuse, versioning, and upgradeability.
Organize Your Underwriting Rules
Underwriting rules can now be organised into categories, assigned business-friendly labels, and configured to refer applications for manual review instead of automatically rejecting them. These enhancements provide a more structured underwriting model, clearer API responses, and improved testing capabilities.
What changed
-
Underwriting Categories — Organize rules into named categories such as KYC, AML, or Credit Risk. Every product includes two default categories that can be used immediately or extended as needed.
-
Alias & Code per Rule — Each rule can now have an optional business-friendly Alias and an optional unique Code. Both are exposed in API responses and Test Your Product results, making rules easier to identify in integrations and troubleshooting.
-
Derogation Mechanism ("Referred by") — Rules that would normally result in Rejected can now be configured to refer the application for manual review instead, introducing a third possible outcome: Derogation.
-
Enhanced API Responses — Underwriting and eligibility APIs now return rules grouped by category together with an aggregated result for each category. These enhancements are additive and remain fully backward compatible.
-
Category-Aware Testing — Test Your Product now displays results grouped by underwriting category and supports defining expected results at category level.
-
Lifecycle Support — Categories, rule assignments, aliases, codes, and derogation settings are preserved during versioning, cloning, template creation, and export/import operations.
Why this matters
As underwriting models grow, managing rules in a single flat list becomes increasingly difficult. Underwriting Categories provide a logical structure that improves configuration, maintenance, and troubleshooting while making underwriting decisions easier to interpret. Combined with rule aliases, category-based API responses, and support for manual review through derogation, these enhancements help teams build more scalable, transparent, and maintainable underwriting models.
Coverage Description Field
You can now add an optional description to coverages, sub-coverages, and perils to keep product definitions clear and easy to understand across your team.
New Dashboard Charts Available
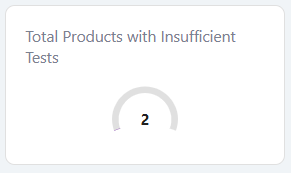
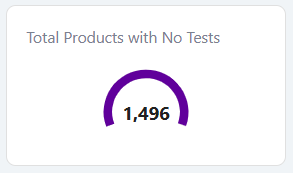
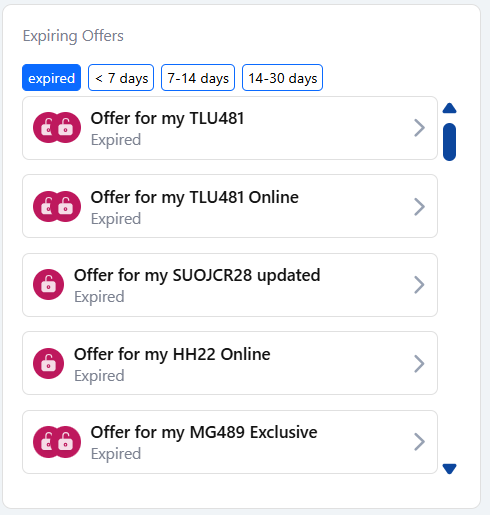
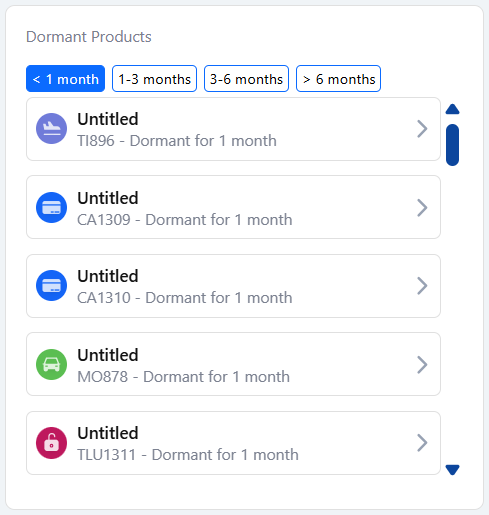
Your Product Factory homepage now includes five new charts to help you catch issues before they become blockers.
-
Total Products with Insufficient Tests – products below the minimum required test count
-
Products with No Tests – products with no tests at all
-
Expiring Offers – offers grouped by expiry window
-
Dormant Products – products grouped by how long they've been in draft
-
Dormant Offers – offers grouped by how long they've been in draft
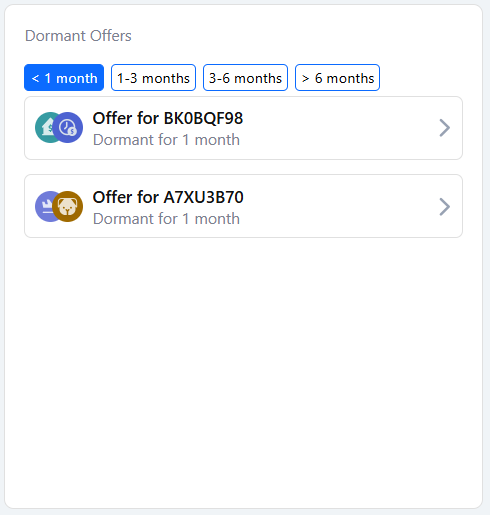
Interest-Only Loan Schedules
You can now configure loans with an interest-only phase followed by a capital repayment phase, giving borrowers the option to pay only interest for a set number of installments before switching to full principal and interest repayments.
What you can do:
-
Configure the number of interest-only installments for a loan product.
-
Automatically generate repayment schedules covering both the interest-only and repayment phases.
-
Validate repayment terms against product configuration.
-
View a complete payment schedule showing interest, principal, and remaining balance for every installment.
Why this matters:
Lenders can launch loan products with more flexible repayment options, allowing borrowers to make lower payments during the initial loan period while maintaining accurate repayment calculations throughout the loan lifecycle.
New Product Creation Experience
You can now find and create products faster with a redesigned product creation page.
What changed
-
You can filter product types by business type, class, and subclass
-
A search bar lets you look up product types by name in real time
-
Product types appear as cards with a short description and a star icon to mark favorites
-
Clicking a card opens a details panel where you can review the product type and start creation
-
Your top 6 favorites are shown upfront for quick access
-
The last 2 product types you viewed are displayed in a dedicated section
-
You can start creating a product directly from search results, without opening the details panel
Why this matters
Finding the right product type used to require scrolling through a long list. With filtering, search, favorites, and recently viewed items all in one place, you spend less time navigating and more time building.
UX Improvements: Consistent Labels and Test Templates
Section names across product types and products now match — no more mismatched labels or inconsistent capitalization.
Improvements to Product and Offer Test Templates:
-
Error messages specify which tests need approval
-
Excel exports include the test case name in the header
-
N/A replaced with Not Available
-
Optional coverages, Insured Object types, and interest steps each have dedicated rows/inputs in both UI and Excel
Why: Reduces navigation confusion and makes test templates easier to fill in, with less back-and-forth during review.
API Improvements
-
You can now control whether underwriting and eligibility API responses include formula step details by passing the optional
includeStepsResultparameter on all V2 product and offer endpoints, set to true by default so nothing changes for your existing integrations. -
You can now run, validate, and manage product and offer test executions directly through the API, including bulk runs, template downloads, and detailed test case comparison. Bulk test execution supports multi-sheet Excel templates with validated headers and field types, highlighted editable cells, and automatic mapping of expected versus actual values on validation upload.
Endpoints
Offer:
-
/pfapi/api/v2/offers/{offerId}/test-template: Generate an Excel test template for an Offer. -
/pfapi/api/v2/offers/{offerId}/test-template/run: Run the Excel test template for an Offer. -
/pfapi/api/v2/offers/{offerId}/test-cases/run: Run test cases for an Offer. -
/pfapi/api/v2/offers/{offerId}/test-case-executions: Retrieves a paginated list of test executions for a specific offer with advanced filtering.
Products:
-
/pfapi/api/v2/products/{productId}/test-template: Generate an Excel test template for a Product. -
/pfapi/api/v2/products/{productId}/test-template/run: Run the Excel test template for a Product. -
/pfapi/api/v2/products/{productId}/test-cases/run: Run test cases for a Product. -
/pfapi/api/v2/products/{productId}/test-case-executions: Retrieves a paginated list of test executions for a specific product with advanced filtering.
-
-
You can now manage user access through dedicated APIs under
/api/auth/.-
GET /permissions/me— retrieve your permissions -
GET /permissions/version— check permissions version for cache validation -
CRUD on
/roles— create, list, get, update, delete roles -
CRUD on
/user-roles— assign roles to users (one role per user)Seeded permissions: product.view, product.edit, product.create, product.approve, offer.view, offer.edit, offer.create, offer.approve, roles.manage, userroles.manage.
-
-
The product metadata API now returns fees and interests as a collection array in all cases, whether single-value or multi-value, giving you a consistent structure to work with. This means you always parse the response the same way, without writing extra code to handle different shapes depending on how many values are present. The value property is still included for backward compatibility, so your existing integrations continue to work without any changes.
-
The Pricing API response was enhanced to include evaluated insurance plan dimensions and their resolved values, supporting three dimension types:
-
Text dimensions
-
Numeric dimensions
-
Option Set dimensions
Each dimension is returned as a structured object containing the dimension ID, name, type, value, lexicon term name, lexicon term type, options set item ID, and percentage source lexicon term name. This allows downstream modules, packages, and services to read the full pricing context directly from the API response without recalculation or additional lookups. The change is backward-compatible — existing modules, packages, and services are unaffected.
-
-
You can now compute pricing directly when retrieving available offers through the V2 API by setting the
ComputePricingIfDefaultPropertiesAreSetparameter in the request body ofPOST /pfapi/api/v2/offers/available. When enabled, pricing is automatically calculated for each offer that has default values for the required formula input parameters. -
The
getAvailableOffers,offerPricing, andofferUnderwritingAPIs now include anisMainProductkey, letting you identify which product an offer was originally started on within a bundle.
Workflow Designer Improvements
UI Designer Visual Overhaul
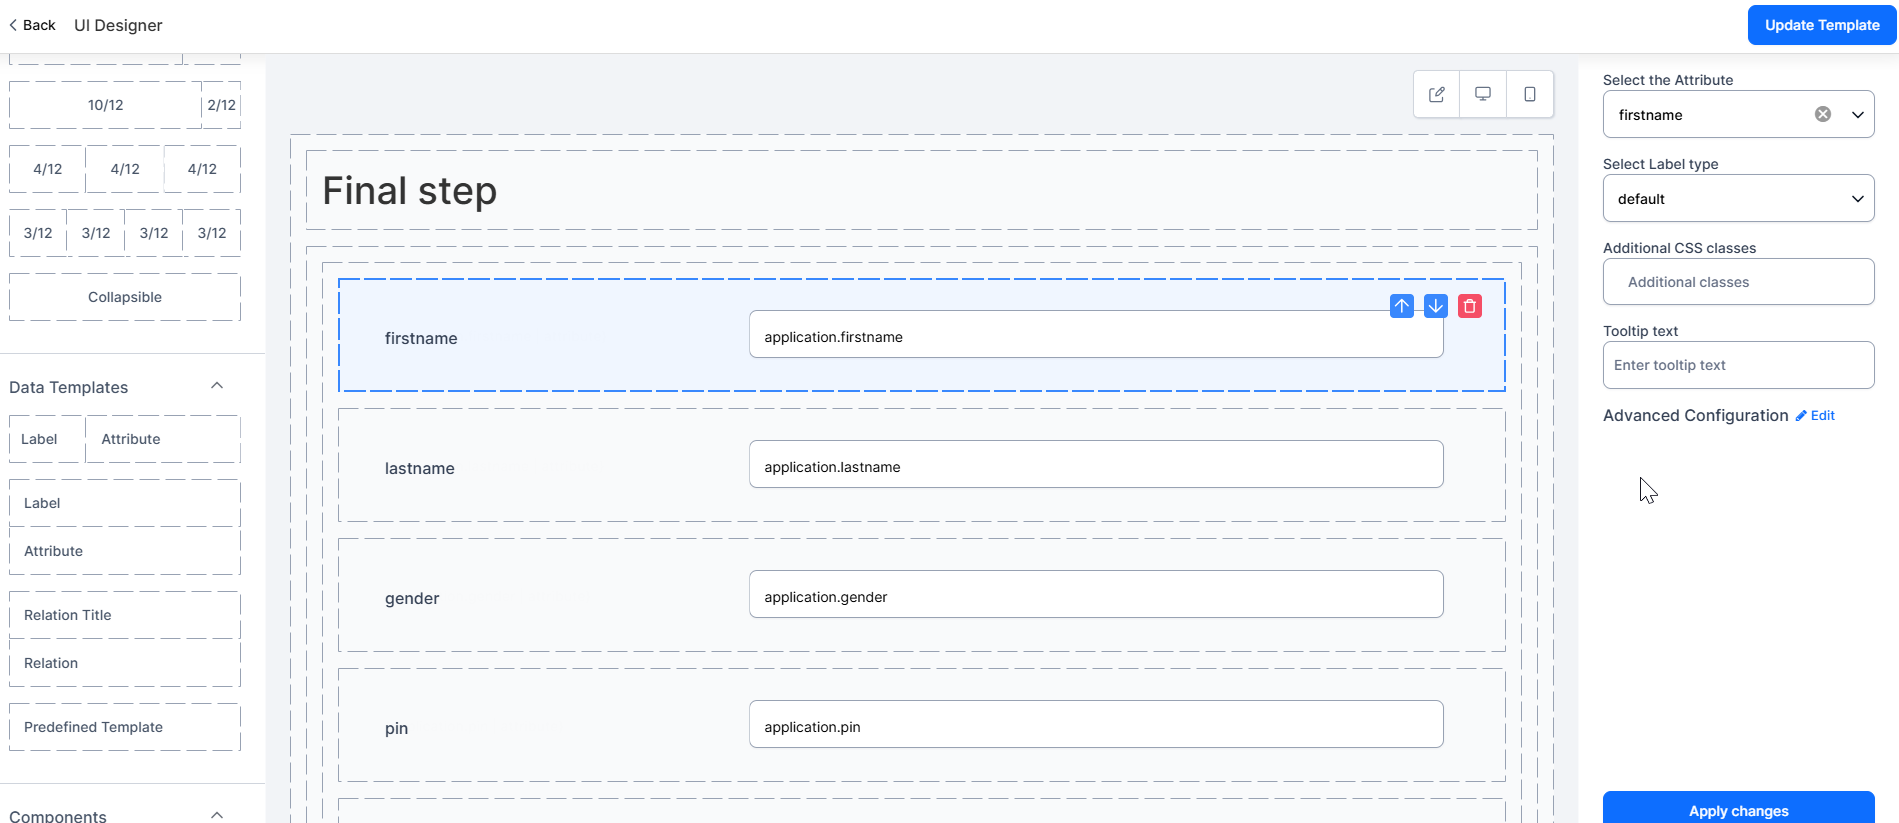
The UI Designer has been redesigned to align with the Workflow Designer, giving you a more consistent and polished experience across tools.
What changed:
-
Updated form controls (inputs, dropdowns, checkboxes) to match the shared design system
-
Refined layout and panel styling across the sidebar, properties panel, and header
-
Improved canvas and builder area with clearer containers, selected states, and spacing
-
Redesigned the advanced configurations preview list for better readability
Why it matters:
-
You get a unified look and feel when switching between the UI Designer and Workflow Designer
-
Clearer visual hierarchy and improved contrast make it easier to scan and interact with elements
-
Consistent spacing and alignment reduce friction when building and editing templates.
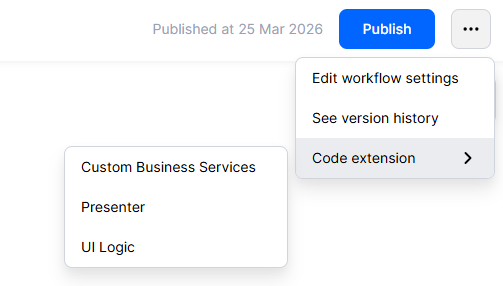
Clearer Menu Labels
You'll now see "UI Logic" instead of "Application Logic" in the Workflow Designer's Code Extension menu. This small label update better reflects what the option actually does, so you always know exactly what you're clicking. Everything else works just as before, no action needed on your end.
New Step Settings Modal
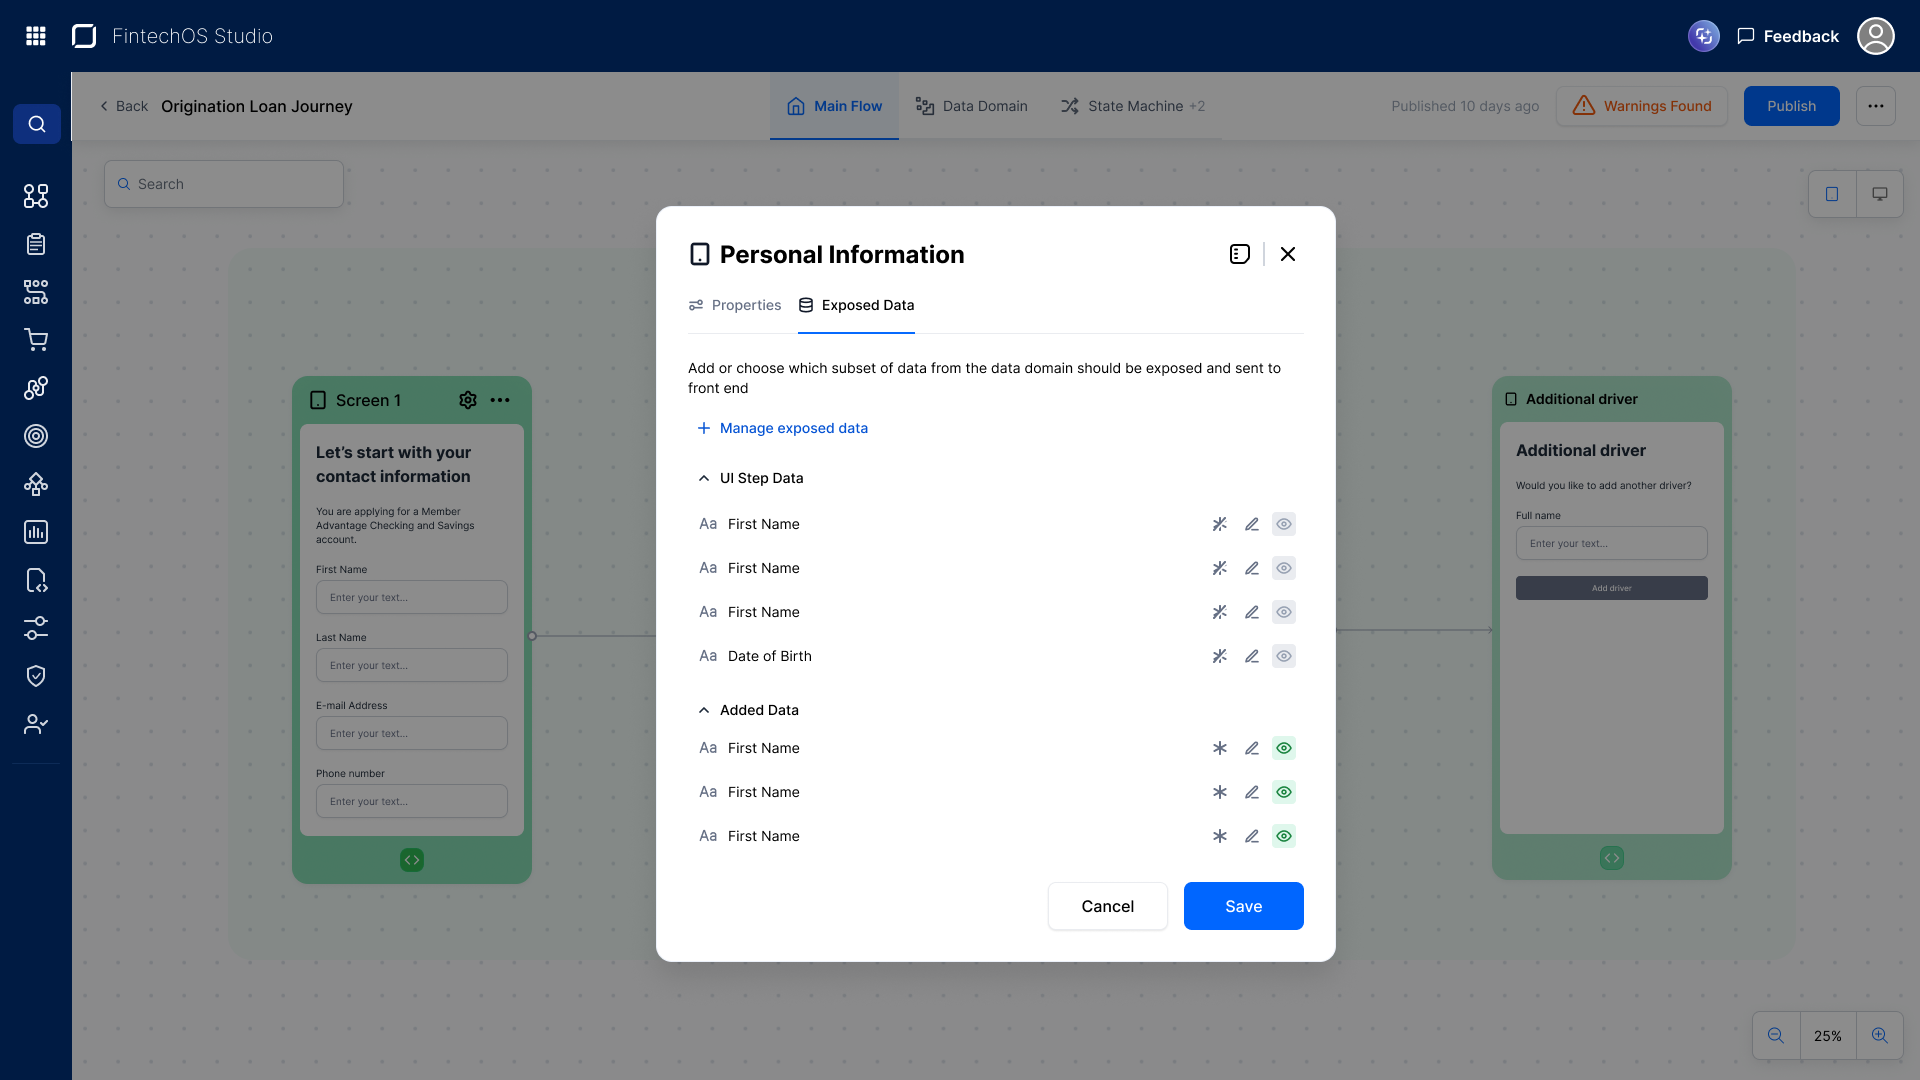
You can now configure your step settings through a dedicated settings modal, available for both UI steps and flow steps in the Workflow Designer.
Where You Can Access It
-
UI step component on the workflow canvas
-
Flow step component (local and external flows) on the workflow canvas
-
Screen components configurator via the settings icon
How to Open the Modal
-
Hover over your step component to reveal the gear icon.
-
Click the gear icon to open the settings modal.
-
Use the tabs to navigate between your settings (e.g., Properties, Exposed Data Model).
-
Click Save to apply your changes and close the modal.
To access Specifications, open the ⋯ (More) menu on the step component and select it from the dropdown.
Renamed "Child Entity" to "Related Entity"
The Data Domain UI now uses the term "related entity" instead of "child entity" across all interfaces. This change applies to dropdown options, default entity names, and modals in the Workflow Designer, providing clearer and more consistent terminology that better reflects how entities are referenced throughout the platform.
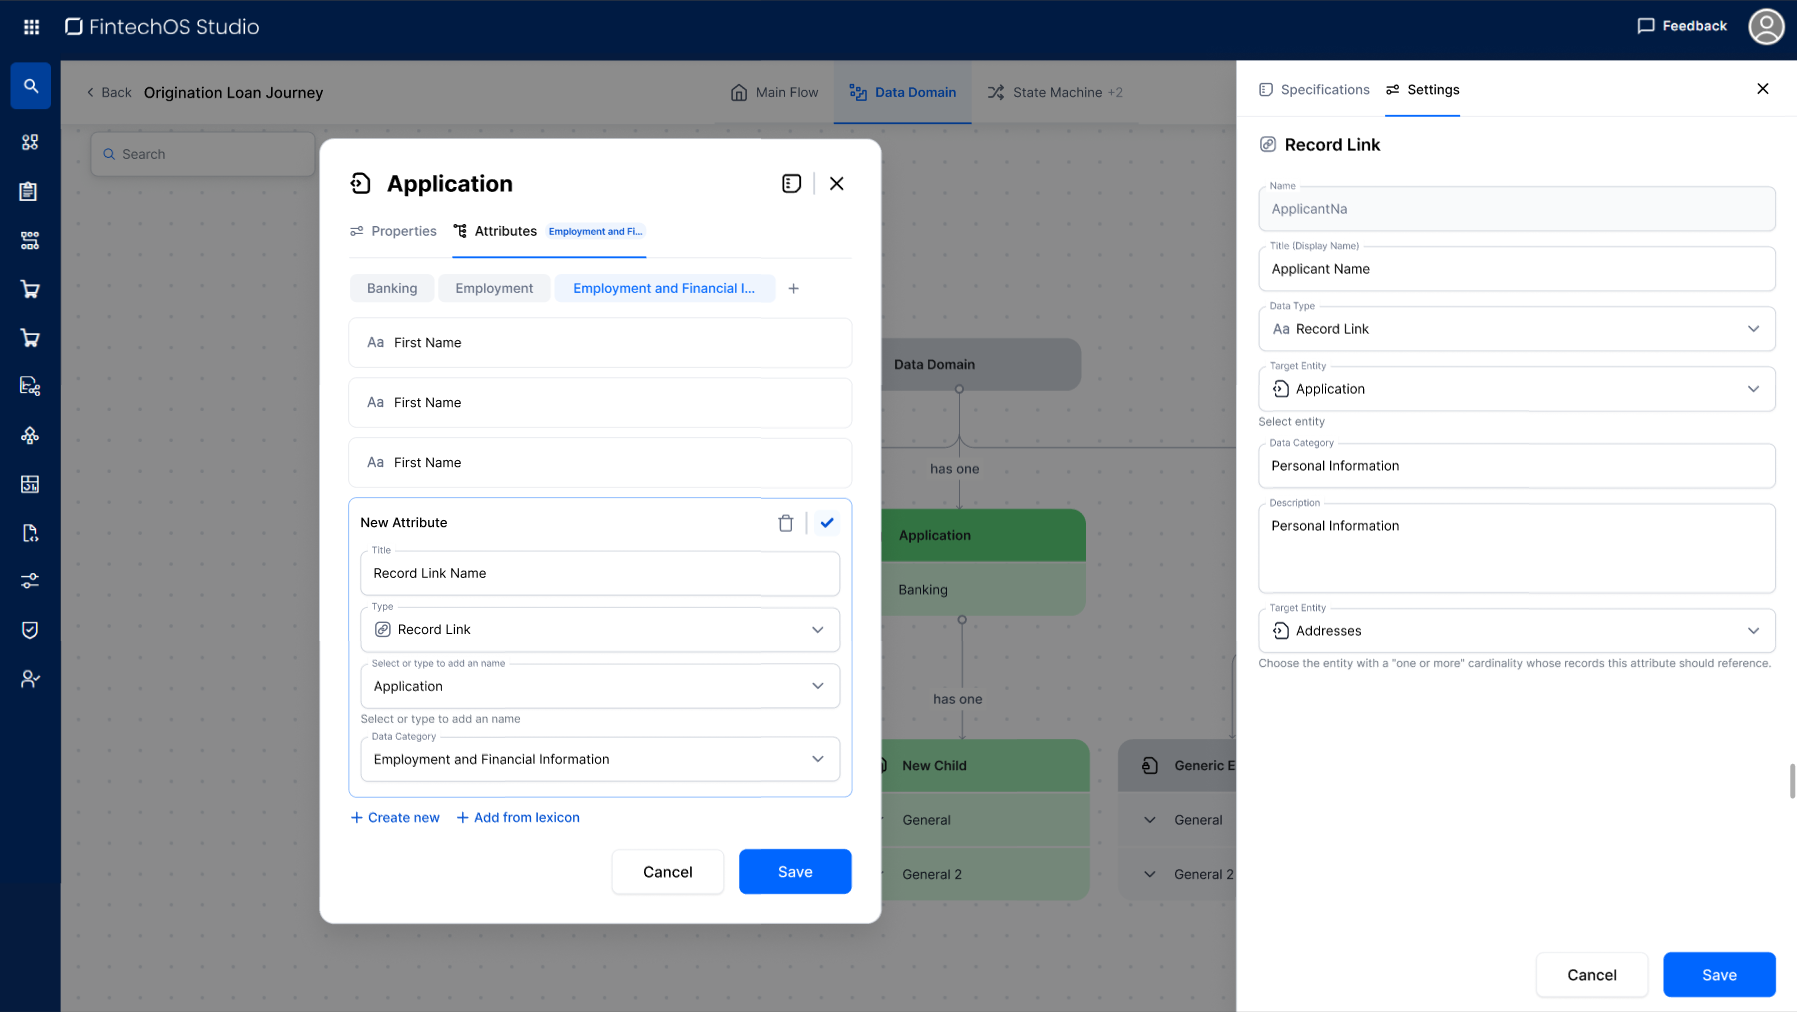
New Record Link Attribute
You can now create Record Link attributes in the Data Domain to reference a specific record from a related entity — such as linking an applicant to one of their addresses or selecting a product from a list.
Record Link is a new attribute type that works like an internal lookup within your data domain. When you add it to a UI step, it renders as a dropdown at runtime, letting end users pick a record from a referenced entity collection. Linked attributes refresh automatically when a selection changes.
Complex workflows often require cross-referencing records across related entities (e.g., "which address is the main address?" or "which product did the applicant select?"). Previously, there was no native way to store and display these references inline. Record Link eliminates manual workarounds and keeps your data model clean and navigable.
What you can do
-
Create a Record Link attribute anywhere you create attributes — in the Data Domain or via the attribute selection component
-
Select a target entity with a one-or-more cardinality as the reference source
-
Configure which attributes from the linked entity appear in the runtime dropdown
-
Display linked entity details as read-only fields or table columns in the UI Designer
-
Add multiple Record Link columns in a table, each pointing to a different referenced entity
Runtime behavior
-
Record Link fields render as a dropdown select box populated with records from the linked entity
-
Changing a selection automatically refreshes all associated linked attributes
-
Linked attributes are read-only, users select a record but cannot edit its source data inline
-
Submitted values are validated server-side against the entity's record collection
Things to keep in mind
-
Only entities with a one-or-more cardinality are eligible as targets
-
If no eligible entities exist, the dropdown displays an informational message
-
Deleting a referenced entity resets all Record Link attributes that point to it, you'll need to reassign a new target before publishing.
Add Tooltips to Attributes
The workflow designer supports attribute tooltips through the Description field.
Best Practices:
-
Keep descriptions concise but informative
-
Explain what data should be entered and in what format
-
Mention any validation rules or constraints
-
For complex attributes (like recordLink), explain what the link represents.
Track Workflow State Transitions
Your workflows now automatically track every business state change. When you publish a workflow, the platform creates a Business State History table that records each state transition for audit and troubleshooting purposes. You can now audit the complete lifecycle of workflow instances, and troubleshoot state transition issues by tracing which BSC route triggered each change.
What changed:
-
Previous and new state names
-
Timestamp and user who triggered the change
-
BSC name and script that executed the transition
-
Related workflow step and instance identifier
-
History tables are created automatically for all workflows and accessible via SQL.
Workflow Preview in Portal
A new Preview button in Studio lets you open and test your workflow directly in a portal tab.
What changed: The Preview button opens a popup with your domain and portal URL, supports additional URLs for B2C or customer portals, and saves your URL configuration in local storage.
Availability: Preview is only enabled when the Vault key environment-context type is set to dev. In non-development environments, the button is disabled. Note that Preview creates real workflow instances, not simulations.
Complete Multi-Stage Async Integrations
You can now complete individual stages in multi-stage asynchronous integration processes. The new ftos.flow.completeAsyncStage() method allows your workflows to track and respond to multiple completion checkpoints within a single external integration. Use this method in webhook handlers or BSC routes when receiving callbacks from external systems.
Behavior
-
Marks the specified stage as complete
-
Automatically resumes your flow when all stages finish
-
Throws an error if the process or stage is not found
Example Use Cases
-
Document processing with OCR, extraction, and validation stages
-
Payment workflows requiring authorization, capture, and settlement
-
Underwriting processes with multiple decision points
-
Any integration needing sequential external callbacks
Complex integrations often require multiple asynchronous steps to fully complete. Previously, you could only track completion as a single event. Now you have granular control over multi-step processes, enabling more sophisticated workflow orchestration and better visibility into where external processes stand.
Error Handling on Flows
You now get consistent error and success feedback from custom services in flows. Previously, when a custom service threw an exception or set a message, there was no consistent way to surface that feedback in the UI. This improvement gives you clear, predictable error and success handling during flow execution.
What changed:
-
Errors from custom services return you to the last successful screen with the error message displayed
-
The current service transaction is rolled back on error
-
Success messages display cleanly in the UI
-
Use UiData with Message and IsSuccess properties to control the behavior
Reports in Flow Instances
You can now generate document reports directly within flow instances using the server-side method call. This enables you to generate and store reports as part of your automated flows without manual steps.
What changed:
-
The ftos.documents.generateByName method now works with flow instance context
-
Reports with Entity scope and Document type can be generated using ftos.documents.generateByName
-
Generated reports are automatically attached to the flow instance.
Updated Integration Configuration Options
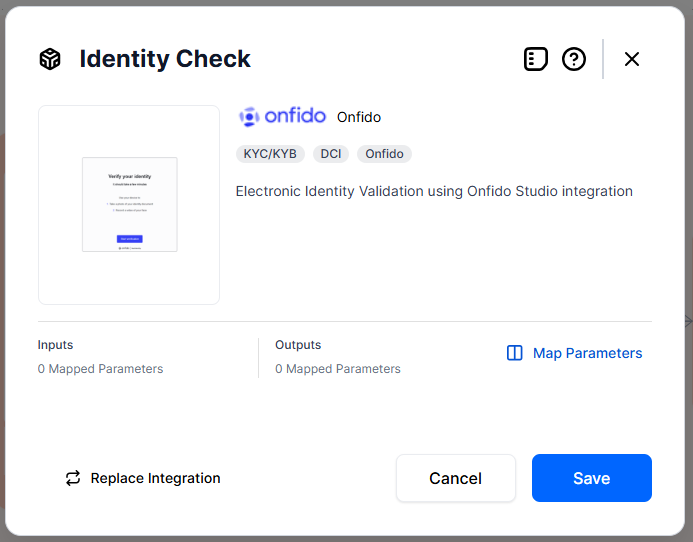
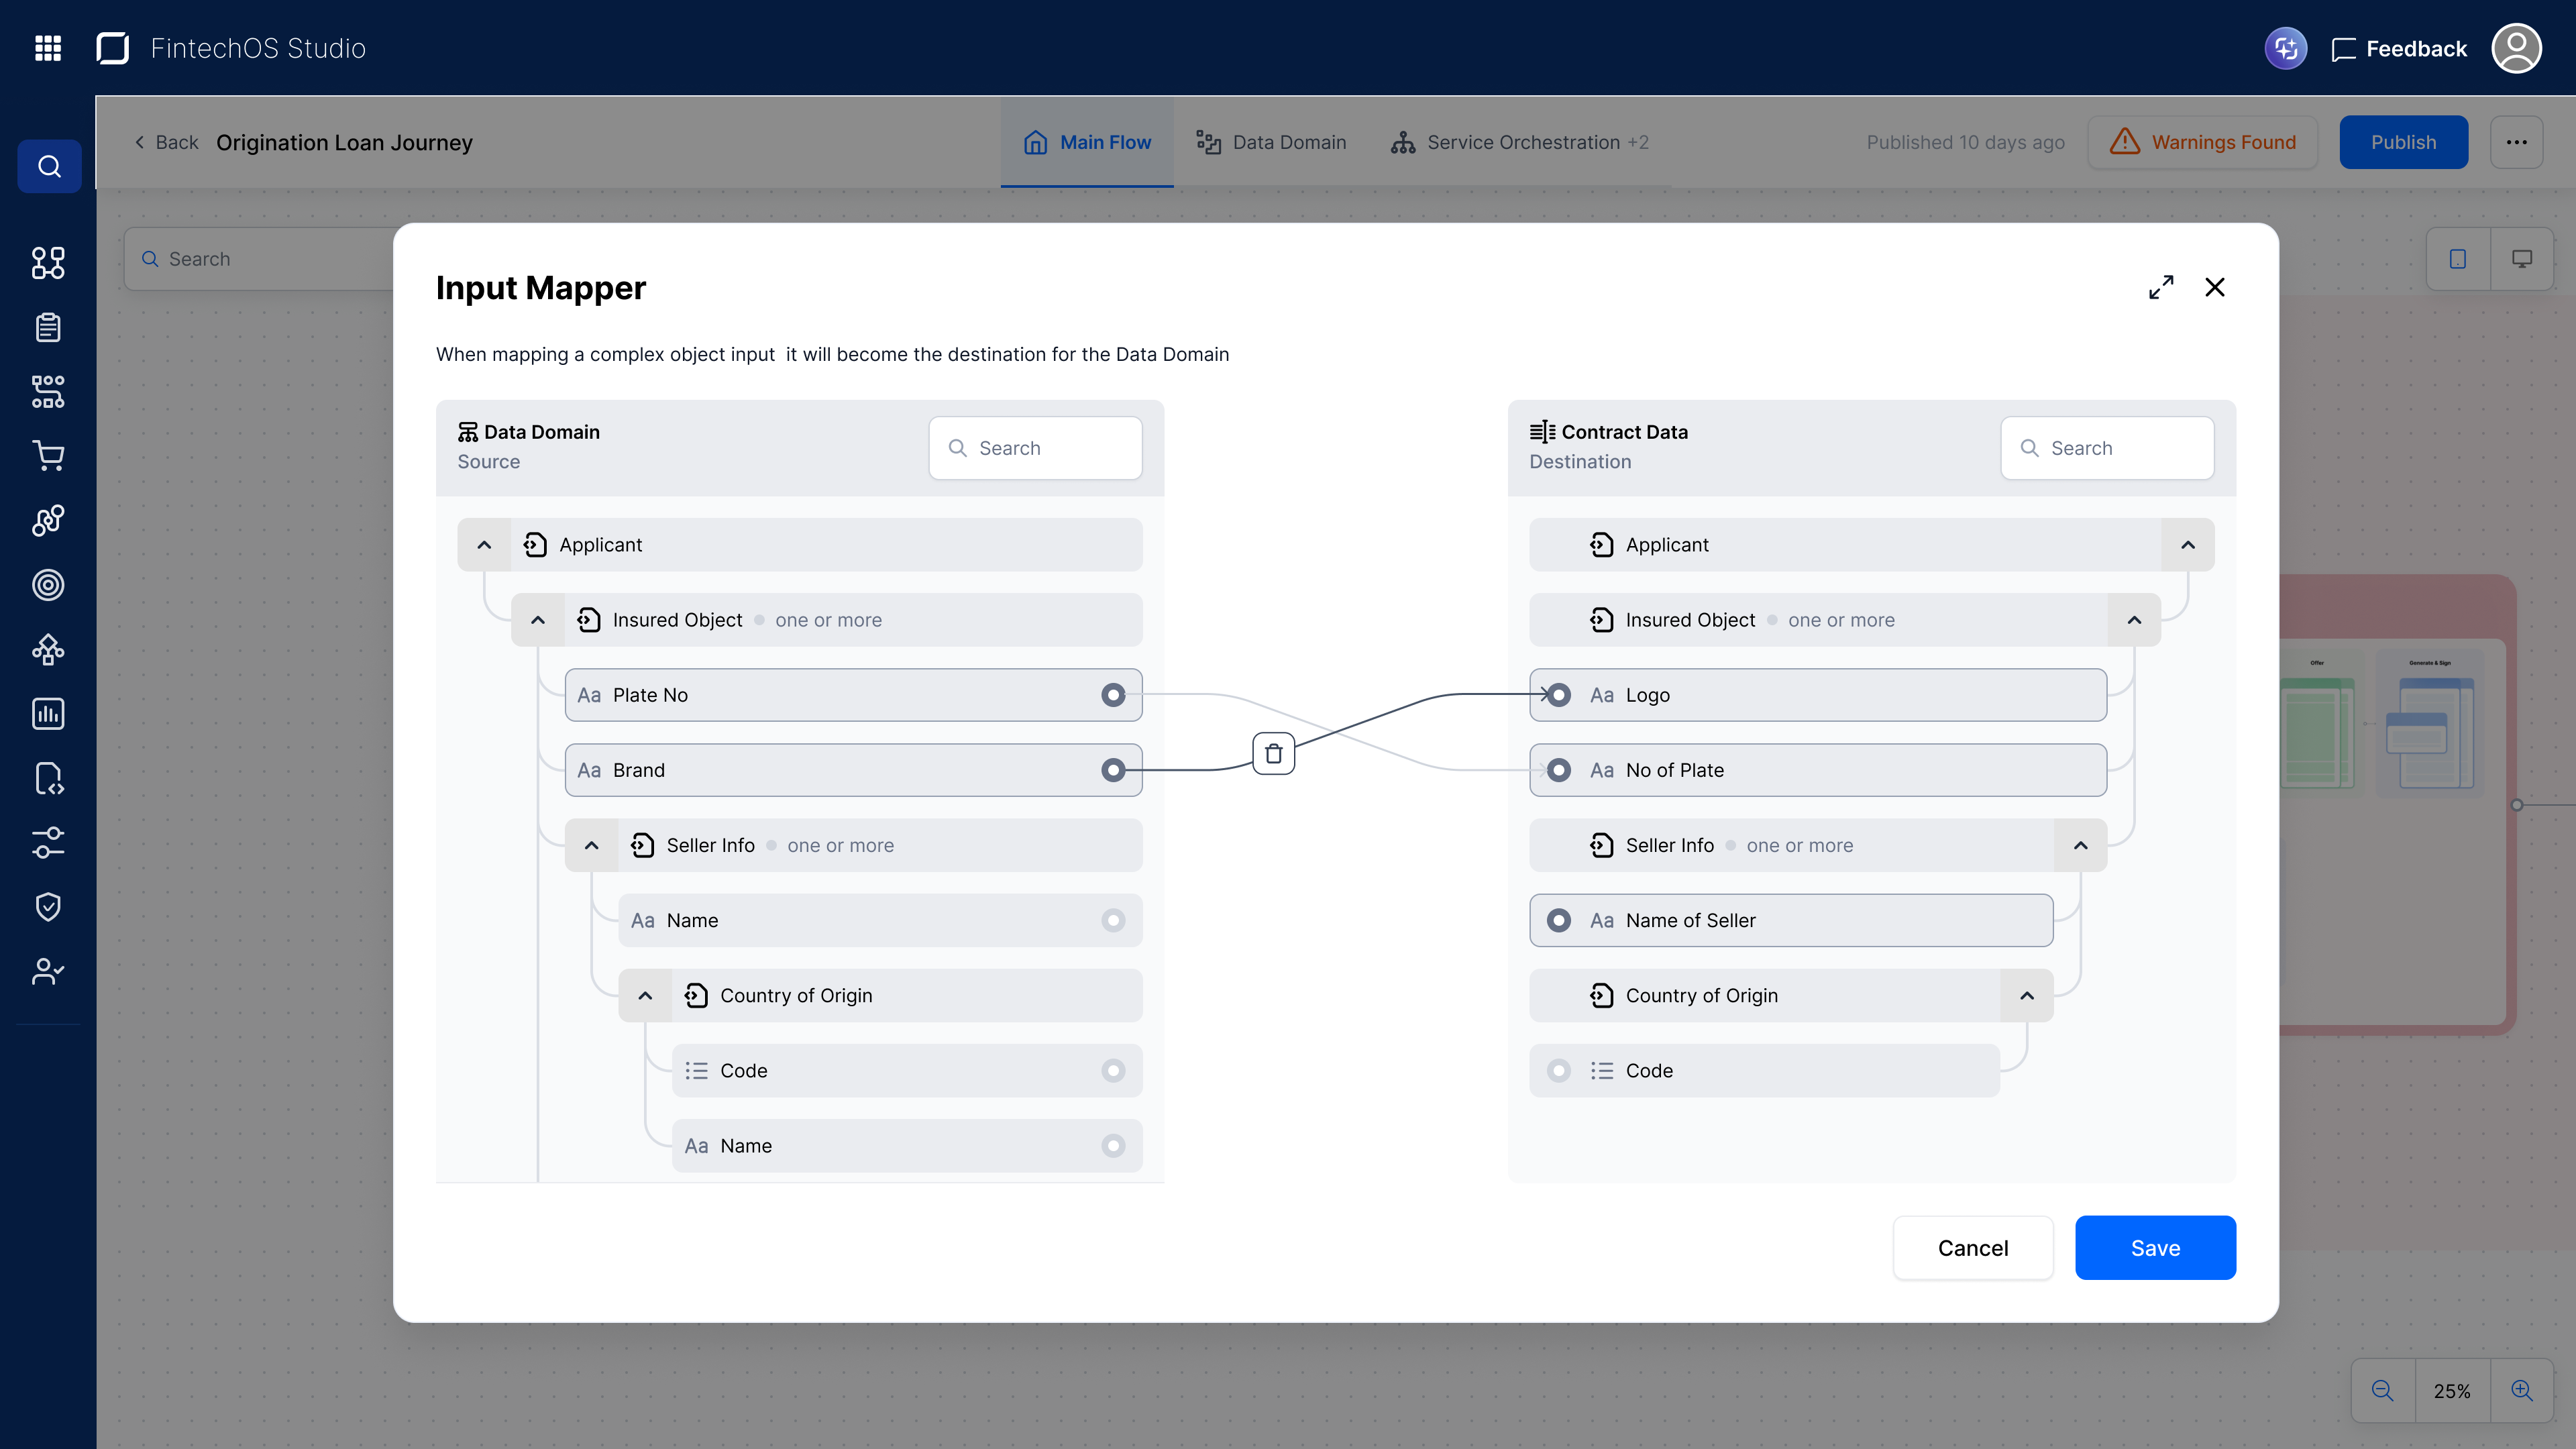
This release makes it easier to set up and configure integrations in the Workflow Designer. Onfido and AriadNext now run on the new Automation Blocks architecture and are available in the Service Catalog. A new JSON editor and dedicated Settings modal give you more control over complex configurations, while visual indicators help you spot mapping errors before publishing.
-
Onfido and AriadNext migrated to Automation Blocks - These integrations now use the Automation Blocks architecture. You can find and add them through the Service Catalog.
-
Complex object mapping - You can map arrays and complex objects to Data Domain attributes using a dedicated data mapper. Visual indicators show which parameters are fully or partially mapped.
-
JSON editor for configuration - A tree-view editor lets you edit complex configurations. It supports expandable objects, predefined templates, and data-domain mapping.
-
Dedicated Settings modal - Mapping and configuration settings are now in a separate modal with two tabs: Mapping and Configuration.
-
Activation and behavior settings - You can select activation settings and, for integrations that support multiple modes, choose which mode to use from the Configuration tab.
-
Simplified step modals - Service and integration modals now show only the key details and a summary of mapped parameters.
-
Parameter type indicators - Each parameter now shows a data type icon and a mandatory marker so you can see what is required before mapping.
-
Unavailable integrations disabled - Integrations that are not available appear as disabled and cannot be selected. This prevents publish failures.
These changes give you more control over how you configure services like Onfido and AriadNext, reduce mapping errors through better visual feedback, and simplify complex integration setups with a structured JSON editor.
Preview Your Workflow in Portal
The Preview button now gives you clear, real-time feedback on its availability.
-
The button is active in dev mode and opens a live workflow preview in a new tab
-
Outside dev mode, the button is visibly disabled with a tooltip explaining why
PDF Viewer Updated
The PDF preview component has been updated to a consolidated viewer engine. File actions using Open or Open & Download now use the improved viewer. Download-only mode is unchanged. No user action required.
Internal Names
Subflows now have an internal name field in the Subflow Settings modal, auto-generated when you create a subflow. You can edit internal names before publishing, but after publishing, they become locked for attributes, statuses, and subflows.
Locking internal names after publishing keeps your live workflows stable. References and integrations that depend on these identifiers stay intact, even if you rename display labels later.
Free Attribute Selection in Subflows
When configuring a subflow, you can now browse and select attributes from all available entities. Additionally, you can change the subflow entity directly from settings.
Decision Step Update
Process Status is no longer available in the Decision Step expression editor to ensure that decision rules are built only with supported attributes. Process Status remains available in Logic Block expressions.
Digital Asset Column Now Available
In the Custom UI view, you can now see a dedicated Digital Asset column alongside your existing data, so you can quickly identify which digital asset is associated with each record without opening it individually — saving you time when reviewing or managing multiple items at once.
Updated libraries
The AngularJS Designer now runs on updated internal libraries, with key Angular and supporting packages upgraded to their latest versions, delivering improved stability and security during your design sessions.
Workflow Runtime API Now in FTOS API
The Workflow Runtime API lets you interact with workflow execution at runtime. You can find it in the FTOS API under the Workflows section in Swagger.
Disable Task Addition from Canvas During Redesign
This UI improvement temporarily disables the ability to add tasks from the Workflow Designer canvas while the feature is being redesigned, keeping the controls visible but greyed out with a tooltip to inform users.
Backward Compatibility for 8.0 Workflows in 8.1
Workflows built in 8.0 using the service/integration catalog are automatically migrated to custom services, ensuring they continue to function correctly after upgrading to 8.1.
Workflow Designer UX Improvements
This release brings a set of visual and interaction improvements to Workflow Designer, making it easier and more intuitive to build and manage workflows.
What's new:
-
You can now search within dropdowns when selecting or creating items, including inside attribute properties, so you can find what you need faster in long lists.
-
Side panels and headers now have consistent sizing across the canvas, reducing visual noise and making the interface easier to scan.
-
Input fields and selected attributes now show a clear active state when open or in focus, so you always know where you are.
-
When you delete a published step in Dev Mode, you now see a confirmation prompt that explains the impact before the deletion proceeds.
-
If a flow step references a related entity that no longer exists, you now see a clear message explaining why the dropdown is empty and what to do next.
-
Hover states, button sizes, and element spacing are now consistent across the canvas, service orchestration, and integration panels.
Custom Controls in UI Designer
You can now create and use custom UI Components in your no-code journeys and workflows, giving you full control over how users interact with screens without relying on built-in controls alone.
This was implemented to let teams build tailored experiences that match specific business needs, reducing dependency on custom development for each journey screen.
What's new:
-
You can create a UI Component by defining its behavior, appearance, and configurable properties in a metadata record in the backoffice.
-
UI Components appear in the left-side toolbar of UI Designer, where you can drag them onto a journey screen and select which component to use.
-
You can configure each component's properties in the right-side panel, including binding it to attributes from your data model.
-
At runtime, the component renders on screen and stays in sync with the journey's data model, reflecting changes from Logic Blocks or user interaction automatically.
-
You can set a thumbnail image for the component list and a preview image that displays on the canvas in UI Designer.
-
You can use an optionsFunction to load configuration properties dynamically, allowing the right-side panel to adapt based on external data or logic.
Redesigned Exposed Data Model Panel
When configuring a UI step in Workflow Designer, you now work with a refreshed Exposed Data Model panel that makes it faster and clearer to manage which attributes are exposed.
What's new:
-
Filters are consolidated into a single dropdown with a visual indicator showing how many are active, and a contextual info text appears when search or filters are limiting the results.
-
The panel opens in a resizable modal, the tree view has a labeled container, and you can click a category name in the preview panel to jump directly to it.
-
Table attributes are automatically added to or removed from the exposed model as you add or remove them from a table element, and technical attributes are now visible in the tree view.
This was implemented to reduce the number of clicks and mental effort needed to set up and review exposed data, keeping you in context while configuring your workflow steps.
On Hold Behavior Updated
In this release, how you configure On Hold for a UI step has changed. You now manage it entirely from the step settings modal.
What changed:
-
Process status is set from the step settings modal; the canvas shows it as a visual indicator only
-
Resume behavior is visible only when the status is set to On Hold, hidden otherwise
-
A new searchable, multiselect dropdown lets you choose which response stages the step waits for while on hold; selections appear as removable chips
-
If a linked service or integration is deleted, it is removed from the list automatically, and you are notified on publish to reconfigure
-
The response stages list is capped at 50 items
Why this matters:
Consolidating On Hold configuration into the step settings modal gives you a single, consistent place to control pause behavior and dependencies, reducing the risk of misconfiguration.
Updated Parameter in Report Method
The recordId parameter in ftos.documents.generateByName now also accepts a flow instance ID, so you can generate and attach reports directly to a flow instance in Journey Designer without any additional configuration.
Developer Experience
B2C Multi-Session Support — Same Browser, Multiple Users
Multiple users can now complete independent B2C journeys within the same browser instance. Previously, opening a second journey in the same browser would overwrite the first user's session, causing data conflicts and blocked applications.
- Each user gets an isolated session — switching between tabs or users no longer causes overlap or data loss.
-
Multiple B2C portal sessions are fully separated.
- Starting a new journey always creates a fresh session.
- Users can partially complete a form, leave, and return without affecting another user's progress.
Common scenarios this resolves:
-
Shared browser at home: A bank client starts a loan application, then their spouse opens the same form in a new tab with their own credentials. Both can save progress, return later, and submit independently.
-
Employee reviewing multiple clients: A bank employee opens resume journeys for several clients in separate tabs. Each client's application stays correctly linked to the right customer.
-
Blocked application recovery: When a client's application becomes stuck, an employee can reload or restart it without accidentally mixing it with another client's data.
-
Multi-merchant checkout: A customer shopping across multiple merchant sites gets a separate B2C application per merchant, correctly linked to the right account.
No configuration required, this enhancement works automatically for all B2C and portal sessions.
Intellisense for server SDK ftos.data.getFlowData
IntelliSense support is available for the ftos.data.getFlowData server SDK method, enabling digital developers to discover and navigate workflow data domain entities, attributes, and relations (both one-to-one and one-to-many) directly through code suggestions as they type. It works consistently across server-side scripts, business service components, and frontend code, dynamically reflecting each workflow's configured data domain to speed up development and reduce runtime errors from mistyped paths.
Scenarios:
-
You write
const flowInstance = ftos.data.getFlowData(flowName, instanceId), and IntelliSense suggests the available first-level entities from the data domain (e.g., flowInstance.application) -
You type flowInstance.application. and IntelliSense suggests that entity's attributes (e.g., code, createdOn).
-
You drill into a 1:1 relation with
flowInstance.application.applicant.and IntelliSense suggests the child entity's attributes (e.g., firstName, lastName) along with any further nested relations. -
You drill into a 1:many relation with
flowInstance.application.applicant.addresses[0]and IntelliSense suggests the collection plus item-level attributes (e.g., countryId, streetName). -
You author server-side scripts or business service components using
ftos.data.getFlowData(flowName, instanceId)and get IntelliSense that mirrors the configured workflow data domain. -
You author frontend code using
formData.modeland get the same IntelliSense behavior as on the server side.
Stronger Job Security
You now have tighter control over who can manually trigger scheduled jobs. Only users and service accounts with admin privileges can use the "Run Now" button in Studio, ensuring jobs aren't triggered by unauthorized accounts.
Mandatory Order Index Values
The Order Index attribute is now mandatory for all entities. Previously, Order Index columns could contain empty (null) values, which added unnecessary complexity to the ordering logic. Starting with v8.1, the platform ensures every record always has a valid Order Index value, making item sorting simpler and more reliable.
Order Index is used in these key areas:
- Entity form sections — section ordering on forms
- Entity form footer items — footer component ordering
- Menu items — navigation menu position
- Action groups — button/action ordering
- Reports — report list ordering
- Project applications — application ordering
What's included in this new feature:
-
A SQL migration script automatically fills in all existing null Order Index values with sequential numbers (starting from the current maximum value + 1) and makes the column non-nullable
-
Order Index attributes are now created and updated with a required validation level, enforced by the platform
-
The Edit Attribute form reflects the required status of Order Index attributes, preventing users from setting them as optional
-
During the upgrade, database indexes and constraints on affected tables are temporarily dropped and recreated, which may result in longer execution times on large databases
Security Roles on External Brokered Accounts Are Now Protected
Security role changes on externally brokered accounts are now blocked by default, ensuring the external identity provider remains the single source of truth for all user attributes, including roles.
New configuration setting:
A new Configuration Manager setting has been added under Studio > Authentication:
"Authentication": {
                ...
                "BrokeredUsers": "AllowEditSecurityRoles=true;"
}-
false (default) — Security roles for external users can only be managed by the external broker via realm mappings. Studio UI edits are blocked.
-
true — Admin users or users with the "Security Role Management" role can assign/remove roles for external users in Studio, as before.
Deprecated Code Editor
After announcing that Advanced Code Editor is deprecated, the editor is officially out. It is no longer available in the Studio.
VS Code Script Debugging
You can now debug server-side automation scripts live from the Visual Studio Code FintechOS extension against a Sandbox environment.
Why it matters
-
Speeds up issue investigation and troubleshooting
-
Enables live debugging directly from VS Code
Getting started
-
Enable V8 debugging in Studio > System Parameters
-
Configure the instance URL, address, and port in .vscode > launch.json
-
Add the debugger keyword to your script
-
Press F5 to start debugging
-
Stop the session using the VS Code debugging controls
Verify OTP via Vonage/Twilio
You can now verify users through Vonage and Twilio using the new DCI Verify integration. OTP codes are generated and delivered entirely by your chosen provider, FintechOS IDP simply orchestrates the flow, removing the need to manage code templates, aliases, or notification services.
What You Get
-
Simplified configuration: set DCI URL, API Key, and Channel (SMS, Email, or WhatsApp)
-
Localized messages: users receive OTPs in their preferred language from a supported locale set (en, de, it, es, pt, fr)
-
Smart channel detection: allow end users to choose between email, SMS or WhatsApp
How it works
-
Your user triggers a verification, at login, after the password was verified successfully and after choosing a channel (Email, SMS, or WhatsApp)
-
FintechOS IDP calls DCI Verify: it sends a verification request to the DCI endpoint using your configured API Key and Channel (SMS, Email, or WhatsApp)
-
DCI routes to your provider: DCI forwards the request to either Vonage or Twilio, depending on your setup. The provider generates the OTP code and delivers it to the user
-
Your user enters the code: the code appears on their phone or email, and they type it into the verification screen
-
FintechOS IDP validates through DCI: the entered code is sent back to DCI, which checks it against the provider's active session
-
Success or failure: if the code matches and the session hasn't expired, the user is authenticated. If not, the provider manages retries until the max attempts are reached
The key difference is that FintechOS IDP never generates or stores the OTP code itself, it acts purely as an orchestrator between your user and the provider via DCI.
Known Behavior
-
When switching between Brute Force Mode options in Keycloak, a JS Platform Services restart is required for user account sync to continue working correctly.
-
You are currently unable to deactivate system jobs linked to sealed digital assets when using forms in Studio, though this action can be performed from the grid view.
Fixed Issues
| No. | Summary |
|---|---|
| n/a | Fixed an issue where BCC addresses stored in the FTOS_DPA_MessageQueue table were ignored when emails were sent through the Job Server's SMTP provider. BCC recipients now receive emails as expected. |
| n/a | When importing a solution package with Data Import Files based on Data Import Templates, the order index column (for example OrderIdx in OptionSetItem or ExecutionOrder in ScheduleService) is no longer updated with the incorrect value of -1. The import now preserves the original order index values from the source file, and the append and overwrite order index deployment scenarios are not applied to Data Import Template imports. |