MFA by Email, SMS
Email and/or SMS Multi-Factor Authentication (MFA) adds an extra layer of security on top of the basic authentication methods. When users access the FintechOS Portal or FintechOS Studio, they will be prompted to provide the login credentials associated with their FintechOS Platform account. To make sure account access is protected, after the login credentials are provided, users are redirected to a secondary login page where they have to enter a one-time security pass code received via email, SMS (the phone number set in the user account profile). Once a user enters the code received via the Email/SMS/IVR(Call Me) option, access to the system is granted.
Follow the instructions below to set up Email/SMS/IVR(Call Me) multi-factor authentication.
1 Create an Authentication Flow
Make sure that the FintechOS Identity Provider has the MFA plugin installed and uses a theme that includes the MFA login screen.
- Log in to the FintechOS Identity Provider admin console.
- Select your FintechOS Platform realm.
- If you want to set an authentication flow for either Studio or Portal, not both, then go to Clients and search for your Portal or Studio.
- In the client settings, go to the Advanced tab and in the Authentication flow overrides section, at Browser Flow select the flow you wish to configure.
- In the left menu, select the Authentication option.
- In the Flows tab, open a built-in authentication flow and alter its requirements. Built-in flows cannot be modified, but you can alter its settings such as OTP forms, conditions, and so on. You might have multiple flows depending on authentication scenarios, such as an authentication flow for existing users, a registration flow, a reset credentials flow and so on. Read more about authentication flows in the official Keycloack documentation.
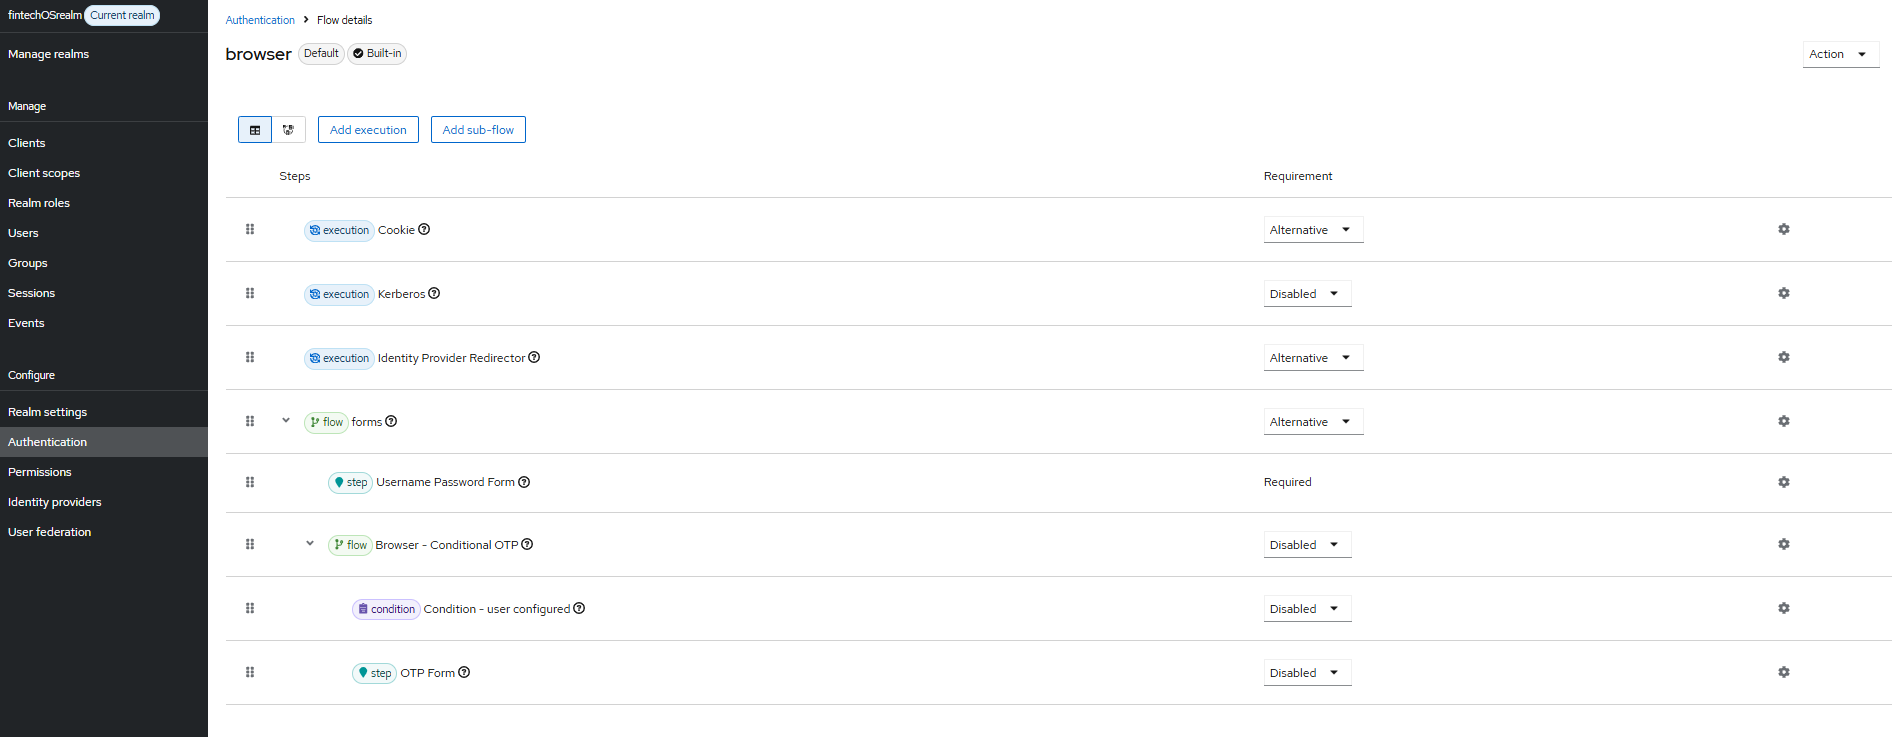
2 Configure the Flow's MFA Execution Step
Authentication flows can be configured to use DCI, Data Core or Twilio and Vonage. The settings for DCI - Data Cor, differ from those of Twilio and Vonage. For instance, the latter supports sending the OTP verification code through WhatsApp as well, provided that the account is a company one. For Twilio and Vonage, DCI supports a predefined list of locales (e.g., en, de, it, es, pt, fr).
 DCI and Data Core
- Open your authentication flow and navigate to the OTP Authentication execution step.
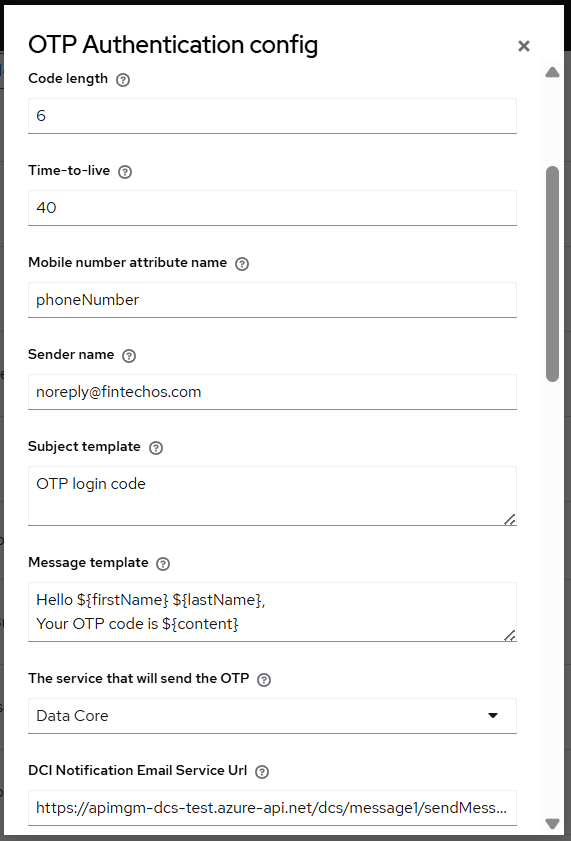
- Click the settings button to open the OTP Authentication config form.
- Set up the following parameters:
Authenticator Reference: Optionally, add a custom reference name for the authenticator. When this authenticator is successfully completed during an authentication flow, the Authentication Method Reference (AMR) protocol mapper will use this value to populate the AMR claim of the generated tokens. Note, the AMR protocol must be configured for the given client to populate the AMR claim.
Authenticator Reference Max Age: Optionally, add the max age in seconds that the authenticator reference value is good for in an SSO session. When the Authentication Method Reference (AMR) protocol mapper is used, the AMR will only be considered valid and populated in the token if the authenticator execution was completed within the specified max age.
- Code length: The length of the one-time password that is going to be sent to the user.
- Time-to-live: The duration in seconds the one-time password is valid.
- Mobile number attribute name: The attribute name that is going to be used to retrieve the user’s phone number.
- Sender name: The sender's email address displayed to the end user when email notifications are sent. It is recommended to pick a sender email address other than generic sender IDs such as “SMS”, “INFO”, “Alert”, "no-reply", and so on. These could be automatically rejected by some email services.
- Subject template: The message subject template that is going to be sent to the user when using the email communication channel. You can use the following placeholders: ${firstName}, ${lastName}, ${content}.
- Message template: The message content template that is going to be sent to the user via SMS or email. You can use the following placeholders: ${firstName}, ${lastName}, ${content}.
The service that will send the OTP: Choose between DCI and DataCore.
DCI Notification Email Service Url: example:
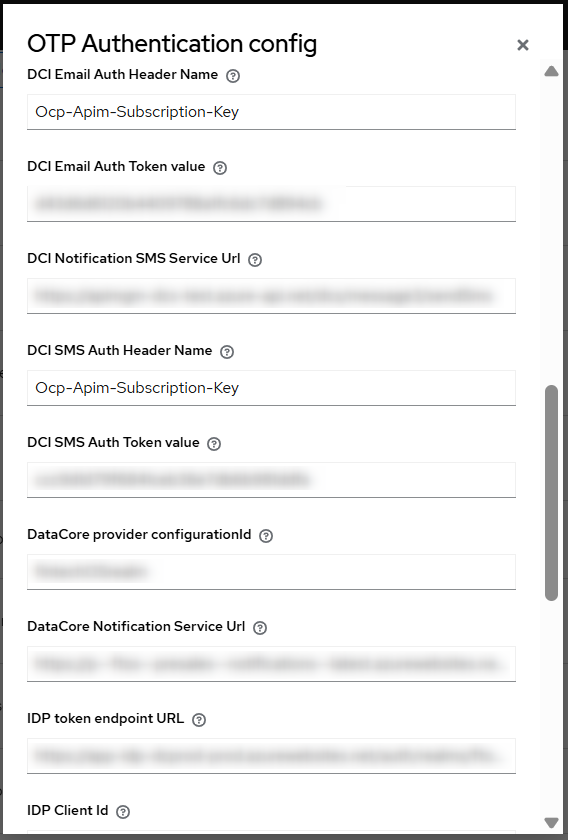
[environemntURL]/dcs/message1/sendMessageDCI Email Auth Header Name: The DCI authorization header name for email service, for example
OCP-Apim-Subscription-KeyDCI Email Auth Token value: The authorization token for the DCI email service, for example:
01234567890abcdef01234567890abcdefDCI Notification SMS Service Url: Add the service URL if you enforce SMS notification, for example:
[environmentURL]/dcs/message3/sendocbsmsDCI SMS Auth Header Name: Add the authentication header name if SMS service, for example
OCP-Apim-Subscription-KeyDCI SMS Auth Token value: Authorization token for SMS service, for example:
01234567890abcdef01234567890abcdefNotification DataCore Service Url: Add service URL if using Data Core, for example:
https://app-envoy-rgname-level.azurewebsites.net/datacoreIDP Client Id: The client id used for obtaining valid access tokens to call the DataCore service.
IDP Client Secret: The client secret used for obtaining valid access tokens to call the DataCore service.
- Simulation mode: When set to True, the actual one-time password will not be sent to the user. Instead, the one-time password will be logged on the FintechOS Identity Provider server.
Allow Email channel: If set to true, the user will be able to select Email as communication channel for receiving the OTP.
- Allow SMS channel: If set to true, the user will be able to select SMS as communication channel for receiving the OTP.
- Allow Call Me channel: If set to true, the user will be able to select Call Me as communication channel for receiving the OTP.
- Skip OTP selection screen: if only one channel is configured, then only that option is displayed to the end user
Allow OTP resend mechanism: allows the user to request another OTP code. The number of retries is configured in the below box Number of maximum OTP resend retries.
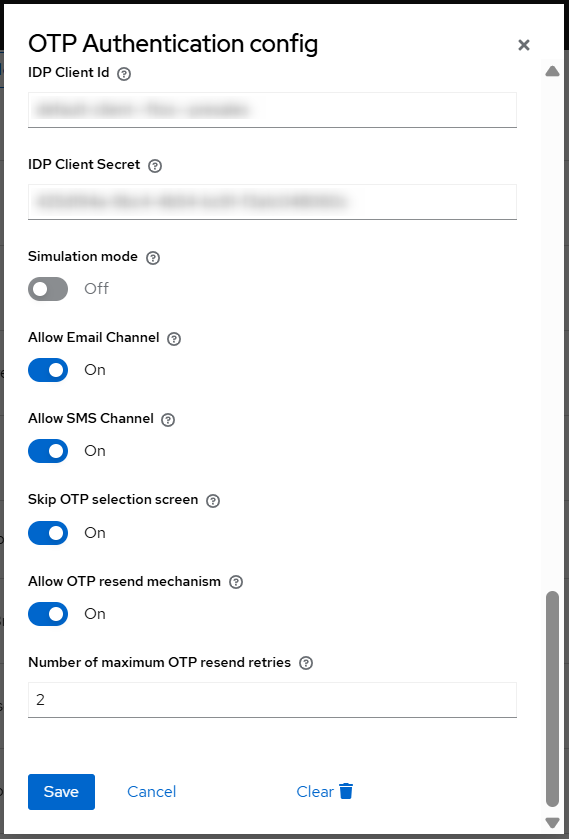
- Click Save.
If the user adds the wrong OTP code for 8-10 times, their FintechOS IDP user is disabled and can be enabled by an admin user.
To modify the text in the UI in the OTP validation screen, including the text above the radio buttons for picking the validation option (email, SMS, call), go to the FintechOS IDP, choose your UI theme, and inside the UI theme folder navigate to baseStudio > login > messages > messages_en.properties, and change the key values. For example, to display "Send SMS" in screen UI, modify the following key to show: otpSelectionFormSms=Send SMS.
Twilio and Vonage
-
In FintechOS Identity Provider, navigate to your realm > Authentication > Twilio and Vonage flow. You do not need to create this flow, this will be available out of the box.
-
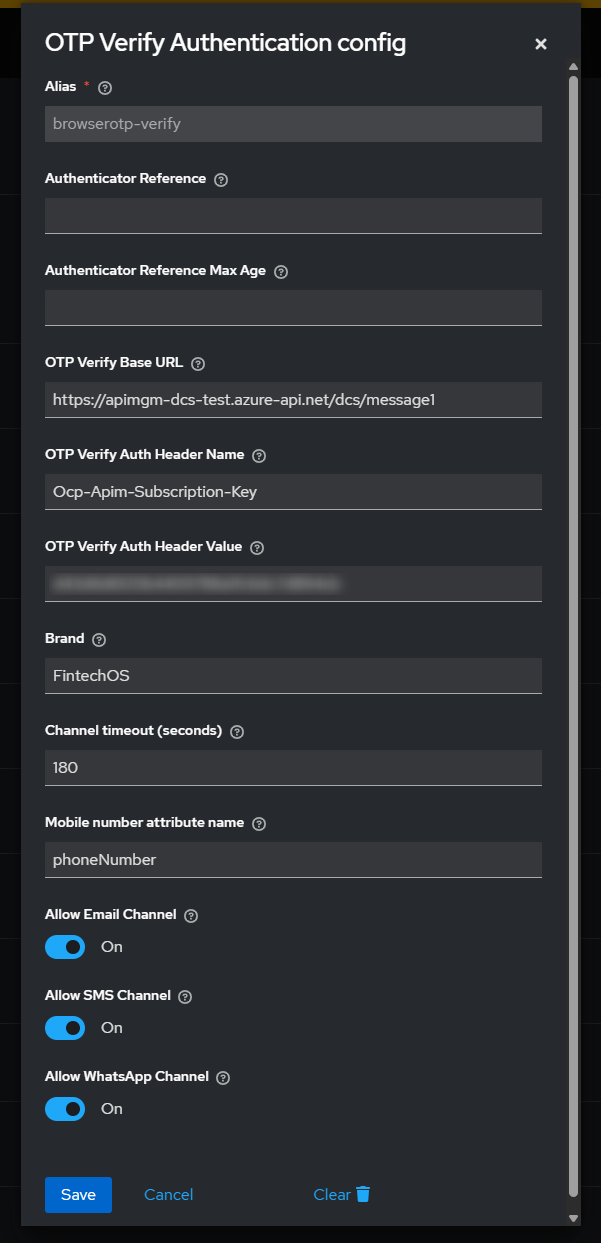
On the OTP Verify Authentication config form, you need to configure:
-
Alias: a descriptive name identifying this specific OTP authentication step.
-
Authenticator Reference: Optionally, add a custom reference name for the authenticator. When this authenticator is successfully completed during an authentication flow, the Authentication Method Reference (AMR) protocol mapper will use this value to populate the AMR claim of the generated tokens. Note, the AMR protocol must be configured for the given client to populate the AMR claim.
-
Authenticator Reference Max Age: Optionally, add the max age in seconds that the authenticator reference value is good for in an SSO session. When the Authentication Method Reference (AMR) protocol mapper is used, the AMR will only be considered valid and populated in the token if the authenticator execution was completed within the specified max age.
-
OTP Verify Base URL: The base link used to generate OTP setup and verification URLs. For Twilio, it contains
message1. For Vonage, it containsmessage3. You must also add the specific API key for each service in the field below. -
OTP Verify Auth Header Name: The configuration field that specifies the name of the HTTP header used to pass the API key when Keycloak authenticates its requests to the DCI Verify service — by default set to Ocp-Apim-Subscription-Key as defined in the DCI APIM subscription-based access model.
-
OTP Verify Auth Header Value: The actual API key for Twilio or Vonage.
-
Brand: the company name.
-
Channel timeout (seconds): The duration (in seconds) that the OTP verification session remains active on the provider side before expiring — defaulting to 180 seconds for Vonage and 600 seconds for Twilio.
-
Mobile number attribute name: If the user wants to receive the verification OTP code via their phone number, then the latter needs to be configured in the FintechOS IDP. To verify if the number is added, navigate to Users > Attributes > Phone Number. If a phone number is not set, SMS and WhatsApp channels are disabled. Depending on which service you use, the phone number is set in the following way:
-
Twilio requires the phone number with the
+prefix before the country code (e.g., +40712345678). A number formatted as 004... will fail with Twilio . It returns error 60200: Invalid parameter 'To'. -
Vonage accepts the phone number with just the numeric country code, without + or 00 (e.g., 40712345678).
-
-
Allow Email Channel: If set to true, the user will be able to select Email as communication channel for receiving the OTP. It uses the email addressed associated to the user's account.
-
Allow SMS Channel: If set to true, the user will be able to select SMS as communication channel for receiving the OTP. Make sure the user's phone number is set.
-
Allow WhatsApp Channel: If set to true, the user will be able to select WhatsApp as communication channel for receiving the OTP, as long as the channel is an official business one. Make sure the user's phone number is set.
NOTE
If all three channels are configured (enabled), then at authentication, the end user has the option to choose from a drop-down which channel to use for verification. This is available after the password verification was successful.
-
-
Click Save.
3 Activate the Authentication Flow
Once the authentication flow is configured, in the FintechOS Identity Provider, navigate to Authentication > Bindings and replace the Browser flow with the newly created flow. This will the set authentication flow globally. However, if you want to enable the flow only for one client, you can navigate to the client page, go to Settings > Authetication Flow Overrides, and change the Browser Flow there.
A user who logs in to FintechOS Portal or FintechOS Studio, will be directed to the one-time password form and will receive the required password via Email, SMS or IVR (Call Me).