Configure the Insurance Persona
Each audience created must be correlated with an insurance persona, which is correlated with a quote.
In this section, you can configure the types of insurance persona and the cards to be displayed.
-
Log in to Innovation Studio.
-
Navigate to Product Factory > Proposal Configurator > Insurance Persona.
-
Click the Insert button on the top right to insert a new persona.
-
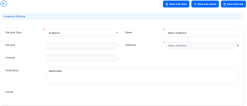
In the Insurance Persona screen, fill out the following fields.
Field Description Persona Type Option set field. Choose the type of insurance person:
-
Persona - a single segment addressed;
-
Audience - multiple segments addressed.
Name The insurance persona name. Persona The correlated persona in case that the Persona Type is set as Persona. Audience The correlated audience in case that the Persona Type is set as Audience. Formula
Dropdown to choose the formula to be used for the insurance persona.
Description Input a description for the created persona. -
-
Click the Save and Reload button on the top right corner. The Cards grid is unfolded, where you can add the cards to be displayed for the created persona, by clicking the Insert button and choosing the cards from the given list.
-
The Insurance Persona Card screen is displayed. Fill out the following fields.
Field Description Card The correlated card for the created insurance persona. Insurance Persona Insurance persona configured existing in the system. Highlighted If the field is ticked, then in the Quote&Bind application when displaying the Offer Cards, one or more Cards with this setting will be highlighted as the best option for the customer’s needs. Name Name for the insurance persona card. Order The order in which the cards are displayed in the Quote&Bind application’s interface. -
Click Save and Close. The created insurance persona card is displayed in the Cards section.
-
Set the order of the cards in this section by using drag and drop. Choose which of the displayed cards is highlighted in the interface by ticking the Highlighted box of the specific card.
-
Click the Save and Close button on the top right corner. The created persona is displayed in the Insurance Persona List grid.
You can delete any insurance persona record in the Insurance Persona List by ticking one or more records and clicking Delete  on the top right corner. In addition, the insurance persona data can also be exported in an .xsls file by clicking the Export
  button on the top right corner.


