Creating Insurance Products
Follow the steps below to add a new Insurance Product:
-
In Innovation Studio, at the top left corner of your screen, click the main menu icon to open the main dropdown list.
-
From this main list, click Insurance Product Factory. A second panel opens, to the left.
-
Next, click Insurance Products to go to the Insurance Products List.
-
On the Insurance Products List page, click Insert, at the top right corner of the page, to add a new record.
When you click Insert to add a new insurance product, the Insurance Product dynamic form opens.
This form allows you to create your desired product and configure the product settings. To complete the creation journey for any product, you go through all the tabs listed below. Filling in information in the first tab activates the next tabs and lets you move forward. The solution also displays different product configuration options, based on what you establish as product behavior when filling in information in the first tab.
If you need to interrupt your journey, you can use the Save and close button to save your product as Draft. While the product is in Draft business status, the form is still editable, and you can complete the journey at a later time.
Prerequisite: In order to create an Insurance Product, at least one Insurance Type must be defined!
The following are the available tabs for creating your product:
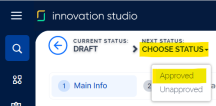
When you finished configuring it, you must activate your product by using the status picker, at the top left corner of your product screen.
Below, an example of where to find the status picker:
Product status determines if your insurance product is used in digital journeys targeting potential customers. In order to make it available to different digital journeys, the product should be in the Approved status. For details, see the Product Life Cycle page.
