Test Calculations
With FintechOS technology, you can create your own insurance formulas, process data for modeling and interpretation, and cast advanced pricing models. The Business Formulas solution, for example, allows you to design formulas that can be attached to different calculating targets (e.g. product pricing/ steps in underwriting flows), and, by doing so, reduce the completion time for those calculations. Moreover, the solution has also a testing feature that allows you to test the formulas you design, before activating them.
Every insurer needs to calculate, calculate and recalculate how the variables related to the insured object influence say the cost of each peril (or a group of perils) and use the resulting knowledge when designing their products. This is where the Insurance Product Factory comes into play: the solution helps you with shortening the time from formula to product design, since it provides access to your formulas and a testing functionality without leaving the context of your product. Subsequently, the Test Calculations functionality helps you to test your formulas, thus contributing to fine-tuning and improving the general performance of your product.
The Test Calculations tab allows you to:
-
perform the calculations according to the Tariff Type and Underwriting Type, set for the specified per product, or product item (coverage).
-
test the pricing and underwriting formulas attached to your product, or coverages.
-
see the results you get with different Testing Scenarios.
-
save the tests you consider relevant, for further processing.
-
perform and store unlimited numbers of tests.
Only one formula can be attached to a specified product, or coverage, at a time.
Test Calculations View
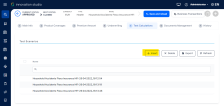
The Test Calculations tab offers you an overview of all the test scenarios registered for the current product. This is an all-inclusive view; yet, you can also use the Search option in order to find a specific peril record.
Below, an example of the Test Calculations main grid, with some registered scenarios:
Inside this grid,
-
To inspect a record from the grid, double-click it.
-
To add a new test calculations record, click Insert, at the top of the grid.
-
To edit a record from the grid, double-click it and make your updates. Next, click Save and close.
-
To delete a record from the grid, select it and click Delete, at the top of the grid.
-
To export a record from the grid, select it and click Export, at the top of the grid.
Create A Test Scenario
To add a test scenario that helps you test a formula attached to a product, or product item (coverage), follow the steps below:
-
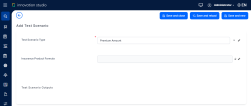
In the Test Calculations tab, click Insert. The Add Test Scenario insert form opens.
The form displays the fields according to the previously chosen Tariff Type - namely, you can create a test calculation scenario either for an Insurance Product Formula or for an Insurance Product Item Formula, depending on the product configurations.
Below, an example of the insurance test scenario insert form:
-
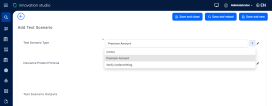
From the dropdown list select a Scenario Type to be used for calculation. The options are: Premium Amount calculation or Verify Underwriting.
Below, an example of how to choose a test scenario type:
-
Use the picker (arrow) to select the Formula to be used for calculation:
-
For the Premium Amount scenario type, the picker list contains only the premium calculation formulas that are mapped to your product, or coverages.
-
For the Verify Underwriting scenario type, the picker list contains only the underwriting formulas that are mapped to your product, or product items.
-
-
Click Save and reload. The Key & Value grid becomes available.
-
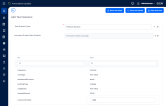
Inside this grid, fill in the values for the exposed keys. Pay attention to that fact that the text values are case sensitive!
Below, an example of the insurance test scenario insert form, with some filled in details in the Key & Value grid:
-
Click Save and reload. The Calculate button and the option to (check) Save the Output Data become available. The Test Scenario Outputs grid becomes available, also, at the bottom of the form.
Below, an example of the insurance test scenario insert form, with the Calculate and Save the Output Data buttons, available after Save and reload:
-
Press the Calculate button and see the results of your test displayed as a secondary Key & Value grid, right under the first one. If you selected the Save the Output Data option, you can notice your test results being logged on, in the Test Scenario Outputs grid, at the bottom of the form.
-
You can repeat the steps 6, 7, and 8 for as many test calculations you need to perform, for this particular scenario.
-
Click Save and close.
