Configure Cancellation Reason Types
Policy Administration allows you to configure the reasons why a policy can be cancelled and also, if a specific cancellation reason type should be included as a reason type for a Masterpolicy beside the policy. The reason types are used during the cancellation flows for policies and masterpolicies.
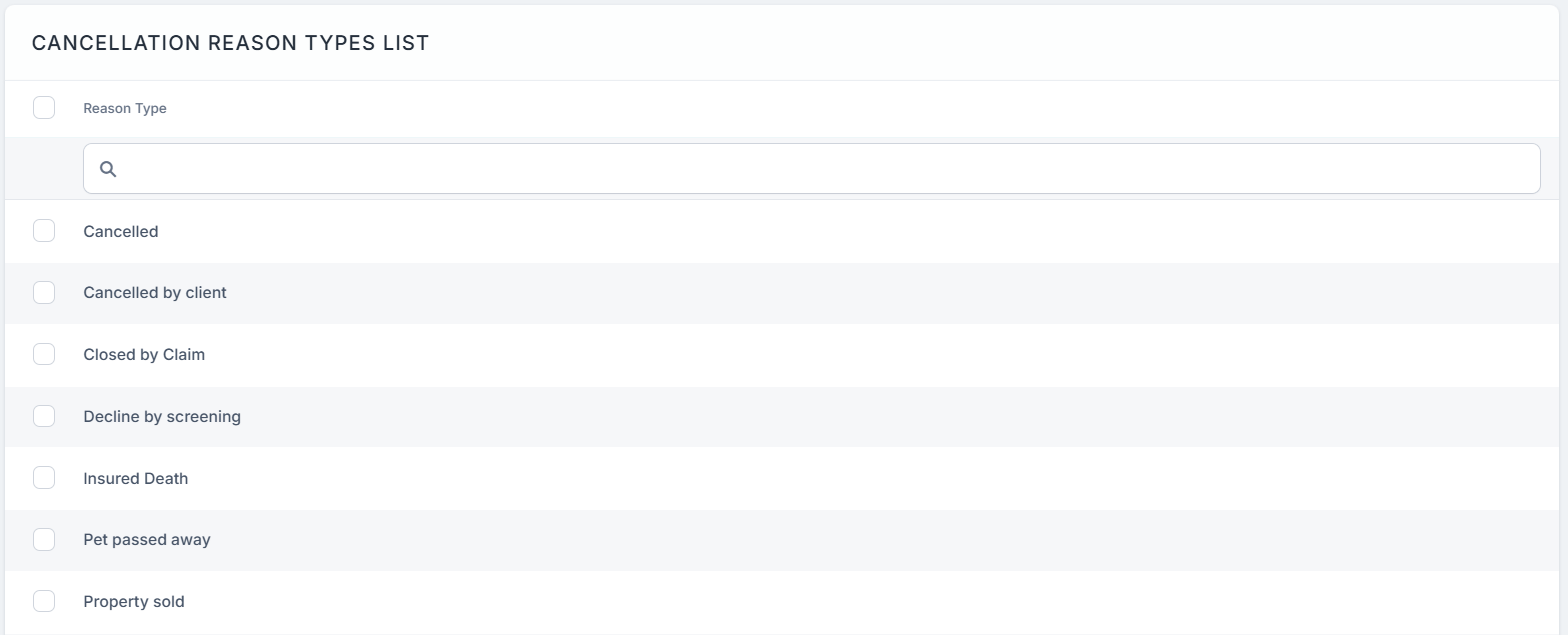
Presented below are the default Reason Types for cancellation, and the business statuses for policies and masterpolicies:
| Reason Type | Policy Status | Masterpolicy Status |
|---|---|---|
| Cancelled | Cancelled | Cancelled |
| Cancelled by client | Cancelled | Cancelled |
| Closed by Claim | Closed by Claim | Cancelled |
| Decline by screening | Decline by Screening | Cancelled |
| Insured Death | Cancelled | Cancelled |
| Pet passed away | Cancelled | n/a |
| Property sold | Cancelled | Cancelled |
| Withdrawal | Withdraw on Client’s Request | Withdraw on Client’s Request |
Custom Reason Type
You can create your own cancellation reason types by following the steps below:
-
In FintechOS Portal, navigate to Settings > Cancellation Reason Types.
-
The Cancellation Reason Types grid is displayed. Insert a new reason type by clicking the Insert button.
-
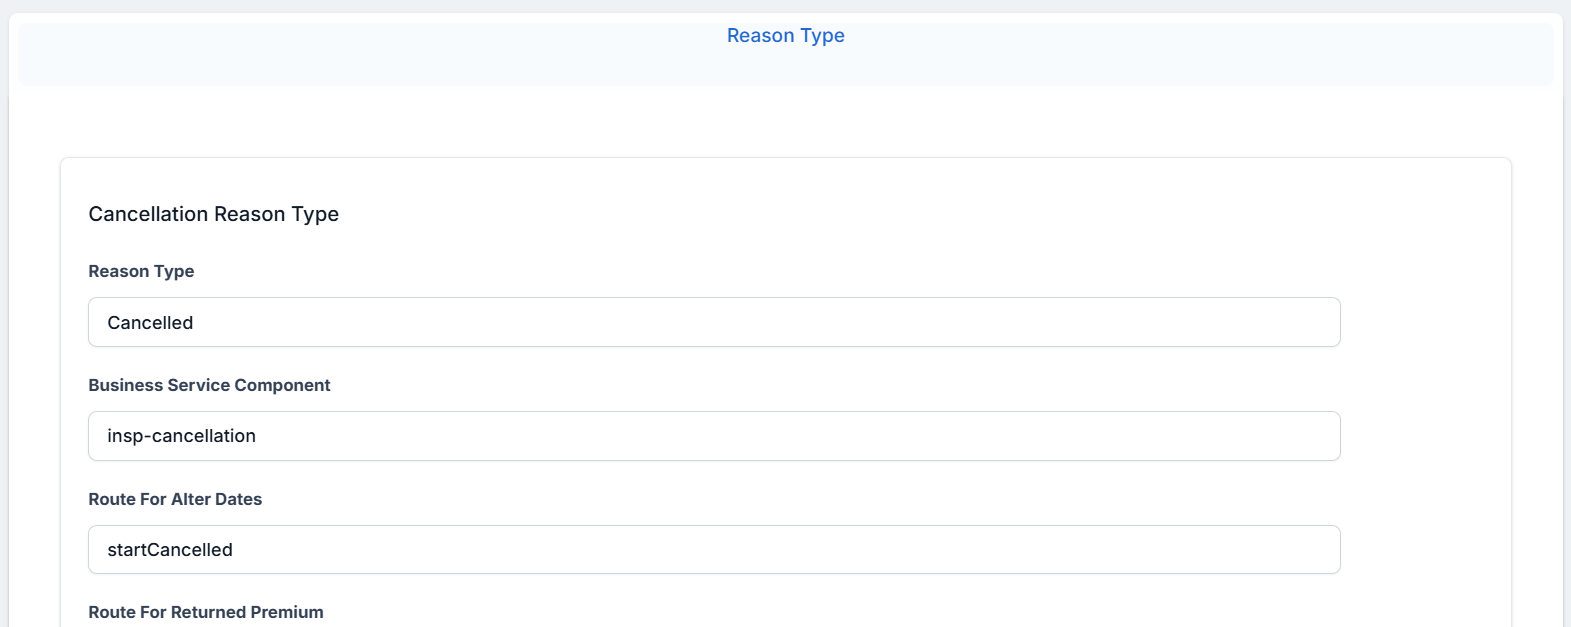
Fill in the fields:
-
Reason Type: name of the cancellation type.
-
Business Service Component: the name of your business component. For default cancellation reason types presented below, the business component is insp-cancellation. The following routes are in this business component:
-
Route for Alter Dates: the name of the route part of the business component. Here is the code that calculates
requestedEndDateandfinalEndDate. -
Route for Returned Premium: the name of the route part of the business component. Here is the code that calculates the amount to be returned.
-
-
Payment Details Mandatory: check whether payment details are mandatory or not.
-
Policy Status: pick from available business statuses.
-
Master Policy: check the box and choose the Masterpolicy Status from the drop down field. If the box is checked then the current cancellation reason type also appears for a Masterpolicy cancellation. If it is not checked, the current cancellation reason type is not displayed as a reason type for a masterpolicy cancellation.
-
Async Flow For Register Cancellation and Async Flow For Approve Cancellation are used for configuring custom actions during the cancellation flow, as explained lower on this page.
-
-
Click Save and Reload.
-
The Insurance Type grid is unfolded, where you can configure the insurance type for which the reason type applies. By default, any insurance type you add on a reason type has
isGeneric = trueand all products with that insurance type have the reason available. But if you makeisGeneric = false, you can choose only specific products with that Insurance Type that will have the reason type available. -
Click Save and Close.
You can also configure a business status mapping between the Cancellation reason type and policy and masterpolicy statuses. For example, the Decline by Screening reason type triggers the transition of a policy to the Decline by Screening business status, and a masterpolicy to Cancelled, after reaching the Cancellation Final End Date.
Custom Actions during Cancellation
You can add custom actions when registering or approving a cancellation. Follow the steps below:
-
Add a new flow in Configuration Manager > Async engine > Flow config. For example:
Copy{
"flowName": "FTOS_INS_CustomActionForCancellationAsync",
"queueMappings": [
{
"sourceQueueName": "ftos-ins-generatenotecancellation",
"endpointName": "FTOS_CMB_SaveNote_AsyncEngine",
"maxThreads": 10,
"initial": true
}
]
}Here you need to set:
-
endpointName: the endpoint that will be called on that custom action;
-
queue name: the queue that will received the calls.
-
-
Add the new queue in Configuration Manager > Async engine > Queue config. For example:
Copy{
"name": "ftos-ins-generatenoteforcancellation",
"maxMessages": 10,
"timeToLive": 1
} -
Create the endpoint that will include the logic that you want to be applied on registering or approving a cancellation.
-
Add the Registered User role to the endpoint.
-
On the cancellation reason type for which you need that action to be applied, set the endpoint name in the desired field, Async Flow For Register Cancellation or Async Flow For Approve Cancellation.
Make sure that the queue name matches the queue set at step 1.
The cancellation Id (the id of the Cancellation) is sent to the custom endpoint as a parameter.