Endpoints
Endpoints specify the location where clients can access on-demand Server Automation Scripts. Endpoints can also be created from the routes section of a business service component.
You can create an endpoint, attach security roles, assign an automation script to it, then on digital journeys or data forms run Call Actions to it.
Create an endpoint
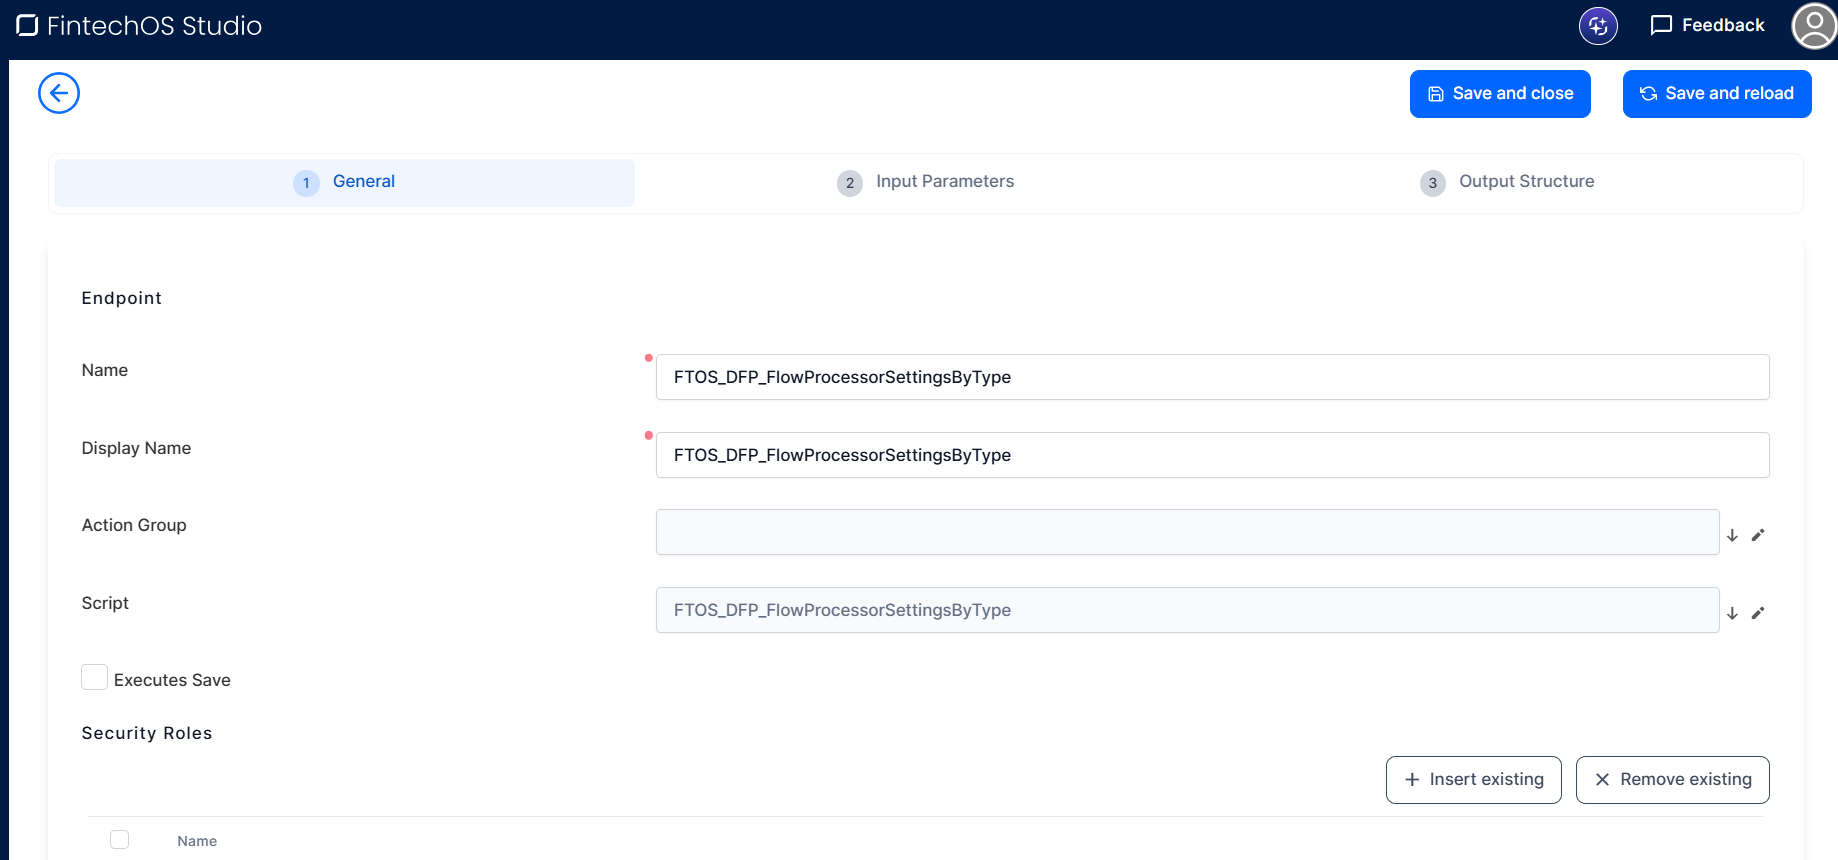
- In FintechOS Studio, go to Main Menu > Advanced > Endpoints.
- Click Insert.
- In the Name field, type the name of the endpoint which will be used by the system. Endpoint names must begin with a letter and contain only alphanumeric characters and underscores.
- In the Display Name field, type the name of the endpoint which will be displayed in the user interface.
- (Optional) If you are working with actions groups, in the Action Group field, select the desired action group you have previously created. For more information on action groups, see Defining Action Groups.
- From the Script drop-down, select the on-demand automation script you previously created.
- If the endpoint is set on a form's action group, when the action group is triggered in the user interface, you can save the form's data before the action group is executed by ticking the Executes Save checkbox.
- If you are generating an endpoint from a route section part of a business service component, pick the component from the drop-down list in the Business service component field.
- Choose the Route Name from the drop-down list.
- Pick the Http Verb, which is the request method to indicate the purpose of the request and what is expected if the request is successful. Pick from: delete, get, patch, post, put.
- Click Save and close to save the endpoint or Save and reload to Attach a security role to an endpoint.
You can now go to the digital journey or data form and run a call action to the server automation script.
Attach a security role to an endpoint
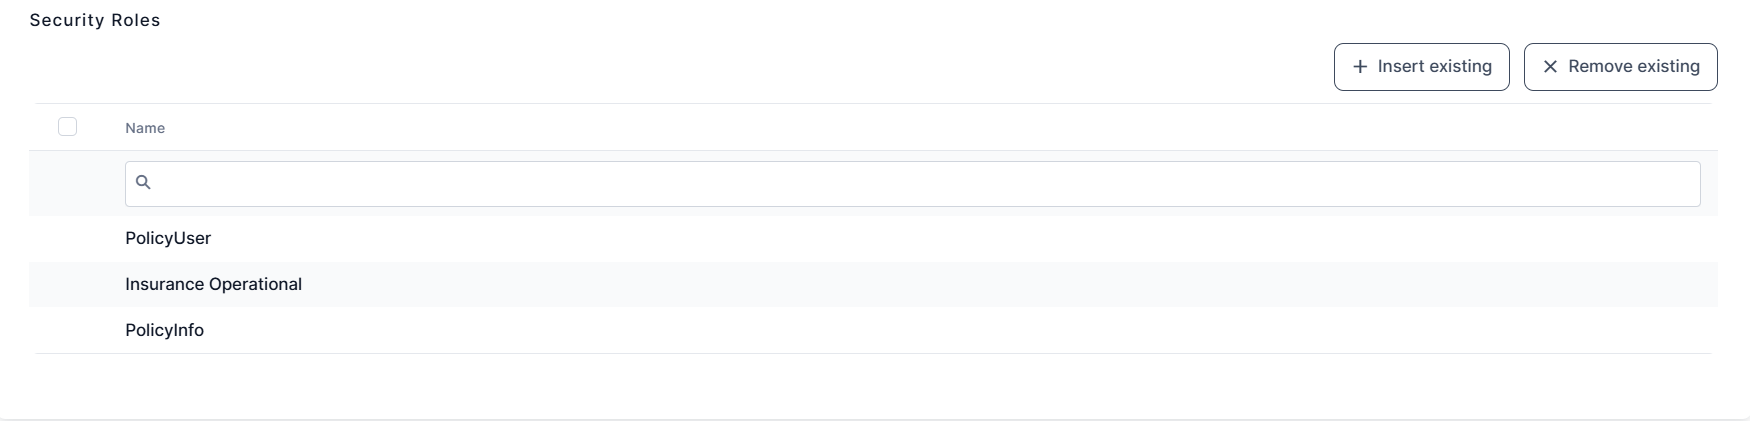
To enforce security, you can choose which Security Roles have the privileges to call actions on an endpoint.
When calling actions on endpoints which have no security roles attached, errors will occur and the actions will not be performed.
For backwards compatibility, the security role “Registered Users“ is automatically added to all endpoints created in previous versions of FintechOS Studio. But, this does not ensure the backwards compatibility for unauthenticated portals. In this case, you need to manually configure or import the security roles assignment.
To attach a security role to an endpoint:
- Open the endpoint, scroll down to the Security Roles section, and click Insert existing.
- Select a security roles from the list by double-clicking or add a new security role (click Insert and provide all details required to create a new security role). The selected security role is displayed in the Security Roles section.
- Click Save and close to save the endpoint.
Customize the Input Parameters
You can define mandatory input parameters that must be passed to the script by the client process and you can enable intelligent code completion in the code editor for the script's input parameters.
To define an input parameter:
- Open the endpoint in the editor and select the Input Parameters tab.
- In the Workflow Input Parameters list, click Insert to add a new parameter to the list.
- Fill in the input parameter's details:
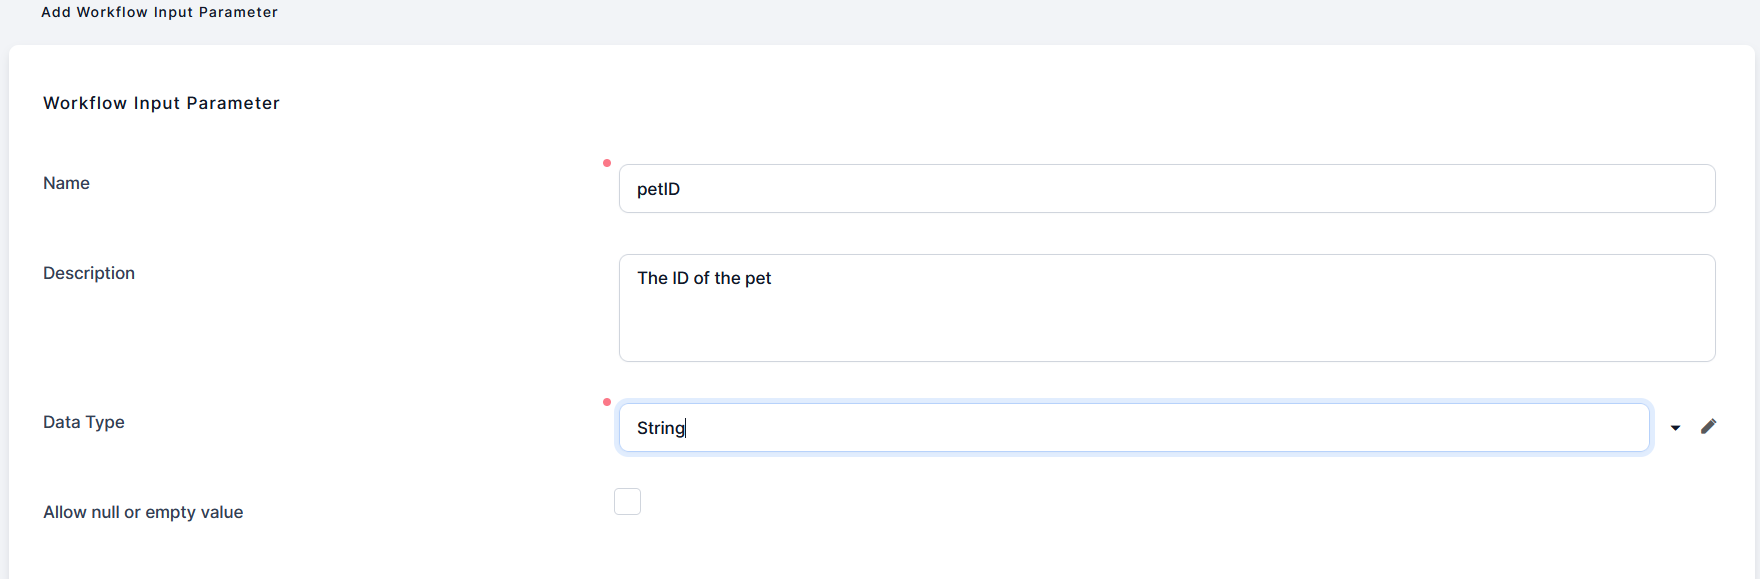
 Name
NameEnter a name for the input parameter. The name must match the incoming variable name provided by the client process.
Description(Optional) Enter a description for the parameter.
Data TypeSelect the parameter's data type. Currently supported data types are any, numeric, boolean, string JavaScript object and custom types.
When the custom data type is selected, the Custom Type Definition field appears. There, you can manually add a JSON schema or create one automatically using the Generate JSON schema button. A JSON schema helps manage the required format for a JSON object.
IMPORTANT!
The schema is used to validate the custom data-type parameters when triggering a server automation script using an ebs.callActionByNameAsync type of Server SDK function. The objects of the parameter should match the declared JSON schema.Check the JSON object properties are required box if the properties of the JSON object are mandatory. If the properties are optional, either leave the box unchecked or delete them from the
"required":field.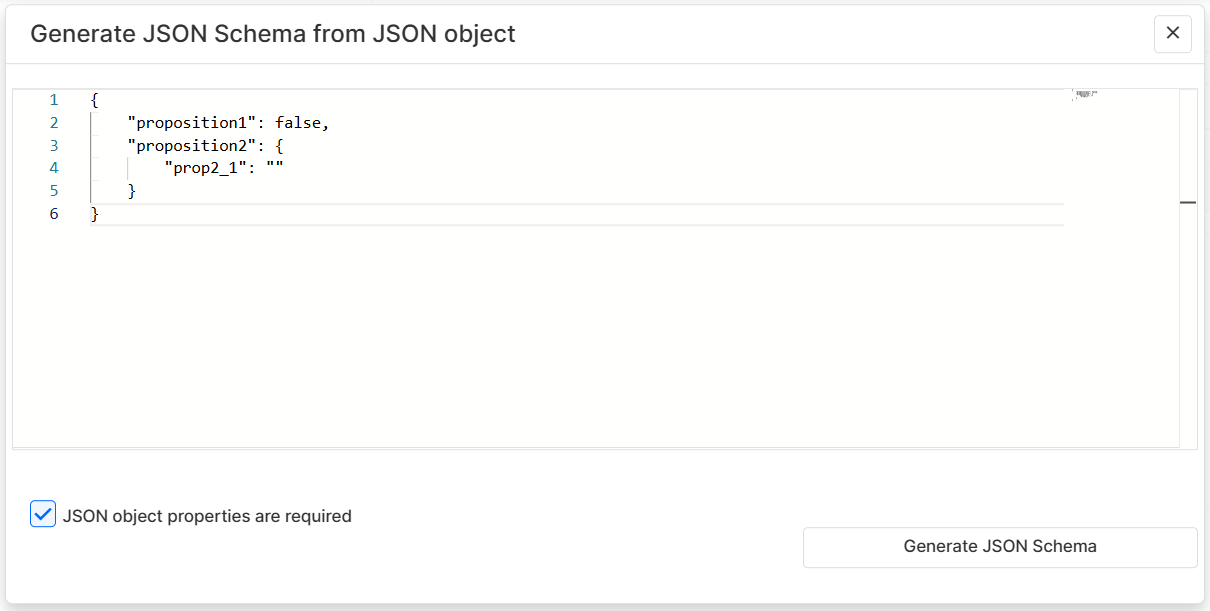
The value for the object properties of the
“type”: ”string”have the corresponding format set in the JSON schema: some of the possible formats are"date-time","time","email","uuid".NOTE
After saving the input parameter, the description of the JSON object and its properties will be displayed when using intelligent code completion (IntelliSense) in the code editor.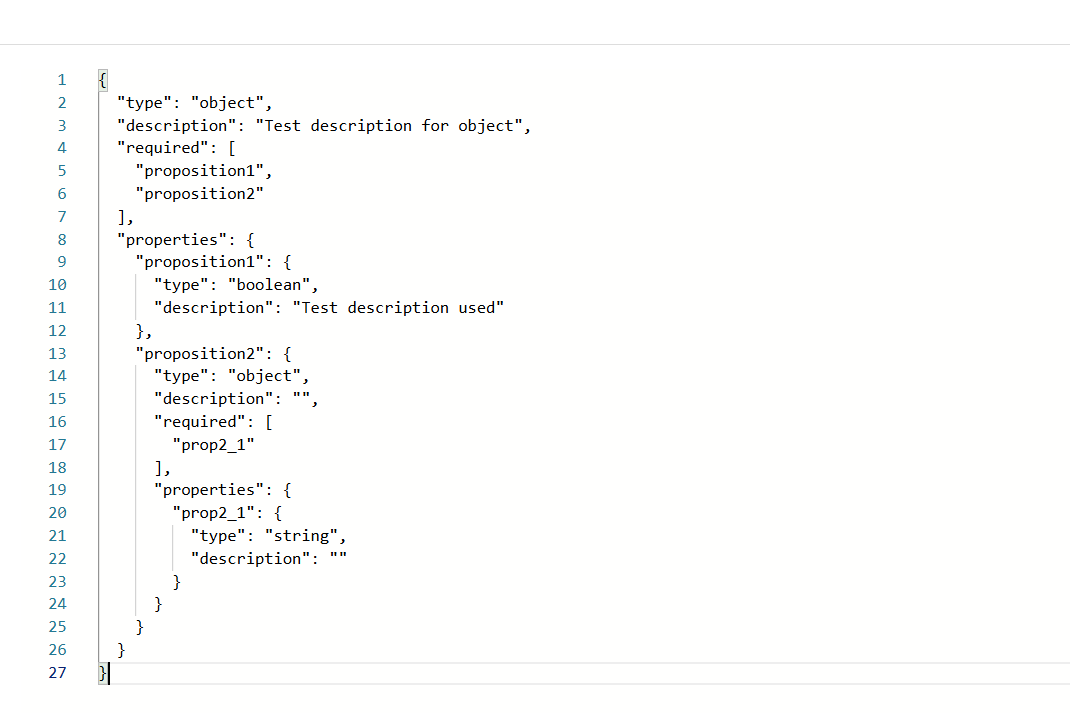 Allow null or empty value
When unchecked, this parameter requires a value. Check to allow null, making it optional in the automation script. By default, this option is unchecked, meaning it requires a value.
- Click Save and close.
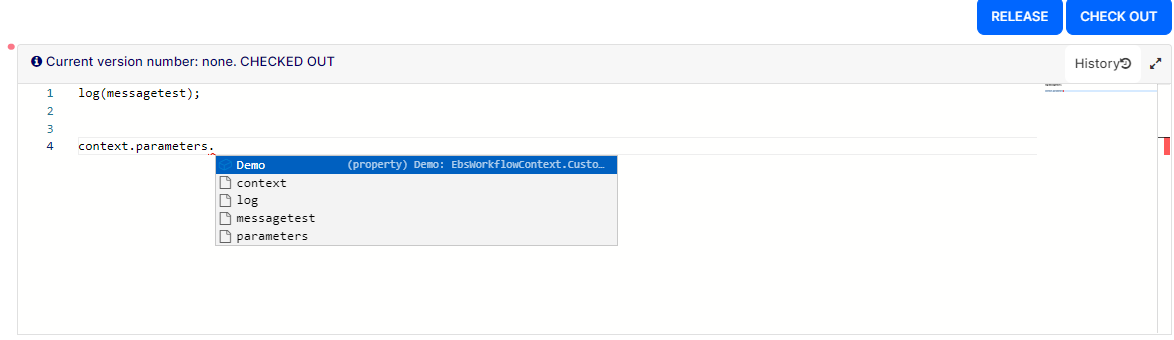
Once defined as above, you can use the context.parameters property in the code editor to access the script's input parameters with intelligent code completion.
Customize the Output Structure
You can customize the script's output structure to enable intelligent code completion for the result passed to the client-side callback function. You can map the output structure to an entity data model, or you can define your own custom structure. Also, you can specify if the output is in the form of a single object instance, or if it is a collection of objects each matching this output structure.
To define the script's output structure:
- Open the endpoint in the editor and select the Output Structure tab.

- Select the Output Structure Type:
- Entity - The output structure is based on an entity data model, matching the entity's attributes' names and types.
- Custom - Select this option if you wish to define the script's output structure manually.
- Boolean - Select this option if the script returns either a true or false result, for instance if you wish to use it for validations.
- Check the Use Json Schema For Output Structure to use a JSON schema for the output structure field.
- Select the Output Parameter Type:
- Single Instance - The script result is a single object instance.
- Collection - The script result is a collection of objects.
- If you selected an output structure type based on an entity, select the Output Structure Entity. This is the entity providing the data model for the output structure.
- If you selected a custom output structure , fill in the Output Structure Custom field in the following format:Copy
{
    "name1" : "dataType1",
    "name2" : "dataType2"
}
NOTE
If you checked the Use Json Schema For Output Structure box, add in the Output Structure Custom field a JSON schema or create one from a JSON object using the Generate JSON schema button as mentioned in the Customize the Input Parameters section. - When leaving the Allow null value option unchecked, this parameter requires a value. Check to allow null, making it optional in the automation script. By default, this option is unchecked, meaning it requires a value.
- Click Save and close.