Online and Mobile Banking Application
This chapter describes the functionalities available to the end-user, from here they can access accounts and initiate transactions. When a user of Online and Mobile Banking opens the solution, the login is done using Strong Customer Authentication![]() Strong customer authentication (SCA) is a requirement of EU Revised Directive on Payment Services (PSD2) on payment service providers within European Economic Area. The requirement ensures that electronic payments are performed with multi-factor authentication, to increase the security of electronic payments.[1] Physical card transactions already commonly have what could be termed strong customer authentication in EU (Chip and PIN), but this has not generally been true for Internet transactions across EU prior to the implementation of the requirement,[1] and many contactless card payments do not use a second authentication factor.. Afterward, the homepage is displayed, a user can access banking services such as transfers and viewing accounts.
Strong customer authentication (SCA) is a requirement of EU Revised Directive on Payment Services (PSD2) on payment service providers within European Economic Area. The requirement ensures that electronic payments are performed with multi-factor authentication, to increase the security of electronic payments.[1] Physical card transactions already commonly have what could be termed strong customer authentication in EU (Chip and PIN), but this has not generally been true for Internet transactions across EU prior to the implementation of the requirement,[1] and many contactless card payments do not use a second authentication factor.. Afterward, the homepage is displayed, a user can access banking services such as transfers and viewing accounts.
Logging into Online and Mobile Banking
- Access the link to the FintechOS Portal.
- New customers must register first by clicking Register. The Online User Enrolment Request page opens. Follow the process described there.
or
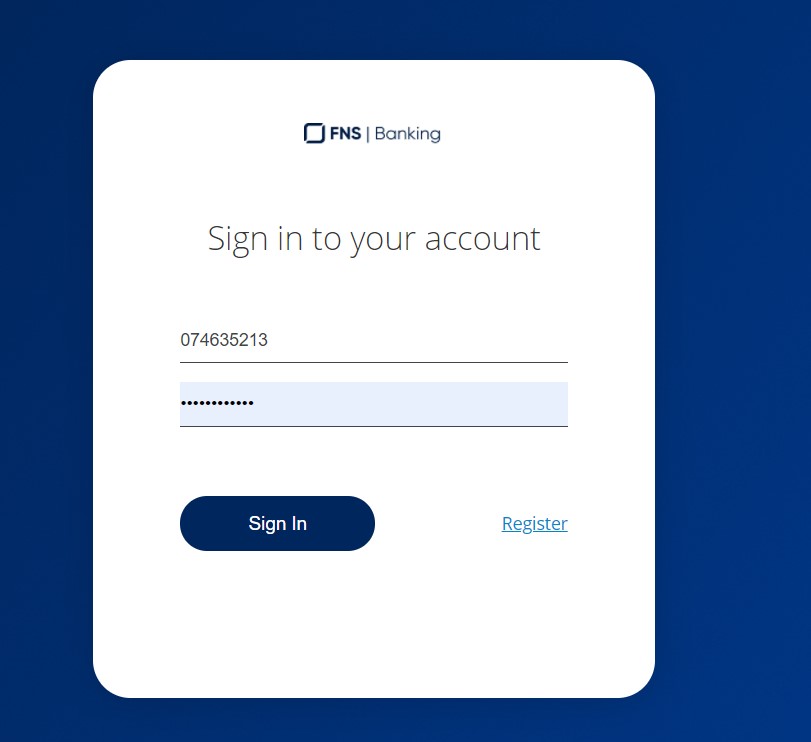
- For registered users, insert the username or email address and password.
Click Sign in.
- The pop-up window's title changes to SMS with the message A text message containing a 6 digits validation code has just been sent to ********123. Insert the code received by SMS.
- Click Next.
-
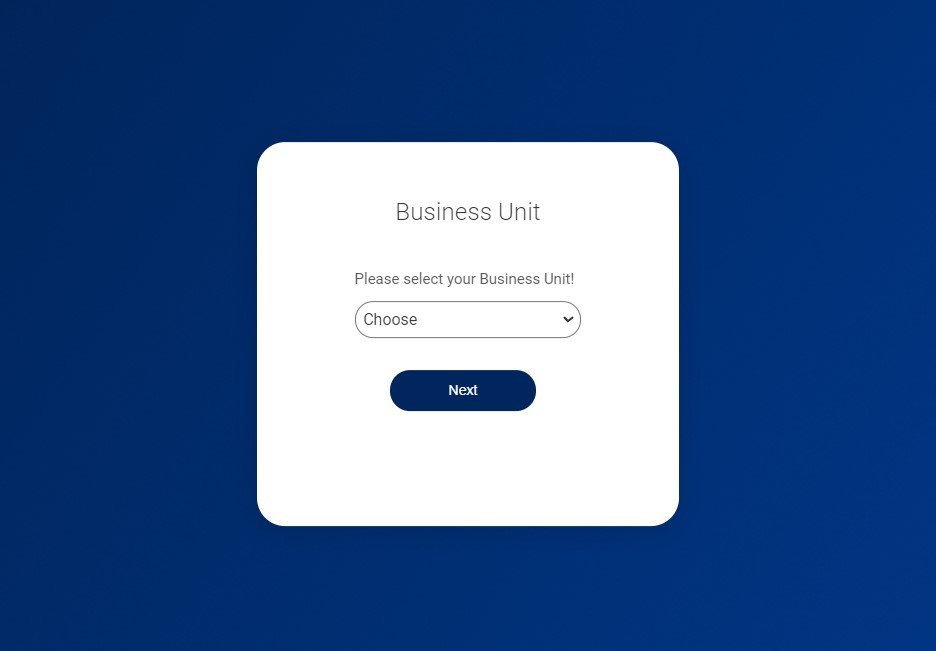
Choose the Business Unit from the drop-down field, i.e., the customer for whom the transaction is made. This screen is available for users with access to multiple customers with only one set of credentials. Selecting a business unit is essential for security reasons.
 IMPORTANT!
It applies only to the users who belong to multiple business units. A user can have access to multiple customers, therefore, there are multiple business units to which they are allocated. - Click Next.
The Homepage is displayed. Depending on the campaign the bank is organizing, after the login, the bank can send a message to the user via a pop-up, for example, it can have a header, a date, the body of the message and two buttons: Message read or Log out. Click the Message read button to access the homepage. The message is available in Inbox.
Homepage
The homepage has the following sections:
- Header
- Overview
- Accounts (liabilities)
- Products (assets)
- Transaction History summary and List of Orders
- Exchange Rates
- Footer.
Header

- Company logo. By clicking this icon, you return to the homepage.
- Inbox messages. By clicking this icon the list of messages received from the system is displayed.
- Change password. By clicking this icon symbolizing a key, the user can change their password.
- Username. The username is displayed here with a photo of the user. Click it to open several other features.
- The language selector. By clicking this icon, a list of available languages is displayed with the respective flags.
- Log off button. By clicking this button the user is able to log out of Online and Mobile Banking.

The main panel displays the Welcome back message and the first name
The Refresh button can be used to refresh the page (the accounts and balance)

Changing your password
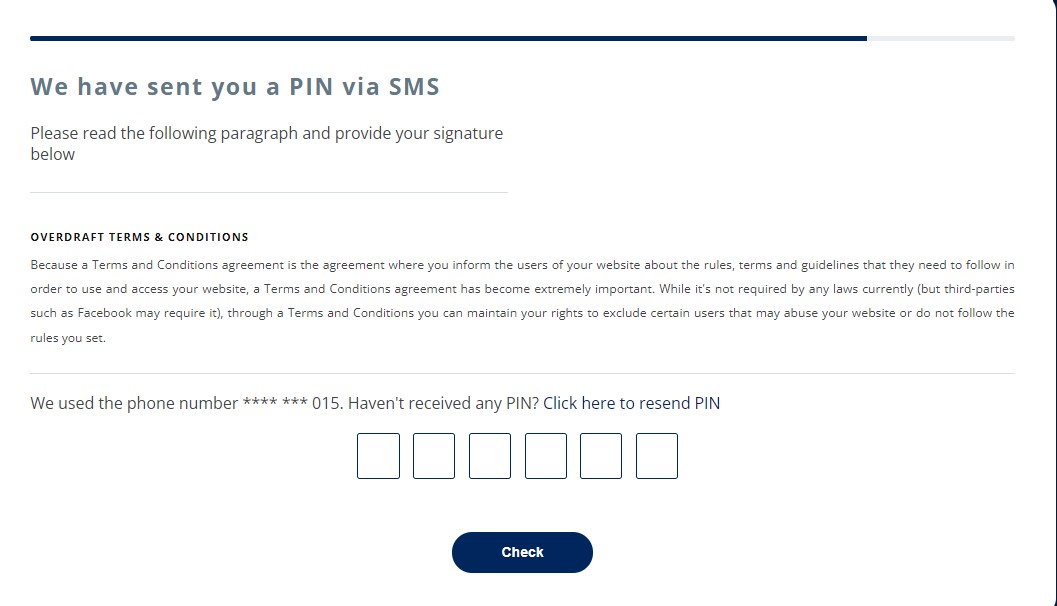
- Click the key icon. It opens the page We have sent you a PIN via SMS. with the message:
Please read the following paragraph and provide your signature below. Overdraft Terms& Conditions. Because a Terms and Conditions agreement is the agreement where you inform the users of your website about the rules, terms and guidelines that they need to follow in order to use and access your website, a Terms and Conditions agreement has become extremely important. While it's not required by any laws currently (but third-parties such as Facebook may require it), through a Terms and Conditions you can maintain your rights to exclude certain users that may abuse your website or do not follow the rules you set. We used the phone number **** *** 000. Haven't received any PIN? Click here to resend PIN - There are six boxes. Insert the six numbers in each box. This is required to verify your identity.
or
If you did not receive the SMS, click Click here to resend PIN. The system displays the message: A new PIN was sent to you. Please check it on your phone.
If the code inserted is wrong, then the system displays the following message:
The code you entered (123456) is not correct, please try again or resend the code.IMPORTANT!
The maximum number for retries is 5. - After you inserted the code, click Check. The page Change Password is displayed. It holds the requirements for the structure of the new password.
- not recently used
- not sequence, letters, name of bank
- minimum 8 characters for the password
- password and username must be different
- the password must not be the email address
- the password must include digits, upper and lowercase, special characters
- Three fields are displayed. Fill in each.
Field
Data Type
Description
Old Password Text Insert the previous password. New password Text Insert the password you wish to use from now on. Confirm Password Text Insert the new password again. The two fields where the password is inserted must match. - Click Change password.
If you insert the previous password wrongly, the system displays a toast message saying: Old password cannot be verified.
Inbox
From the homepage, in the header, click the Inbox icon to display the following types of messages:
- the messages sent by the user to the bank
- the messages from the bank to the user
- pop-up messages from the bank to the user
- chat between the user and the bank with replies for bidirectional communication.
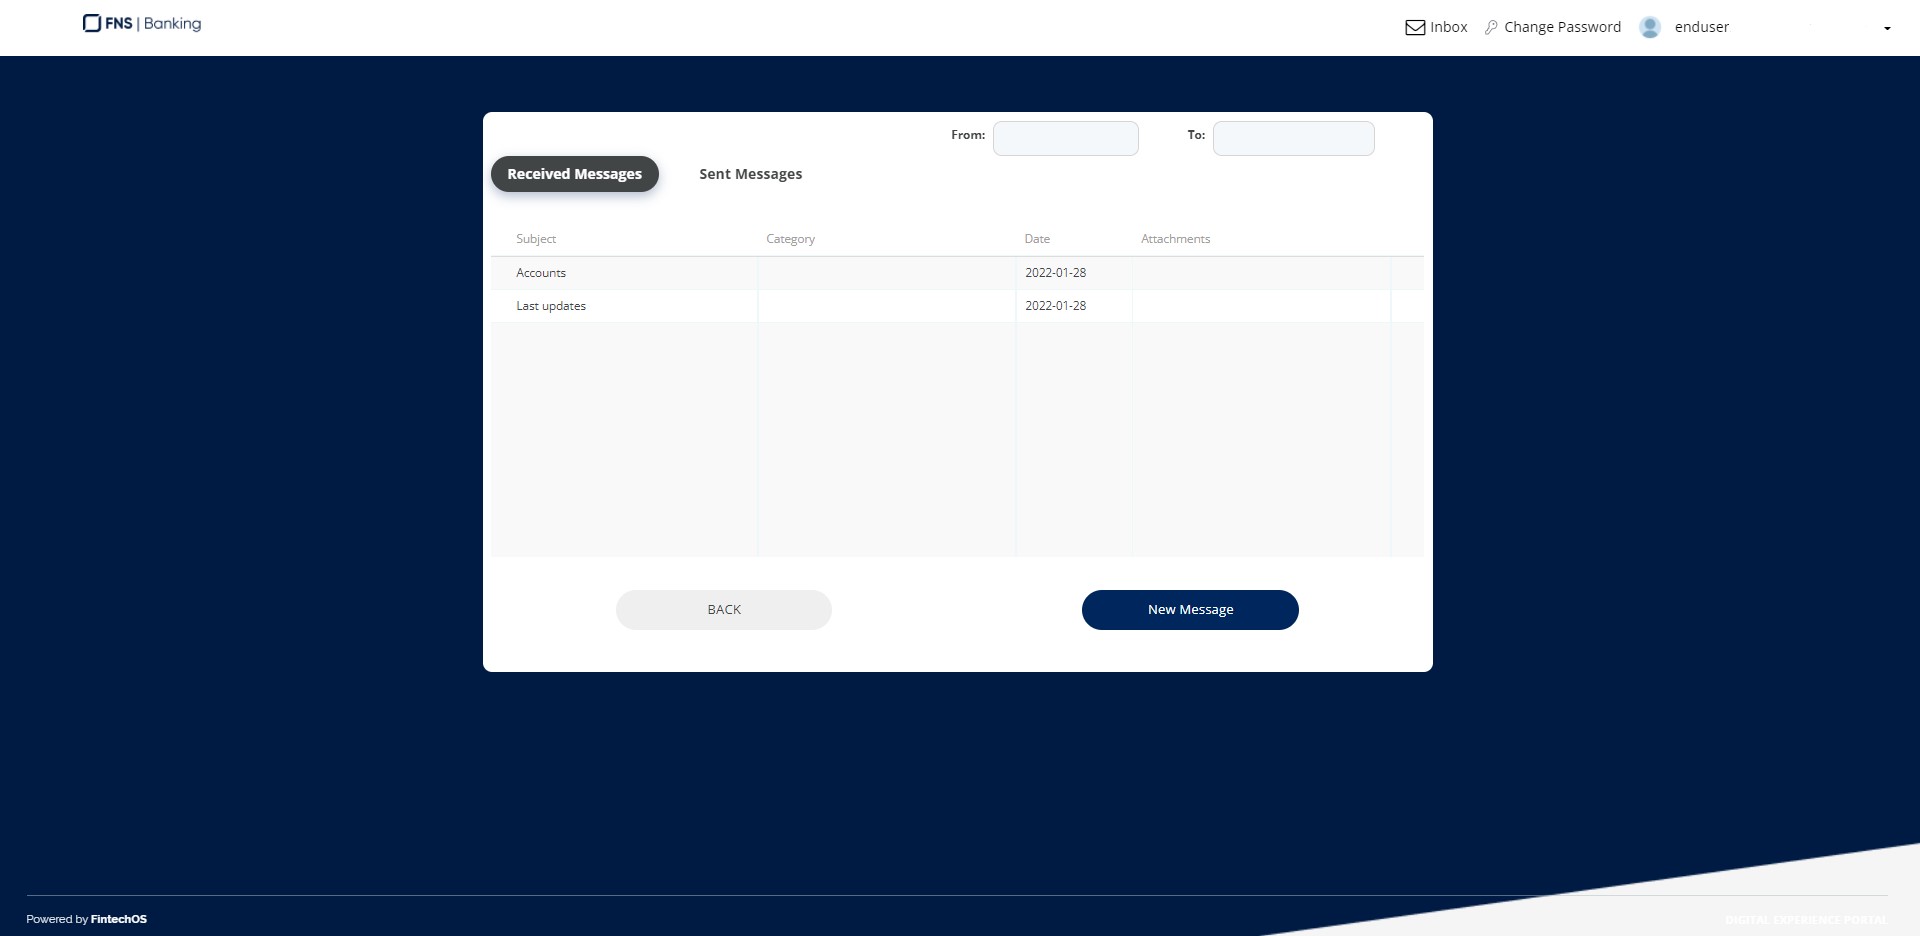
A user receives two types of messages:
- mailbox bulk messages: those displayed in Inbox
- mailbox pop-up messages: those displayed after login, mandatory to be read, afterword, the homepage is accessible.
All messages are displayed per client, regardless of the user that logged in. If a customer has multiple users linked, it is sufficient that one user logs in and reads the message for the message to be marked as read.
As a user, you can create a new message by clicking the button New message at the bottom of the page. Additionally, you can filter between the messages by:
| Field | Data Type | Description |
|---|---|---|
| Received Messages | Button | Messages sent by the bank. |
| Sent Messages | Button | Messages you sent to the bank. |
| From | Date | The beginning date. |
| To | Date | The end date. |
The grid organizes the messages by: Subject, Category, Date and Attachments.
Click on a message to display the Message Details page:
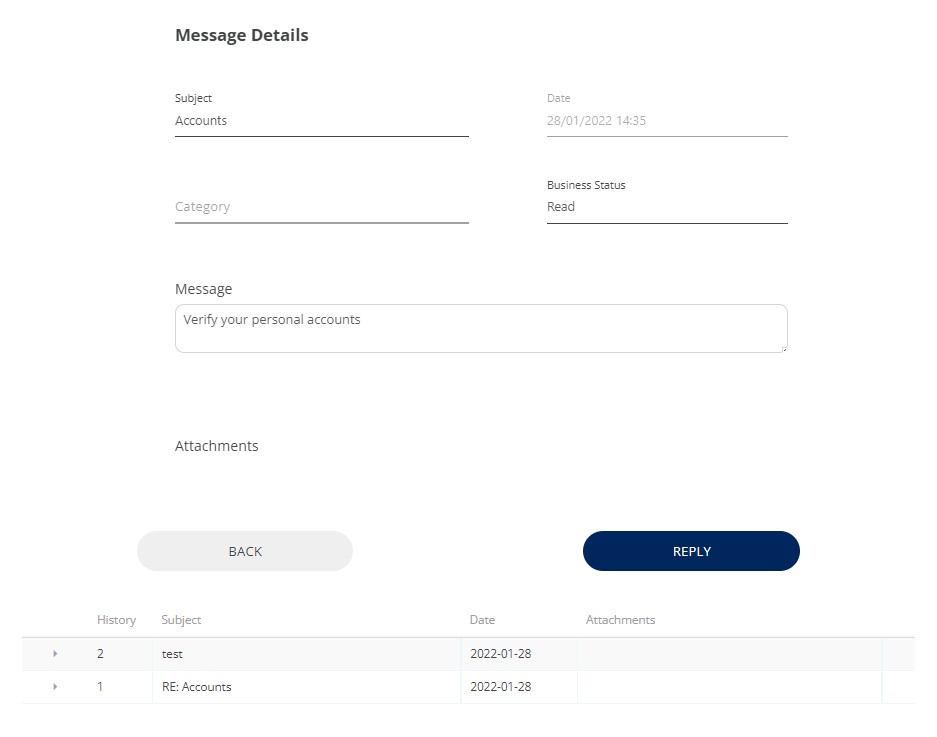
| Field | Data Type | Description |
|---|---|---|
| Subject | Text | The title of the message. It is read-only. |
| Date | Date | The date it was sent. It is read-only. |
| Category | Option Set | The category, e.g., loan message. It is read-only. |
| Business Status | Text | The status of the message, e.g., read. It is read-only. |
|
Message |
Text Area |
The body of the message. |
|
Attachments |
File |
The file added to the massage. |
Underneath, there is a history table with the replies to the message ordered by date. Click on a row to expand it and display the message and the name of the attachment. At the end of each row, there is a download symbol for the message that has an attachment. Click it to download locally the file.
Click Reply to send an answer to the bank. The system displays the New Message page with the fields:
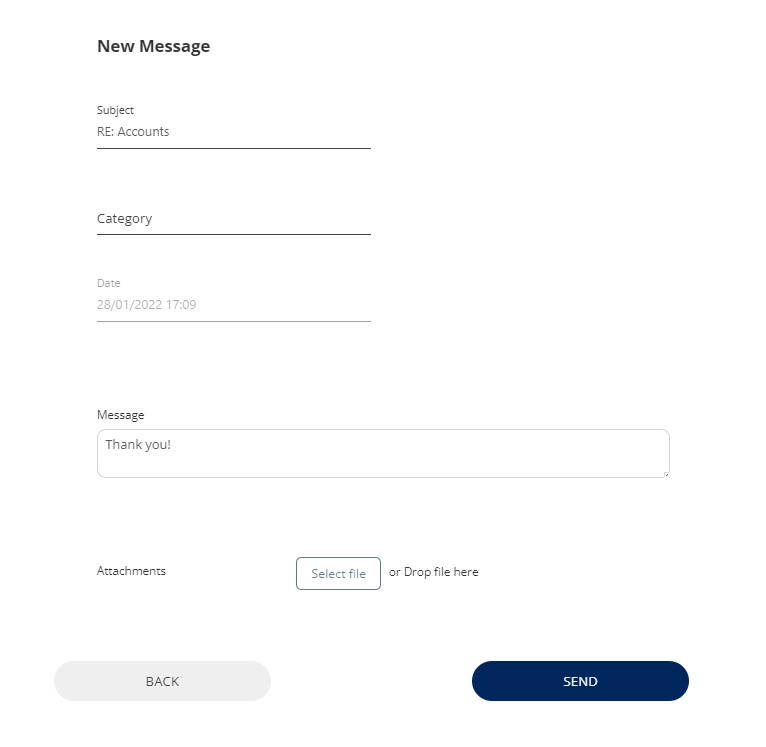
| Field | Data Type | Description |
|---|---|---|
| Subject | Text | Insert the title of the message. The maximum is 50 characters. It is read-only when replying to a thread and has the prefix "RE:" before the rest of the text. |
| Category | Option Set | Insert the category, e.g., loan message. It is mandatory. |
| Date | Date | The current date. It is read-only. |
| Message | Text Area | Insert the body of the message. It must have a minimum of three characters. |
| Attachments | File | Add a file to the massage. Only one file can be attached. |
In case the subject is not filled in or has less than 3 characters when the Send button is clicked, the following message is displayed: Please fill in minim 3 characters as Subject of the message.
In case the message body is empty or shorter than three characters, when the Send button is clicked, the following message is displayed: Minimum 3 characters to be filled in for the text message.
Click Send to dispatch the message. The system displays the We have sent you a PIN via SMS page. Insert the six-digit code in the six containers to authorize the message. Click Check. The system displays the message: Your message was successfully sent!
Click the Back button on the bottom of the page to return to the homepage.
Products Overview & Details
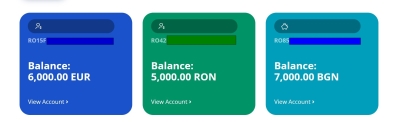
One of the most frequent use cases for any user is checking the account balance and verifying its product information. Users are able to view ay type of account.
The information is presented as cards on the homepage and whenever there are more accounts the user is able to swipe and get to the intended product fast.
For each type of account the details come with a standard product characteristics to be presented.
Each financial institution has its product features and knows which are the most relevant information for its users, the application is built so that during the implementation choosing which information to be shown from Core Banking is done in minutes.
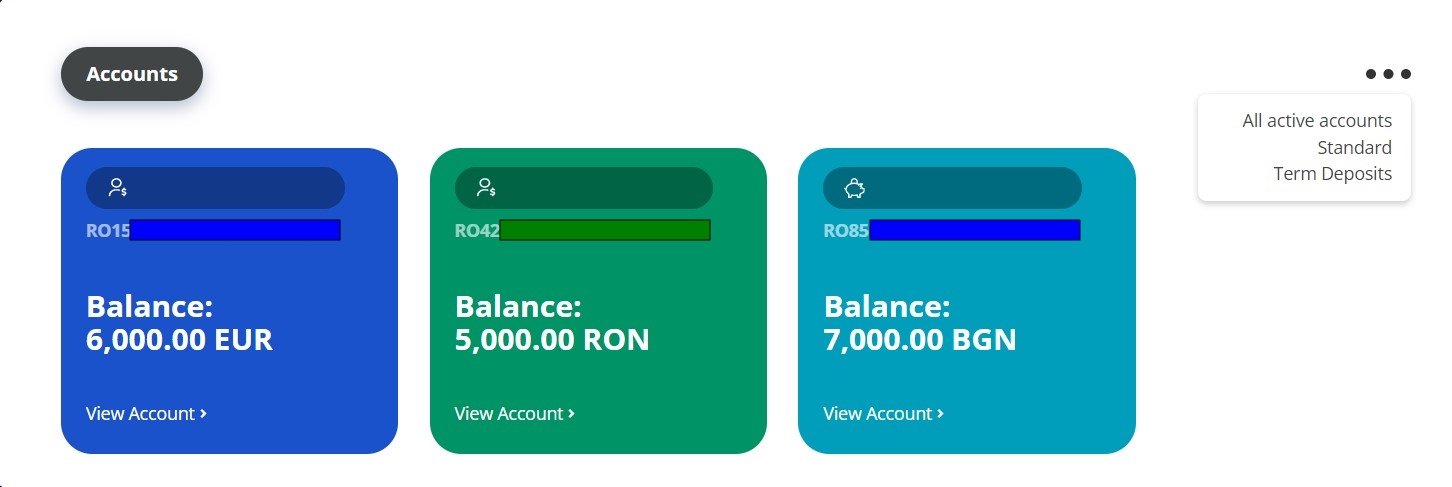
Accounts
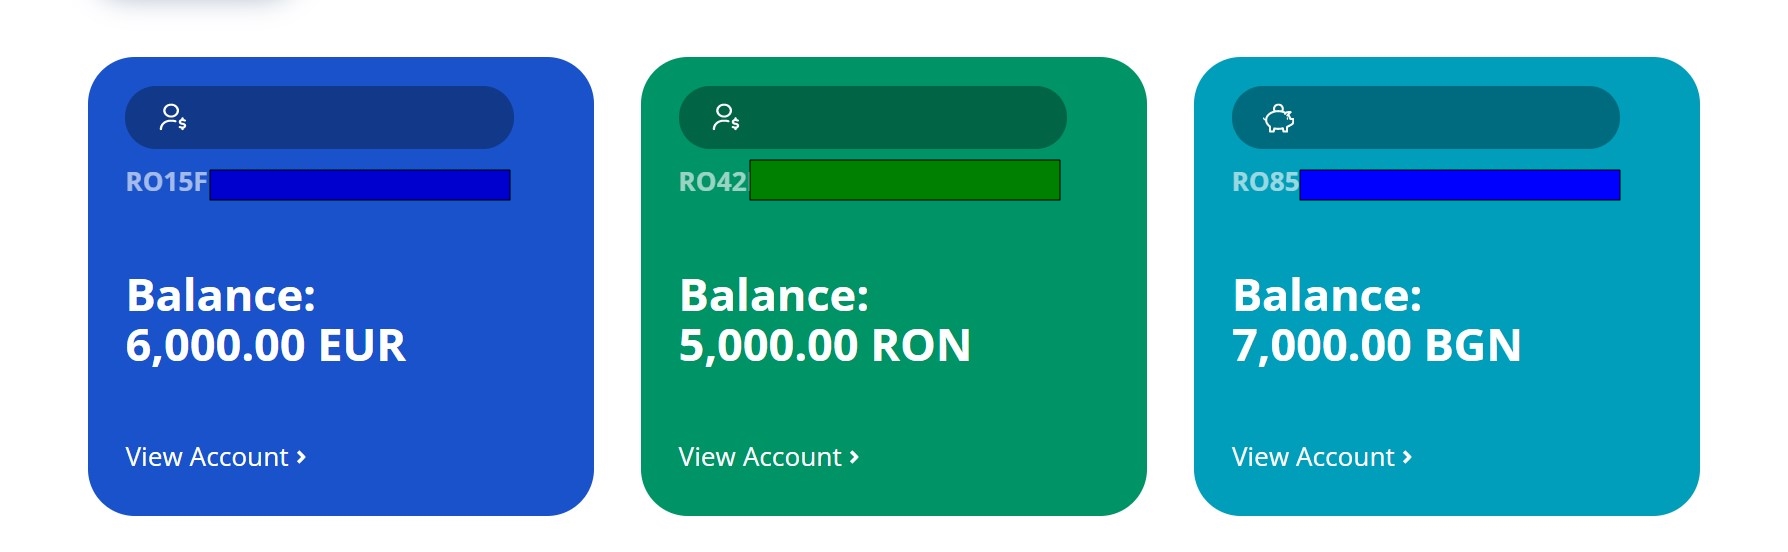
This section contains the accounts of the customer including the current accounts, deposits, salary account, and more. The accounts are ordered via the balance from the biggest to the smallest amount. It contains cards with the following information:
- the account alias
- type of account
- balance on that account
- IBAN
- account type
- View details button.
The main components of the Account details page can be split in:
- Product information
- Actions
- Transaction History.
Account Alias
Each account has a default name given by the system comprised of the type and the currency. However, you can modify it:
- Click View Account.
- Click the Edit button.
- Type the new name.
- Click Save. The system displays a confirmation message.

For more details on the generation of the alias, see Optional Technical Configurations.
Filtering between Accounts
On the list of accounts, there are three dots signifying the filter options on the right-hand corner of the Accounts list. Click the three dots to display the list of types of accounts that can be viewed:
- All active accounts
- Standard
- Term deposits
- Savings.
Click one of the listings to navigate between the accounts owned.
Click View account details to open the page of the account where more information is displayed such as opening date, interest rate, maturity date, and more.
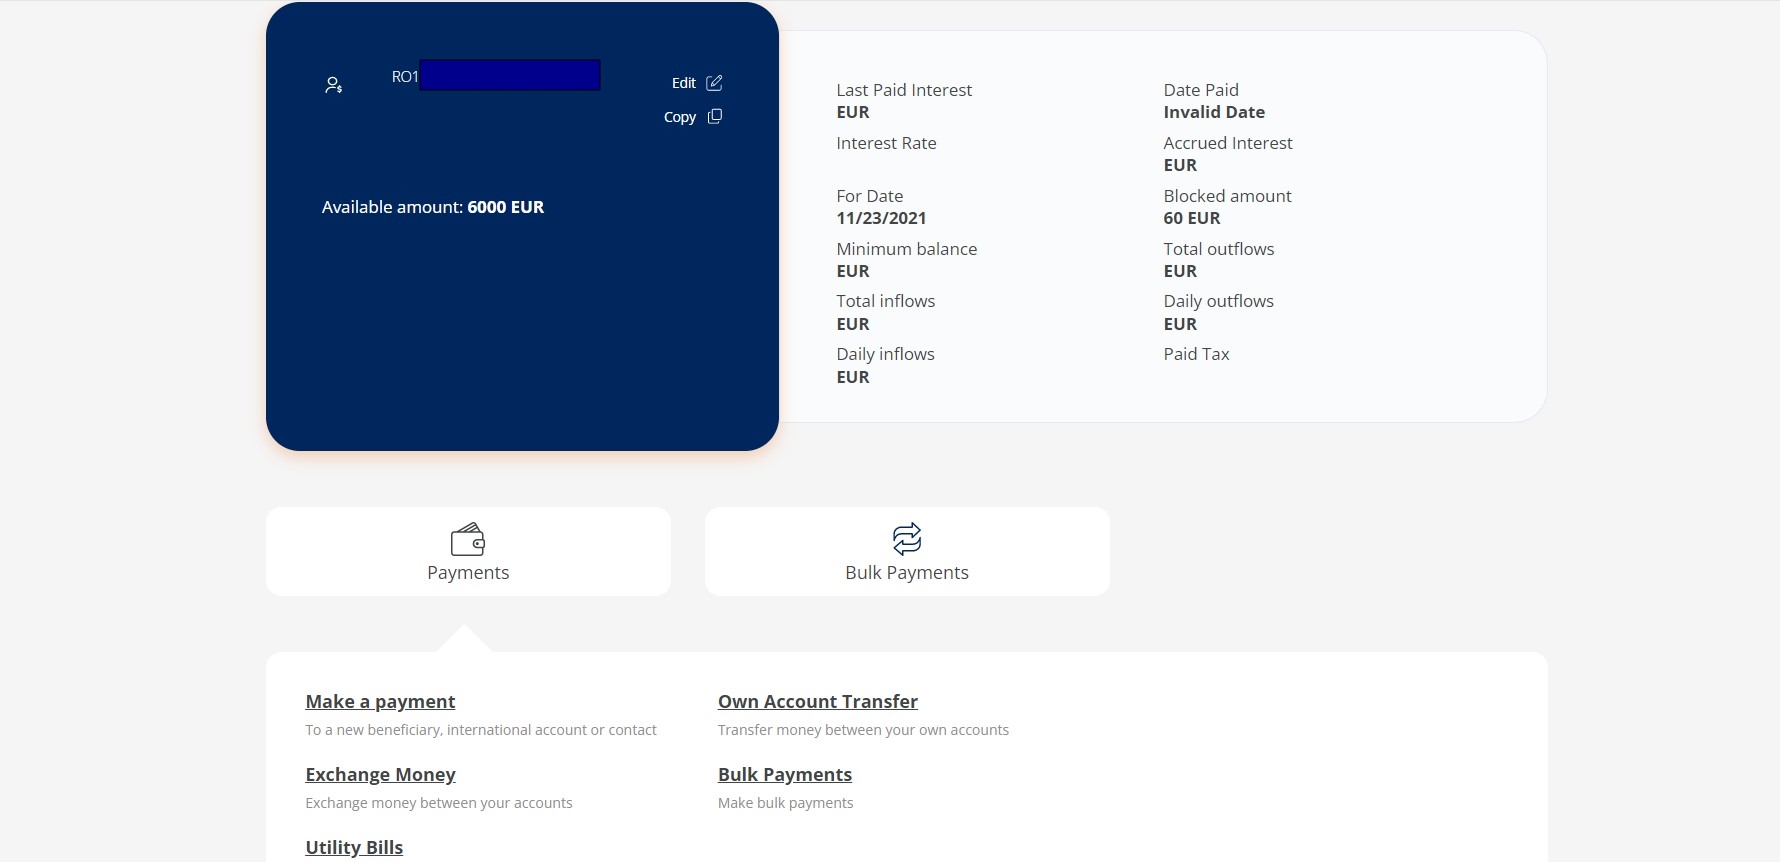
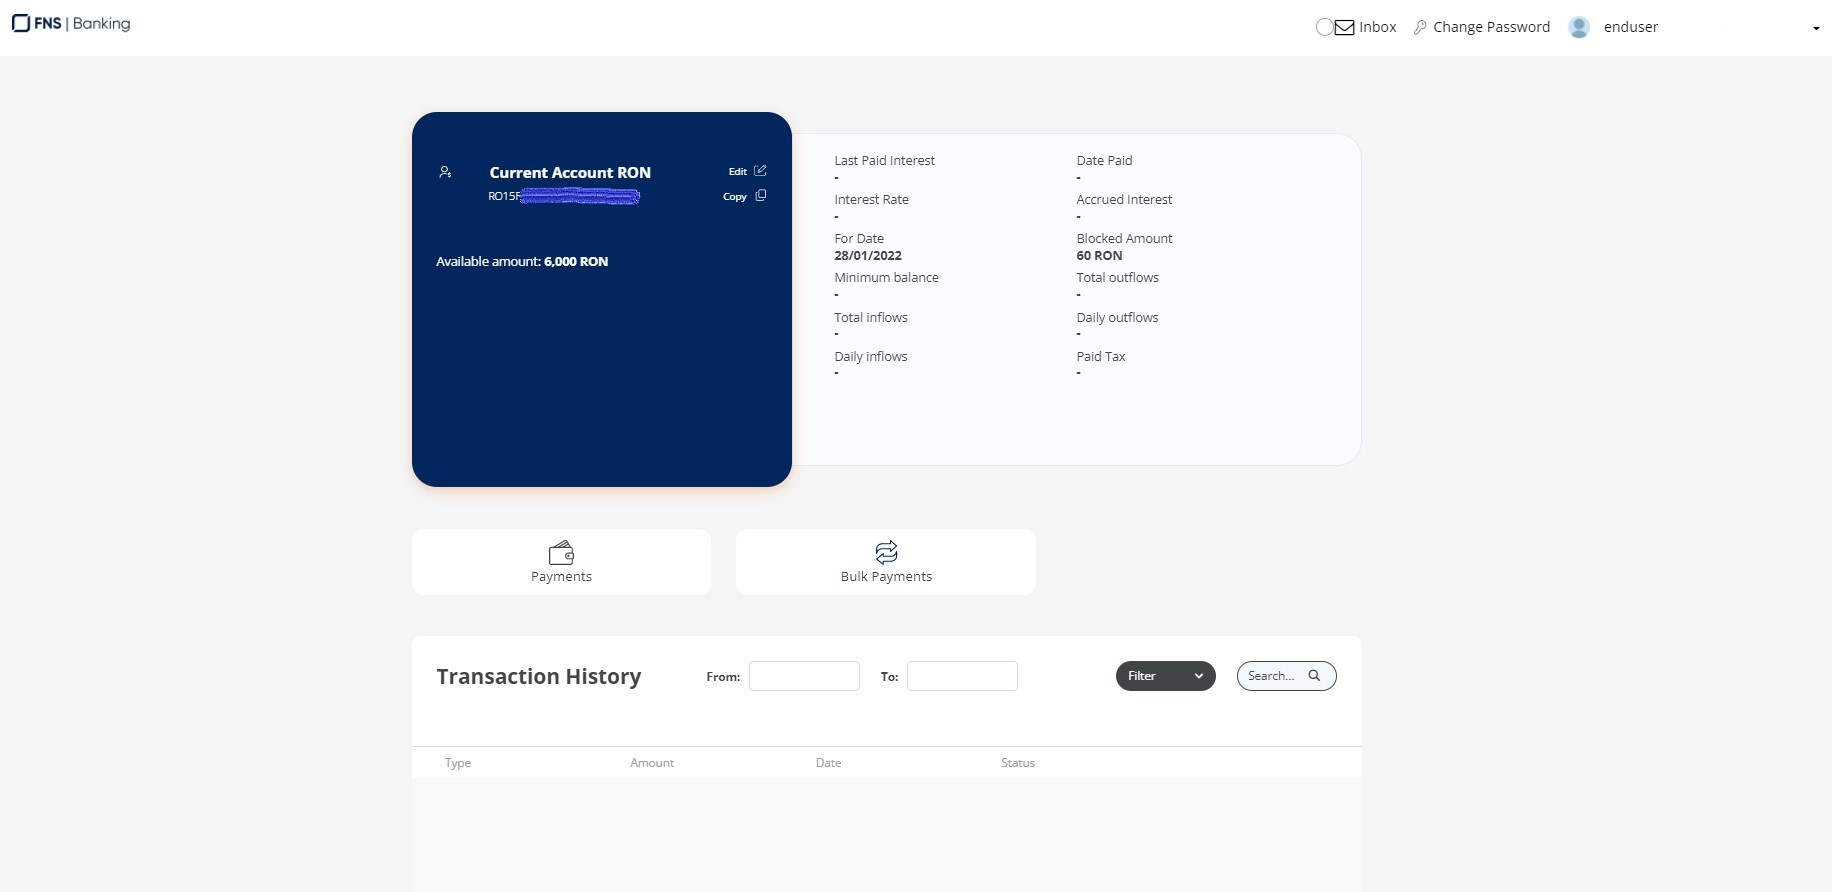
Current Account
For any account, the user can set an alias. The IBAN is displayed and the user can copy it to the device. The Available Balance of the account is displayed as well.
| Field | Description |
|---|---|
| Last Paid Interest | Valid for the deposit account. It displays the paid interest for the amount. |
| Date Paid | This field displays the date when the interest rate was paid. |
| Interest Rate | This field displays the value in percentage of the interest. |
|
For date |
The current date. |
| Accrued interest | This field displays the actual interest. |
| Blocked amount | The amount that is no longer available to the user. |
| Minimum balance | The value of the minimum amount. |
| Total outflows (debit) | The total value of the debit. |
| Daily outflows (debit) | The value of the debit in one day. |
| Total inflows (credit) | The total value of the credit. |
| Daily inflows (credit) | The value of the credit in one day. |
| Paid tax | The value of the tax paid to the national state. |
There are three buttons:
- Transferring Money
- Bulk Payments.
- Save for your dream (Online and Mobile Banking Application).
The widget Transaction History is displayed after the details about the account.
Term deposit
The IBAN is displayed and the user can copy it to the device. The Available Balance of the account is displayed as well.
| Field | Description |
|---|---|
| Maturity Date | The date when the term deposit reaches maturity. |
| Balance | The value of the deposit. |
| Interest rate | The interest rate to be received for the deposit. |
| Roll over | The field displays whether or not the deposit will be reiterated on the date of maturity. |
| Accrued Interest | This field displays the actual interest. |
| Date | Maturity date. |
| Opening Date | The date when the deposit was opened. |
| Opening Amount | The value of the initial amount. |
| No. of previous renewals | The number of renewals of the deposit. |
| Last interest capitalized amount | The value of the interest. |
| Last paid tax | The value of the tax paid for the interest. |
| Paid on | The date when the tax was paid. |
| Pre-term closure interest rate | The value of the interest rate before taxation. |
| Term of the deposit | The term of the deposit. |
| Additional deposit option | It displays the yes/no. |
| Term for additional deposit | |
| Blocked amount | The amount that is no longer available to the user. |
| Date of the blocked amount | If an amount was blocked, the date when the amount was blocked is displayed here. |
| Reason for the blocked amount | The reason for blocking the amount. |
| Maximum additional amount | The maximum value of the additional amount. |
There are two buttons as well: Payments (which launches the Initiating a General Payment), Bulk payments (which launches the Initiating and Authorizing a Bulk Payment).
The widget Transaction History is displayed.
Loans
This section contains the loans of the customer such as overdraft, personal loans, mortgages, credit card, auto credit, etc. It contains cards with the following information:
- Overdraft Limit (applicable for overdrafts)
- Used Amount (applicable for overdrafts)
- Total Amount Borrowed of the loan
- Total Outstanding Amount
- Next Instalment Amount
- Next Due Date
- View details button.
Click View account details to open the page of the loan where more information is displayed such as:
| Field | Description |
|---|---|
| Total | The total amount borrowed. |
| Remaining | The amount left in the account. |
| Due Date | The date when the payment is due. |
| Next Payment | The value of the next payment. |
| Opening Amount | The total amount borrowed. |
| Tenor | The length of time that takes for the borrower to repay the loan along with the interest. |
| Number of remaining installments | The number of payments. |
| Contract Start Date | The date when the contract started. |
| Days in overdue | The number of unpaid days. |
| Life insurance | Yes or No whether there is an insurance. |
| Number of paid installments | The installments paid. |
| Interest rate | The value of the rate. |
| Overdue amount | The value unpaid. |
| Date of Last Payment | The date when the last installment was paid. |
| Contract End Date | The date when the contract is no longer valid. |
There are two buttons as well: Payments (which launches the ) and Bulk payments (which launches the Initiating and Authorizing a Bulk Payment).
Transaction History
This section displays the history for the following banking products:
- Current, basic and saving accounts
- Term deposits
- Loan accounts (personal and mortgages).
For details, see Transaction History.
List of Orders
The List of Orders displays all transactions registered via Online and Mobile Banking:
- payment transactions successfully executed
- rejected payment orders
- pending for authorization payment orders
- future scheduled payment orders.
For details, see List of Orders and Multiple Authorizations.
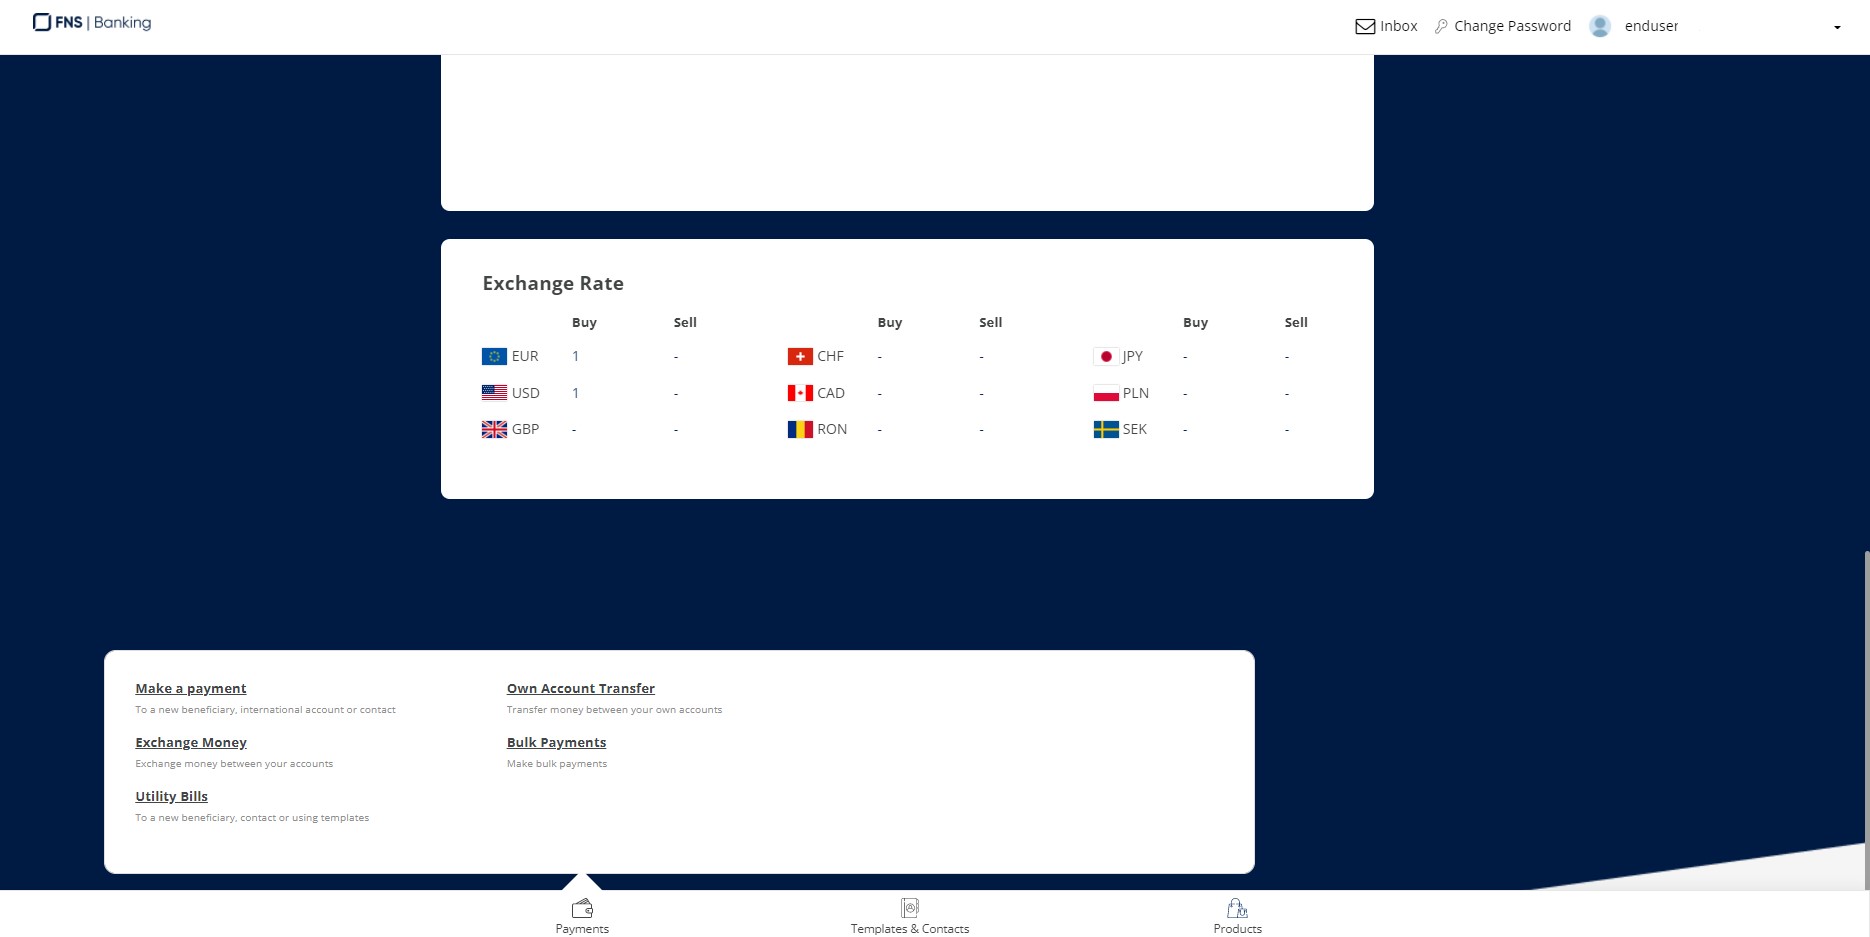
Exchange Rates
This widget displays nine currencies with their respective buying and selling values related to the local currency. The default list contains the currencies: euro, American dollar, British pound, Swiss franc, Canadian dollars, Romanian Ron, Japanese Yen, Polish złoty, Swedish krona.
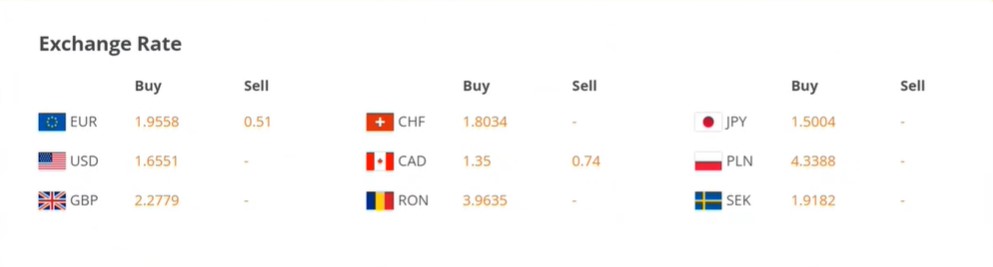
Core Banking returns several rate for exchange for cash withdrawal, two rates are used:
- BuyCash
- SellCash.
The list or currencies can by modified by modifying the system parameter . The data is returned by an API, it is inserted into the FintechOS database, all the values are stored over time. Exchange rates are returned by a stored procedure with a DB Task named FTOS_IB_GetExchangeRatesForWidget.
Footer
This section contains the Payments, Templates & Contracts, Products.
Click Payments to initiate a payment. A pop-up opens with the following types:
- Make a payment. Click this button to initiate a payment (see ).
- Utility Bills. Click this button to initiate a utility bill (see Utility Payments).
- Exchange. Click this button to initiate a foreign currency exchange.
- Own Account Transfer. Click this button to initiate a transfer.
- Bulk payments. Click this button to initiate a bulk payment (see Bulk Payments).
By clicking Templates & Contracts, the Templates page is displayed with the list of existing templates. For details, see Beneficiary & Payment Templates.
For details on how to initiate payments, see: