Managing Insurance Products
The Insurance Product Factory enables you to create, adjust and maintain insurance products, and product sub-components. When they are in Approved status, your products can be exposed to potential customers, through different digital journeys.
For specific details about creating a product, consult the Creating Insurance Products page.
Check the following pages to find out more about how you can use this solution:
-
Insurance Lines Of Businesses - for details about creating and maintaining LOB classifications.
-
Insurance Products - for general details about insurance products.
-
Insurance Perils/Conditions - for details about how to create and configure perils.
-
Insurance Types - for details about how to create and configure types.
-
Product Interrogation History - for details about how to access the API interrogation history of a product.
Product Operations
The following operations are available for interacting with your products portfolio:
There are times when you need to create a draft product, rapidly. While the product is in Draft business status, the form is still editable and you can complete the product creation journey at a later time.
To create a draft product, please follow the next steps:
-
In Innovation Studio, at the top left corner of your screen, click the main menu icon to open the main dropdown list.
-
From this main list, click Insurance Product Factory. A second panel opens, to the left.
-
Next, click Insurance Products to go to the Insurance Products List.
- On the Insurance Products List page, click Insert, at the top right corner of the page.
- The Insurance Product form opens. Fill in only the mandatory fields, and you will be able to save the record as a Draft.
-
Click Save and close.
The following are the mandatory fields, that you must fill in before Save and close:
| Field | Description |
|---|---|
| Insurance Product Type | Click the dropdown to select a Type of insurance for your insurance product - ex. Auto, Health, Home, Travel. See Insurance Types for details. |
| Insurance Product Code | Fill in the code of your insurance product. |
| Name | Insert the name of your insurance product. |
| Currency | From the dropdown, select the currency for your insurance product. |
| Prorata Type Configuration | Set the proportion rate type for premium payments. More details about Prorata Type Configuration in the description of the Policy Admin configurations section, in the Main Info tab. |
| Write off | Set the tolerance threshold for writing off payments. More details about Write off in the description of the Payments Schedule & Billing configurations section, in the Main Info tab. |
| Premium Invoice Generation | Configure the values to be used for automatic invoice generation. More details about Premium Invoice Generation in the description of the Payments Schedule & Billing configurations section, in the Main Info tab. |
| Tariff Type | Set the tariff type options. The option set values are: Per Coverage and Per Product. |
| Underwriting Type | Set the underwriting type options. The option set values are: Per Coverage and Per Product. |
Cloning a product is also a way to rapidly create a draft product, since every cloned product is registered in the system only in Draft status.
To create a clone product, please see the next section.
Every cloned product is registered in the system in Draft status, irrespective of the status of the original product. While the product is in Draft business status, the form is still editable and you can complete the product creation journey at a later time. For more details, see also the Cloning Insurance Products page.
Follow the below steps for cloning an insurance product:
-
In Innovation Studio, at the top left corner of your screen, click the main menu icon to open the main dropdown list.
-
From this main list, click Insurance Product Factory. A second panel opens, to the left.
-
Next, click Insurance Products to go to the Insurance Products List page.
- From the list, select the Insurance Product that you want to clone and double-click it.
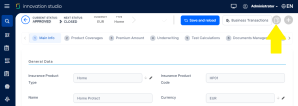
- Once opened, go to the top right corner of the screen, and press the Clone button to launch the cloning.
Below, an example of where to find the clone button:
- Next, the cloning pop-up opens. Use it to fill in a Name and an Insurance Product Code for the new product. After cloning, the product view opens and you can edit it - the product being in Draft status.
When your product is in Active status, changing it may be done only by adding a new version. If this is your case, follow the details from the next section, about versioning.
Follow the below steps for modifying an insurance product that is in Draft status:
-
In Innovation Studio, at the top left corner of your screen, click the main menu icon to open the main dropdown list.
-
From this main list, click Insurance Product Factory. A second panel opens, to the left.
-
Next, click Insurance Products to go to the Insurance Products List page.
- From the list, select the Insurance Product that you want to edit and double-click it. Once opened, use the form to edit your product.
Follow the below steps for versioning an insurance product:
-
In Innovation Studio, at the top left corner of your screen, click the main menu icon to open the main dropdown list.
-
From this main list, click Insurance Product Factory. A second panel opens, to the left.
-
Next, click Insurance Products to go to the Insurance Products List page.
- From the list, select the Insurance Product that you want to version and double-click it. Once opened, go to the top right corner of the screen, and press the Plus button to launch the versioning process.
- Use the form to make adjustments to your Product.
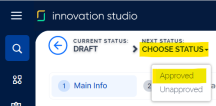
- Once finished, use the status picker at the top left corner of the screen to change the status of the newly created version from Version Draft to Approved.
Below, an example of where to find the status picker: - After versioning, the product view opens and you can see your adjustments. You can also check the versioning log in the product's History tab.
For deploying changes on existing products, you can also choose to import the changes in a Data Config Definition file, as this functionality has the versioning mechanism embedded. For more details, see also the Importing Insurance Products page.
Pay attention to the fact that some policies might include the product that you want to delete.
Follow the below steps to delete an Insurance Product record:
-
In Innovation Studio, at the top left corner of your screen, click the main menu icon to open the main dropdown list.
-
From this main list, click Insurance Product Factory. A second panel opens, to the left.
-
Next, click Insurance Products to go to the Insurance Products List page.
- From the list, select the record that you want to delete and then click Delete, at the top right corner of the page.
This functionality lets you add product data on a destination environment by using the FintechOSData Import Templates. The most important use case for this functionality is a fast bulk import into the system of numerous new insurance products - with all imported products being registered in Draft status. But this is not the only use case. For more details, consult the Importing Insurance Products page.
Here are the details for importing Product Data by using the available Data Import Templates configured for the Insurance Product Factory solution:
-
In Innovation Studio, at the top left corner of your screen, click the main menu icon to open the main dropdown list.
-
From this main list, click Evolutive Data Core. A second panel opens, to the left.
- Click Data Import Templates to open the Data Import Templates List page.
- From the list, select the Data Import Template that you want to update and double-click it. Once opened, scroll down to the List Of Data Imports section, and press Insert to upload your file. After import, you can see the new import added in the list and you also check the versioning log in the product's History tab.
Templates are different depending on what kind of data needs to be added. Check the Importing Insurance Products page, for more details about the templates for every import category.
The solution lets you interrogate product data by using API calls. For a specified insurance product, or product item (coverage), you can:
-
get the premium calculation amount (price) valid at a certain date.
-
get the underwriting decision result valid at a certain date.
-
get all its attached tariff and underwriting formulas.
For more details, start from the Insurance Product Factory Endpoints page.
This functionality lets you access the product interrogation history on a destination environment. In Innovation Studio, in the Product Interrogation History section, you have an overview of all the API calls registered in your system.
To view your Product Interrogation records, follow the steps below:
-
In Innovation Studio, at the top left corner of your screen, click the main menu icon to open the main dropdown list.
-
From this main list, click Insurance Product Factory. A second panel opens, to the left.
-
Next, click Product Interrogation History to go to the Product Interrogation History page.
On the Product Interrogation History page:
-
To inspect a record from the grid, double-click it.
-
To export a record from the grid, select it and press Export, at the top right corner of your screen.
For more details, consult the Product Interrogation History page.
The Insurance Product Factory maintains the underlying data in a consistent data model. Consequently, you have a reliable data model for your insurance products that you can reference when you build your digital journeys. This allows you to manage your product portfolio at will, without having to re-code your digital journeys every time an insurance product is added, updated, or retired.
