Onboarding Private Individuals
The process of onboarding private individuals represents a way of offering customers fast access to banking products and other services. During this process customer information is collected, evaluated, and authorized for secured retail banking. It is the first stage of the customer journey once they begin using a product or service.
HINT
The customer's data can be added by inputting the information manually, or by using the OCR button. For additional information on how to use the second option, see the Using OCR Functionality page.
The customer's data can be added by inputting the information manually, or by using the OCR button. For additional information on how to use the second option, see the Using OCR Functionality page.
Follow the below steps to start the onboarding process for retail customers.
- Go to the FintechOS Portal.
- Open the Main menu in the top left corner and expand the General menu.
- Select the Private Individuals menu option. The Account Private Individuals List page opens.
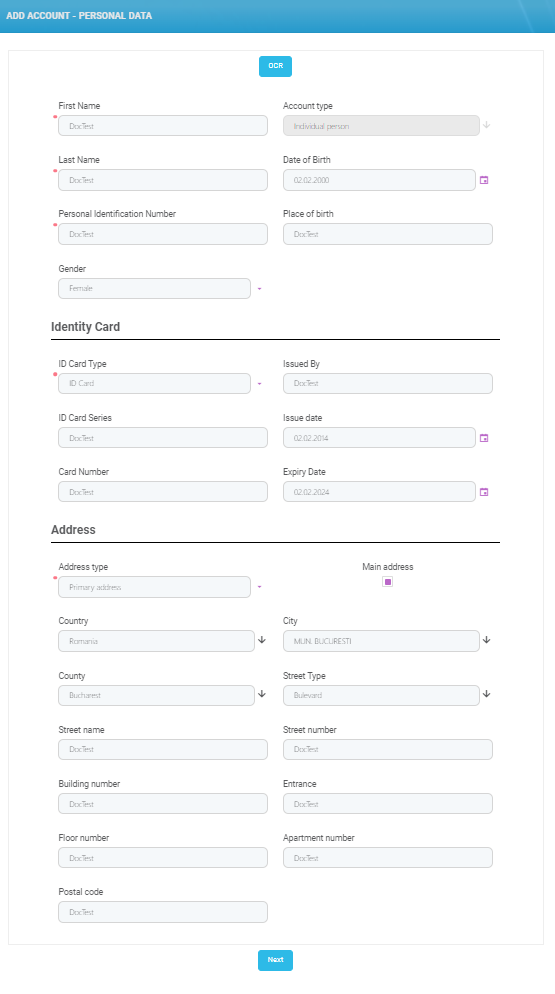
- Click the Insert button in the top right corner. The Add Customer - Personal Data page opens.
- Fill in the following fields:
Field Description First Name The customer's first name. Account Type Read only field. The customer's account type. Middle Name
The customer's middle name.
Last Name The customer's last name (family name/ surname). Date of Birth The person's date of birth. Personal Identification Number A unique number allocated by the government to an individual used taxation and other transactions purposes. The length depends on the country that issued the document. Place of Birth The person's place of birth. Gender The person's gender. The following options are available: Female
Male
Identity Card ID Card Type The person's identification document card type. Select from the following options: - ID Card
- Other Types
- Passport
- Permit for Residency
Issued By
The name of the institution that issued the identity document.
ID Card Series The person's identification document card series. Issue Date The issue date of the identification document. Card Number The person's identification document card number. Expiry Date The expiration date of the identification document. Address Address type Select the address type from the following options: - Primary Address
- Secondary Address
- Billing Address
- Social Address
- Delivery Address
- Home Address
- Residence Address
Main address If true, the record is set as the main address. Country The country from the customer's address. City The city from the customer's address. County The county from the customer's address. Street Type The street type from the customer's address. Select from the existing records or insert a new one. Street Name The street name from the customer's address. Street Number The street number from the customer's address. Building Number The building number from the customer's address. Entrance The entrance name/ number from the customer's address. Floor Number The floor number from the customer's address. Apartment Number The apartment number from the customer's address. Postal Code The postal code number from the customer's address. - Click the Next button. The Add Account - Personal Data Additional page opens.
- Fill in the following fields:
Field Description Division Business division to which the customer belongs. For additional details see the Define Business Divisions section. Branch responsible The business branch to which the customer belongs to. For additional details see the Define Business Unit Type section. Business Line The division’s business line to which the customer belongs. For additional details see the Define Business Lines section. Account Responsible The employee responsible for the customer's account. For details on how to create system users, see the Adding Users and the Adding System User Information pages. - Click the Save button. The customer's dashboard is displayed in the Managing Detailed Customer Information page.