Banking Contracts
Any agreement between a bank and customer regarding the usage of a banking product is documented legally with a contract.
FintechOS Core Banking allows banks to create banking product agreements (contracts) for their customers based on approvals. This is how Core Banking indicates the selling of a banking product, recording a contract to reflect the product and negotiated details within the origination process.
Contract Statuses
The four-eyes principle is applicable for all contracts in FintechOS Core Banking, meaning that a record should be approved by a second bank employee, with higher authorization rights. This is enabled via approval task Core DPA Platform capabilities and thus it is also a bank's responsibility to set proper security roles and access rights to its users, in order to make sure that the same user can't insert and also authorize the same record.
A contract record has the following business workflow statuses:
-
Draft - the status of a newly created contract record that was not yet sent for approval. While in this status, you can edit some fields, but you can't add events (payments) to it. Send the record to approval after editing all the necessary details.
-
Pending - this is a system status applied to contracts sent for approval, but not yet approved. No updates are available in this system status.
-
Approved - the status of a contract record after being authorized by a user with contract approval competencies. While in this status, you cannot edit the record's details, but you can add events to it within the Payments tab. If you need to alter the contract's details, create a new version based on the current contract.
NOTE
Each event must also be approved by a user with contract approval competencies, otherwise, the transaction is not performed by the system. -
Closed - the last status of a contract, after manually closing it or after creating a new version based on the current version. No updates are allowed on the record.
In order for the customer to use the contract, applying transactions to it, it must be in the Approved status.
Contract Implementation Notes
-
The contract approval is made according to the specifications of the bank set during the implementation process.
-
The integration is done according to the bank's requirements.
-
The approval of the contract should be done after the advance is paid, in the case of loan contracts that have an advance amount or percent specified to be paid on the first disbursement day (merchant loans), in order to avoid having to close newly created contracts if something goes wrong in the process of collecting the advance plus potential fees.
Contract Versioning
Core Banking allows you to create new versions for an existing contract if you need to modify an existing approved contract. New versions are automatically created when the payment schedule is modified - that implies any increase/ decrease, change of costs, reschedule or payment holiday transactions.
A contract version can have the following statuses:
-
Contract Version Draft - the status of a newly created contract version record that was not yet sent for approval. While in this status, you can edit some fields, but you can't add events (payments) to it. Send the record to approval after editing all the necessary details.
-
Approved - the status of a contract version record after being authorized by a user with contract approval competencies. While in this status, you cannot edit the record's details, but you can add events to it within the Payments tab.
-
Contract Version Closed - the last status of a contract version, after manually closing it or after creating another new version based on the current version. No updates are allowed on the record.
All existing versions of the contract in Contract Version Draft status are automatically changed to Contract Version Closed when a payment event outside regular schedule is approved for that contract.
Changing Contract Statuses
You can manage a contract's life cycle by changing its status from the top right corner of the screen.

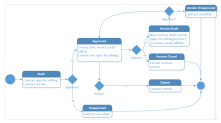
The contract status transitions are illustrated below:
Note that:
- Once a record is live, its settings can no longer be modified.
- If you want to update the details of a live contract, you must create a new contract version.
- When you create a new contract version, the current version is retired and moved to history; no updates are allowed on the retired version.
- Every contract version starts in a draft state and must go through an approval process before going live.
- Only one version of a contract can be live at one time.
As a best practice, new records or new versions of existing records created on a specific day should be approved on the same day.
Managing Contracts
To manage contracts:
-
Log into FintechOS Portal.
-
Click the main menu icon at the top left corner.
-
In the main menu, expand the Core Banking Operational menu.
-
Click Contract menu item to open the Contracts page.
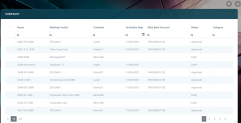
Alternatively, you can select the Contracts dashboard.
In the Contracts page, you can:
-
Create a new contract by clicking the Insert button at the top right corner.
-
Edit a contract from the list by double-clicking it.
-
Delete a contract by selecting it and clicking the Delete button at the top right corner. Only draft contracts can be deleted. Once approved, a contract should be closed.
-
Search for a specific record by filling in any or all the column headers of the displayed contracts records list.
Actions
Core Banking has a series of buttons that help shorten the processes of managing contracts. Such actions aid the user to quickly streamline several processes.
In the selected contract's page, in the top right corner, a series of buttons (depicted below in green) trigger different actions.
-
Button 2 is the Save and close button.
-
Button 3 is the Save and reload button.
-
Button 4 opens the Contract Business Workflow Transitions List.
-
Button 5 creates a new version of the exiting contract. The new version has to be approved before the customer starts using it. If it is NOT approved, then the initial version can still be used.
Read about how to perform specific actions within the lists in the dedicated Working with Lists section.


