Create a Complex Journey with Decision Points
Depending on the business needs, a journey can be comprised of several form driven flows to connect a customer and a company officer. During the navigation between steps several calculations, endpoints, actions need to be triggered and depending on their outcome to guide the customer to another flow.
Task at hand
To create a complex journey map with flow control rules, actions, formulas and business workflow. The journey is an application for a personal loan origination with one flow, the customer's. There are the following decision points:
- On the first step, a Flow Control Rule with conditions on two attributes: Age and Education.
- On the Flow Control Rule an action to change the status from Prospect to Loan denied will be placed.
- On the second step, an Action on Save with a Rule will be created with two separated conditions on the attributes Number of children and Persons in care. One of the conditions will have to be met.
- On the Action an action to change the status from Prospect to Loan denied will be placed.
- On the third step, a Business Condition on the workflow if the savings attribute is to change the status to loan denied.
- On the third step, a Business Formula step calculates the formula Savings=Income(monthly)-spendings(monthly), and if the Savings value is less than 400 pounds, then the loan is rejected.
Before you begin
- Create a data model with two entities: FTOS_Account, FTOS_Product. The first entity has the following attributes:
Fields for FTOS_Account Type FullName Text age Whole Number PersonalIdentificationNumber Whole Number Education Option Set Dateofbirth Invariant Date Product Lookup Savings Numeric Spendings Numeric MaritalStatus Bool NoofChildren Whole Number Personsincare Whole Number Income_permonth Numeric Fields for FTOS_Product Type Productname Text Creditcard Bool Loanamount Money Regularpayments Option Set monthlypayment Money effectiveinterestrate Text - Create one form driven flow: FTOS_Flow_LoanCustomer. FTOS_Flow_LoanCustomer has six steps: a Know your customer step where we collect basic information; an in-depth data step-for information such as marital status, no of children and persons in care; a third step where the financial data is collected such as income and spending; a loan information step such as amount and period; a congratulations step and a failed step.
- Create a business workflows diagram with the statuses: Prospect, In progress, Approved, Loan Denied, Congratulations and the following transitions: Prospect_In Progress, Prospect_Loan Denied, In Progress_Apporved, In Progress_Loan Denied.
A few tips and tricks
When creating the data model, in the entity FTOS_Account insert a lookup attribute pointing to FTOS_Product. Then, in the Extend data model, add a Related extension. In the extension add the virtual attributes from FTOS_Product.
Afterwards, in the form driven flow named FTOS_Flow_LoanCustomer, in the Tab Data model, add the Business Entity Extensions add the related extension created earlier.
Expose the journey in the FintechOS Portal, on the dashboard following the path: FintechOS Studio > Digital Frontends> Digital Experience Portals.
When creating the business workflow, attach the workflow to the entity and add the transitions. Between the statuses. To check if the configuration is working, access the Portal, fill in the first step of the Form Driven Flow and watch what happens in the second step.
1 Create a navigation rule between the first two steps
Follow the path: FintechOS Studio > Digital Journey > Form Driven Flow.
The map should look like this when the rule is created.
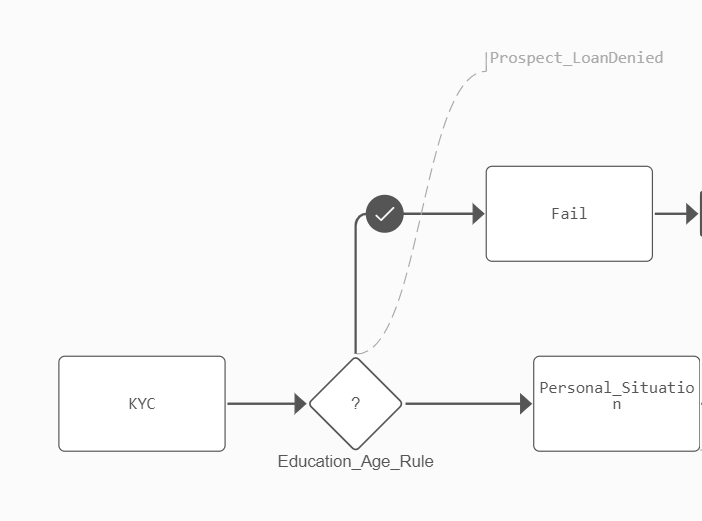
In the Form Driven Flow named FTOS_Flow_LoanClient, click on the first step. Click on the Flow Control tab of the step named KYC. In the DEFAULT NAVIGATION RULE, select the Navigate to another step (it is selected by the system automatically), in the Select step, from the drop-down, choose Step2, click the Save and reload button.
In the Flow Control Rules, click the Insert button to add the first decision point.
| Field | Details |
|---|---|
| Name | Insert the name for the report. e.g. Rule1. |
| Form Section | This is automatically filled in by the system with Step1. |
| Description | Insert a suggestive description. e.g rule for KYC. |
| Evaluate only for Journey | from the drop-down list, choose the digital Journey created, e.g.Evaluate only for Journey. IMPORTANT! To properly use this feature in the Advanced tab of this form driven flow insert the code below in the AfterEvents tab. Copy |
In the Define rule expression, three conditions are added by clicking on the plus sign next to the And label and selecting add a condition. For example, in our use case, the user will fail if he is younger than 18 and if he has only finished high school.
| Attribute | Condition | Value |
|---|---|---|
And | ||
| Age | is less than or equal to | 18 |
Or | ||
| Education | equals | Bachelor's degree |
| Education | equals | Master's degree |

In the Action section, in Select step, choose from the list step 5, the failure step. Hence, if the customer's data matches the conditions from the rule, he/ she will fail the application, if not he/ she will move to the next step, the default step. Click the Save and close button.
The rule will be applied in the context of the digital journey, otherwise, the rule will not be read.
For details, see Flow control.
2 Create an Action on Save with a rule
Follow the path: FintechOS Studio > Digital Journey> Form Driven Flows.
Navigate to the second step named Personal_Situation. Access the Actions tab of the step (not the Form Driven Flow!) and on the grid On Step Save, click the Insert button.

Fill in the fields:
| Field | Details |
|---|---|
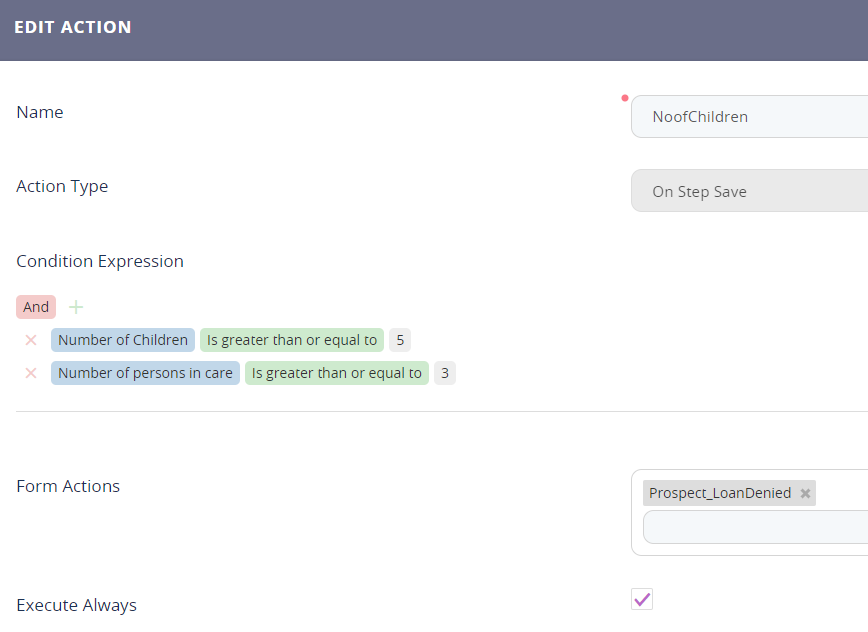
| Name | Insert a suggestive name. e.g. NoofChildren. |
| Action type | This is automatically filled in by the system as On Step Save. |
| Condition expression | Two separate conditions are added:
|
| Form action | Select the form action when the status is changed from Prospect to Loan. |
Execute always | The boolean must be true. The rule will be executed always, regardless of the Journey Context. |
Click the Save and Close button.
For details, see Adding and Configuring Steps.
3 Create a business condition with Business Workflows
Follow the path: FintechOS Studio > Fintech Automation > Business Workflows > Business Workflow Designer.
To create a transition rule using the automation processor, there are two methods to access the configurations one by clicking on the Fintech Automation > Business Workflows > Business Workflows Designer > Design > CONFIG (the button on the top ribbon of the designer)
or
by following the path Fintech Automation > Business Workflows > Business Workflows Configurations and selecting from the list the Configurations named Loan_Workflow for FTOS_AB_Account.
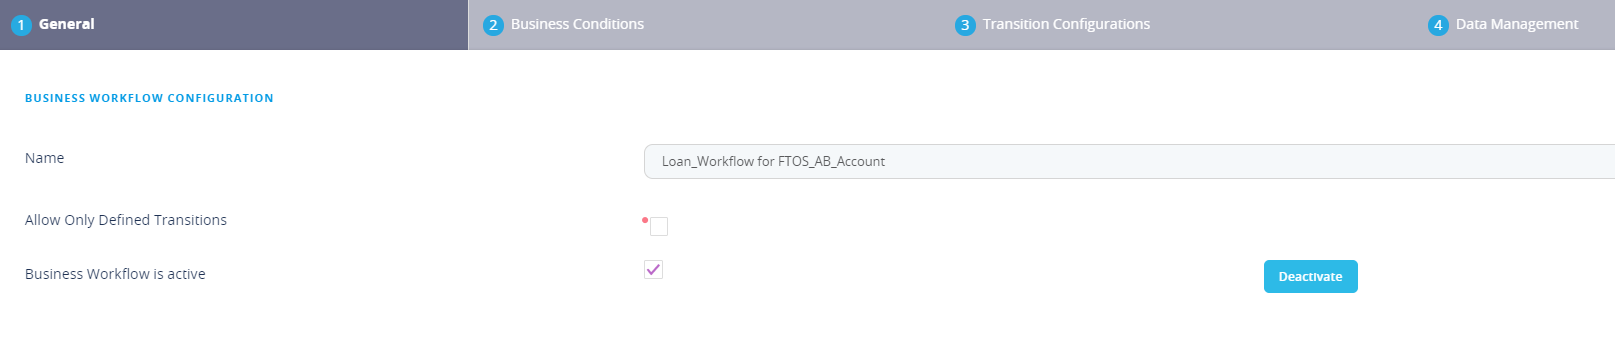
The boolean Allow only defined Transitions must be left false or null to ensure that the transitions which are not defined in the designer can be configured. Navigate to the Business Conditions tab to add the actual decision point to be later placed on the transition. Click the Insert button.
To access the Business Conditions, a second method is to follow the path: Fintech Automation > Business Workflows > Business Rules.
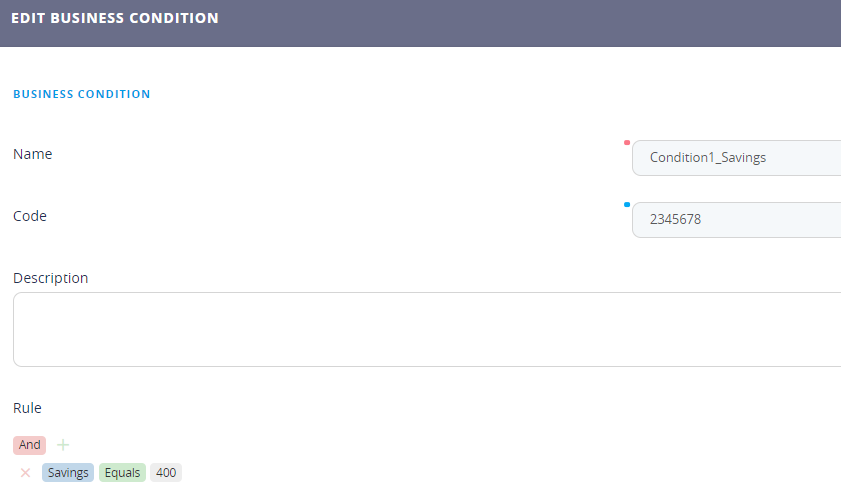
Insert a suggestive name, e.g. Condition1_Savings and a code. In the Rule section, add the attribute Savings, the comparison operator, is less than, and the value 400. Hence, a client who has less than 400 pounds as savings will fail the application for a loan. Click the Save and close. Now the next step is to save the condition to a transition.
Follow the path: FintechOS Studio > Fintech Automation > Business Workflows > Business Workflow Configurations.
Select from the list the configuration named Loan_Workflow for FTOS_AB_Account. Navigate to the Business conditions tab and click Insert. Add from the list the condition created above named Condition1_Savings. Click the Save and Reload button.
Navigate to the Transition Configurations tab where all the transitions between steps are displayed. Search of the Prospect_LoanDenied transition. Double-click it. Navigate to the Action Group tab. Click the Insert button.
| Fields | Details |
|---|---|
| Name | Insert a suggestive name, e.g. transitionAction. |
| Code | Insert a code for identification, e.g.123456789. |
| Description | Insert a suggestive description. |
![]()
Click the Save and reload button. Navigate to the tab Actions After. Click in Insert button.
![]()
| Fields | Details |
|---|---|
| Name | Insert a suggestive name, e.g. Transition Action. |
| Code | Insert a code for identification, e.g.456. |
| Description | Insert a suggestive description. |
Action stage | This field is automatically filled in. |
Apply always | The bool must be ticked true to apply the action at all times. |
Action type | Select from the list change business status. |
Business Workflow status | Select from the drop-down list of statuses the loan denied. |
Message | Insert a message to be shown to the customer. e.g. ''You have been denied the loan.'' |
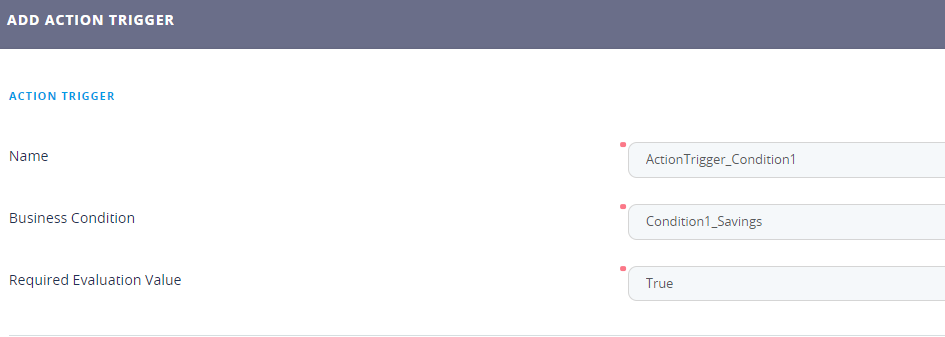
Click the Save and reload button. Navigate to the Action triggers tab. Click the Insert button. This is where we will map the condition created to the transition.
Fill in a suggestive name, e.g. ActionTrigger_Condition1. Select from the drop-down list the Business Condition. In the Required Evaluation Value, select from the drop-down true. Hence, when the savings amount is less than 400 pounds (when the condition is true) that will act as a trigger to cause the transition. Click the Save and close button.
For details, see Business Workflows Processor.
4 Create a Business Formula
Follow the path: FintechOS Studio > Fintech Automation > Business Formulas >Formula Input.
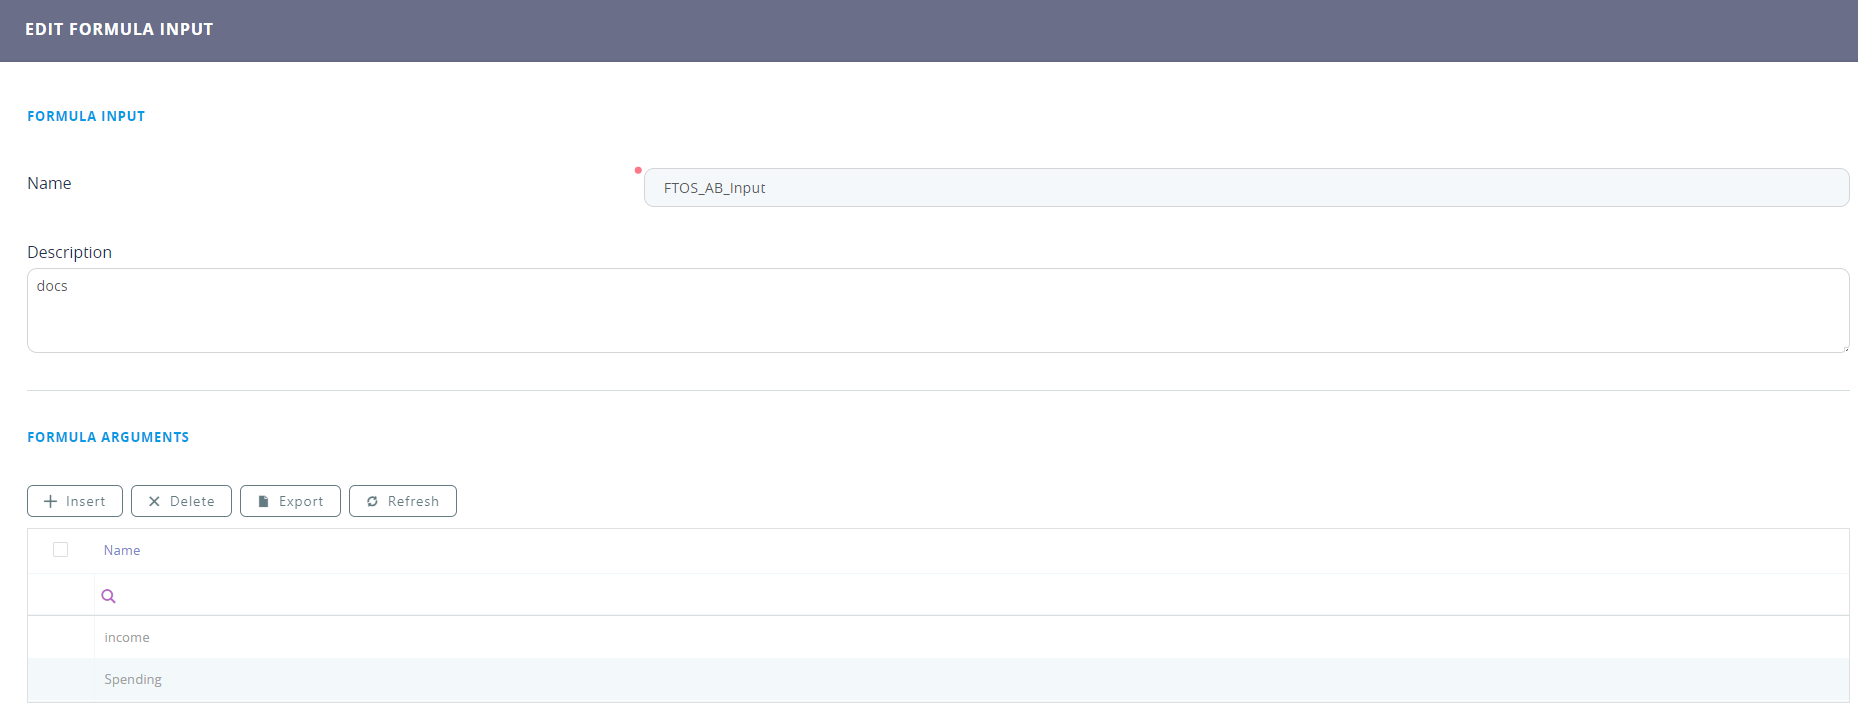
The list of previously created inputs open. Click the Insert button. The Add Formula Input page opens. Write a suggestive name for the input that holds the lits of arguments, e.g. FTOS_AB_Input. Click the Save and reload button. The grid Formula Arguments opens. Click the Insert button to add an argument.
| Fields | Details |
|---|---|
| Name | Insert a suggestive name, e.g. Income. |
| Display Name | Insert a suggestive display name, e.g. Income. |
| Formula input | This is automatically filled in. |
Master type | Select Simple type. |
Formula Argument Sub-Type | Select Decimal. |
Click the Save and close button. Repeat to add the Spending arguments. Click the Insert button for the arguments grid.
| Fields | Details |
|---|---|
| Name | Insert a suggestive name, e.g. Spending. |
| Display Name | Insert a suggestive display name, e.g. Spending. |
| Formula input | This is automatically filled in. |
Master type | Select Simple type. |
Formula Argument Sub-Type | Select Decimal. |
Click the Save and close button.
Follow the path: FintechOS Studio > Fintech Automation > Business Formulas >Formula.
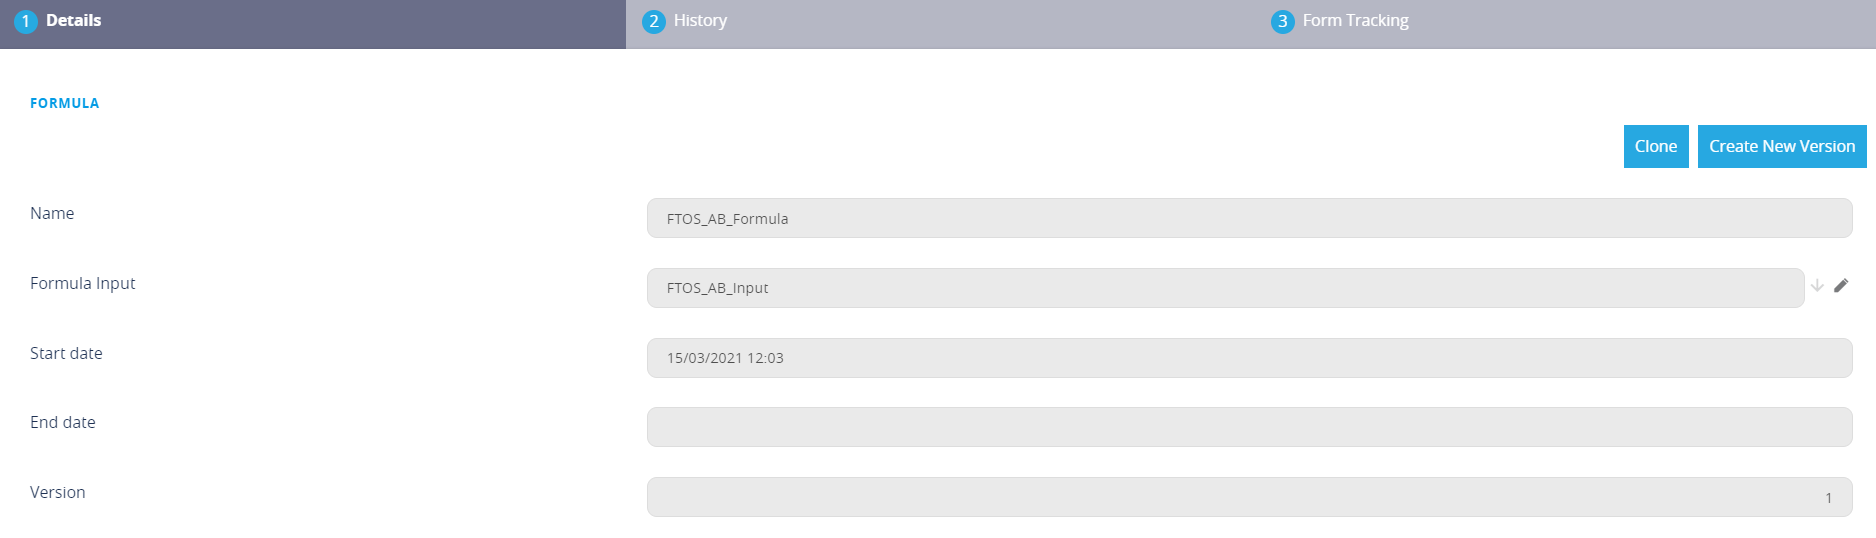
The list of previously created formulas open. Click the Insert button. The Add Formula page opens.
| Fields | Details |
|---|---|
| Name | Insert a suggestive name, e.g. FTOS_AB_Formula. |
| Start date | Select the date, e.g. 15 of March 2021. |
| Formula input | Select from the drop-down list the formula input created earlier. |
| End date | Select the date, e.g. 15 of March 2025. |
| Version | This is automatically filled in by the system. |
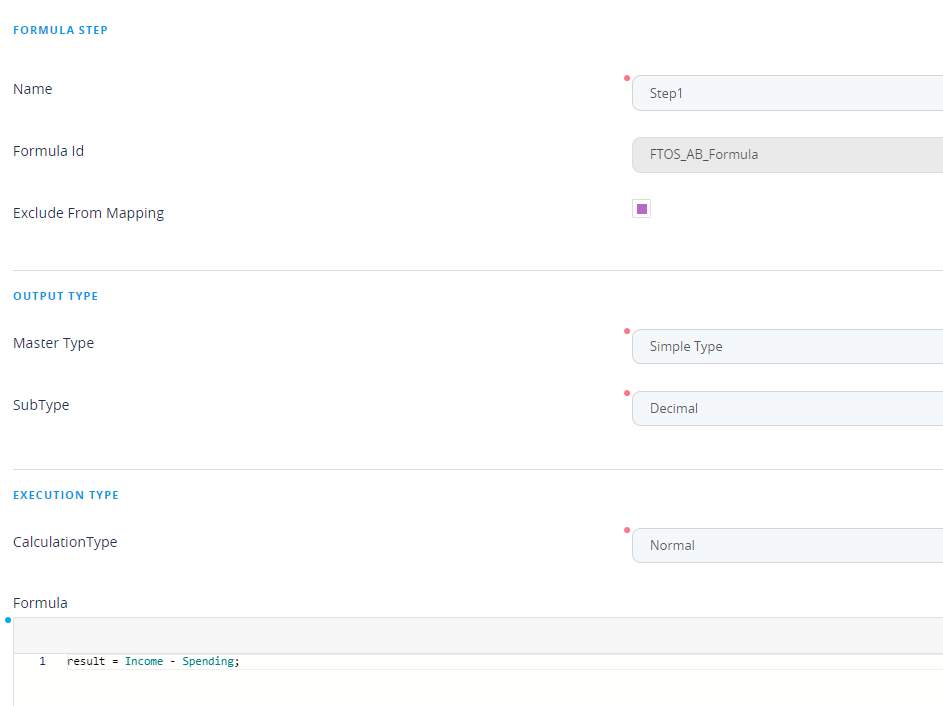
Click the Save and reload button. In the Steps grid, click the Insert button. The Add Formula Step page opens. Fill in the fields:
| Fields | Details |
|---|---|
| Name | Insert a suggestive name, e.g. Step1. |
| Formula ID | It is read-only. |
| Exclude from mapping | The boolean will be false, |
| Master type | Select from the simple type. |
| Subtype | Select from the drop-down decimal. |
Calculation type | Select from the drop-down list normal. |
In the code editor, add the formula:
result = Income - Spending;Click the Save and reload button. In the workflow configurations on the top-left top part, activate the formula.
Follow the path: FintechOS Studio > Fintech Automation > Business Formulas > Formula Parameter Mapping.
The list of mappings is displayed. Click the Insert button to add a new mapping. The Definition page is displayed. Fill in the following:
| Fields | Details |
|---|---|
| Data Mapping Type | Select Formula from the list. |
| Master Entity | Select the entity which has the attributes, e.g. FTOS_AB_Account. |
| Operation Name | The field will be completed by the system. |
| Name | The field will be completed by the system. |
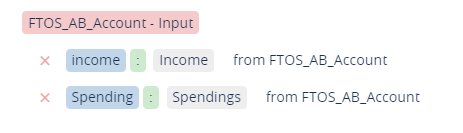
Click the Save and reload button, the input and output tab will be displayed. Click on the input tab. For both income and spending, click the arrows next to them and select the attributes for each. From these attributes, the system will take the values and show the result. Click the Save and reload button.
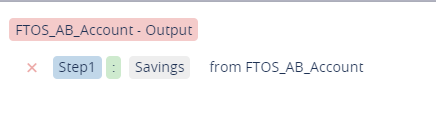
Click on the output tab. For Step1 select the attribute Savings. This is where the result of the formula will go.
Follow the path: FintechOS Studio > Digital Journey > From Driven Flows.
Navigate to the flow created named FTOS_Flow_LoanCustomer. Navigate to the Actions tab. Click the Insert button. Type-in a name for the action, e.g. Call_Formula. Click the plus sign and select from the list Call formula with data mapping. For the first cell select the formula and from the second the mapping. Click the Save button.
Navigate to the Steps tab where on the third step, the action will be placed. Click on the third step. Navigate to the Flow Control tab. There in the Actions attach the Call_Formula action. Click the Save and reload.
In the rules grid, click the Insert button and add a rule with the condition if savings is less than 400, then the change business status action is called and the navigation is to step 6, the loan rejected step.
For details, see Business Formulas.
Congratulations! You have a complex journey now!