Define Business Rule Expressions
This is where you build business rules based on your business needs. Using pre-defined arguments, you can structure a rule into steps and test it. The rule expressions support different types of results (simple or collection).
To define a rule expression:
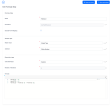
- Open the Main Menu in FintechOS Studio and select Products > Business Rules.
- Click Insert at the top right corner of the page.
- Enter a Name for the rule.
- Select the Start Date when you wish to activate the rule (see Rule Cloning and Versioning). By default, it uses the current date and time.
- In the Formula Input field, select the set of arguments that will be processed by the formula (see Rule Input Parameters for details).
- The End Date and Version fields are populated automatically based on the rule's versioning. For details, see Rule Cloning and Versioning.
- Tick the Is Audited checkbox if you wish to track the rule usage. This will save auditing details in the
EbsMetadata_FTOS_CALC_FormulaAudittable every time the rule is run. - Use the After Import Status drop box to configure the rule's status when imported on a different environment:
- Active (default) - The rule will be activated after import on the target environment.
- Draft - The imported rule will be set to a draft state on the target environment.
- Click Save and Reload.
Add steps to a rule
Steps allow you to process a rule in successive stages and to use the output from a step as an input argument in subsequent steps.
If your calculation is complex, needs periodic update, or must be simplified for transparency and traceability, we suggest you split it in separate steps, each with its own expression. This architecture allows calling the result of step N-1 in step N (“result = step 1 + a;”).
For example, you can create a rule that calculates the premium amount in the first step, then use the result as an input in the second step to calculate the monthly payment installments (by dividing the premium amount to the number of months).
- In the rule screen, in the Formula Steps section, click Insert to add a step. This will open the Add Formula Step screen.
- Enter a Name for the step. The name must be unique in the rule (Two steps can have the same name, but must belong to different rules). This name can be used in subsequent steps as an input argument.
- The Formula Id field is automatically populated with your rule name.
- Check the Exclude From Mapping checkbox if you want to disable the output parameter mapping for the step (see Rule Parameters Mapping for details). This is useful, for instance, if you wish to safely test your rule without affecting entries in the database.
- In the Master Type field, select the data type for the step's result. This can be either Simple Type (a single value) or Collection (a set of multiple values).
For collections, you will have to specify a calculation type based on an iteration (see below). - In the Sub-Type field, enter the data type for the step's result:
- Whole Number
- Decimal
- Boolean - For simple master types only.
- Text
- Object - For collection master types only.
- Date Time
Data type Example Whole number 30000 - income in EUR Decimal 350.78 - rent expenses in GBP Boolean true - is married Text Construction type e.g. "wood" Object It is a grouping of arguments that are connected. E.g.:
“Age”: “WholeNumber”,
“Salary”: “Decimal”,
“Education”: “Text”,
“IsMarried”: “Boolean” - Calculation Type can be set as either Normal or as an Iteration. Iterations allow you to define collections dynamically, based on an iteration counter, using the following format
result[i] = .... For details, see Dynamic Collections Definitions. - The Number of Iterations is applicable only for iteration calculation types and sets the maximum value of the iteration counter. You can use either a rule input argument of type whole number, or the output from a previous step.
If the output of such a step is a collection, the counter will be equal to the collection's length. E.g.: If the previous step outputs a collection with five items, the number of iterations for the current step will be 5. - Enter the expression for the step in the Formula text box. For details, see Formula Editor.
- Click Save and Close .
- Repeat for any additional steps you wish to include in your business rule. The output from a step can be used as an input argument in subsequent steps. NOTE
You cannot add new steps to active rule. For this, you need to create a new version of the rule (see Rule Cloning and Versioning).

After you've added all the steps, click Save and Close .
The order used for each step is indicated in the Oder Index column on the right in the grid.
Test Your Rule
You can create various tests for a rule to see how it performs.
To create a test:
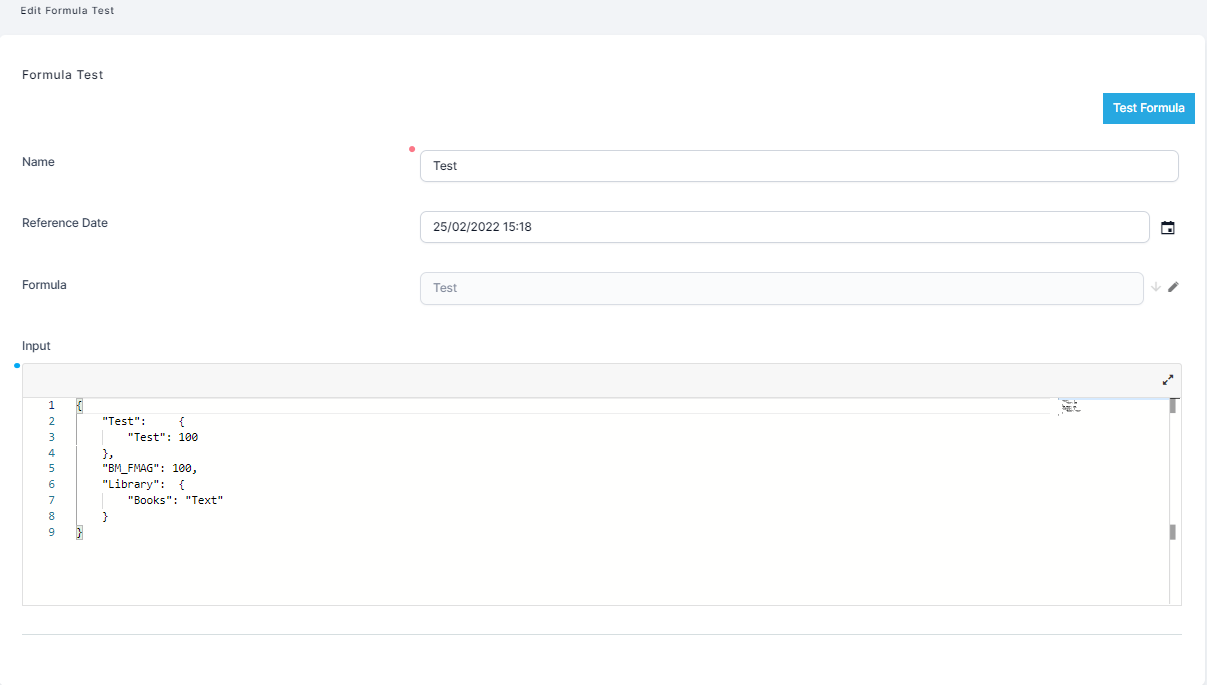
- In the rule screen, in the Formula Tests section, click the Insert button to add a test.
- Enter a Name for your test.
- Enter a Reference Date for the test. By default this will be the current date and time. The reference date allows you to test your rule with various data set versions, for instance with a data set that will become active in the future (see Data Set Versioning). For this purpose, you will also select the Test with Draft Dataset checkbox.
- The Formula field will be automatically populated with the rule name.
- Click Save and Reload. A new button will appear called ''Test Formula''.
- Edit the Input field with the desired input parameters. This field is filled in automatically with the rule input and with default values for each argument from this input. The user can just insert some values, not necessarily arguments.
- Click the Test Formula button at the top right corner of the page.
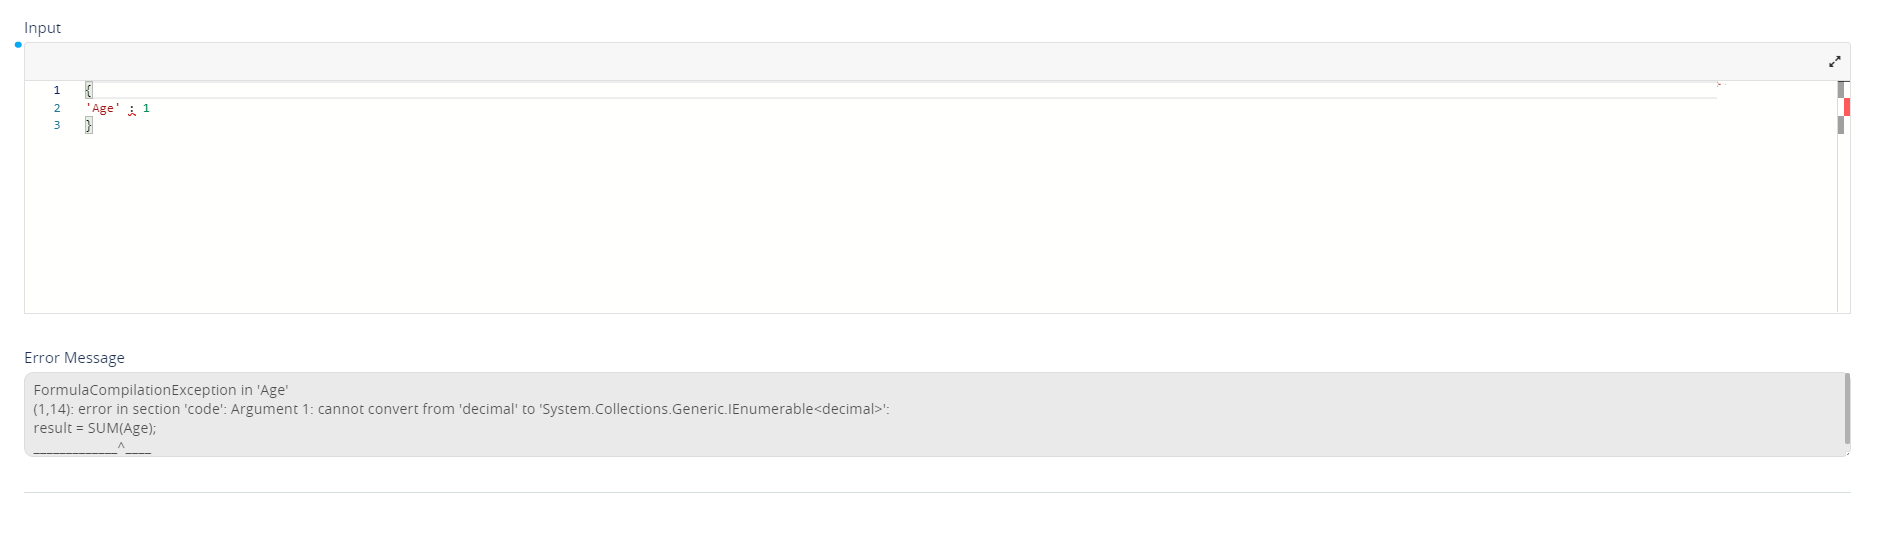
- Check the Execution Successful checkbox and the Output field to investigate the rule execution.
If the result is successful, the output will include the rule result as well as the sequence of inputs and step results that led to it.
{
  "formulaResult": 34.0,
  "inputParams": {
    "n": 10,
    "fibonacci": [
      0.0,
      1.0,
      1.0,
      2.0,
      3.0,
      5.0,
      8.0,
      13.0,
      21.0,
      34.0
    ],
    "fn": 34.0,
    "docTestFibonacci": 34.0
  }
}
If the result is an error a new text box will appear. In the text box, the system will retrieve the reason for the error.
Rule Cloning and Versioning
When you first create a rule, it will be in a Draft state, meaning that it can be edited and tested, but not used by the system. Users cannot create a new version from this state by clicking the button ''Create new version'' on the right-side of the screen.
Activate a Rule
To activate a rule draft, in the rule page, click the Next Status: Active field in the top left corner of the screen.

Activation has the following implications for the rule:
- you can create a new version of the rule (see Create a New Rule Version Draft)
- you can clone the rule (see Clone a Rule)
- the rule needs to have at least one step
- the rule expression becomes readonly
- when a versioned rule goes into Active status, the parent rule end date is updated with the versioned rule's start date and its status is updated to Closed.
- you can no longer update or delete the rule's input.
You can still run a closed version of a rule with the ftos.formulaEngine.run Server SDK method.
Once activated, you can revert an active rule to the draft status only if:
- Its start date/time is later than the current date/time.
- There is no other draft created in a newer rule version (see Create a New Rule Version Draft).
Otherwise, an active rule can only go into the Closed state.
Clone a Rule
After activation, you can create a clone of that rule. This allows you to use an existing rule as a template for similar use cases. To do so:
- Click the Clone button at the top-right corner of the rule screen.

- The cloned rule is created and opened automatically.
- Modify the cloned rule as needed, then click Save and Close.HINT
After cloning a business rule, rename both the rule clone and its associated inputs clone to prevent future naming conflicts (e.g., if additional clones are later created from the same rule or inputs).

Create a New Rule Version Draft
An active rule cannot be modified. Instead, a ''Create New Version'' button in the top right corner of the rule page allows you to create a new version of the same rule and to make modifications on the new version. The new version will keep the original start date if it is in the future. Otherwise it will use the current date.
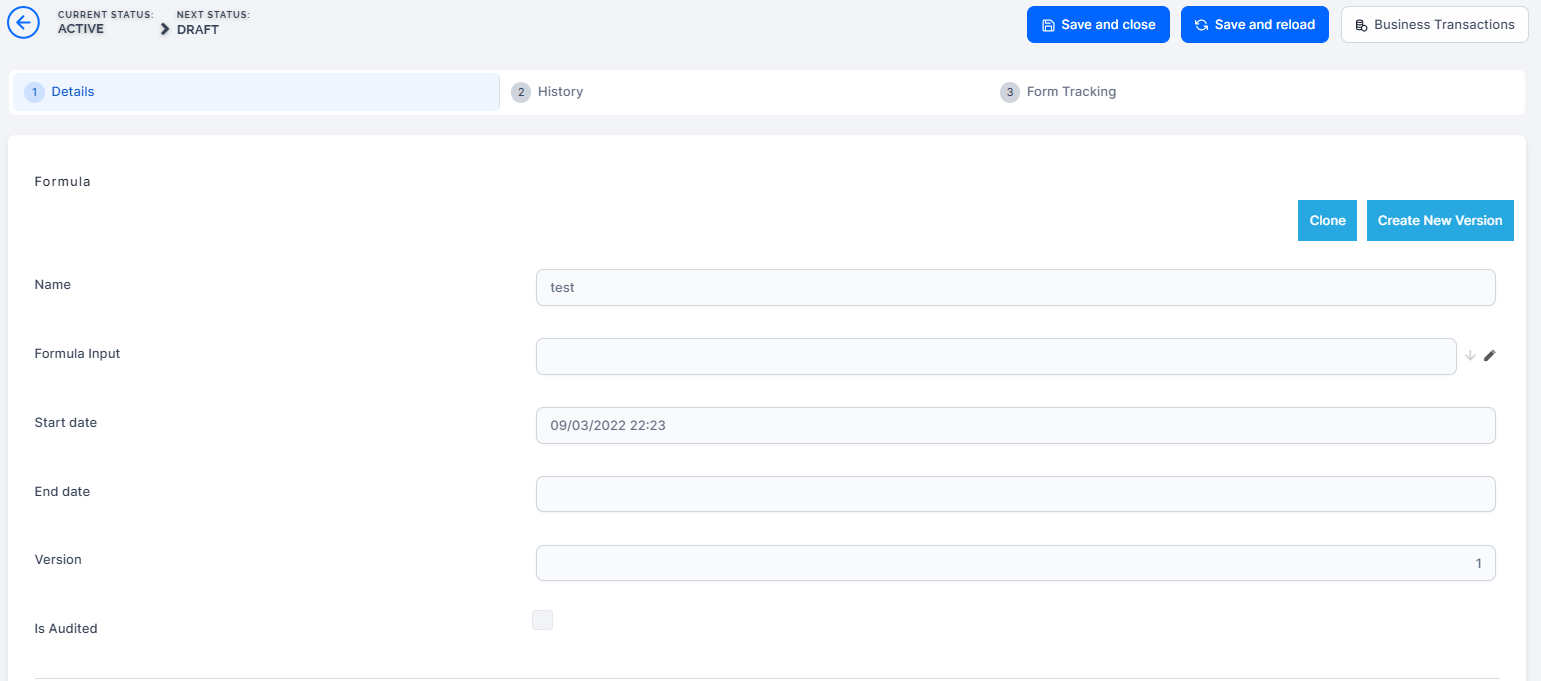
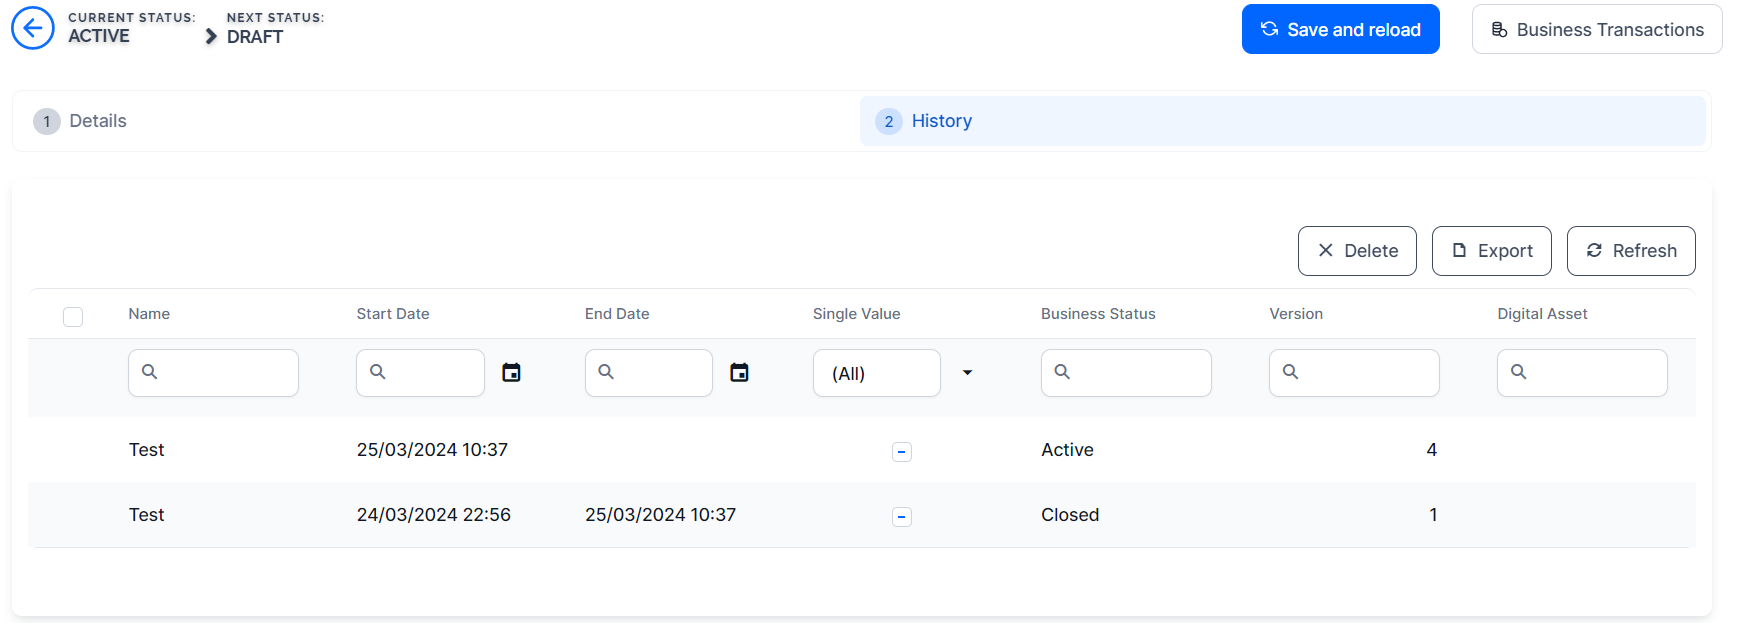
Click the Create New Version button to create a new Draft version based on the active rule. You can edit the draft version while the active rule is still enabled. It will have the same name as the original, but the version number will be increased by one. To find the New Rule Version Draft, open the rule you wish to change and click the History tab where all the modifications are displayed.
The start date of the new version must be later than or equal to the current date and time.
Activate a Rule Version Draft
Once you finish updating the draft version, change its status from Draft to Active as shown in the Activate a Rule section. The previously active version will be set to a Closed state, and the draft version will become the currently active version.
You can track the rule versions in the History tab of the rule page.
You need a rule to determine the insurance premium for a building depending on the construction type and the exposure to other risks. The risk exposure is represented as whole number coefficients (e.g., 1, 2, 3, 4, 5).
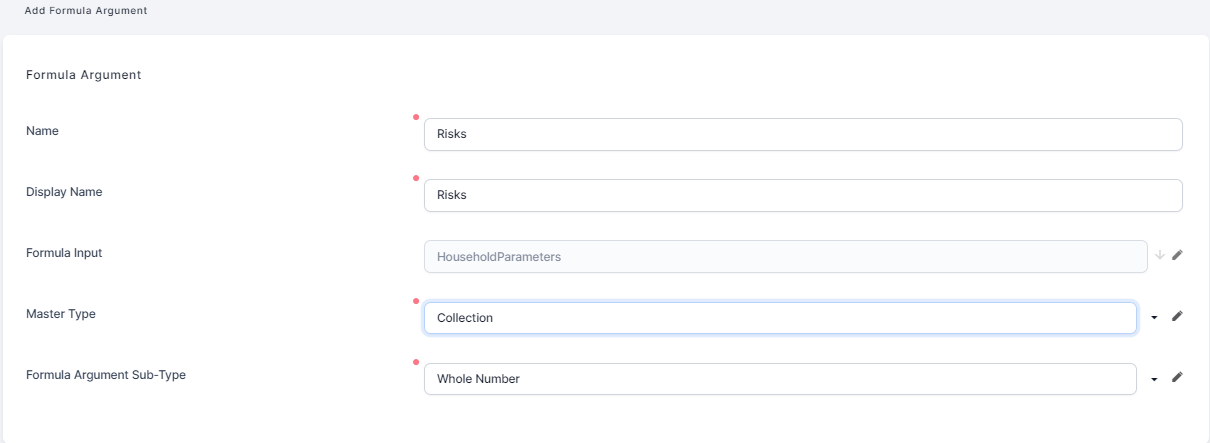
Create the input data by creating an argument. In this case we need as arguments the construction type, the structure type and the risks.
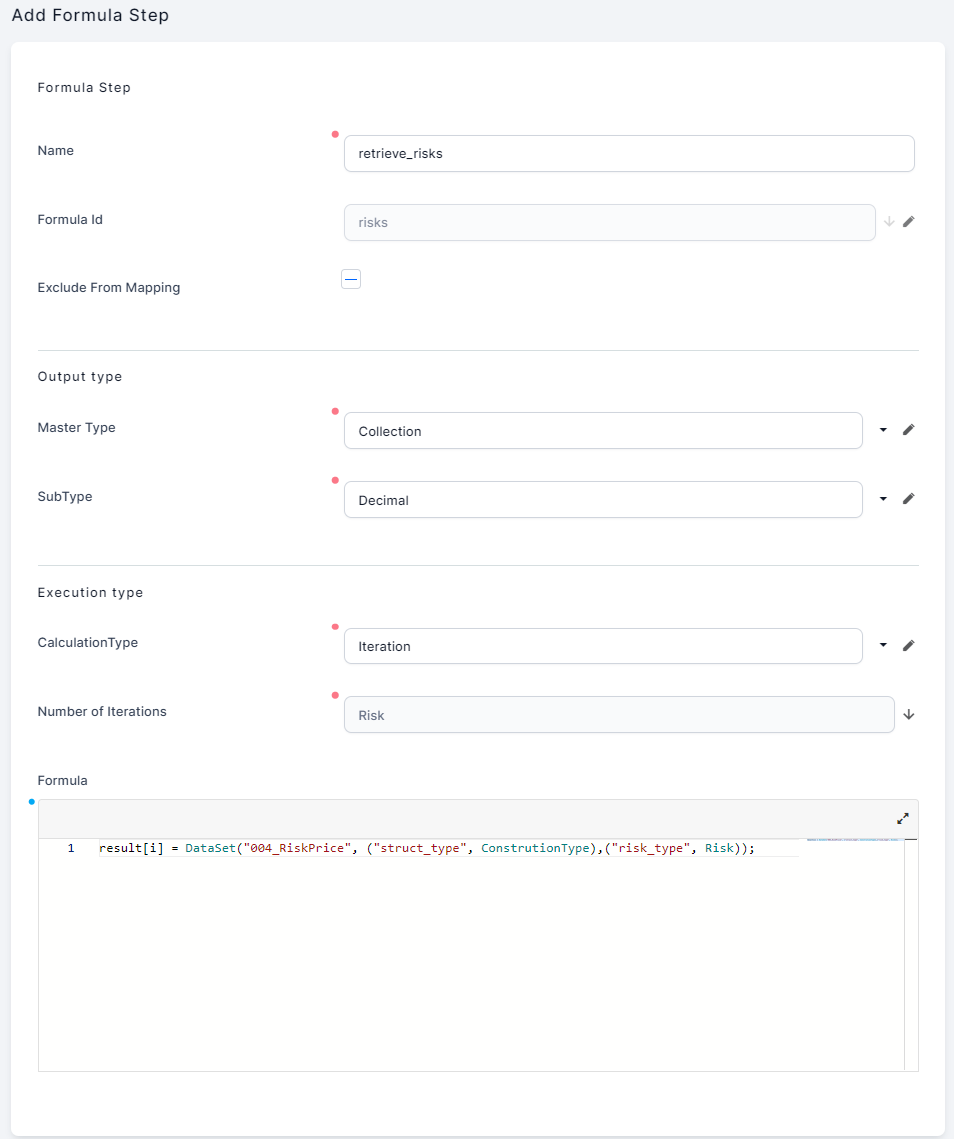
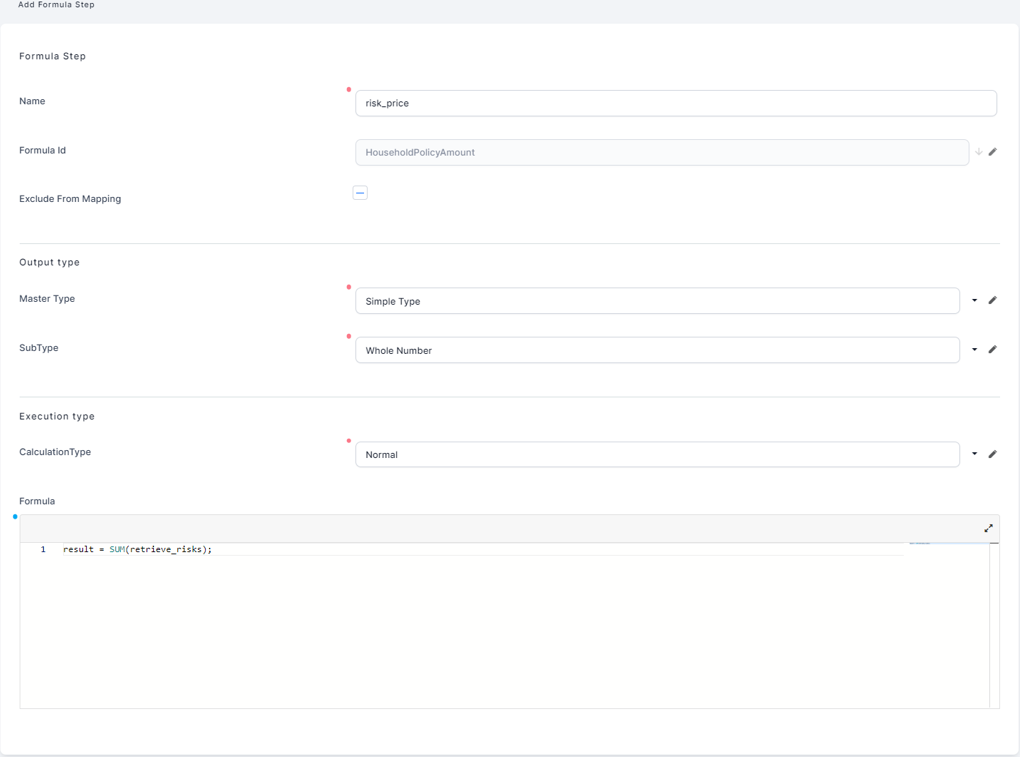
Create the two steps for the rule, where the first step becomes the input argument of the second step. In the first step, calculate the array of prices for the risks. In the second step, calculate the sum of those prices.
Test the rule by adding a data set and, in the formula test grid, inserting a structure type, a construction type and an array of risk (the coefficient of those risks that mark a real risk).
