Motor Insurance
Motor Insurance provides financial compensation to cover any injuries caused to people or their property. You have to have motor insurance before you can drive your vehicle in a public place. It protects you, your vehicle, and other motorists against liability in case there is an accident.
In the title field, enter a name for the product. Optionally, you can click the ellipsis button (...) to also provide a description and/or an availability period. Below, fill in the following product configurations.
Main Info
The Main Info section defines the currency used for the insurance's associated prices and values, the cover term(s)![]() Period during which the insurance coverage is active and in effect. During this time, the insured party is protected under the terms of the policy, provided that the premiums are paid as required. Once the cover term expires, the policyholder is no longer protected unless the policy is renewed or extended., and the insured object(s)
Period during which the insurance coverage is active and in effect. During this time, the insured party is protected under the terms of the policy, provided that the premiums are paid as required. Once the cover term expires, the policyholder is no longer protected unless the policy is renewed or extended., and the insured object(s)![]() Item or entity that is covered by an insurance policy..
Item or entity that is covered by an insurance policy..
| Parameter | Description |
|---|---|
| Insurance |
Select the currency for the insurance's associated prices and values, and define the cover term(s) for the policy. You can configure up to three options for the cover term. E.g.: Insurance in Euro with a cover term of 1 year or 18 months or 2 years. |
| Insured Object(s) | Choose the insured objects and their features that must be input by the applicant.
If the product template has multiple insured objects available, you can repeat the process to add additional insured objects. E.g.: Household defined by Building Class, Building Materials, Property Condition. E.g.: Car defined by Car Condition, Engine Type, Mileage. E.g.: Property defined by Property Condition. |
Coverages
Coverages configure the claim rules (deductible![]() Amount of money that the insured party must pay before their insurance policy starts paying for covered expenses., indemnity limit
Amount of money that the insured party must pay before their insurance policy starts paying for covered expenses., indemnity limit![]() Maximum amount of the insurer’s liability for any claim or claims under a policy., waiting period
Maximum amount of the insurer’s liability for any claim or claims under a policy., waiting period![]() Amount of time an insured party must wait before some or all of their coverage comes into effect., and event limit) for the various perils
Amount of time an insured party must wait before some or all of their coverage comes into effect., and event limit) for the various perils![]() Specific event or circumstance for which an insurance policy provides protection and financial compensation covered by the insurance.
Specific event or circumstance for which an insurance policy provides protection and financial compensation covered by the insurance.
- Each insured object can be divided into coverages based on its components. For instance, a home insurance can have coverages for the dwelling, garage, and personal belongings. Likewise, a health insurance can have separate coverages for the medical expenses and for the prescribed medications.
- Coverages can be divided into sub-coverages that group together perils of the same type. For instance, a dwelling coverage can have separate sub-coverages for natural disaster perils (such as earthquakes, floods, hurricanes) and for man-made perils (such as vandalism or burglary).
To set up coverages for your insurance, for each insured object:
| Parameter | Description |
|---|---|
| Coverage |
Coverages allow you to break down the insured object into multiple components. For instance, a household insured object can be broken down into coverages for building, garage, courtyard, etc. In an insured object, click + Add coverage and set a name for your coverage (default is Untitled). |
| Claim rules | You can set up claim rules at either the coverage, sub-coverage, and/or peril level to configure the disbursement
E.g.: Natural Disasters coverage with deductible of 1500 USD and with indemnity limit of 1000000 USD. E.g.: Intentional Damage sub-coverage with deductible of 1000 USD and with indemnity limit of 200000 USD and with waiting period of 3 months and with event limit of 2 reimbursed 100000 USD each. |
| Sub-coverages |
Sub-coverages group together specific types of perils, for instance FLEXA (Fire, Lightning, Explosion, Aircraft Fall) or Crime. Inside a coverage, click + Add sub-coverage and set a name for your sub-coverage (default is Untitled). |
| Perils |
Perils are specific events or circumstances for which the insurance policy provides protection and financial compensation. You can select perils like lightning, accidents, vandalism, etc. as defined in the Insurance Peril settings. Inside a sub-coverage, click +Add peril and set a name for each event covered by the insurance (default is Untitled). HINT
In the perils' pop-up window, you can click Add perils in Product Settings to open the Insurance Peril settings and add a new peril. |
Underwriting
The underwriting rules determine an applicant's eligibility for the product and whether or not a manual approval process is required (available only for rules based on Product Data Sets). You can define underwriting rules at the insured object or at the coverage level to differentiate between eligibility for specific coverages or for the insured object as a whole.
To create a rule, click the + sign next to the desired insured object or coverage and select one of the following options:
- Add Rule - Follow the sentence-based interface to configure a condition based on a Lexicon Term (e.g. Property Condition is Good or Excellent).HINT
In the attributes' pop-up window, you can click +New Attribute to quickly add a new lexicon term or Product Settings to edit the current lexicon term. - Add Formula - Use Product Formulas that return a boolean result ("True" for approval and "False" for rejection);
- Add Data Set - Use Product Data Sets for the evaluation. This is mandatory if the rule can return an outcome where the application must go through a manual approval process. The data set can return only the Approved, Derrogation, or Rejected results (or an equivalent terminology defined in the Underwriting Data Set Values, e.g. Passed, Manual Analysis, or Not Passed).
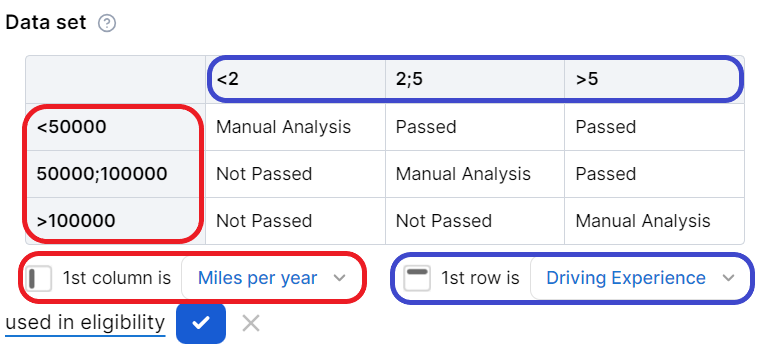
For each rule, you can select the used in eligibility option to mark it as a knock-out rule, which automatically disqualifies the applicant if its condition is not met. Otherwise, the rule is submitted to the final approval review.
For the manual approval result, you need to configure the journey to direct the application to a back-office manual approval process. If you are using Multi-Dimensional Data Sets based on cascading data sets, the manual approval outcome must be defined in the top-level data set.
Pricing
Pricing determines how the product's insurance premiums![]() Amount of money the policy holder pays to the insurance company in exchange for insurance coverage. This payment is typically made on a regular basis, such as monthly or annually. It represents the cost of obtaining and maintaining insurance protection. are calculated. Pricing calculations are based on Product Formulas, allowing you to implement complex decision modeling. You can apply pricing formulas at the insured object, coverage, and/or sub-coverage level.
Amount of money the policy holder pays to the insurance company in exchange for insurance coverage. This payment is typically made on a regular basis, such as monthly or annually. It represents the cost of obtaining and maintaining insurance protection. are calculated. Pricing calculations are based on Product Formulas, allowing you to implement complex decision modeling. You can apply pricing formulas at the insured object, coverage, and/or sub-coverage level.
- Select add formula for the chosen insured object, coverage, or sub-coverage.
- Select a predefined formula, or write your own (see Product Formulas for details).
If you try to add an attribute that does not exist, the platform will add it as a Lexicon Term with your definition so you can use it again. This way, you can expand and customize the lexicon based on your product requirements.
Plans
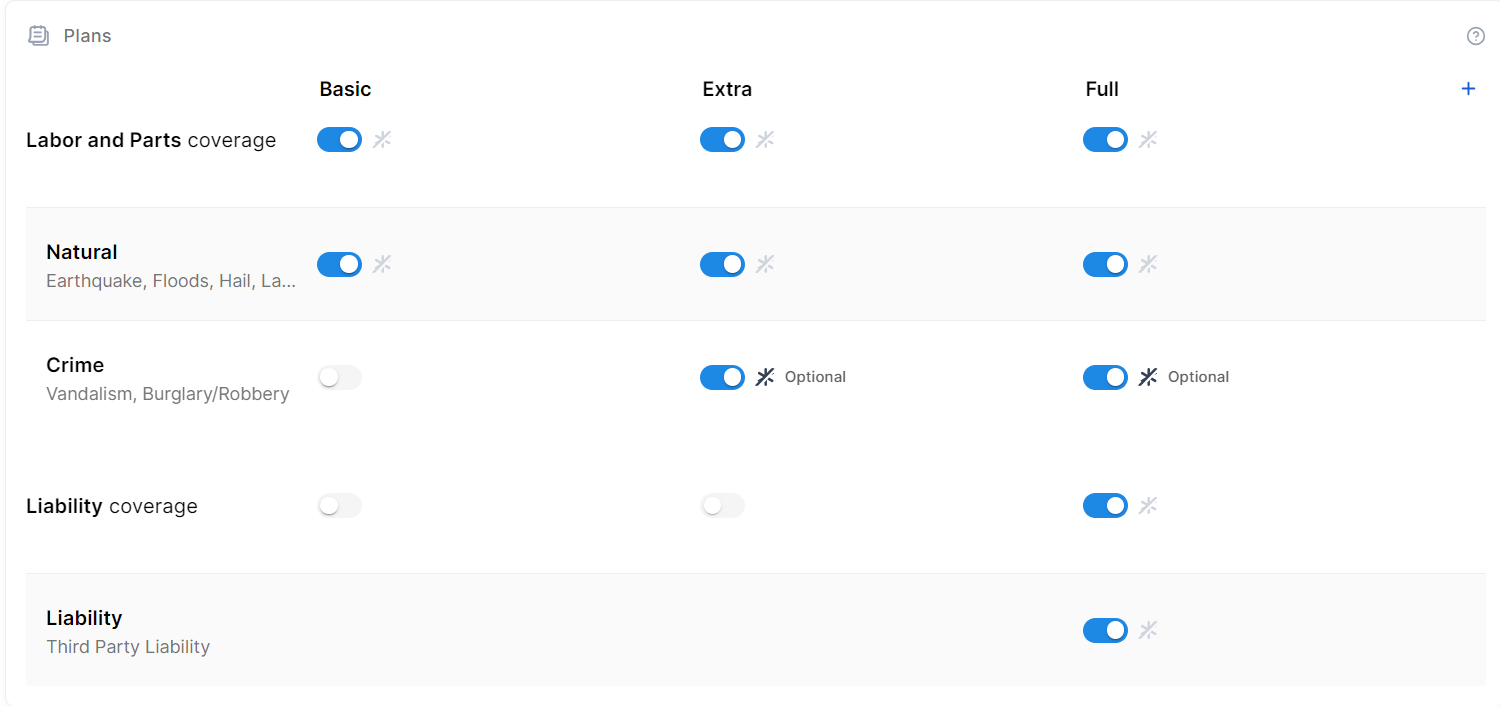
Plans determine coverage variations that you want to include in your product's Offers. They are based on the coverages and sub-coverages you have set up in your product.
An initial plan with all coverages disabled is set up by default. To configure your full commercial offering:
- Click the + Add Plan button to add additional plans.
- Provide a name for each plan.
- For each plan, toggle the available coverages and sub-coverages and mark the ones that are optional.
By default, you can configure up to 4 plans. You can adjust the maximum number of plans using the
kv/<environment name>/mkexp-bff/appSettings/numberOfAllowedPlans Configuration Manger key.Override the Default Claim Rules
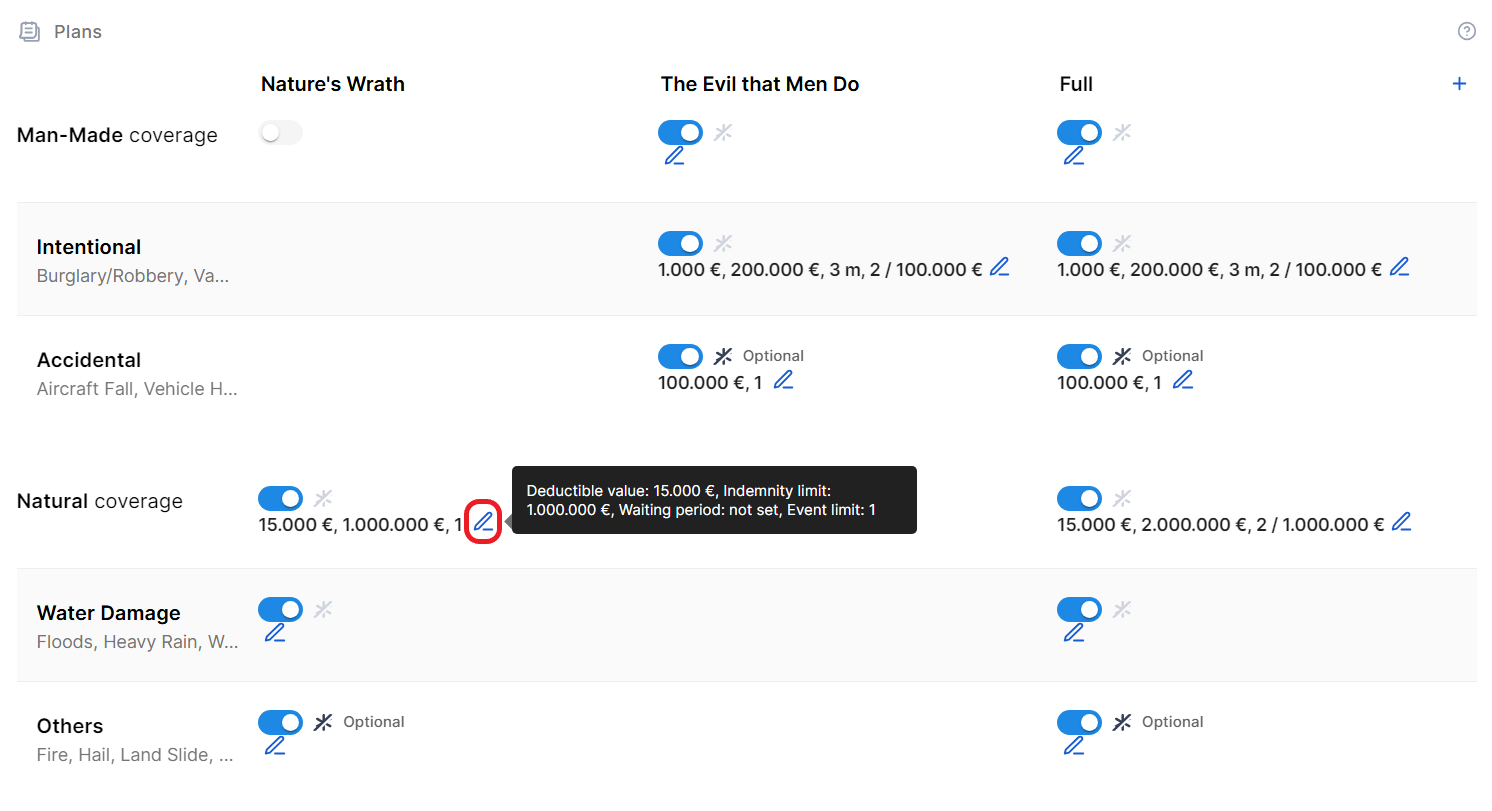
To customize the claim rules (such as the deductible![]() Amount of money that the insured party must pay before their insurance policy starts paying for covered expenses., indemnity limit
Amount of money that the insured party must pay before their insurance policy starts paying for covered expenses., indemnity limit![]() Maximum amount of the insurer’s liability for any claim or claims under a policy., waiting period
Maximum amount of the insurer’s liability for any claim or claims under a policy., waiting period![]() Amount of time an insured party must wait before some or all of their coverage comes into effect., or event limits) of a coverage or sub-coverage for a specific plan:
Amount of time an insured party must wait before some or all of their coverage comes into effect., or event limits) of a coverage or sub-coverage for a specific plan:
- Click the pencil icon next to the desired coverage or sub-coverage.
- In the side-panel that appears, modify the Deductible, Indemnity limit, Waiting period, Event limit, and Event limit occurrence fields as needed.
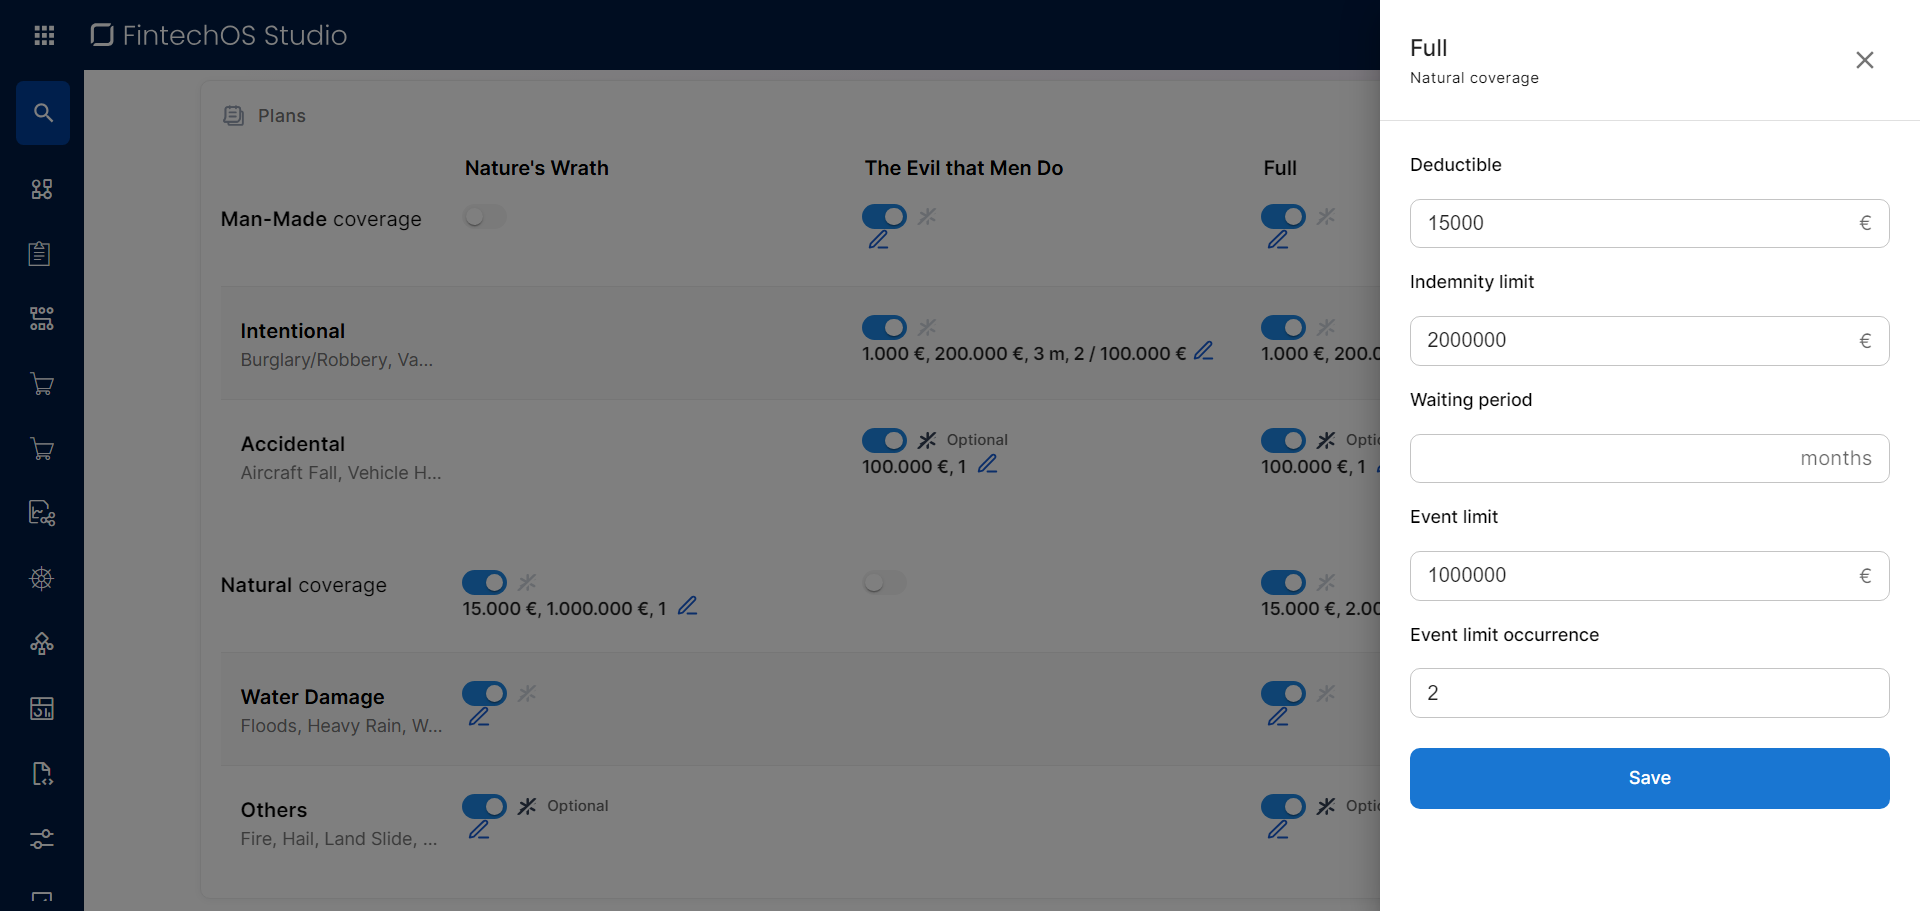
- Click Save.
The updated claim rules remain persistent even if you toggle the coverage or sub-coverage on and off within the plan.
Add Dynamic Dimensions to an Insurance Plan
Dynamic dimensions, also referred to as Plan Dimensions, allow you to define additional amounts that fine-tune claims or other financial parameters more granularly at the plan level. To add a dynamic dimension:
- Click the ellipsis button (...) next to the plan name.
- Click Dynamic dimensions to open the side panel.
- If the desired dimension doesn't exist yet:
- Open the Create Dimension tab.
- Provide a Name for the new dimension.
- If you wish to be able to define the dimension as a percentage of another reference value, select the Allows percentage value checkbox.
- Click Save.
- In the Dimensions tab, click + Add value.
- Select the desired dimension.
- If the dimension has a predefined value:
- Leave the value option selected
- Fill in the desired amount.
- If the value is a percentage of another reference value:
- Select the percentage option.
- Fill in the percentage value.
- Select the lexicon term that represents the reference value.
- If the dimension has a predefined value:
- Click Save.
Payment
The Payment section configures the payment frequency for the insurance premium. You can set up multiple payment options such as weekly, monthly, or one-time payments, allowing applicants to select their preferred payment frequency from the available periodicities.
E.g.: Payments are taken Monthly.
Documents
Specify the document types required from the customer, as well as the document types provided to the customer. These may include personal identification documents such as driving licenses, passports or ID cards, or other documents related to the insured object.
Document requests or provisions can be tailored based on the product, the insured object, or the coverage(s) sold.
| Parameter | Description |
|---|---|
| Required from customer |
Documents that the customer must provide in order to verify identity, income, ownership, product eligibility, etc. To add a required document:
E.g.: Property title for Insured object Household. |
| Provided to customer |
Documents that must be provided to the customer typically in order to obtain an agreement and/or signature. To add a provided document:
E.g.: Terms and conditions is static requires accord and requires signature. |
Service
Configure how the product will be serviced with regards to policy details, claims processing, servicing and managing quotes, or billing and collection operations:
Use Billing & Collection to configure insurance premium payments.
- Payment methods: Specify the payment methods accepted for premiums, including the primary method.
- Write-off: Choose a premium greater than or less than the invoiced amount, or none.
- Grace period: Determine the number of days until penalties are imposed.
- Invoice generation: Choose when the premium invoice should be generated.
- Payment schedule: Select the configured payment schedule that should apply for the product. Schedule types are configured via FintechOS Portal > Main Menu > Payment Schedule Type.
Use Claims Management to configure how to process claims for compensation.
- Update Indemnity limit: Determine if a policy's insured amount should be adjusted after each paid claim.
- Notification limit: The maximum time that loss notices can be registered.
Use Policy Administration to manage the insurance policy and contract.
- Renewal: Configure the automated policy renewal process, if necessary.
- Suspension duration: Set the duration of the policy suspension, in days.
- Free withdrawal: Determine the days the policyholder can terminate and receive a full refund.
- Pro rata calculation: Define the calculation and duration of the Pro Rata.
- Tariff: Select whether the tariff is calculated on a per-coverage or per-product basis.
- Underwriting: Select whether the underwriting rules should be applied per coverage or per product.
- Policy parties: Select which previously configured parties shall be used for your product.
Use Quote Admin for quote management.
- Issue Master Quote: Determine whether the product has master quotes and, if so, how the tariff and underwriting regulations apply.
Once you’ve configured all the fields, change the status from Draft to Approved to activate your product and enable you to include it in Offers. For details on versions, see Product Life Cycle.