Claim Payments
After a claim is initiated, you can add the loss value and create and process a claim payment. Follow the steps below to create a payment proposal:
-
After completing the steps on page Create a Claim, go to the Loss Values tab. Add Loss Amounts for each of the covered items. When done, click Add Loss Value.
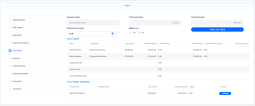
- In the Loss Values Validation section, click Validate next to the loss amounts that will be paid.
- Go to the Claims Payments tab, and click Insert to initiate a payment proposal.
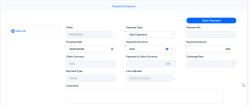
- Choose the Expense Type from the drop-down, choose the Payment Currency and input the Payment Amount. If you input a value less than the loss value, then the Payment Type is Partial. If you input the whole loss value amount, then the Payment Type is full.
-
Click Save Payment. The payment is now in Proposed status, and the Approve Payment tab becomes available.
-
Go to the Approve Payment tab and choose to Approve or Unapprove the payment. If you click Unapprove, the payment status changes to Unapproved, and the flow stops. If you click Approve, the payment status changes to Approved, and the Accept Payment tab becomes available.
-
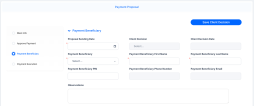
In the Payment tab, input the Payment Beneficiary from the drop-down (all the payment beneficiary data is automatically taken from the policy), the IBAN Account, Bankand Payment Date. Add a payment request document. Click Save Client Decision.
-
The next step of the Claims Management customer journey is to manage any claim related information. Go to the Rejection, Journal & Third Party Details for more information about these journey steps.


