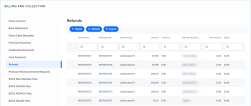
Refunds
For some of your recurring outgoing payments scenarios, you can configure Billing & Collection to automatically approve and allocate those types of outgoing payments. For other scenarios, you have an outgoing payment request manual approval flow that lets you propose, approve or decline such requests, according to your needs.
With Billing & Collection you can effortlessly manage payment requests received from different sources or systems - such as Claim payments, Commission, Broker Balance (Credit), etc. See some examples below.
Payment requests are automatically registered into your system when you use the Bank Statements functionality to upload your bank statement files. Your import triggers the automatic parsing, sorting and matching of the Payment data - contained by the file, with the Refunds already configured or scheduled by you - such as broker commissions. For payment requests that respect some rules, such as providing the correct unique identifier for a broker or the number of the policy under brokerage, the allocation flow for the outgoing payment is completely automated. After import, you can find all the new outgoing payments into the Refunds section. You can recognize the automatically allocated outgoing payments by their Paid business status. If necessary, you can open a record to see the paid amount. More details about how the system does the sorting of the received payment data, in the Bank Statements documentation.
Refunds are automatically registered by your system - for example, when you use the Bank Statements functionality to upload your bank statement files or when you receive an API call, with some payment request details.
Follow the steps below to view refunds:
-
In FintechOS Portal, go to Main Menu > Contract Management > Billing and Collection > Refunds. Double-click an item to open its details.
-
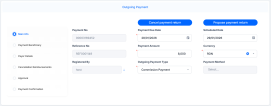
A refund has the following sections:
-
The Main Info section shows details such as payment number, method, currency, and so on. When the refund is in Draft status, you can edit the due date, amount, currency, type, and so on.
-
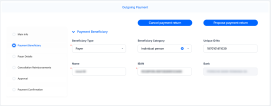
The Payment Beneficiary section, where the Beneficiary Type can be: Payer, Insured, Contractor, Policy Beneficiary, Broker, Service Provider, or Other. Fields are editable when refund is in Draft status.
-
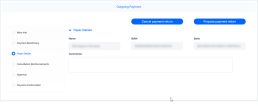
The Payer Details section, to input the company's details. Insert any relevant information in the Comments field, to be considered when approving the payment request.
-
The Cancellation Reimbursements section displays the details of an outgoing payment with any payment method chosen on the reimbursement. It has a link to the premium reimbursement generated by a cancellation.
-
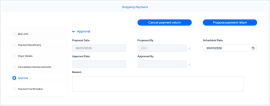
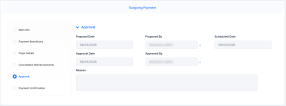
In the Approval tab you can set the scheduled date. This section shows details after the refund is approved.
-
The Payment Confirmation tab shows details about the payment.
-
-
Click Propose payment return, so the record transitions from the Draft to the Proposed status. In this way you can further approve the payment request.


You can approve a payment request only when it is in Proposed status. Follow the steps below:
-
Open your refund in the Proposed status.
-
Go to the Approval tab. Change the scheduled date if necessary, add a comment and click Approve. The refund transitions to Approved status, and the user is mentioned in the approval details.

The Billing & Collection solution automatically allocates an Outgoing Payment Request to an Outgoing Payment, based on the following rules:
-
Reference No of the payment request.
-
IBAN Account of the Payment Beneficiary and Payment Amount.
-
The allocation is done only if the payment has the same currency and the same IBAN as in the payment request.
-
The allocation is done only for the Payments Requests which are the Approved Status, with Updated Status as Scheduled.
As the first step of the allocation process, the system checks the details of the outgoing payments for the existence of Reference No.
If the user imports a Payment File (MT940 -D) using only the Reference No., the payment is allocated on that specific Request that matches the Ref No.
In case the Payment File contains a smaller payment amount than in the Outgoing Request, that specific payment amount is allocated on the Outgoing Payment Request, the Payment is Closed and the Outgoing request remains in Scheduled status, until the total sum is paid.
In case the Payment File contains a bigger payment amount than in the Outgoing Request, the rest of the amount remains in the Unallocated status (the payment is Partially Allocated).
First, if the Reference No is not identified, the system checks the IBAN Account, the currency, and the Payment Amount and allocates the Payment Request which has the same amount.
If the user imports a Payment File (MT940 -D) using the IBAN, Currency, and the correct Payment amount, then the amount is automatically allocated on the Outgoing Request identified by those criteria exactly.
If any of the criteria are not found/ filled in the MT490File, the automatic allocation does not take place. (E.g.: If the payment amount is different than the OutgoingRequest).
Also, when multiple outgoing requests are found (that have the same IBAN, Currency, and Payment Amount), the automatic allocation chooses the oldest record and allocates the amount on it (FIFO rule).
Note: All the automatic or manual allocation for Outgoing Payment Requests takes place only if the request is in status Scheduled.
The Payments Instruction File is an important element of the automatic payment management featured by the Billing & Collection solution. This File contains instructions that trigger the payments from the insurer’s bank account, for a claim payment, for example.
A daily job automatically examines the outgoing payments requests registered into the system - irrespective of the source, process, or system it came from. Next, it prepares the File containing the payment instructions for the eligible requests - for example, for the outgoing payments in Scheduled status. The File is then transmitted to the bank and the amounts are disbursed from the insurer’s bank account, according to the instructions.
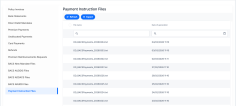
Follow the steps below to view a payment instruction file:
-
In FintechOS Portal, go to Main Menu > Contract Management > Billing and Collection > Payment Instruction Files:
-
Double-click a record to inspect it. Here, you can find the name of the file, the generation date, and the user who created it.
