FintechOS Platform 20.1
Enjoy a wide variety of new features and improvements brought by this release. FintechOS Studio now benefits from a visual overhaul, making it a more comfortable space to work in. Focus on specific business needs with the FintechOS Studio Personas. Use the Data Model Designer, Data Model Explorer, and Data Extensions in the Evolutive Data Model. Create better connections with customers with the redefined Digital Journeys. These barely scratch the surface of what this release brings, so continue reading for all the details.
What's New
FintechOS Studio Personas
This release introduces the concept of FintechOS Studio personas to narrow the capabilities and refine the focus to suit specific business needs, offering a personalized experience.
The personas not only provide you with a different look and feel, and a different main menu, but also with access to specific features:
- Developer - has access to advanced capabilities (both no-code and low-code capabilities)
- Consultant - only has access to no-code capabilities
The FintechOS Studio login page changes its look and feel based on the selected persona:
Developer Login Page

Consultant Login Page

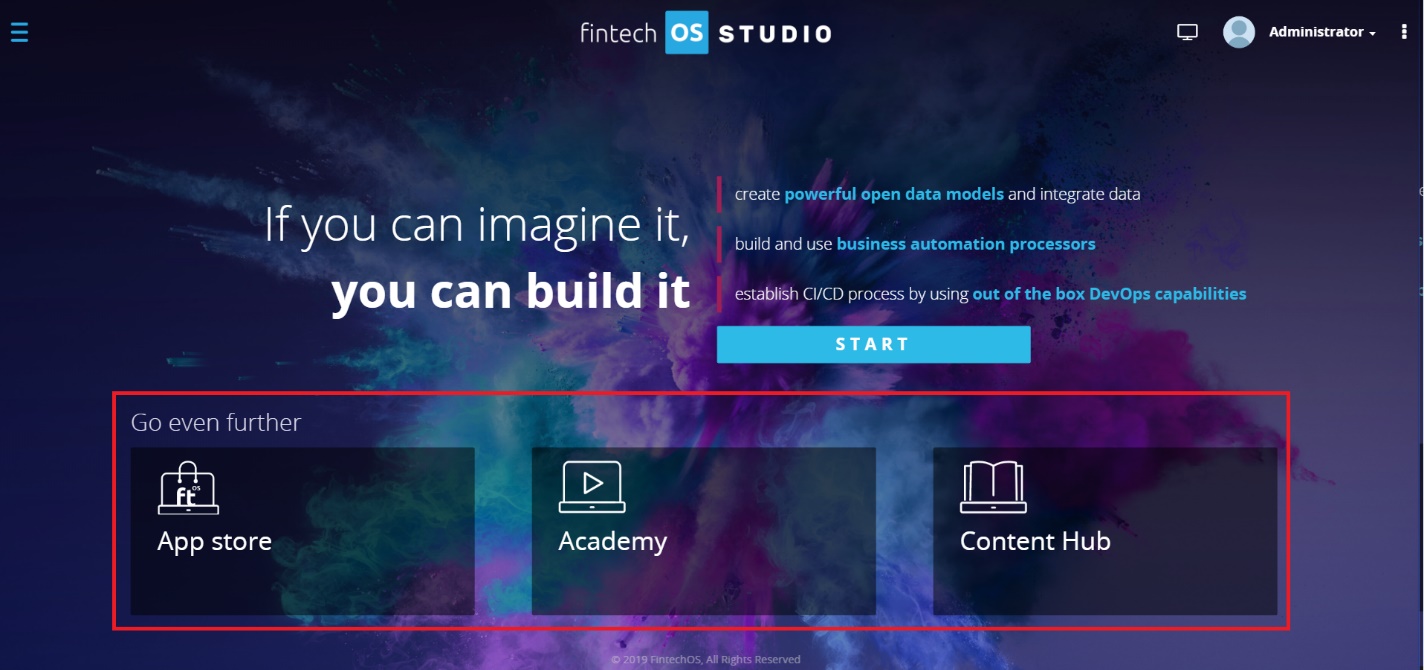
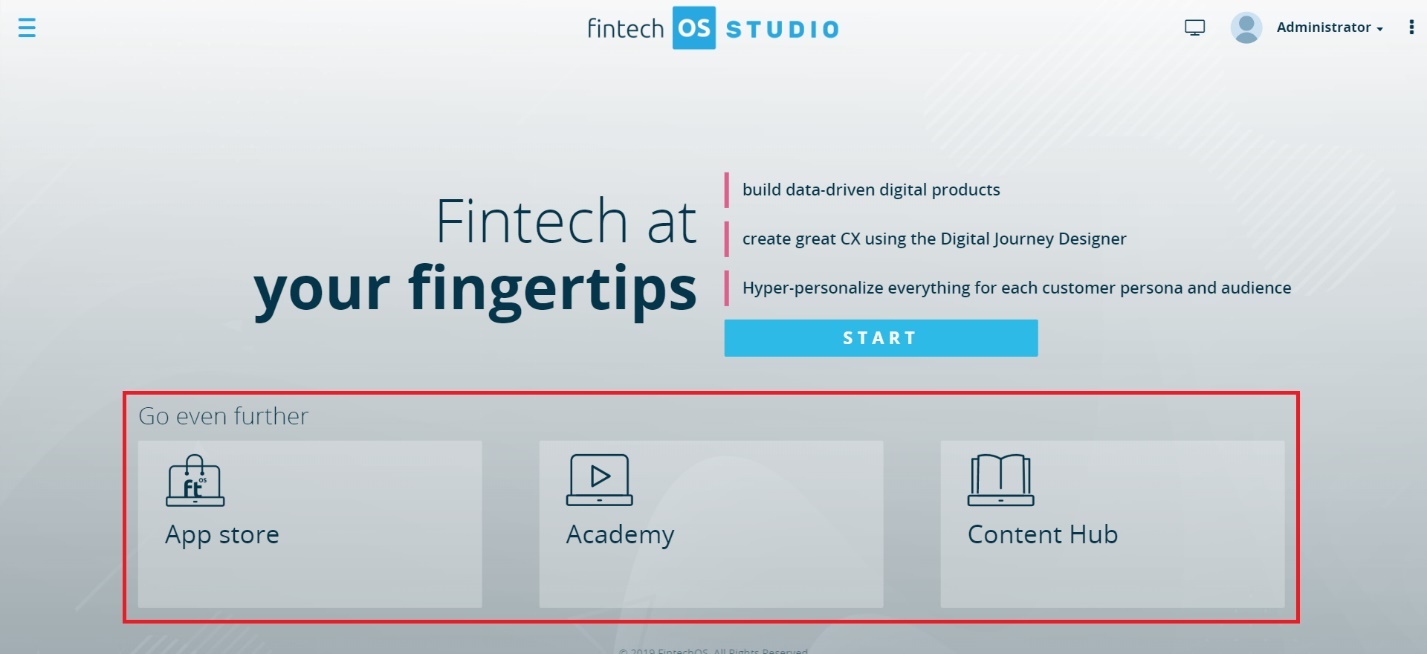
After logging in, the homepage style corresponds to the selected persona. From the homepage, you can access the following:
-
FintechOS AppStore – Get apps, plugins, modules and predefined settings that you can use in your own projects
- FintechOS Academy – Learn about the FintechOS technology and get officially certified
- FintechOS Content Hub - Find videos, demos, data sheets, tech documents, brand assets, and other useful tools
Developer’s home page
Consultant’s home page
For the complete list of features available in FintechOS Studio per persona, see FintechOS Studio User Guide.
Rebranded and Redesigned FintechOS Studio
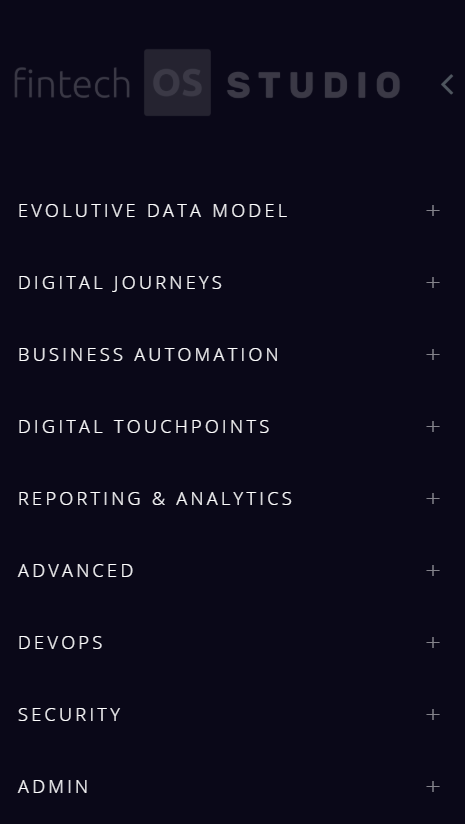
The options from the main menu have been reorganized and renamed in a manner which better accommodates the personas and the scopes they are used for.
Developer’s Main Menu
Consultant’s Main Menu
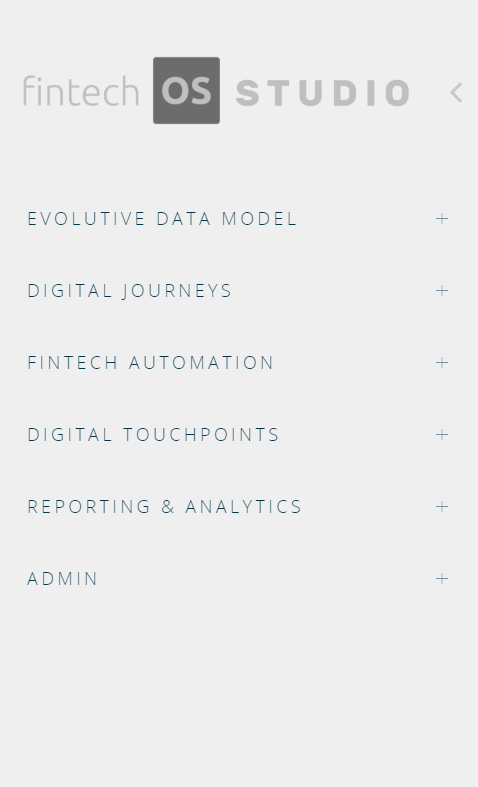
Various sections and pages have been renamed throughout FintechOS Studio to accommodate new features and the features restructure.
Evolutive Data Model
The Business Model main menu option available in FintechOS Studio versions prior to 20.1 has been renamed to Evolutive Data Model to highlight the fact that FintechOS provides you with more than the ability to model the database structure; it also provides you with the means to extend data models with data extracted from legacy systems, processes, and data repositories.
Data Model Designer
This release provides you with the ability to visually create, browse, and edit logical, relational, and physical data models using the FintechOS Studio Data Model Designer.
FintechOS Studio’s Data Model Designer comes with a user-friendly interface which enables you to easily add, update, and extend data models.
To access it from the main menu, click Evolutive Data Model > Data Model Designer.
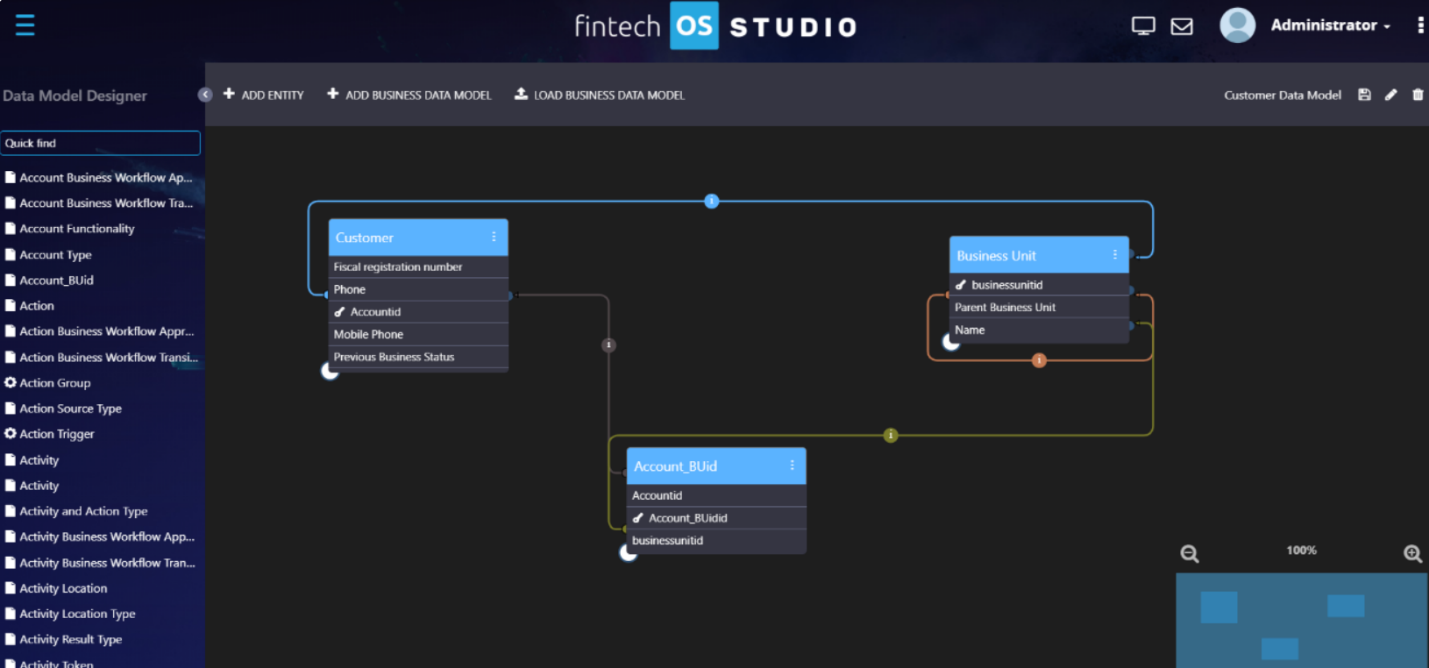
For more information on how to create and work with data models using the Data Model Designer, see FintechOS Studio User Guide.
Data Model Explorer
The Business Entities main menu option available in FintechOS Studio versions prior to 20.1 has been renamed to Data Model Explorer to emphasize that, in FintechOS, the concept of business entities, besides entity management (add, edit, and delete entities), also entails data modeling (add new attributes and define relationships). This extends data models by adding entity data extensions, importing data from legacy systems, or from other data repositories, as well as creating and defining data forms and views.
Data Extensions
Virtual attributes have been renamed to Data Extensions. What's more, starting with this release, full support has been added for Data Extensions, meaning they can be added like regular attributes.
You can add Data Extensions to entities in the Edit Entity form, under the Extended Model section.
In FintechOS you can extend a data model with two types of data extensions:
- Custom data extensions – attributes which are not associated with any entity, but give you the possibility to get existing values of attributes from the database
- Related data extensions - attributes which relate to real entity attributes which exist in the database
You can use Data Extensions on Digital Journeys to provide customers with a tailored experience.
For more information on Data Extensions and how to create them, see FintechOS Studio User Guide.
Data Governance
This release enables you to take full advantage of the FintechOS functionality, while complying with the General Data Protection Regulation (GDPR).
In this regard, FintechOS Studio allows you to:
- define the context for sensitive data
- classify data as sensitive
- define the rules to be run over the sensitive data proposed for annonymization
In the Portal, you are able to annonymize customer requests to the data defined as sensitive.
For more information on how to govern data under the GDPR in FinetchOS Studio, see FintechOS Studio User Guide.
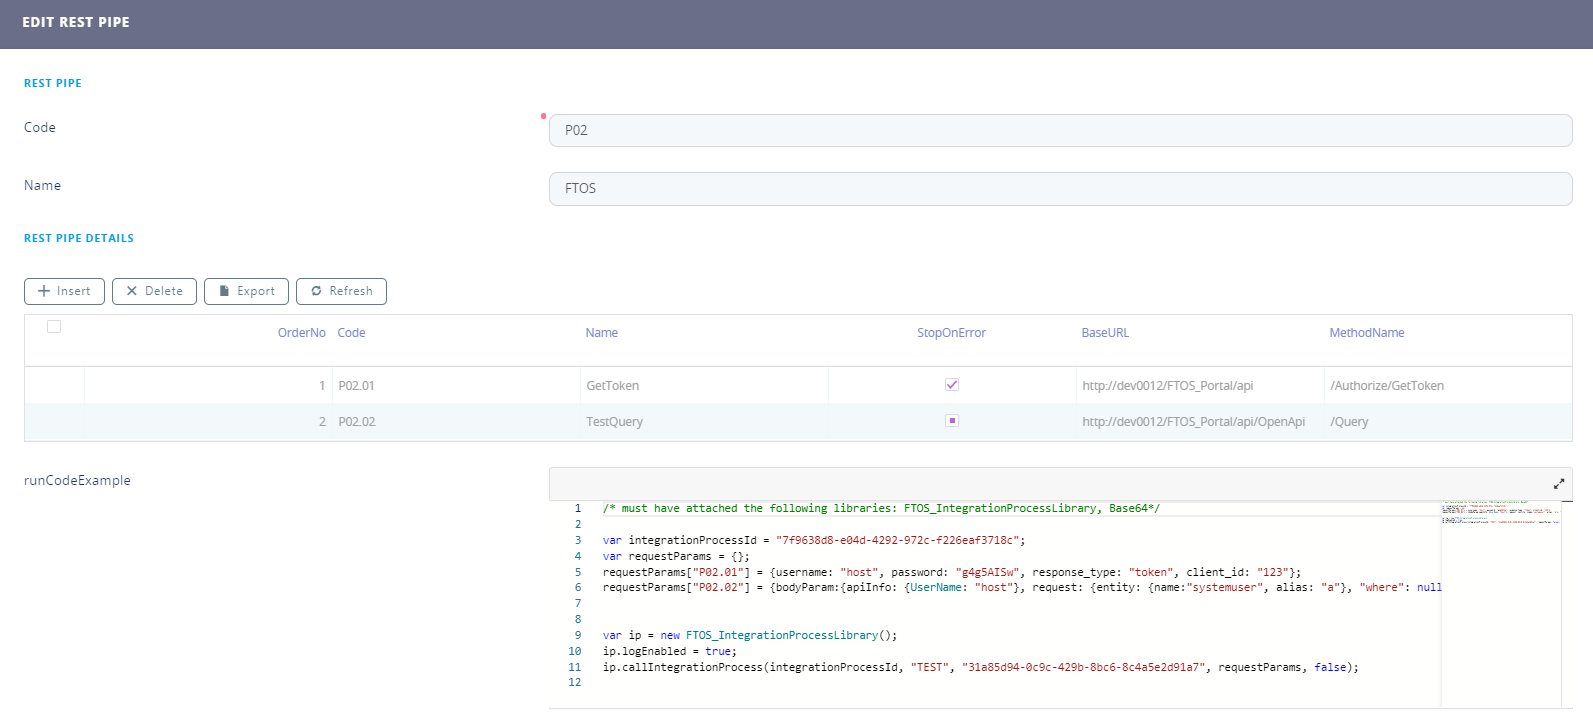
REST Pipes
The REST Pipes features simplifies the integration of FintechOS with third-party systems or other instances of FintechOS.
To access REST Pipes, on the main menu, click Evolutive Data Model > Rest Pipes. The REST Pipes List appears displaying the REST Pipes you defined. If none, the list is empty.

A REST Pipe can have one, or a collection of REST Pipe details; each REST Pipe detail allowing you to call a specific REST web method, specifying the parameters transmitted to the web call.
To call a REST Pipe, you have to use the following code:
var integrationProcessId = FTOS_IntegrationProcessUtils.getIdFromCode("FTOS_IntegrationProcess", "code", restPipeCode);
var ip = new FTOS_IntegrationProcessLibrary();
ip.logEnabled = false;
var response = ip.callIntegrationProcess(integrationProcessId, contextEntityName, contextUniqueId, requestParams, runAsync);
Where:
- integrationProcessId is the REST Pipe ID
- contextEntityName is the name where the integration will be run
- contextUniqueId is the ID of the line from the context entity
- requestParams is an object with static parameters. The parameters you can use are the ones you added to the REST Pipe Details, under the REST PIPE DETAIL PARAMETERS section. The requestParams object has the following syntax:
{RestPipeDetailCode1 : {param1: val1}, param2: val2}, RestPipeDetailCode2 : {param3: val3}, param4: val4}. - runAsync. If true, the REST Pipe will run asynchronously
If the REST Pipe is a collection of REST Pipe details, they will be called in the order given by the OrderIndex in the REST PIPE DETAILS section.
To simplify the deployment across various environments, you can configure REST Pipes in the web.config file:
- For all REST Pipe details, make sure the baseUrlIsKeyInConfigFile checkbox is cleared in the REST Pipe edit form.
- Go to the web.config file and configure the BaseURL, by adding the following setting:
<add key="FTOS_IntegrationProcessBaseUrl_[RestPipeDetail].[code]" value="https://hostname/NameWebAppAPI"/>Example:
We have a REST Pipe with the code P04 which has a REST Pipe detail with order number 1. In the web.config file you need to add its default code, which is P04.01:
<add key="FTOS_IntegrationProcessBaseUrl_P04.01" value="http://hostname/BRDF_Api"/>For REST pipes comprised of more than one REST pipe detail, to simplify the settings in the web.config file, provide the code of the REST Pipe. It will apply to all REST Pipes in the collection.
Example:
<add key="FTOS_IntegrationProcessBaseUrl_P04" value="http://hostname/BRDF_Api"/>You can also configure one value for all REST Pipes:
<add key="FTOS_IntegrationProcessBaseUrl" value="https://hostname/NameWebAppAPI"/>In this case, the BaseURL will be determined sequentially using the first configuration key found in the web.config file.
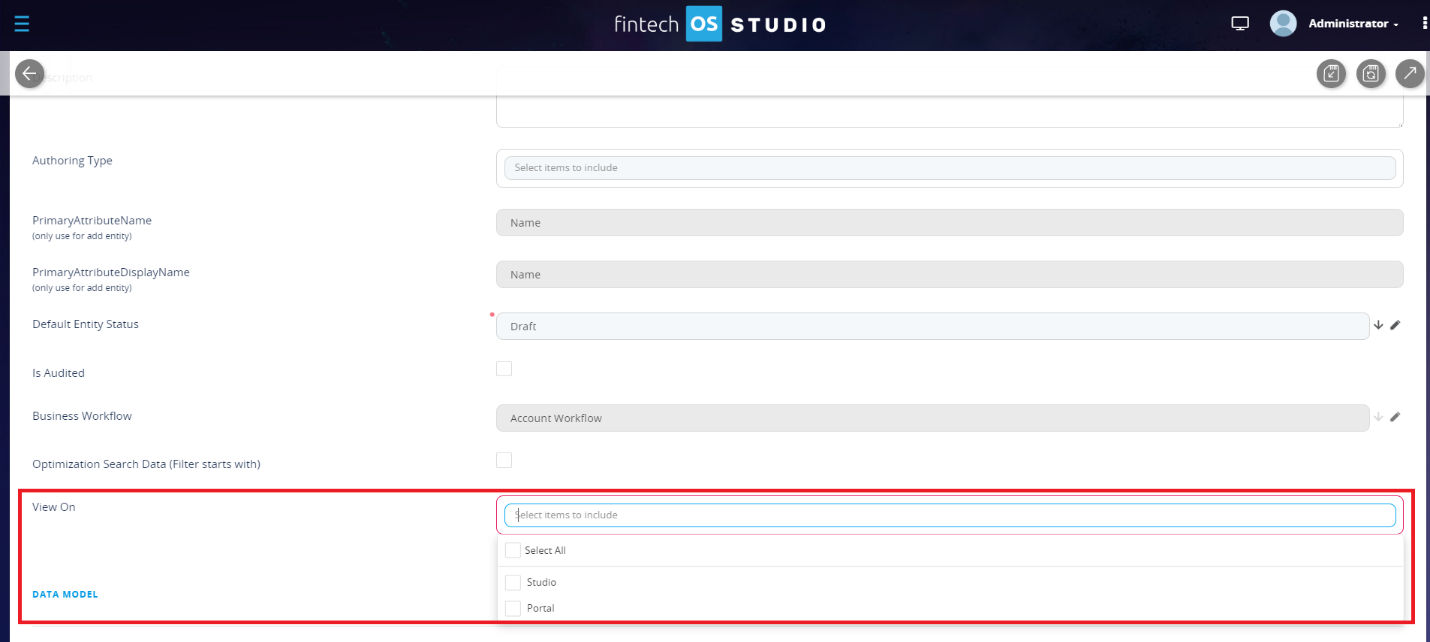
Entities Displayed in Menu Items
The Menu Items features enables you to customize the main menu (and subsequent sub-menus) of the FintechOS Studio and Digital Experience Portal by adding entities to Menu Items, and then organizing them in sub-menus based on your preferences.
When adding or editing an entity, you can choose if the entity will be added to the Menu Items of Studio, Portal, or both.
Digital Journeys
The user journey has been renamed to Digital Journey throughout FintechOS Studio.
For better flexibility, you benefit from two types of Digital Journeys:
- Form driven journeys – Defined on entity, enable you to group business-wise information in a logical and comprehensive manner in steps presented in a wizard-like manner in the Digital Experience Portals.
- Custom journeys – Create custom URLs which redirect the user to a specific data form or data view, and generate custom filtered views based on security roles or add buttons which trigger specific actions.
For more information on how to create digital journeys, see FintechOS Studio User Guide.
Digital Journey Map
This release introduces the ability to visualize the order of steps for a Form Driven Journey, which is wizard-like and is comprised of various steps.
For Wizard mode Form Driven Journeys (having the Wizard mode checkbox ticked in the General tab), you can view the Digital Journey flow (the steps order) by clicking the Journey Map tab.
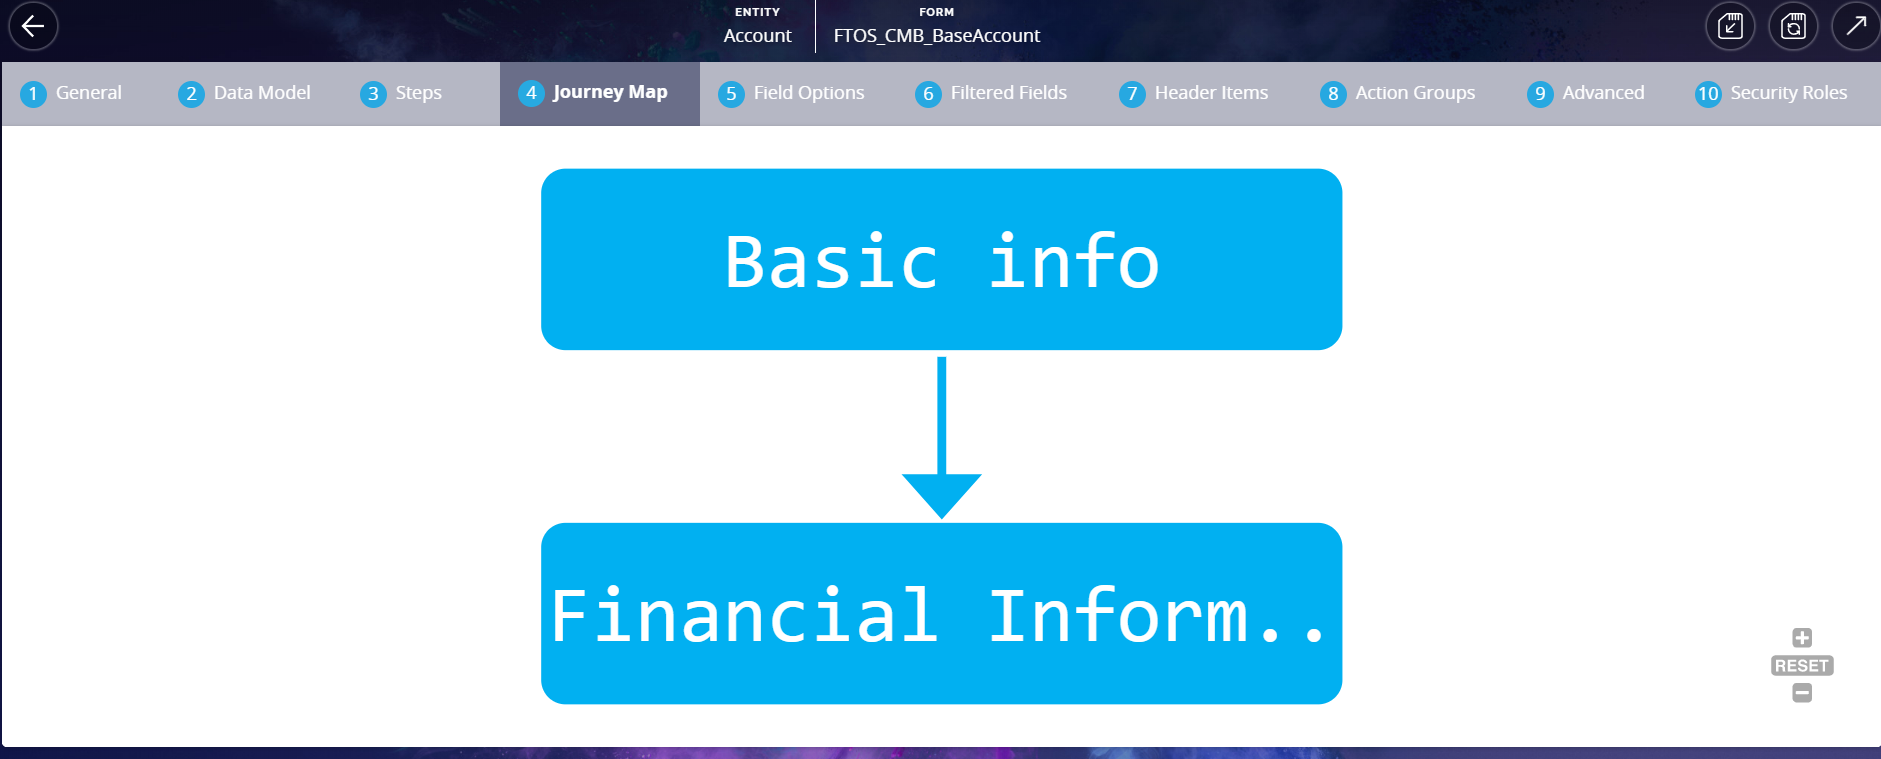
You can access the Edit Form section of a specific step by double-clicking that step in the Journey Map.
Flow Control
By default, the flow of a Form Driven Journey is given by the OrderIndex of the steps listed on the journey in the Steps tab.
This release introduces the ability to control the navigation flow of a Form Driven Journey by setting up two types of rules based on the action that is triggered:
-
Cancel Transition (beforeSave) – an error message will be displayed and nothing happens.
-
Navigate to section (AfterSave) – navigates to the specified step instead of the next (as given by the OrderIndex of the steps defined on the journey).
For more information, see the FintechOS Studio User Guide.
Fintech Automation
To provide better support when creating apps and digital journeys using the FintechOS technology, some of the most common and useful Automation Processors and apps have been built in FintechOS Studio. These Automation Processors enable you to:
-
Define evaluations you can further use at specific decision points in digital journeys
-
Create and maintain portfolios for banking and insurance products
-
Create hyper-personalized Digital Journeys
-
Automatically populate entity records in your FintechOS applications with text extracted from document scans or photos
-
Automatically generate dynamic, personalized, and accurate essential business documents
-
Allow your customers to electronically sign digital documents in a secure manner using qualified electronic signatures
-
Create omnichannel campaigns using personalized content
For the full list of built-in Automation Processors, as well as detailed information on how to install, configure, and use them, see Automation Processor specific documentation.
FintechOS Automation: Business Workflow
The Business Workflow feature is now available in FintechOS Studio as a built-in Automation Processor. You can access it from the main menu, FintechOS Automation > Business Workflow.
Business Workflow: Workflow Designer
This release introduces Workflow Designer, a graphical tool which simplifies business workflow creation, enhancing productivity. It comes with a user-friendly interface, offering the means to add workflow statuses and transactions via drag and drop.
You can access the Workflow Designer from the business workflow Edit Form section, by clicking the Designer button.
The figure below presents an example of a business workflow created with the Workflow Designer:

Business Workflow: Business Workflow Rules
From the edit business workflow form, you can configure the set of rules to be automatically triggered on workflow status change and also define specific actions to be performed before or after the status change.
With this release, FintechOS Studio provides you with two options to access the edit business workflow form (Edit Business Workflow Configuration page):
-
From the Edit Business Entity page, by clicking the Settings button next to the Business Workflow non-editable field.
-
From the Business Workflows Configurations List page, by double-clicking the record you want to configure.
For more information on how to define workflow rules, see Configure Workflow Rules.
Business Workflow: Approval Flow
To better support your business processes, a new feature is now available when working with Business Workflows: the Approvals feature. It allows you to define an Approval Flow for entities which transition from one status to another.
The Approvals feature provides the following capabilities:
- Set whether a transitioning entity from a status to another requires specific user approvals.
- Define Approval Flows per Business Workflow transition.
- Create user competences and levels of competence, and assign users with specific competences. This ensures that only users that have the competence to do so can approve entity transitions from one status to another during the Approval Flow. Example: A CreditRisk competence has the following levels: Level 1: CreditOfficer, Level 2: UnitCreditManager, and Level 3: CreditManager.
- Define approval tasks for users with specific competence levels.
- Trigger specific actions based on the user’s approval action (reject/approve).
Digital Touchpoints
The Digital Experience Portals and anonymous Digital Journeys available in previous releases have been organized on the main menu under Digital Touchpoints.
Menu Items
FintechOS v20.1 introduces the ability to customize the main menu (and subsequent sub-menus) of the Digital Experience Portal by adding entities which are non-menu items (those which have the View On checkbox ticked clear in the entity edit form) as children of the entity marked as menu items.
For more information on how to customize the Portal’s menu, see Grouping Entities in Menu Items.
Power BI Embedding
This release introduces Power BI report types, report parameters (for Embedding-type reports), and a new way to configure embedded Power BI reports.
Prior releases provided the users with the ability to view Power BI reports by authenticating with Azure AD credentials.
This release introduces two types of Power BI reports:
- Requires SignIn (legacy) - users need to authenticate with Azure AD in order to view the reports.
- Embedding (new)- users can view reports using an authorization token, without authentication in Azure AD.
For Power BI Embedding report types, you can also define report parameters.
For more information on Power BI reports, see Advanced Analytics.
Developer Tools
Server SDK: New Methods
This release introduces two new methods to the Server SDK:
-
IsPersona(“PersonaName”, “EntityType”, entityId) – calls the name of the persona segment, and the ID of the entity which should be a part of the selected persona
-
IsInAudience(“AudienceName”, “EntityType”, entityId - calls the name of the audience segment, and the ID of the entity which should be a part of the selected segment
FintechOS Documentation
Our team provides you with a better structured documentation, organized per type and product version.
Fintech OS technical documentation is available here.
Improvements
Evolutive Data Model
New Fetch Option
This release introduces an option for the Fetch Processor, "disableAutoLookupJoins" which allows you to disable the automatic joins for lookups and optionSets. Setting it to true forces the Fetch Processor to leave the original fetch as is, and stop automatically adding joins for lookups and optionSets.
Example:
var fetch = {
        "entity": {
        name : "attribute", alias : "a"
        },
        ....
        options :
        {
        "disableAutoLookupJoins" : true
        }
        }
Digital Journeys
Filter Builder Control
This release introduces an improved filter builder which adds the entity name in saved conditions.
Old save condition example:
[
        ["myAttr","=","a value"],
        "and",
        ["anotherAttr","=","another value"]
        ]
New save condition example:
{
        entityName: "myEntity",
        condition:
        [
        ["myAttr", "=", "a value"],
        "and",
        ["anotherAttr","=","another value"]
        ]
        }
Digital Developer Tools
Automation Scripts: ConvertFromBase64
This release introduces support for converting a Base64 byte array to a string while specifying the original string encoding:
     var input = getProperty('inputBase64');
        var output1 = server.Convert.FromBase64(input, 'utf8');
        var output2 = server.Convert.FromBase64(input, 'unicode');
        var output3 = server.Convert.FromBase64(input, 'utf7');
        var output4 = server.Convert.FromBase64(input, 'ascii');
        var output5 = server.Convert.FromBase64(input, 'utf32');
Automation Scripts: Catch custom errors thrown by callees
With this release, you can catch user errors created by calling the method throwException.
try
        {
        throwException('This is a custom error message');
        }
        catch(err)
        {
        log(err);
        }
System entities
To prevent changing specific entities used by system apps, a new attribute, "IsSystemRecord" attribute was added to the "ClientScriptLibrary", "Workflow", and "WorkflowLibrary" entities. These are read-only, so changing their records is not possible.
Server SDK
Improved HttpGet method
The HttpGet method has been extended in order to support additional headers (options).
Request:
interface IEbsHttpGetOptions
        {
        timeout? : number;
        additionalHeaders? : any;
        }
Response
interface IHttpResponse
        {
        IsSuccess : boolean,
        StatusCode : number,
        Response : any
        }
declare function httpGet(url: string, obj: any, timeout: number): IHttpResponse;
declare function httpGet(url: string, obj: any, options: IEbsHttpGetOptions): IHttpResponse;
Innovation Core
Data Auditory
This release introduces new logging improvements:
- LoginAudit also logs the forwarded address for the host user when requests pass through a proxy.
- The API Logging journal also performs log in and log out on actions.
Encoded cell values when exporting to excel files
This release introduces higher data protection by preventing CSV injection. When you export data to an Excel file, the cell values are encoded. So, the cell values that begin with characters which can be used to perform a CSV injection (+, -, =, or @) are preceded with a single quote, escaping these characters and interpreting the cell values as data.
Known Issues
|
Summary |
Module |
|---|---|
|
In the current version charts aren’t exported/imported with the deployment packages |
Deployment Packages |
|
Before importing a package that has endpoints in it, first make sure to delete the same endpoints that exist in the destination environment |
Deployment Packages |
|
In the current version charts are not populated dynamically |
Experience Portal |
|
Plugin assemblies need to be copied and pasted in the Portal PluginStore\AddIns folder after the import in FintechOS Studio in order to be functional |
FintechOS Studio |
|
UploadEBS – The message error that is displayed when the virtual folder is missing is not clear |
FintechOS Studio |
|
General – The prompt for saving changes will not appear when the “Insert” button is clicked |
FintechOS Studio &Experience Portal |
|
Editing inline doesn’t work if the view columns are created with the attribute aliases from the fetch |
Experience Portal |