Create Multiple Portal Profiles
A large company has people working on different projects in order to deliver successfully in time to a client. Each project has limited access to the same database and each user must see exactly what is meant for him or her. In order not to have all projects on the same Portal, multiple variations of the Portal and its users must be created while all are still connected to the same database. To achieve this, Portal Profiles is a great solution.
Task at hand
Create two portal profiles with different background images, System Parameter values, different menu items, different dashboards and security roles. The additional Portal Profile created is named Fuerteventur_Insurance, with a main dashboard and a home insurance dashboard where there is a shortcut to the entity FTOS_Pricing and a security role named Home_Insurance. It also has a system parameter where the BlackListPeriod(Days) is 15. Additionally, a security role should be created, e.g. Fuerteventura_Home_Insurance, it will be added to the menu item and to the Portal Profile. For this role, add the CRUD operations at the business unit level.
Before you begin
- Create the entity FTOS_Pricing with the following attributes: Product name, price, transactions per day, number of products available.
- Create a dashboard named AccountDashboard.
- Expose the data form of this entity and create records inside that dashboard.
1 Duplicate the Portal file
After installing a FintechOS environment, on the server there are some files. The Portal file, must be copied and pasted next to the existing one. The copy must be named Fuerteventura_Insurance to be distinguished from the original. Insert in the web.config file of the FintechOS Portal named Fuerteventura_Insurance one key with the name of the Portal Profile. Here is the key:
<add key="core-setting-portal-profile" value="Fuerteventura_Insurance"/>2 Create the security role
Follow the path: FintechOS Studio > Security > Security role.
Insert a name. Click the Save and reload. The Security items grid will open.
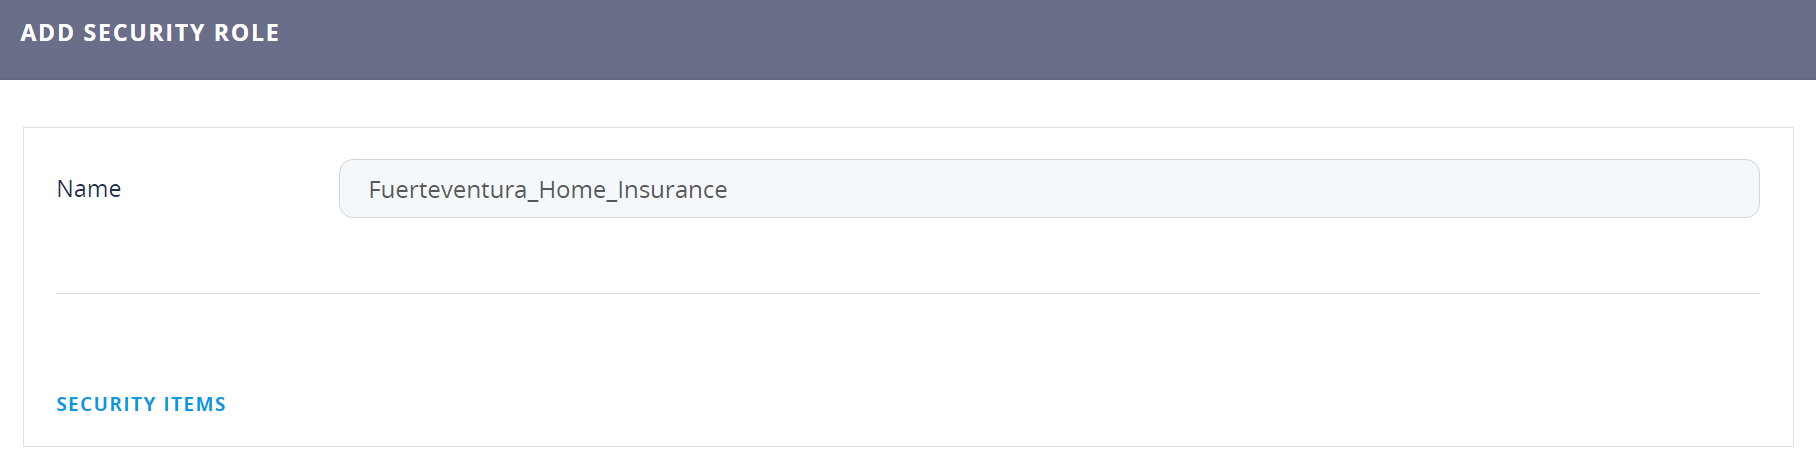
In the Security items grid, you need to add the following on the entity FTOS_Pricing:
| Operation | Security scope |
|---|---|
| Delete | Business Unit |
| Insert | Business Unit |
| Read | Business Unit |
| Update | Business Unit |
Additionally, create a business unit named Fuerteventura_Home_Insurance_BU. For details, see Security or see Build a Complex Security System. Add this security role to a system user who will access the Portal.
3 Create the portal in the FintechOS Studio
Follow the path: FintechOS Studio > Digital Frontends > Portal Profiles.
The Add Portal Profile page opens. Insert a name and description. Add the company logo, the background image and the login background image. Tick the boolean Use Full Width Forms.
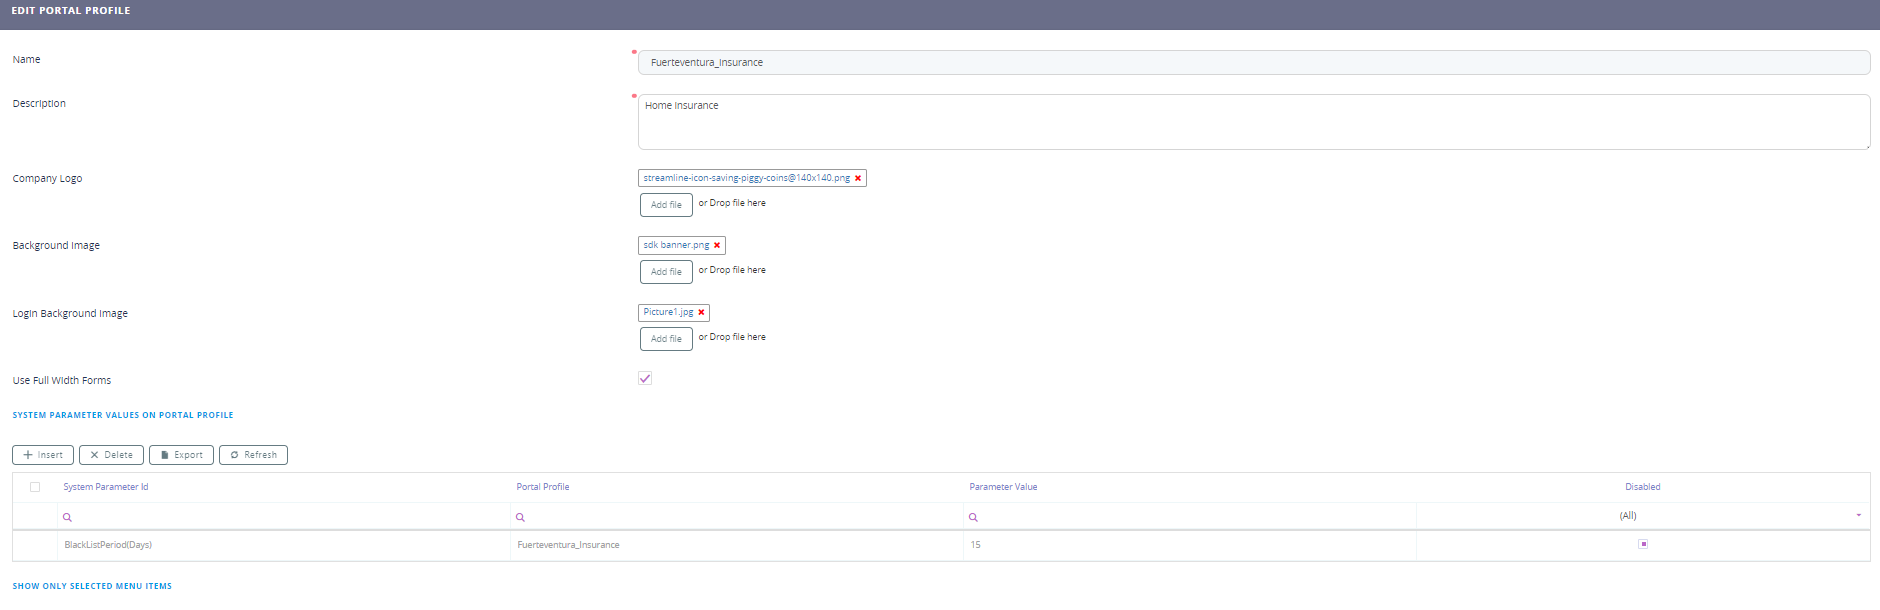
Click the Save and reload button.
Four grids will open. To insert the first system parameter click the Insert button. Fill in the following fields:
| Field | Data |
|---|---|
| System parameter ID | BlackListPeriod(Days) |
| Portal Portal Profile | Fuerteventura Insurance |
| Parameter value | 15 |
| Disabled | Null |

Click the Save and close button. To add the menu items, we have to navigate to another page either by clicking the Attache menu item button below the grid or by navigating to the path. After adding it, here it will be displayed and from here you can only delete it.
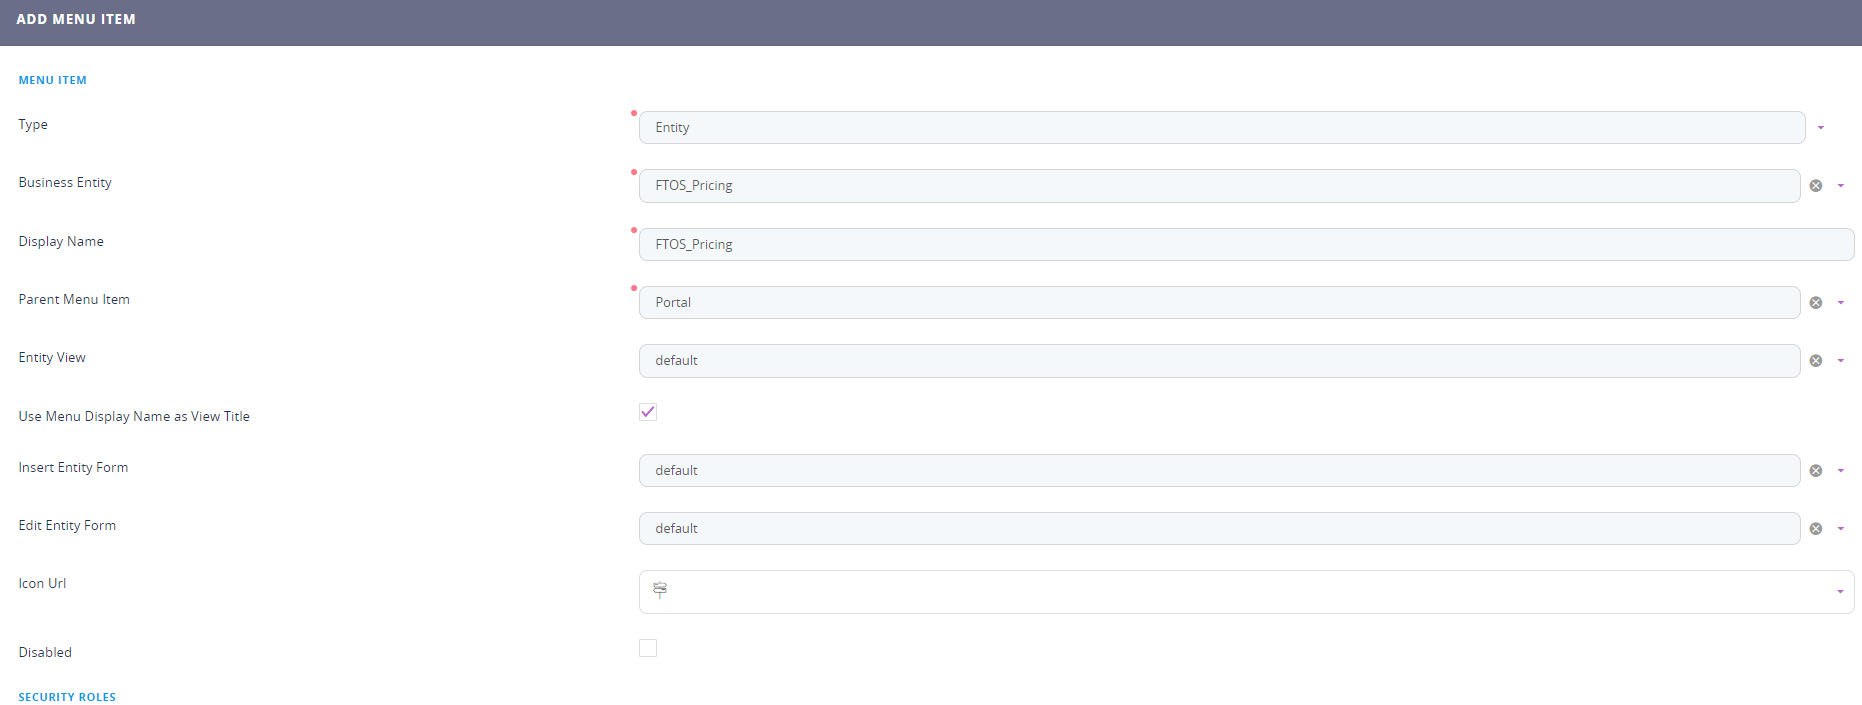
Follow the path: FintechOS Studio > Digital Frontends > Menu items.
Click the Insert button.
| Field | Data |
|---|---|
| Type | Select entity from the list. |
| Business entity | Select the entity to be added as a menu item. e.g. FTOS_Pricing. |
| Display Name | FTOS_Pricing |
| Parent menu item | Select Portal |
Entity view | Select the entity view you wish to add, e.g. the default is automatically created. |
Use menu display name as view title | The bool should be true. |
Insert entity form | Select the entity form you wish to add, e.g. the default is automatically created. |
Edit entity form |
|
Icon URL | Select from the list an icon. |
Disabled | The boolean is null. If the boolean is true, then the menu item is not rendered in the portal. |
Click the Save and reload button.
The Security roles grid will open. Click the Insert existing button. From the list select the Registered Users and the Fuerteventura_Home_Insurance. Click the Save and close button.
4 Add a dashboard
Follow the path: FintechOS Studio > Digital Frontends > Portal Profiles.
In the grid dedicated to dashboards, click the Insert button, hence, you will create a dashboard for it or add an existing one. In the field dashboard, select from the drop-down list the AccountDashboard or add a new one.
Click the Save and close button.

5 Create a link for the Portal Profile
In order to access the Portal Profile, it needs a dedicated link. In the Internet Information Services Manager create a new URL for the Portal Profile. The only difference in the URL is the name of the environment. For example https://insertservername.com/Fuerteventura_Insurance/Main.
for more details, see Portal Profiles.
Congratulations! You have created a Portal Profile.