Commercial CMR
CMR insurance is an insurance policy for motor fleet owners that provides liability coverage for cargo loss or damage under the rules of the CMR convention. The CMR Convention is an international treaty that standardizes conditions for transporting goods by road across borders in participating countries.
To create a CMR insurance product, in FintechOS Studio, go to Main Menu > Products > +New Product > Commercial > CMR. In the title field, enter a name for the product. Optionally, you can click the ellipsis button (...) to also provide a description and/or an availability period. Below, fill in the following product configurations.
Main Info
The Main Info section defines the currency used for the insurance's associated prices and values, the cover term(s) Period during which the insurance coverage is active and in effect. During this time, the insured party is protected under the terms of the policy, provided that the premiums are paid as required. Once the cover term expires, the policyholder is no longer protected unless the policy is renewed or extended., and the insured object(s) Item or entity that is covered by an insurance policy..
| Parameter | Description |
|---|---|
| Insurance |
Select the currency for the insurance's associated prices and values, and define the cover term(s) for the policy. You can configure up to three options for the cover term. E.g.: Insurance in Euro with a cover term of 1 year or 18 months or 2 years. |
| Insured Object(s) | Choose the insured objects and their features that must be input by the applicant. You can add multiple insured objects.
You can configure multi-object insurance products by adding multiple insured objects—such as a bicycle, rider, and accessories—each with its own coverages, underwriting rules, and pricing formulas. E.g.: Household defined by Building Class, Building Materials, Property Condition. E.g.: Car defined by Car Condition, Engine Type, Mileage. E.g.: Property defined by Property Condition. |
|
|
|
Coverages
Coverages configure the claim rules (deductible Amount of money that the insured party must pay before their insurance policy starts paying for covered expenses., indemnity limit Maximum amount of the insurer’s liability for any claim or claims under a policy., waiting period Amount of time an insured party must wait before some or all of their coverage comes into effect., and event limit) for the various perils Specific event or circumstance for which an insurance policy provides protection and financial compensation covered by the insurance.
- Each insured object can be divided into coverages based on its components. For instance, a home insurance can have coverages for the dwelling, garage, and personal belongings. Likewise, a health insurance can have separate coverages for the medical expenses and for the prescribed medications.
- Coverages can be divided into sub-coverages that group together perils of the same type. For instance, a dwelling coverage can have separate sub-coverages for natural disaster perils (such as earthquakes, floods, hurricanes) and for man-made perils (such as vandalism or burglary).
You can configure coverages and sub-coverages per insured object in a multi-object, multi-instance model, where each insured object (e.g., Household, Vehicle, Driver) has its own collapsible section with an independent coverage hierarchy of coverages, sub-coverages, and perils.
To set up coverages for your insurance, for each insured object:
| Parameter | Description |
|---|---|
| Coverage |
Coverages allow you to break down the insured object into multiple components. For instance, a household insured object can be broken down into coverages for building, garage, courtyard, etc. In an insured object, click + Add coverage and set a name for your coverage (default is Untitled). |
| Claim rules | You can set up claim rules at either the coverage, sub-coverage, and/or peril level to configure the disbursement Payment or distribution of funds from an insurance company to a policyholder, beneficiary, or a third party, in accordance with the terms and conditions specified in the insurance policy. conditions:
E.g.: Natural Disasters coverage with deductible of 1500 USD and with indemnity limit of 1000000 USD. E.g.: Intentional Damage sub-coverage with deductible of 1000 USD and with indemnity limit of 200000 USD and with waiting period of 3 months and with event limit of 2 reimbursed 100000 USD each. |
| Sub-coverages |
Sub-coverages group together specific types of perils, for instance FLEXA (Fire, Lightning, Explosion, Aircraft Fall) or Crime. Inside a coverage, click + Add sub-coverage and set a name for your sub-coverage (default is Untitled). |
| Perils |
Perils are specific events or circumstances for which the insurance policy provides protection and financial compensation. You can select perils like lightning, accidents, vandalism, etc. as defined in the Insurance Peril settings. Inside a sub-coverage, click +Add peril and set a name for each event covered by the insurance (default is Untitled). HINT
In the perils' pop-up window, you can click Add perils in Product Settings to open the Insurance Peril settings and add a new peril. |
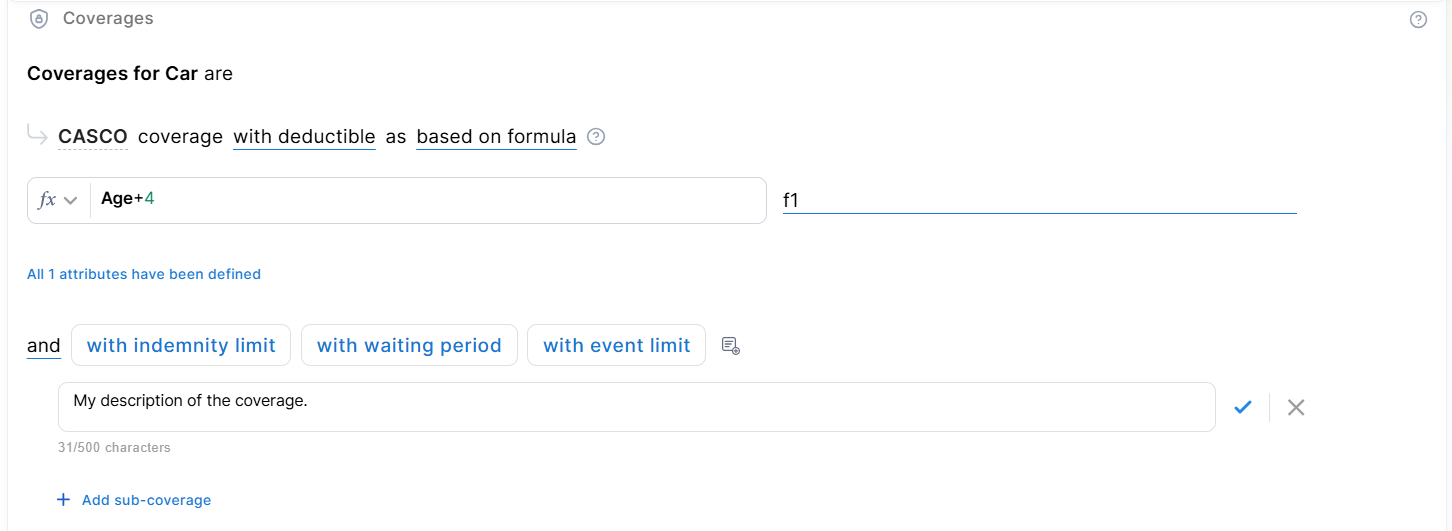
You can add an optional description to coverages, sub-coverages, and perils to keep product definitions clear and easy to understand across your team.
Underwriting
The Underwriting Module lets users define and manage underwriting rules that assess product eligibility and risk. Rules are built from lexicon terms — inputs, datasets, and formulas — and each rule is used in underwriting, eligibility (knock-out) checks, or both. They also help determine whether or not a manual approval process is required (available only for rules based on Product Data Sets). You can define underwriting rules at the insured object or at the coverage level to differentiate between eligibility for specific coverages or for the insured object as a whole.
Underwriting rules go up to coverage level only, NOT sub-coverage level.
Categories
Categories let you organize your underwriting rules into named groups so you can manage and evaluate them more easily. The default categories are:
-
KYC/KYB (Identity & Verification) — identity verification via official documents / trusted data sources (ID/passport, address, biometric or digital identity), including customer due diligence and screening.
-
Financial Crime (AML & Fraud) — fraud / financial-crime risk assessment: sanctions and PEP screening, AML risk scoring, and suspicious-pattern detection across profiles, funding sources, and transactions.
15 further predefined categories are available when you click Add Category: Credit Risk, Financial Profile, Affordability & Capacity, Employment & Stability, Collateral & Guarantees, Product-Specific Constraints, Legal & Compliance, Behavioral Risk, Risk Profile, Insured Object Risk, Medical / Health Risk, Geographical Risk, Coverage & Policy Constraints, Claims History, Distribution / Channel Rules.
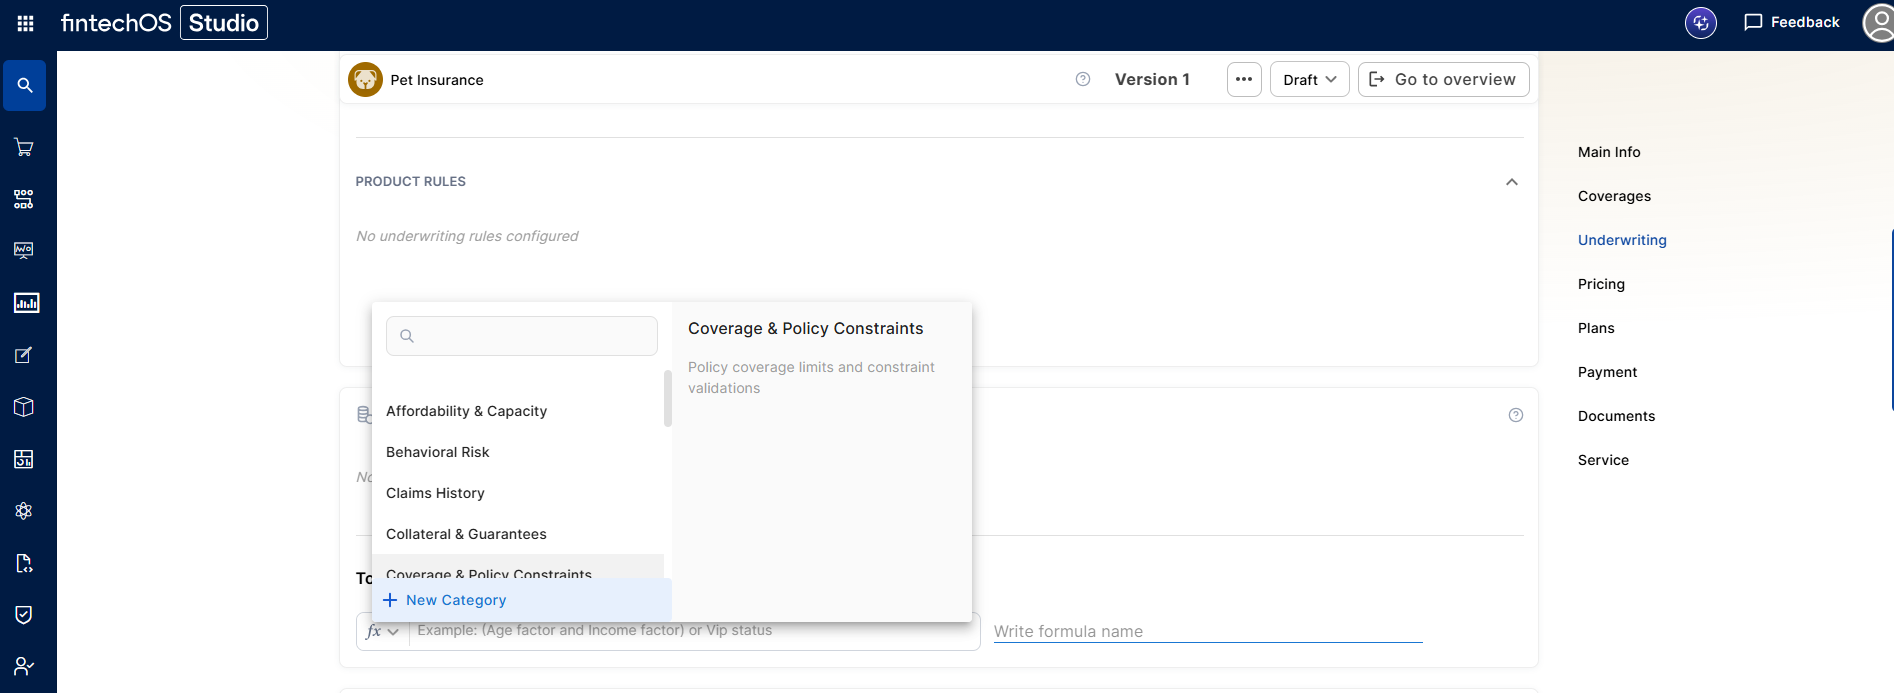
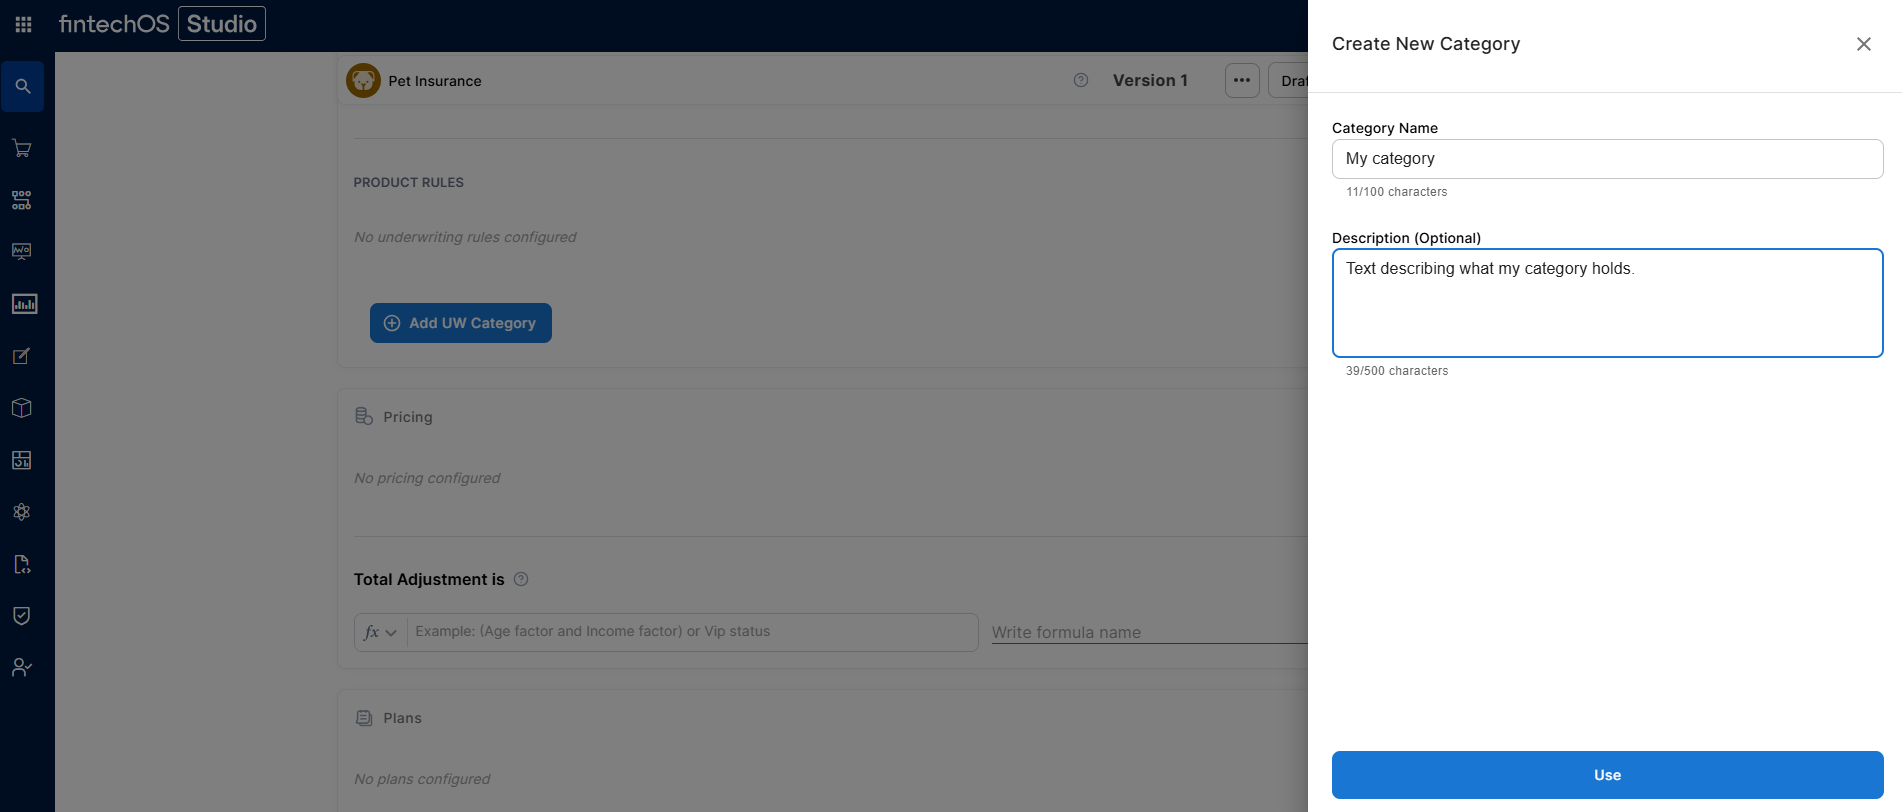
You can also create custom categories, which let you group underwriting rules under a label that matches your specific business logic — for example, if none of the 15 predefined categories fit a set of rules unique to your product or market. Click New Category, and fill in the Category Name and Description.
Product Rules
Product rules are the default, uncategorized group — any underwriting rule that hasn't been assigned to a specific category lives under Product Rules, and you can move a rule back there at any time to un-categorize it.
Derogation Rules
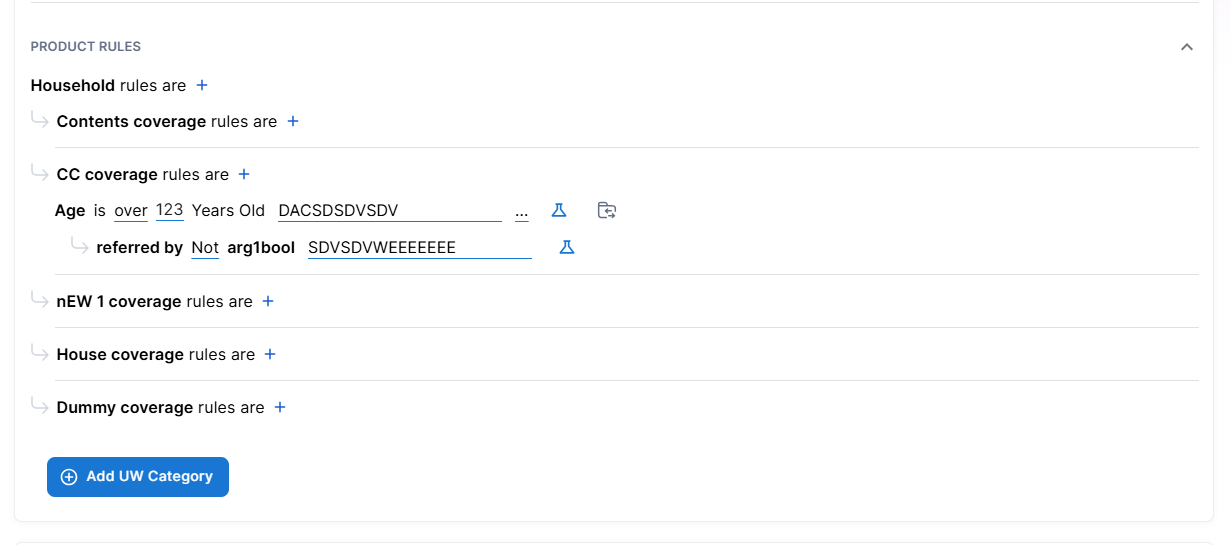
A derogation rule lets you send a rejected underwriting rule to manual review instead of automatically rejecting the application. This adds a third possible outcome — Derogation — alongside Approved and Rejected.
Configuration:
-
While editing a rule, click referred by to attach a derogation
-
Choose the derogation type: Add rule, Add Data Set, or Add Formula
-
The derogation appears as an indented child statement under its parent rule
-
The parent rule cannot be saved until the derogation is fully configured.
Constraints:
-
Each rule can have only one derogation
-
Data Set rules cannot have a derogation
-
A derogation has no category, alias, or code
-
Derogations cannot be nested — a derogation cannot have its own derogation
-
A lexicon term used as a main rule can also be reused inside a derogation
Create Rules
Regardless of category, to create a rule, click the + sign next to the desired insured object or coverage and select one of the following options:
- Add Rule - Follow the sentence-based interface to configure a condition based on a Lexicon Term (e.g. Credit Rating is Good or Excellent).HINT
In the attributes' pop-up window, you can click +New Attribute to quickly add a new lexicon term or Product Settings to edit the current lexicon term. - Add Formula - Use Product Formulas that return a boolean result ("True" for approval and "False" for rejection);
- Add Data Set - Use Product Data Sets for the evaluation. This is mandatory if the rule can return an outcome where the application must go through a manual approval process. The data set can return only the Approved, Derrogation, or Rejected results (or an equivalent terminology defined in the Underwriting Data Set Values, e.g. Passed, Manual Analysis, or Not Passed).
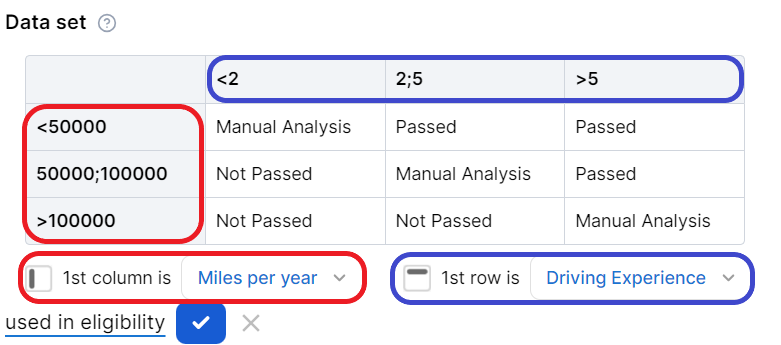
For each rule, you can optionally set an alias — a display name that replaces the underlying lexicon term in the UI — or a code — a unique identifier for referencing the rule in integrations, reports, or external systems.
For each rule, you can select the used in eligibility option to mark it as a knock-out rule, which automatically disqualifies the applicant if its condition is not met. Otherwise, the rule is submitted to the final approval review.
For the manual approval result, you need to configure the journey to direct the application to a back-office manual approval process. If you are using Multi-Dimensional Data Sets based on cascading data sets, the manual approval outcome must be defined in the top-level data set.
Pricing
Pricing determines how the product's insurance premiums Amount of money the policy holder pays to the insurance company in exchange for insurance coverage. This payment is typically made on a regular basis, such as monthly or annually. It represents the cost of obtaining and maintaining insurance protection. are calculated. Pricing calculations are based on Product Formulas, allowing you to implement complex decision modeling. You can apply pricing formulas at the insured object, coverage, and/or sub-coverage level within each section.
- Select add formula for the chosen insured object, coverage, or sub-coverage.
- Select a predefined formula, or write your own (see Product Formulas for details).
-
The Total Adjustment section lets you define an optional formula that runs after all insured object premiums are calculated. Its result — a positive or negative monetary value — is added to the total premium, enabling commercial adjustments like discounts or surcharges without affecting the base premium used for reporting. It can:
-
reference standard inputs, formulas, and datasets
-
also reference two special wildcards:
-
Total Premium – the pre-calculated sum of premiums for all instances of all insured object types
-
Number of Instances – the total count of all insured object instances across all object types
-
-
During pricing calculation:
-
The Adjustment formula is evaluated after the base total premium is calculated
-
The calculated value is added to the total premium
-
The response includes both the calculated adjustment value and the adjusted total premium.
-
-
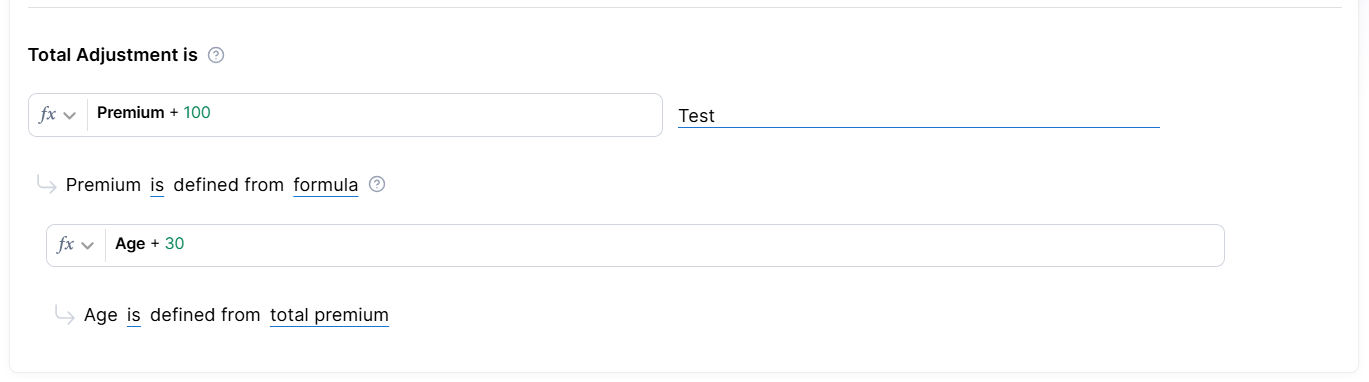
If you try to add an attribute that does not exist, the platform will add it as a Lexicon Term with your definition so you can use it again. This way, you can expand and customize the lexicon based on your product requirements.
Plans
Plans determine coverage variations that you want to include in your product's Offers. They are based on the coverages and sub-coverages you have set up in your product. In each plan, coverages are automatically grouped by their associated insured object, so you can easily identify which coverages belong to which insured object.
An initial plan with all coverages disabled is set up by default. To configure your commercial offering:
- Click the + Add Plan button to add additional plans.
- Provide a name for each plan.
- For each plan, toggle the available coverages and sub-coverages and mark the ones that are optional.
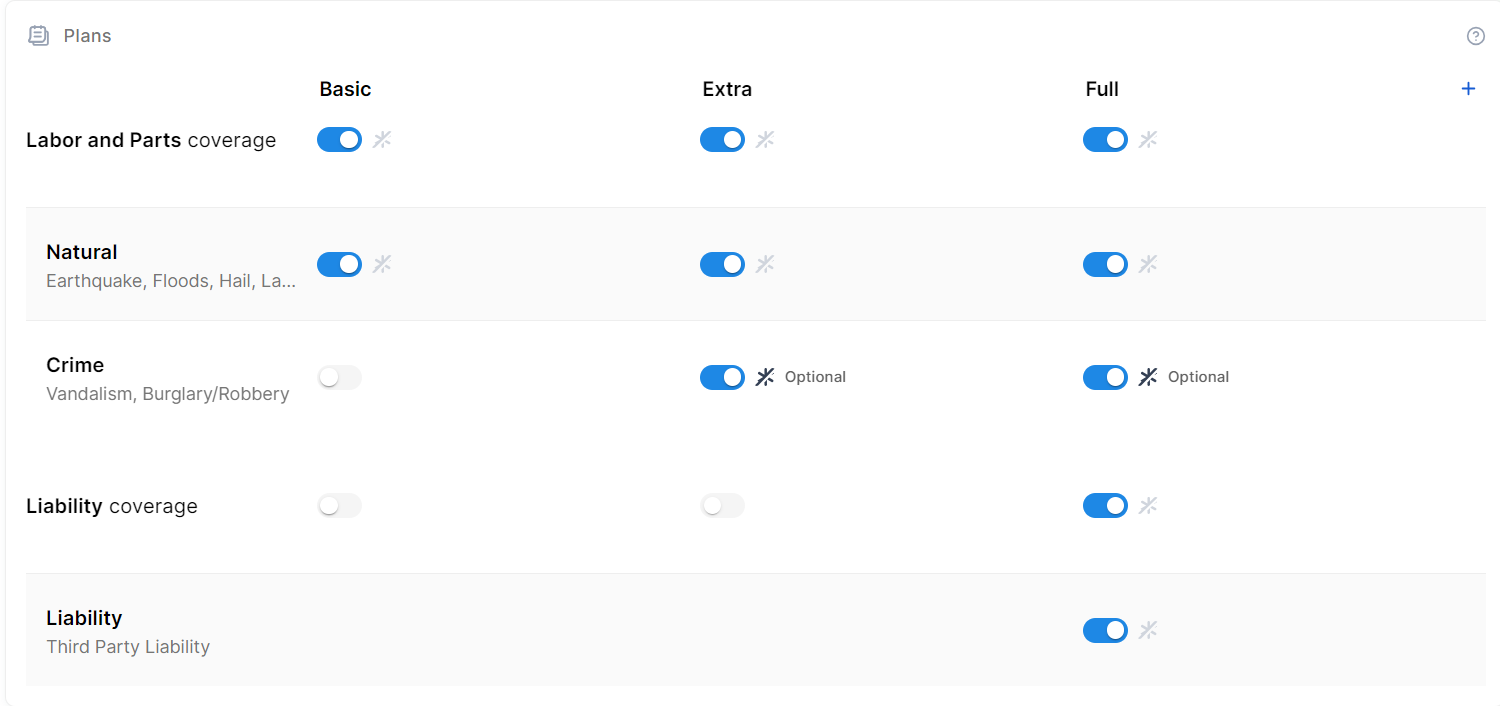
By default, you can configure up to 4 plans. You can adjust the maximum number of plans using the
kv/<environment name>/mkexp-bff/appSettings/numberOfAllowedPlans Configuration Manager key.To delete a plan, click the ellipsis button (...) next to the plan name, then select Delete plan.
Override the Default Claim Rules
To customize the claim rules (such as the deductible Amount of money that the insured party must pay before their insurance policy starts paying for covered expenses., indemnity limit Maximum amount of the insurer’s liability for any claim or claims under a policy., waiting period Amount of time an insured party must wait before some or all of their coverage comes into effect., or event limits) of a coverage or sub-coverage for a specific plan:
- Click the pencil icon next to the desired coverage or sub-coverage.
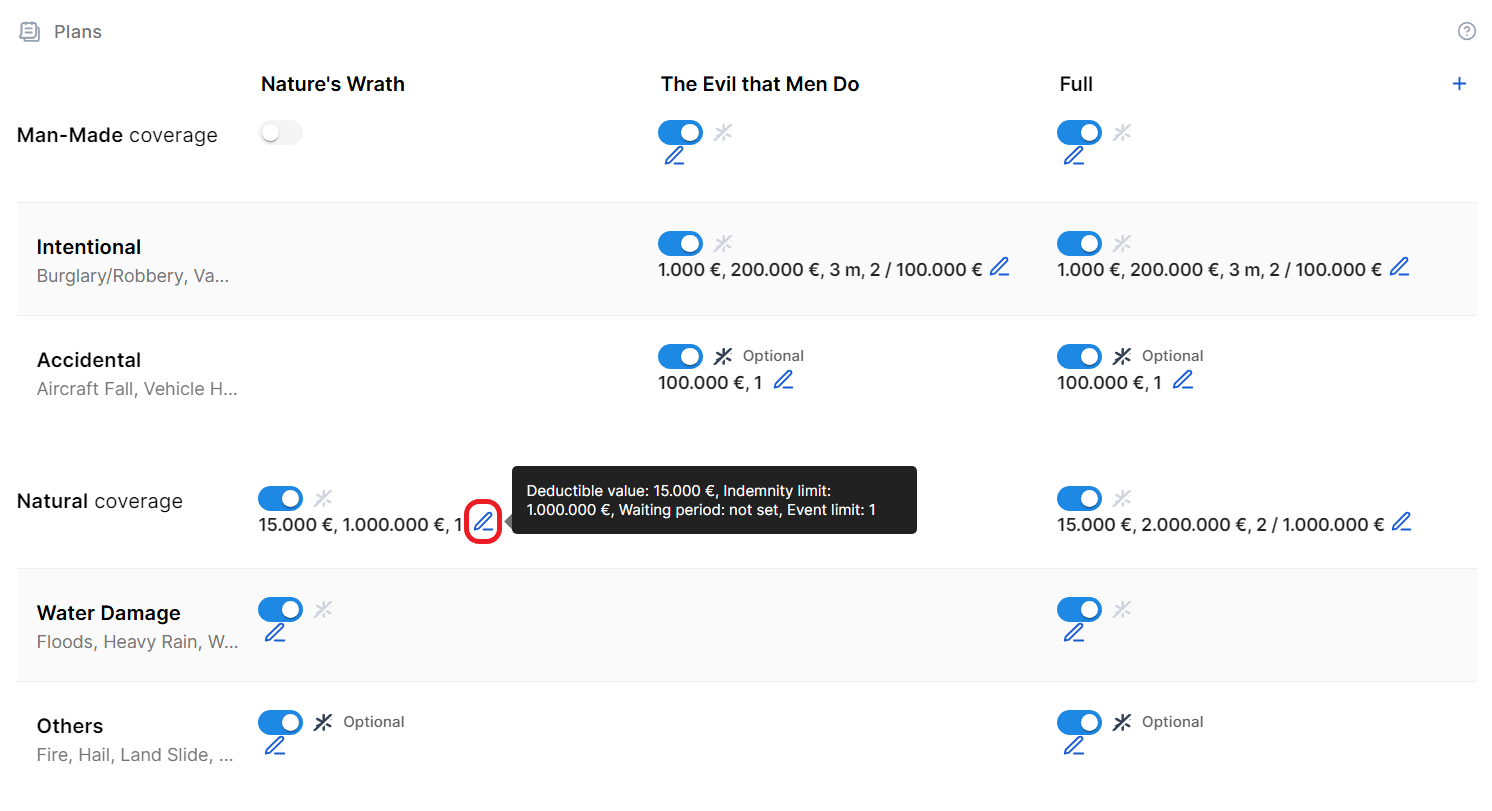
- In the side-panel that appears, modify the Deductible, Indemnity limit, Waiting period, Event limit, and Event limit occurrence fields as needed.
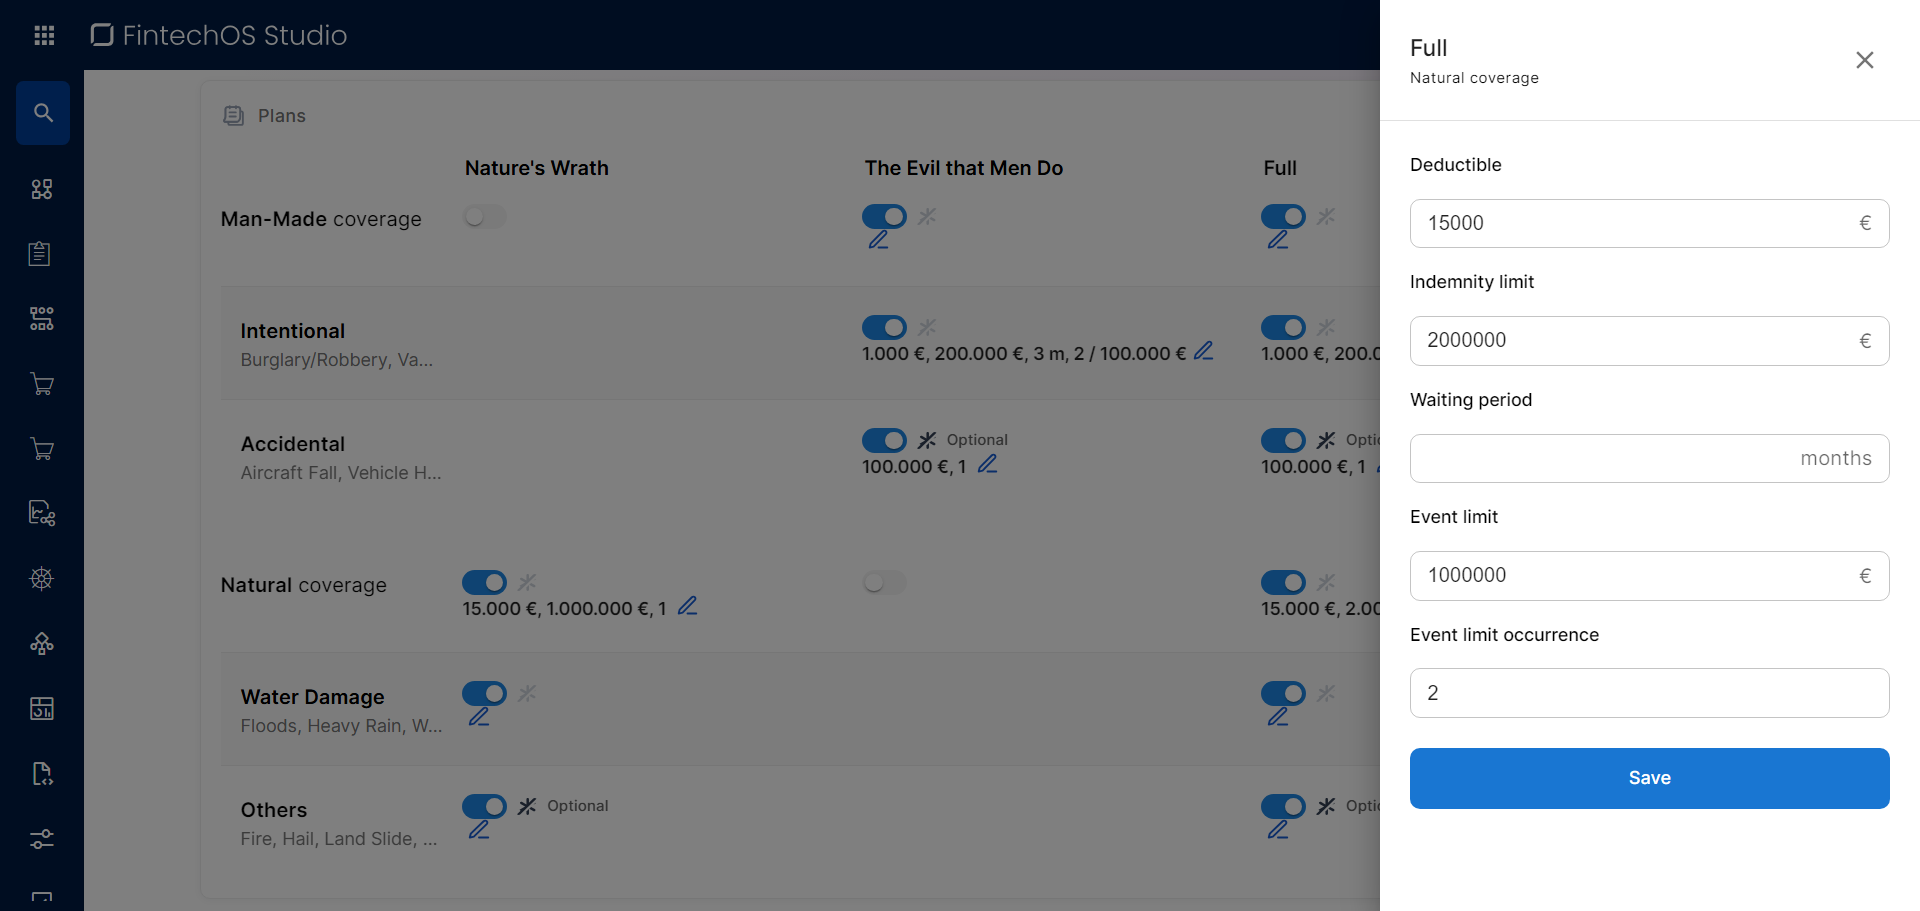
- Click Save.
The updated claim rules remain persistent even if you toggle the coverage or sub-coverage on and off within the plan.
Add Dynamic Dimensions to an Insurance Plan
Dynamic dimensions, also referred to as Plan Dimensions, allow you to define additional amounts that fine-tune claims or other financial parameters more granularly at the plan level. To add a dynamic dimension:
- Click the ellipsis button (...) next to the plan name.
- Click Dynamic dimensions to open the side panel.
- If the required dimension doesn't exist yet:
- Open the Create Dimension tab.
- Provide a Name for the new dimension.
- You can select an existing Lexicon Term.
- Alternatively, you can create a new lexicon term by entering a new name.
- If you create a new lexicon term, you must configure its data type, data category, prefix, and suffix. Only numeric and option set data types are allowed.
- Click Use or Create and use, depending on whether you selected an existing term or created a new one.
- In the Dimensions tab, click + Add value.
- Select the desired dimension.
- If the dimension has a predefined value:
- Leave the value option selected
- Enter the desired amount.
- If the value is a percentage of another reference value:
- Click value and select the percentage option.
- Enter the percentage value.
- Select the lexicon term that represents the reference value.
- If the dimension has a predefined value:
- Click Save.
Split Insurance Premiums
For each plan, you can distribute insurance premium amounts between coverages or sub-coverages, depending on where the premium formula is applied:
- If the premium formula is defined at the insured object level, the total premium can be divided among its coverages.
- If the premium formulas are defined at the coverage level, each coverage premium can be further divided among its sub-coverages.
To do so, you specify the percentage of the premium allocated to each coverage or sub-coverage. The split applies only to mandatory coverages or sub-coverages. Optional ones are excluded from the allocation (they receive 0% of the split and must be priced separately).
To split the insurance premium for a plan:
- Click the ellipsis button (...) next to the plan name.
- Click Configure premium split to open the side panel.
- Type in the percentages allocated to each coverage or sub-coverage.
- If pricing is set at the insured object level, distribute the premium among the mandatory coverages, so that all the percentages total 100%.
- If pricing is set at the coverage level, distribute each coverage’s premium among its mandatory sub-coverages, so that the percentages total 100% for each coverage.
- Click Save.
Defining a premium split is optional. If no split is configured for a plan, the system automatically applies the default premium calculation defined in the Pricing section.
Payment
The Payment section configures the payment frequency for the insurance premium. You can set up multiple payment options such as weekly, monthly, or one-time payments, allowing applicants to select their preferred payment frequency from the available periodicities.
E.g.: Payments are taken Monthly.
Documents
Specify the document types required from the customer, as well as the document types provided to the customer. These may include personal identification documents such as driving licenses, passports or ID cards, or other documents related to the insured object.
Document requests or provisions can be tailored based on the product, the insured object, or the coverage(s) sold.
| Parameter | Description |
|---|---|
| Required from customer |
Documents that the customer must provide in order to verify identity, income, ownership, product eligibility, etc. To add a required document:
E.g.: Property title for Insured object Household. |
| Provided to customer |
Documents that must be provided to the customer typically in order to obtain an agreement and/or signature. To add a provided document:
E.g.: Terms and conditions is static requires accord and requires signature. |
Service
Configure how the product will be serviced with regards to policy details, claims processing, servicing and managing quotes, or billing and collection operations:
Billing & Collection
Use Billing & Collection to configure insurance premium payments.
- Payment methods: Specify the payment methods accepted for premiums, including the primary method.
- Write-off: Choose a premium greater than or less than the invoiced amount, or none.
- Grace period: Determine the number of days until penalties are imposed.
- Invoice generation: Choose when the premium invoice should be generated.
- Payment schedule: Select the configured payment schedule that should apply for the product.
Claims management
Use Claims Management to configure how to process claims for compensation.
- Update Indemnity limit: Determine if a policy's insured amount should be adjusted after each paid claim.
- Notification limit: The maximum time that loss notices can be registered.
Policy Admin
Use Policy Administration to manage the insurance policy and contract.
- Renewal: Configure the automated policy renewal process, if necessary. When Renewal is set to yes with the new offers option, you can specify whether the renewal generates a new policy or retains the same policy, and whether the offer is processed with automatic issuance or without automatic issuance.
- Suspension duration: Set the duration of the policy suspension, in days.
- Free withdrawal: Determine the days the policyholder can terminate and receive a full refund.
- Pro rata calculation: Define the calculation and duration of the Pro Rata.
- Tariff: Select whether the tariff is calculated on a per-coverage or per-product basis.
- Underwriting: Select whether the underwriting rules should be applied per coverage or per product.
- Policy parties: Select which previously configured parties shall be used for your product.
Quote Admin
Use Quote Admin for quote management.
- Issue Master Quote: Determine whether the product has master quotes and, if so, how the tariff and underwriting regulations apply.
Once you’ve configured all the fields, change the status from Draft to Approved to save your Home Insurance product. For details on versions, see Product Life Cycle and Replication.