Authentication with Okta
Starting with release 22.1, the FintechOS Platform uses the FintechOS Identity Provider as the default authentication layer for the FintechOS applications and services. You can configure the FintechOS Identity Provider to act as an identity broker, allowing users to log in to FintechOS applications and services using their existing Okta credentials. For more information, see Using Okta as External Identity Provider.
This authentication method is provided only for backward compatibility.
Okta is a standards-compliant OAuth 2.0 authorization server and a certified OpenID Connect provider.
FintechOS Platform built-in integration with Okta enables users to log in to the Digital Experience Portal using the Okta single-sign on (SSO).
How to Set up the Okta Authentication
To set up the Okta authentication for your Experience Portal, follow these steps:
Step 1. Create and configure the Okta app
- Using an Okta admin account, log into Okta and create an Okta application (Application tab > Web > OpenID Connect).
- From the Applications tab > General > Login, set up the FintechOS Platform callbacks by configuring both the login and the logout redirect URLs, as follows:
- From the API tab > Authorization Servers, create an authorization server for the Okta application.
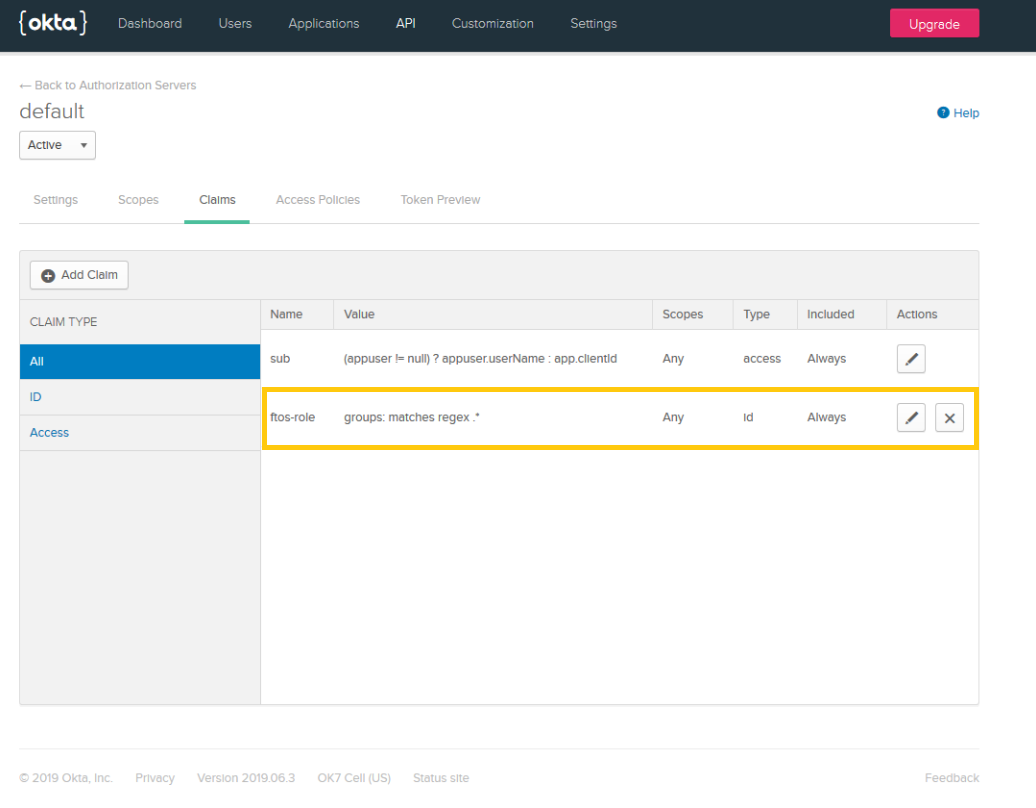
- Expose the Okta roles in custom claims consumable by FintechOS Platform. To do so, synchronize the user groups created in Okta with FintechOS Platform by creating a custom claim named ftos-role mapped to the group metadata in Okta. For more information on how to create a custom claim in the Okta app, see Okta Documentation.
| login redirect uri | {$portalRoot}/Account/LogonCallback |
| logout redirect uri | {$portalRoot}/Unauthorized |
When a user is authorized with Okta, a corresponding system user will be created in FintechOS Platform . In the web.config file you can configure default roles for this user, organization, business unit and user type.
Step 2. Configure the Experience Portal
Prerequisite:
Make sure that you know the following values:
- Client ID (from the Okta app, General tab)
- Client Secret (from the Okta app, General tab)
- Discovery Endpoint (from the Okta app, API section > Authorization Servers > Metadata URL)
Configuration using Vault secrets:
Set Okta authentication:
| Key Path | Key Name | Key Value |
|---|---|---|
| kv/<environment>/<application>/app-settings | EBSDefaultAuthentication | Okta |
Replace the keys' value with your Okta configuration:
| Key Path | Key Name | Key Value |
|---|---|---|
| kv/<environment>/<application>/app-settings | openid-client-id | {ClientId} |
| kv/<environment>/<application>/app-settings | openid-client-secret | {ClientSecret} |
| kv/<environment>/<application>/app-settings | openid-callback-url | http://${portalRoot}/Account/LogonCallback |
| kv/<environment>/<application>/app-settings | openid-discovery-endpoint | https://${oktaApplication}.okta.com/oauth2/${authServerId}/.well-known/oauth-authorization-server |
User mapping settings:
| Key Path | Key Name | Key Value |
|---|---|---|
| kv/<environment>/<application>/app-settings | openid-auto-user-roles | Guest,Developer,Registered Users |
| kv/<environment>/<application>/app-settings | openid-auto-user- organization | ebs |
| kv/<environment>/<application>/app-settings | openid-auto-user-businessunit | root |
| kv/<environment>/<application>/app-settings | openid-auto-user-type | Back Office |
| kv/<environment>/<application>/app-settings | openid-auto-user-remote-roles-add | 0|1 |
| kv/<environment>/<application>/app-settings | openid-auto-user-remote-roles-sync | 0|1 |
The table below describes the Okta app configuration keys:
| Key | Description |
|---|---|
| ${portalRoot} | The root URL of the Experience Portal. |
| ${authServerId} | The ID of the authorization server associated with the Okta application (default value is default). |
| ${oktaApplication} | The ID of the Okta application. |
| Key | Description |
The table below describes the user mapping configuration keys.
| Parameter | Value |
|---|---|
| openid-auto-user-roles | The platform role names, separated by colon. These roles will be added automatically when the Okta user is mapped to a platform user. |
| openid-auto-user-organization | The platform organization name. The mapped user will be added in this organization. |
| openid-auto-user-businessunit | The platform business unit name. The mapped user will be added in this business unit. |
| openid-auto-user-remote-roles-add | If set to 1, the roles from the Okta app will be added to the mapped user. |
| openid-auto-user-remote-roles-sync | If value is 1, the roles from Okta and the default roles are always synchronized at login. Any roles manually added to a Okta user are lost. |
Go to the <app-settings> section and add the configuration of your Okta appplication:
<!-- 1. Set Okta authentication-->
<add key="EBSDefaultAuthentication" value="Okta" />

<!-- 2. Replace these values with your Okta configuration: -->
<add key="openid-client-id" value="{ClientId}" />
<add key="openid-client-secret" value="{ClientSecret}" />
<add key="openid-callback-url" value="http://${portalRoot}/Account/LogonCallback" />
<add key="openid-discovery-endpoint" value="https://${oktaApplication}.okta.com/oauth2/${authServerId}/.well-known/oauth-authorization-server" />

<!-- 3. Map user settings: -->
<add key="openid-auto-user-roles" value="Guest,Developer,Registered Users" />
<add key="openid-auto-user-organization" value="ebs" />
<add key="openid-auto-user-businessunit" value="root" />
<add key="openid-auto-user-type" value="Back Office" />

<add key="openid-auto-user-remote-roles-add" value="0|1"/>
<add key="openid-auto-user-remote-roles-sync" value="0|1"/>
How it Works
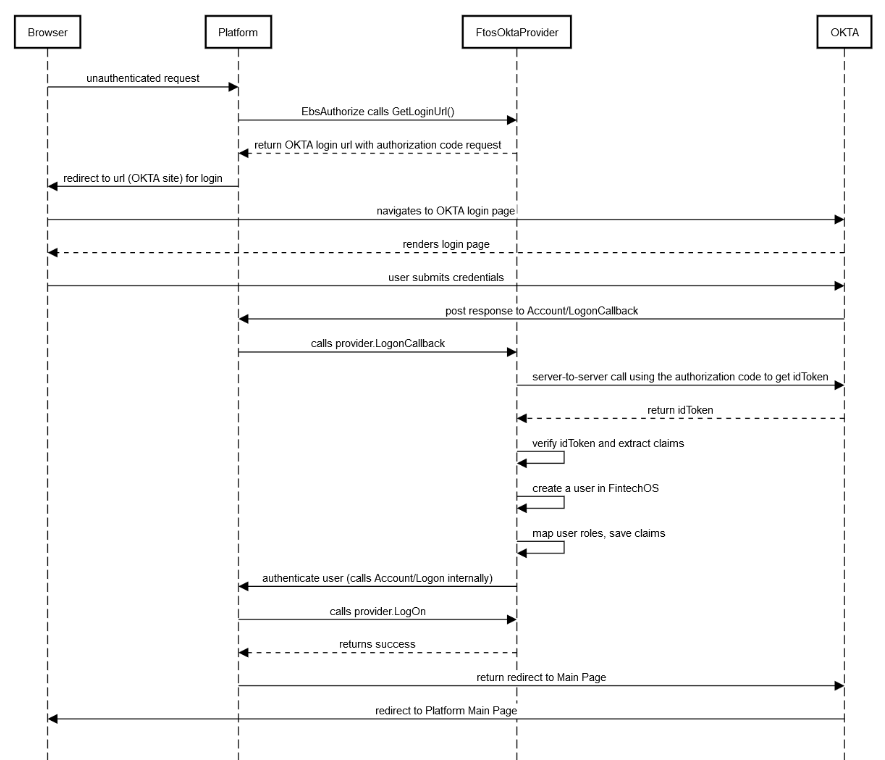
The diagram below describes the FintechOS Platform login flow when using Okta authentication.
Group mapping in FintechOS
When a user is authorized with Okta, a corresponding system user is created in FintechOS. In web.config file of the FintechOS instance, default roles for this user, organization, business unit and user type are added.
Create a custom claim named ftos-role mapped to the group metadata in Okta. This configuration is done for the authorization server associated with the Okta application.
How users log in the Portal
When accessing the Digital Experience Portal URL, users will be redirected to the URL of the authorization server associated with the Okta app. The Okta login page appears.
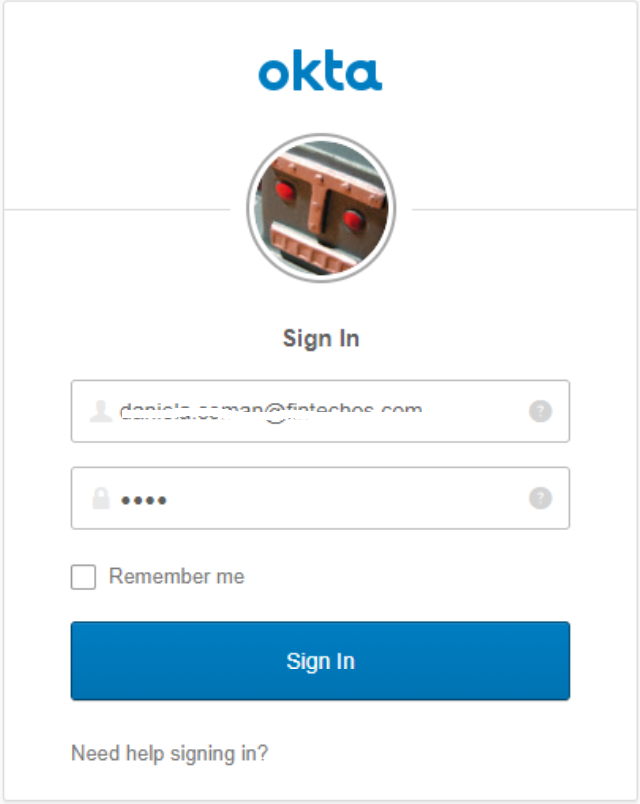
Once they provide Okta account credentials, they will be logged into the Digital Experience Portal.
When new users are created, they will receive an email notification from Okta which contains instructions and Okta credentials.