Back-Office Administration
The administration of Online and Mobile Banking is performed by the bank employees within the FintechOS Portal.
Several configurations are available for a customer (legal entity or individual) such as:
- Service activation for a customer
- Give access to users to the customer's accounts
- Activate/Delete/Modify a user for that customer
- Edit security profile of a user
- Inclusion of the user in a list for the Signature Engine & Administrative Rules
- Linking the Authorizer
- Strong Customer Authentication
- Blocking or a user in case of stolen credentials/device
- Parametrize at each account level which transaction types are enabled for each user (Account/Transaction section tab).
Main Dashboard of the FintechOS Portal for the Back-Office
Log in the FintechOS Portal with the credentials.
The dashboard contains:
- views
Online requests not validated, i.e., the user was not associated to a customer of the bank. The view displays the list from the most recent entry to the oldest. It displays the users' requests not created online successfully.
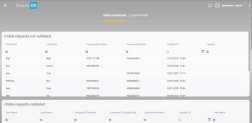
Fields Description Name Name of the person who initiated the online request. It is read-only. Last Name Last name of the person who initiated the online request for the Online and Mobile Banking service. It is read-only. Personal ID Number Personal ID of the person who initiated the online request, non-residents field is blank. It is read-only. Document Number This field is filled only by non-residents with the number of their passport or another document. It is read-only. Date created Date when the online request has been initiated. It is read-only. Reason Reason for which the user has not been created online (it is read-only): - Personal ID not found in Core Banking
- Document no. not found in Core Banking
- Mobile phone doesn’t correspond with the one in Core Banking
- Other errors.
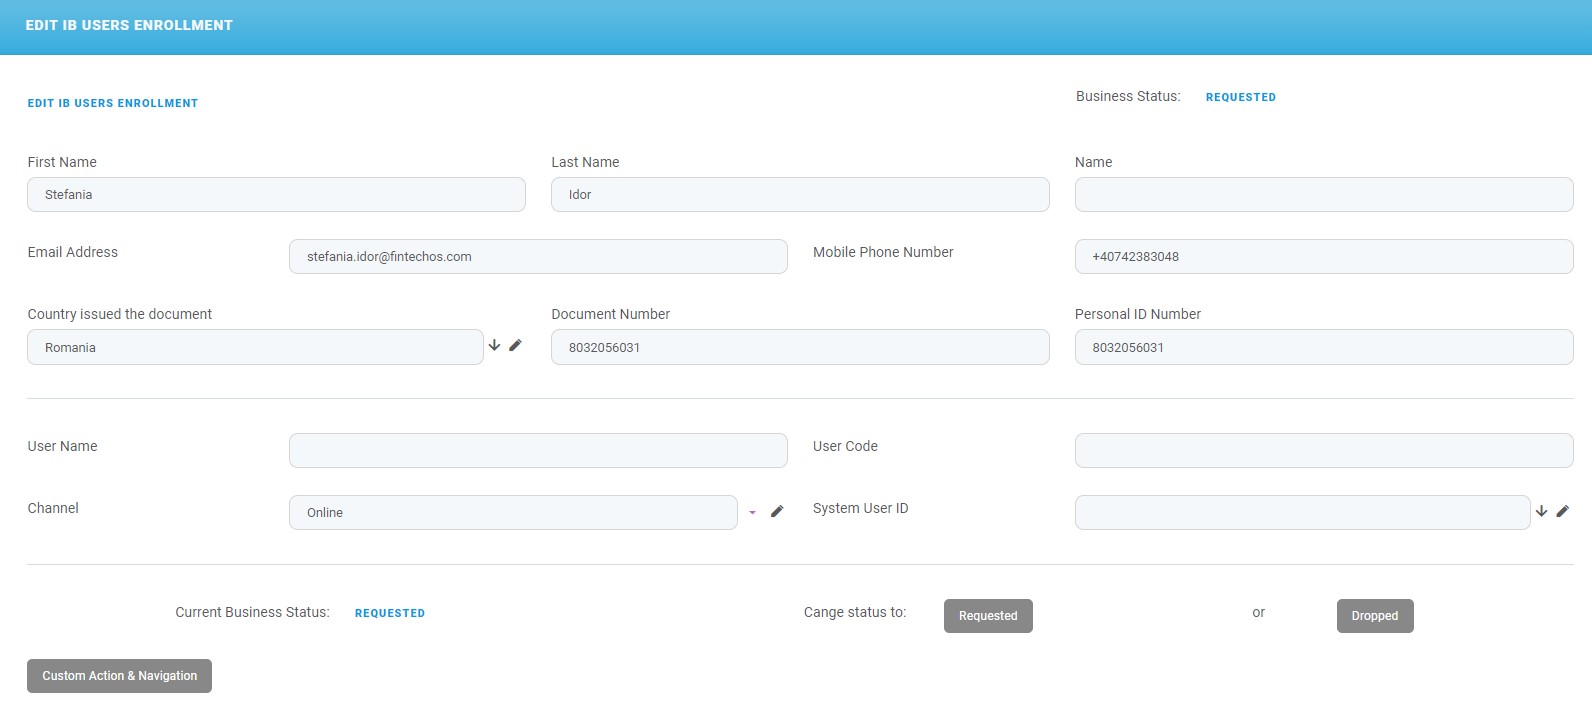
By double-clicking an entry in this grid, it opens the page EDIT IB Users Enrollment.
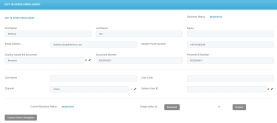
Fields Description Business Status The present status. The value is REQUESTED. First Name The first name of the user. Last Name The last name of the user. Name The full name. Email Address The email address of the user. Mobile Phone Number The mobile phone number of the user. Country issued the document The country that provided the document. Document Number The document number for identification. Personal ID Number The Personal Number for identification for residents. User Name The username for authentication in Online and Mobile Banking. User Code The user code. Channel The channel used for initiating the request. The value is Online. System User ID The ID of the system user in FintechOS Portal. Current Business Status It displays the present status. The value is REQUESTED. Change status to The next status by:
- clicking the button Requested
or
- clicking the button Dropped.
Online requests validated, i.e., the person who initiated the request online has a match with a customer of the bank.
Column Description Name Name of the person who initiated the online request. It is read-only. Last Name Last name of the person who initiated the online request. It is read-only. Personal ID Personal ID of the person who initiated the online request, non-residents field is blank. It is read-only. Customer IDCoreBanking The Core Banking ID identified by the system based on the Personal ID or Document number provided by the person in the online request process following interrogation of API of the financial institution. It is read-only. Document Number This field is filled only by non-residents with the number of their passport or another document. It is read-only. Date created Date when the online request has been initiated. It is read-only. username The username created in the online request. It is read-only. My requests sent for Approval, i.e., the requests from the maker are sent to the checker, the records with the statuses
Sent to ApprovalorIn Progress Approvalare displayed.Column Name Customer ID CoreBanking Customer Name Status Date created for most recent record Created by Requests sent for Approval, i.e., all the requests from the makers.
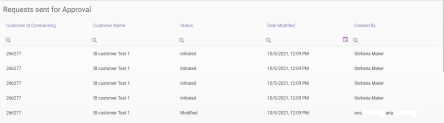
Column Name Customer ID CoreBanking Customer Name Status Date created for most recent record Created by
- buttons:
Start New Enrolment. Click this button to search for a customer and, then, create a user to be added to that customer.
Search Users. Click this button to search for users and reset password.
- Search active services. Click this button to search for services.
- Add Customer. Click this button to add a new customer in the system.

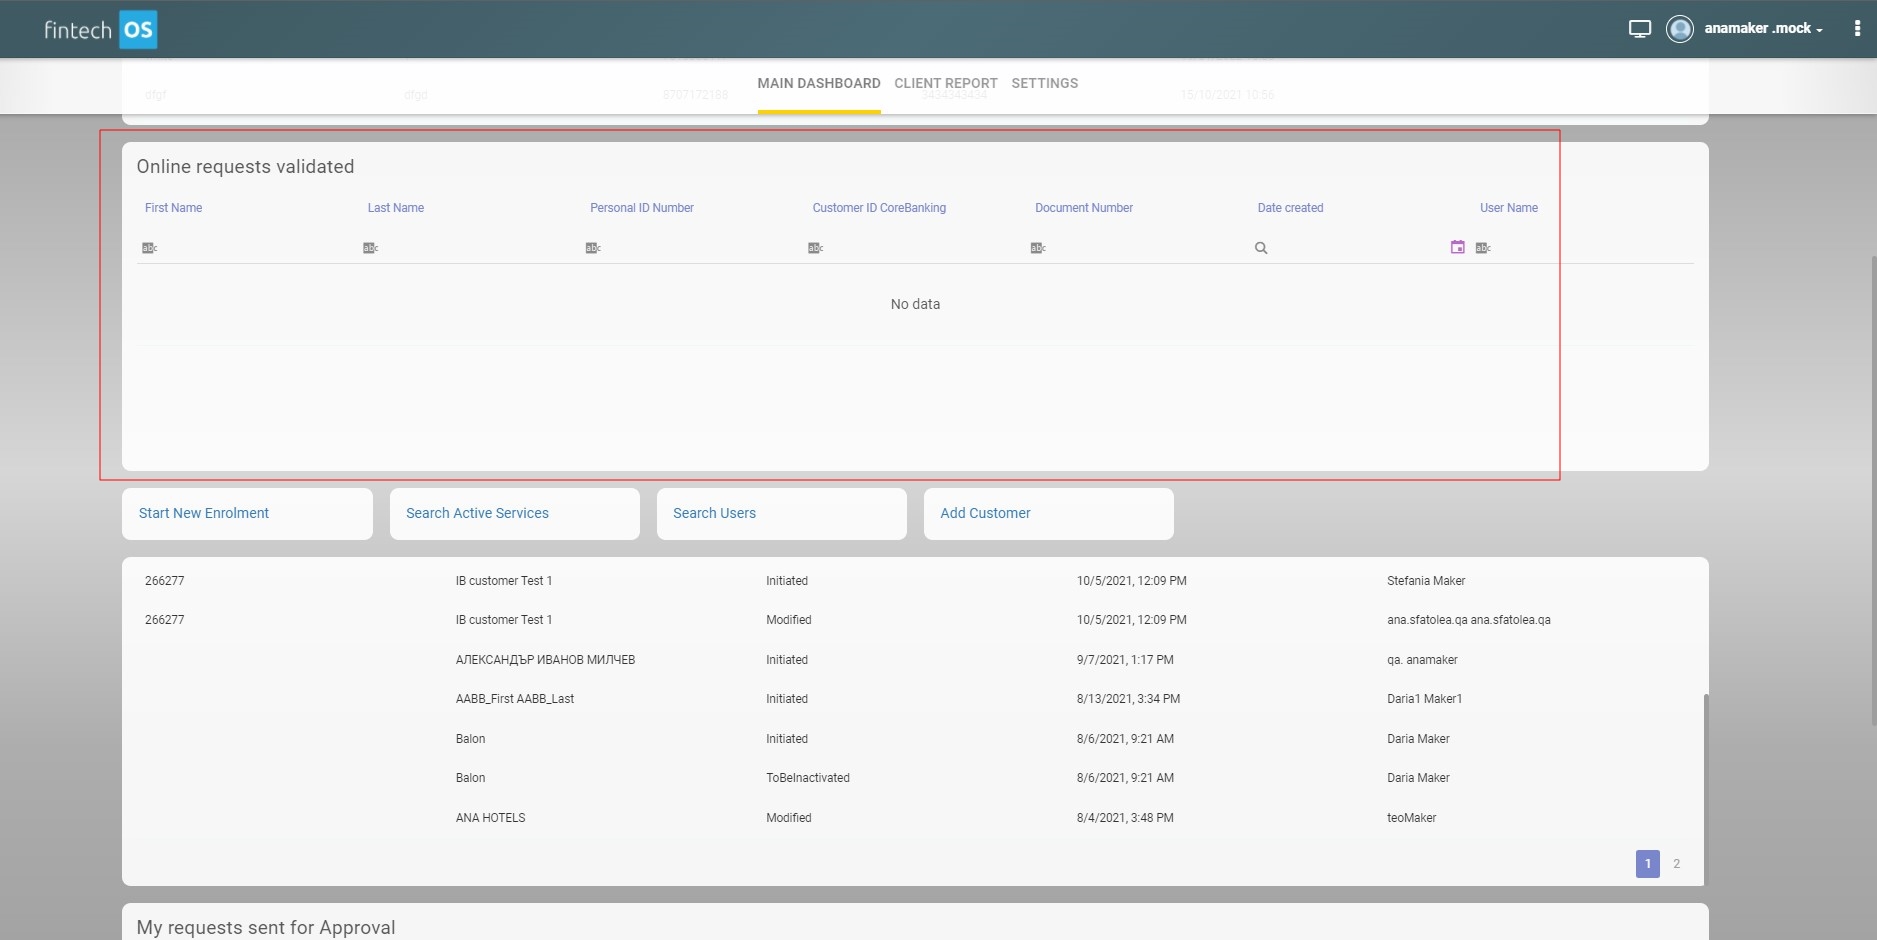

Depending on the security roles given to a system user, a bank representative sees a selection of grids.
Search Users
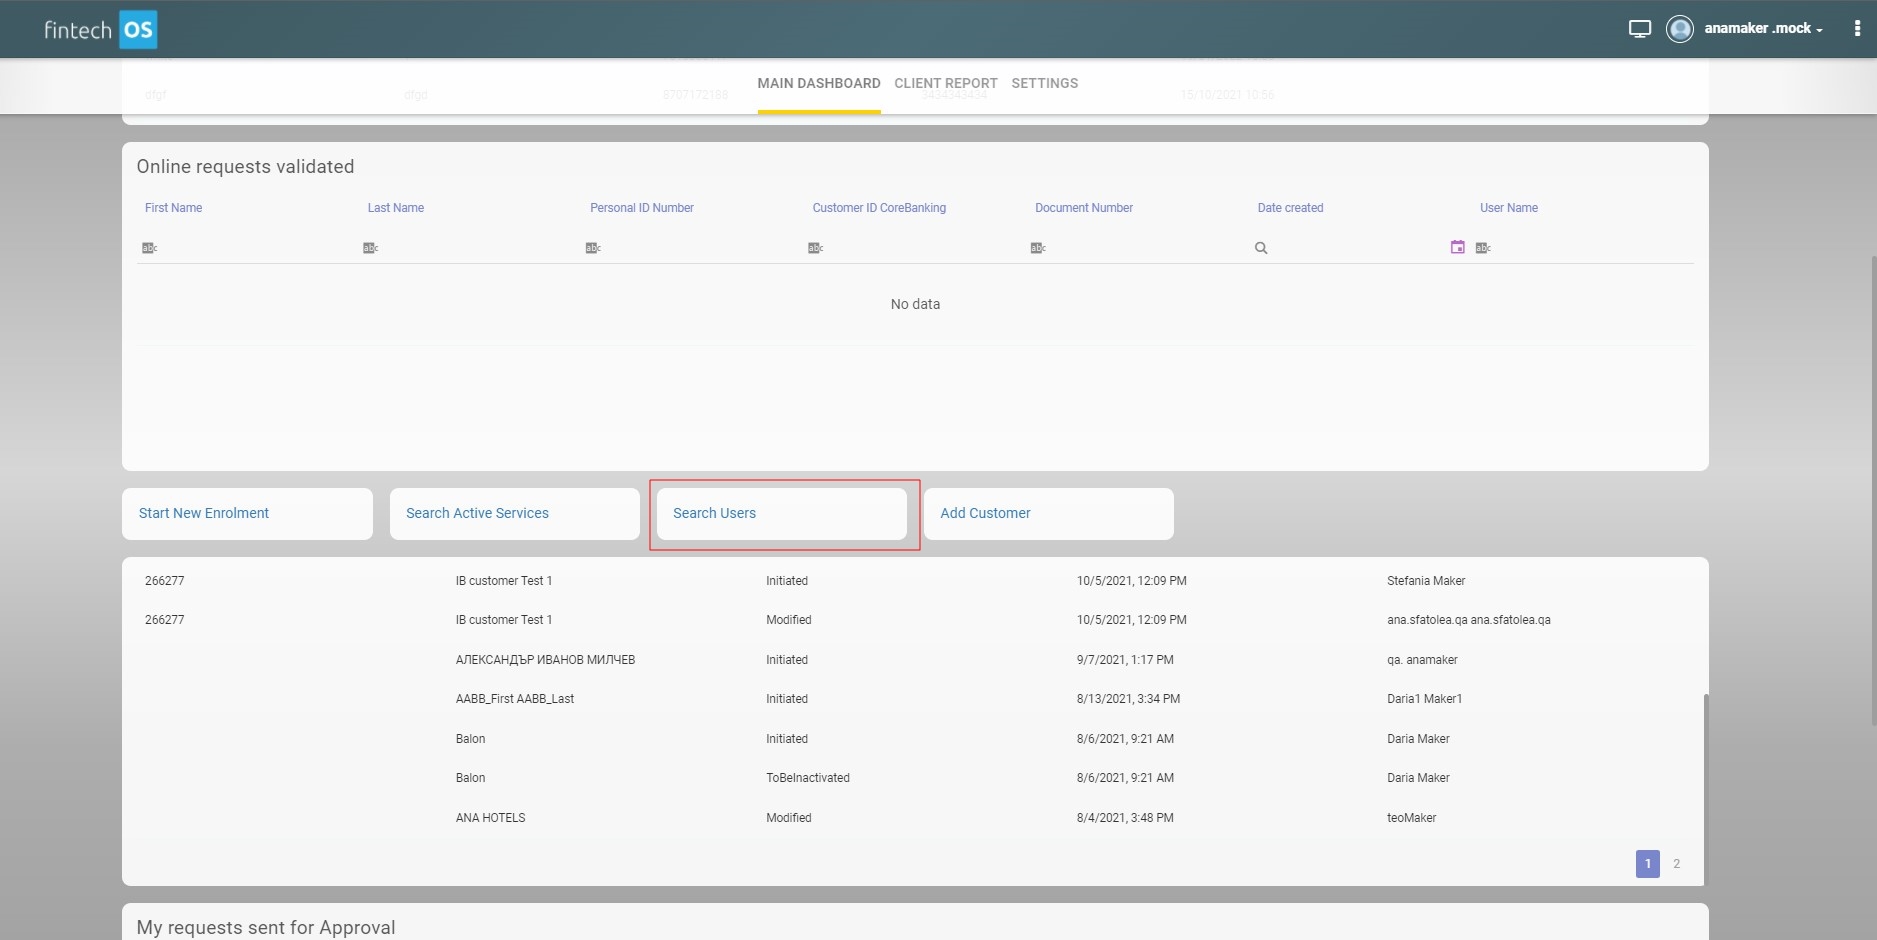
When the online request done by a user was not validated through the process of Online User Enrolment Request, in the back-office, click Search users. A list of users is displayed.
To search in the list, insert data into any of the following fields from the header:
- First Name
- Last Name
- Customer ID CoreBanking
- Personal ID Number
- Company registration number
- Mobile Phone Number
- IBAN
 International Bank Account Number.
If there are less than 10 results, the grid displays all the 10 results.
If there are 10 or more results returned, the system displays a message: There are too many results, please be more specific in your search. The grid displays 0 results.
If no customer is returned, an error message is displayed.
Reset Password
This functionality is achieved by accomplishing two actions one by the back-officer and one by the user. The user arrives at a branch and asks the back-office employee to initiate the process.
These are the steps for the back-office employee:
- Click Reset password to initiate the changing of the password for the customers who forgot their password. A new page opens with a field where to insert the username or the email of the customer.
- Insert the username or email and click Submit. This button triggers en email to be sent to the email address of the user.
These are the steps for the user:
- Access the link from the email sent within 5 minutes, before it expires. The Update password page is displayed to the user.
- Insert in the two fields the new password.
- Click Submit. The page Your account has been updated is displayed.
Insert a New User in the System
If the user cannot be found, insert the user by clicking the Insert button on the right-hand corner of the screen.
| Column | Data Type | Description |
|---|---|---|
| Customer ID CoreBanking | Text | Insert the ID. |
| Document No. | Text | Insert the document number. |
| Email Address | Text | Insert the email address. |
| First Name | Text | Insert the first name. |
| Country issued the document | Lookup | Select from the list the country that issued the document for non-residents. |
| Last Name | Text | Insert the Last Name of the customer. |
| Mobile Phone Number | Text | Insert mobile phone number. |
| username | Text | Insert a valid username. |
| Personal ID Number | Text | Insert the Personal ID number of the person. |
| System User ID | Lookup | Insert the ID that has been assigned to the user automatically by the system. |
Click the Save and reload button.
Search Active Services
Click the button labeled Search Active Services to open the grid Associated Customer List with three columns: Full Name, System User, and Status. From the list, click on one of the names to open the User Client List.
Add Customer
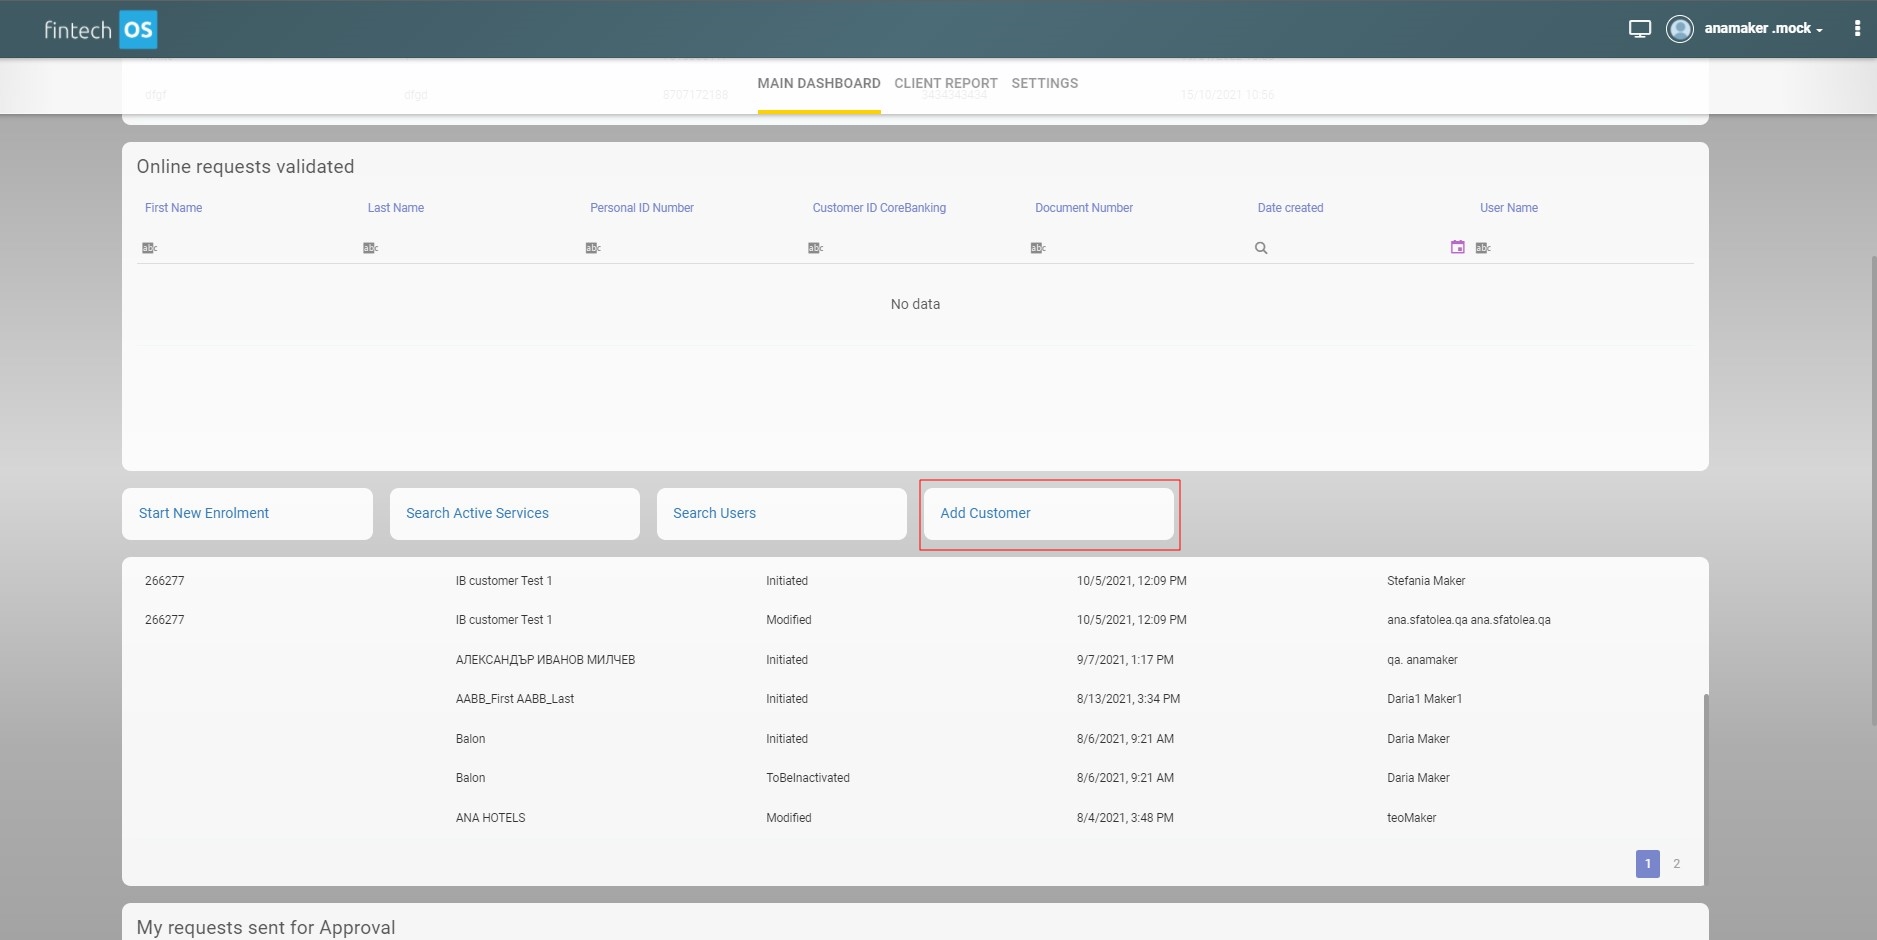
Click the button labeled Add Customer to initiate the flow for inserting a new customer in the system. It displays the page Add Customer.
Fill in the fields:

The full name and PIN must be unique in the database otherwise, the customer cannot be added.
| Field |
Data type |
Description |
|---|---|---|
| Customer Name |
Text |
Insert the name of the customer. |
| Account Type |
Lookup |
Select from the drop-down list the corresponding type:
|
| Personal ID | Text | Insert the personal identification number of the customer. |
| Commercial registration number | Text | Applicable only for legal entities, insert the commercial registration number |
| First Name | Text | Insert the first name of the customer. |
| Middle Name | Text | Insert the middle name of the customer. |
| Last name | Text | Insert the last name of the customer. |
| Mobile Phone | Text | Insert the mobile phone number of the customer. |
| Phone | Text | Insert the phone number of the customer. |
| Text | Insert the email of the customer. | |
| Fiscal registration number | Text | Insert the Fiscal registration number |
| Full Address |
Text Area |
Insert the complete address of the customer. |
| Company Unique ID | Text | Applicable only for legal entities, insert the Company Unique Identification Document number. |
| Customer Id Corebanking | Text | Insert the customer CoreBanking ID. |
| Customer Code Corebanking | Text | Insert the customer CoreBanking code. |
Click Create Customer. The Customer Info page is displayed. Using the API calls, the system gets the remaining information about the customer from Core Banking.
Administration of Customers done by the Back-office
The following headings present the section tabs to manage customers and users as well as transactions and rights of users. These steps are done by the maker and checker, the bank's employees.
1 Customer info
To modify an existing customer, open the Customer Info page.
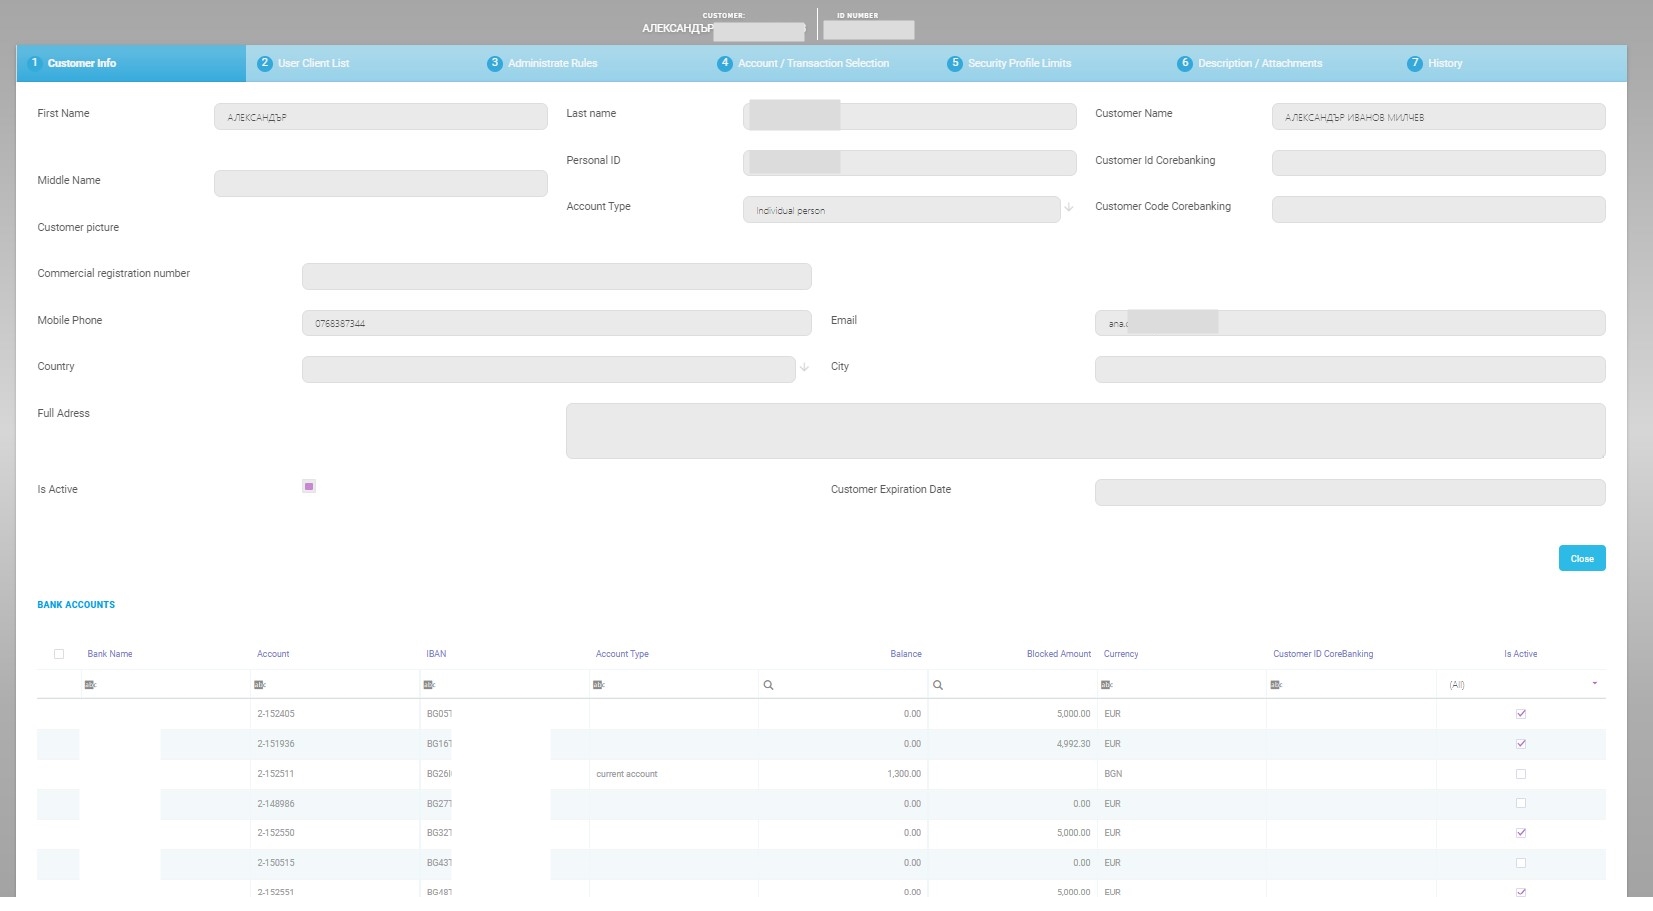
| Field | Data type | Description |
|---|---|---|
| First Name | Text | To be filled in for individual persons. |
| Last Name | Text | To be filled in for individual persons. |
| Customer Name | Text | It is the full name of the customer/the name of the legal entity. |
| Personal ID (PIN/Fiscal Registration No) | Numeric | To be filled in for legal entities. It is the Fiscal Registration Number |
| Personal Identification Number | Numeric | It is the Personal Identification Number. To be filled in for individual persons. |
| Customer ID Core Banking | Text | The id given by Core Banking to a customer. |
| Account Type | Lookup | Select from the drop-down the type:
|
| Customer picture | File | Add a file from the local device. |
| Commercial registration number | Numeric | Insert the unique combination of numbers and letters. The company registration number |
| Mobile Phone | Text | Insert a valid phone number. |
| Text | Insert a valid email address. | |
| Country | Lookup | Select from the drop-down the country where the company/individual resides. |
| City | Lookup | Select a city. |
| Full Address | Text | Insert a valid address of the company/individual. |
| Is Active | Boolean | True, then the customer is active. |
| Customer Expiration Date | Date Time | The date when the customer is no longer valid for services or products from the bank. |
To return to the homepage, click Close.
In the lower part of the Customer Info tab, there is the grid Bank Account, all the customer's accounts are displayed, brought from Core Banking.
2 User Client List
Click the section tab named User Client List. This section tab displays the users who have power of attorney on the accounts of the customer.

Depending on the roles, several actions can be performed by bank representatives:


A person named John Doe works for one company and has access to that company's accounts and he has his own personal account where he has his funds. John Doe is the user. There are two customers: one individual and one company, but one user. To identify that it is the same person, the Personal ID Number is used.
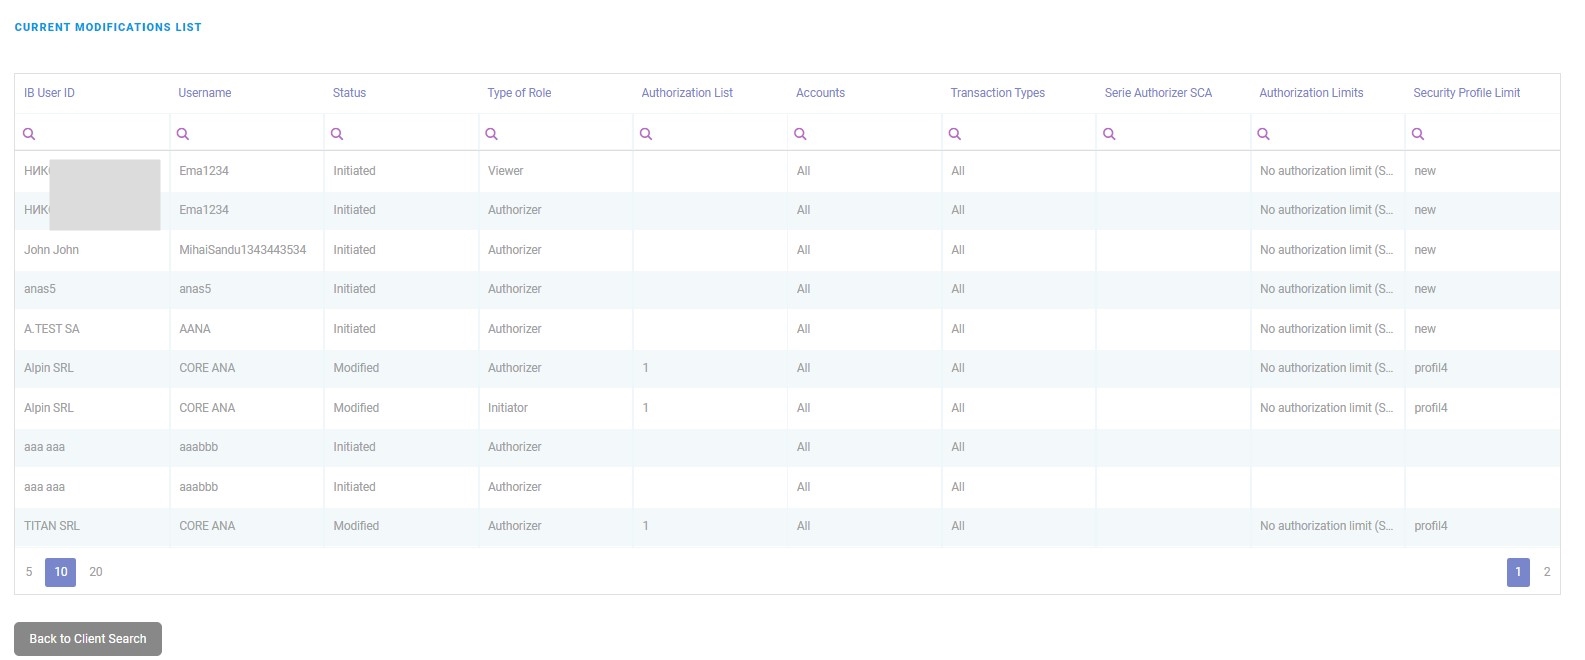
The grid Current Modifications List
It displays all the users regardless of the status. When double-clicking on a record, the page Edit Associated Customer is displayed.
The grid has the following fields:
- IB User ID,
- Username,
- Status,
- Type of role,
- Authorization List,
- Accounts,
- Transaction Types,
- Serie Authorizor SCA,
- Authorization Limits,
- Security profile limit.
To insert a new user:
- Click the Insert button. The page Add Associated Customer opens.
From here, two scenarios are possible:
- attache an existing user to a customer as explained in Adding a User to Online and Mobile Banking
or
create a new user by clicking the button Add FTOS_IB_User. In this scenario, first, create the user as explained in Creating a User.
- In case of attaching an existing user to a customer, fill in the following fields:
Field Data type Description Client ID Option set It displays the name of the customer on whose account the user is going to have access. Name Option set From the drop-down list, select the name of the user to be added to Online and Mobile Banking. The users displayed in this list already exist in the system.
If you are looking for a user who does not exist in the drop-down list, click the button Or Add FTOS_IB_User.
Type of role Option set Select the type of role the user has on transactions:
- Initiator (can view and input payments, but not to authorize any payments. An initiator has access to Account balance & Details, Account statements, and initiate payments)
- Viewer (can only view account information such as Account balance & Details, Account statements, but cannot initiate payments or authorize them)
- Authorizator (can authorize payments. An authorizator has access to Account balance & Details, Account statements, Initiate payments, Own Account transfers, Domestic payments, Budget Payments, Foreign currency payments, Bulk payments, Open New Products).
Authorization List Option set Select the authorization list to which the user belongs to:
- 1 (signs a payment first)
- 2 (signs a payment second)
- 3 (signs a payment third)
- 4 (signs a payment fourth).
NOTE
These settings for the order of the signatures can be turned off using a system parameter. People can belong to different lists, but a user from any list can sign the payment regardless of the number they belong to.For details on authorization, see Signature Engine & Administrative Rules.
Accounts Option set Select between the two options:
- All (access to all accounts)
- Selected (access to some accounts).
The default value is All. To change the value it is possible only by navigating to the section tab Account/Transaction Selection.
Transaction Types Option set It has two options:
- All (can initiate/view/authorize all types of transactions)
- Selected (can initiate/view/authorize some types of transactions).
The default value is All. To change the value it is possible only by navigating to the section tab Account/Transaction Selection.
Authorization Limits Option set Insert the maximum value the user can sign as payment.
The field enables setting up a maximum transaction limit for the cases in which there is no need for list-based signature schema.
Security Profile Limit Option set Select the profile desired for the user from the list. Depending on this profile, transaction limits are set. This is where the maximum value for which the user can sign a payment. New Account Added Automatically
Bool
This field is checked/ unchecked for the specific user to be able to have rights on that account
- Click the Save and reload button.
A user of Online and Mobile Banking goes through multiple statuses in the life-cycle of the record. The statuses available are:
- Initiated
- Active
- Modified
- Manually Blocked
- To be inactivated
- Inactive.
By double-clicking on one entry in the grid CURRENT MODIFICATIONS LIST, the current version of the entry is displayed. Depending on the status of the entry, the fields above act differently:
- if the entry has the business status
Initiated, the fields are editable. - if the entry has the business status
Active, the fields are read-only, in which case to modify them, create a new version. - if the entry has the business status
Modified, the fields are editable. - if the entry has the business status
To be inactivated, the fields are read-only. - if the entry has the business status
Inactivate, the fields are read-only.
Once the user has been attached to a customer, the first status is Initiated. Once the checker has approved the UserxCustomer, then the status is Active. To modify the status of a UserxCustomer, select the record from the grid Current Modifications List and click the button Modify selected to make a modification for the active service. The record is duplicated from the first grid on the User Client List to the second grid named Active Settings (Before Current Modifications), where the record is displayed with the status Active while in the first grid Current Modifications List, the status of the record is Modified.
The grid Associated Customers displays the other customersID the user has access to. A user can have power of attorney for more customers with multiple sets of credentials.
The grid Other users with the same Personal ID Number displays the credentials the same user has for different customers.
The grid Associated Customers to other Users with the same Personal ID Number displays the customers and the credentials a person has.
The grid User Bank Accounts displays the bank accounts the user has access to. Double-click a record, and the page Edit IB BANK ACCOUNT is displayed. The fields are displayed:
| Field | Data type | Description |
|---|---|---|
| Customer | Lookup | Select the customer from the list. |
| IB User | Option set | Select the user from the list. |
| Bank Account | Option set | Select the account from the list. |
| Is Active | Boolean | If true, then the account is active. |
| Account Alias | Text | Insert the alias for the account. This name is displayed when a payment is initiated, and the user sees the list of accounts and the alias. For example, for the bank account number UK123BKA123 an alias can be inserted ''My Salary Account EUR''. |
Click the Save and close button.
The grid Active Settings (before current modifications)
It displays the users who have the business status Active and To be inactivated for whom a modification is not yet approved by a checker. These users are found as well in the grid above with the status Modified or Initiated.
The Reset modifications button is displayed to the checker. By clicking it :
- deletes all the records with status
Modified.A pop window (confirmation for reset) appears for the maker:
Please be advised that all modifications that you have made in User Client List, Administrate Rules and Accounts/Transactions selection will be undone. All records which appear with “Modify” or ''To be inactivated'' status will be reset and sent back to Maker admin user.
There are two options:
- Not now
or
- Ok (The page reloads with the modifications to be undone and it resets the status).
- Not now
- it changes the status of the record from
In progress ApprovaltoInitiated.
A pop window appears for the checker:

Please be advised that all modifications that you have made in User Client List, Administrate Rules and Accounts/Transactions selection will be returned to the maker. All records which appear with “Modify” or "To be inactivated” status remain and sent back to Maker admin user. The options available are:
- Not now
or
- Ok (The page reloads with the modifications to be undone and it resets the status).
- Not now


Modifying a User
These actions are done by the maker:
- From the gird Current Modifications List, click once on the user.
- With the user selected, click the Modify selected button. The page Edit Associated Customer is displayed.
- Modify only the following fields:
Field Data type Description Type of role Option set Select the type of role the user has on transactions:
- Initiator (can view and input payments, but not to authorize any payments. An initiator has access to Account balance & Details, Account statements, and initiate payments)
- Viewer (can only view account information such as Account balance & Details, Account statements, but cannot initiate payments or authorize them)
- Authorizator (can authorize payments. An authorizator has access to Account balance & Details, Account statements, Initiate payments, Own Account transfers, Domestic payments, Budget Payments, Foreign currency payments, Bulk payments, Open New Products).
Authorization List Option set Select the authorization list to which the user belongs to:
- 1 (signs a payment first)
- 2 (signs a payment second)
- 3 (signs a payment third)
- 4 (signs a payment fourth).
NOTE
These settings for the order of the signatures can be turned off using a system parameter. People can belong to different lists, but a user from any list can sign the payment regardless of the number they belong to.For details on authorization, see Signature Engine & Administrative Rules.
Authorization Limits Option set Insert the maximum value the user can sign as payment.
The field enables setting up a maximum transaction limit for the cases in which there is no need for list-based signature schema.
Security Profile Limit Option set Select the profile desired for the user from the list. Depending on this profile, transaction limits are set. This is where the maximum value for which the user can sign a payment. - Click the Save button. The record has been updated. In the Current Modifications List, the user has the status
Modified. These modifications have to be approved by a checker to becomeActive. Until then, in the grid below named Active Settings, the user is displayed again with the statusActive. These settings in the last grid are active in the system until the checker approves the modified entry. The flow status for the customer isInitiated. - Click Continue to Activation to send to the checker. In the grid Requests sent for Approval, the Customer Name is displayed with the status
Modified.
To approve a modification to a user
A checker does the following:
- Open the Innovation Studio.
- Navigate to the grid Requests sent for approval.
- From the grid, select the record which was sent. The User Client List is displayed.
- The section tab User Client List, click Pick up. The Pick Up button saves the username of the checker in the field Last Checker and all records that have the flow status
Sent to Approvaland triggers the system to automatically change the flow status for all records inSent to ApprovaltoIn Progress Approval.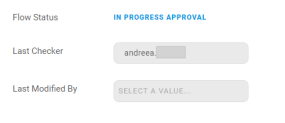
In the field Last checker, the name of the checker is filled in. The flow status is
In progress approval.If the checker clicks on the user to see the modifications, all the fields are read-only and the status is
Modified.From here there are two possible paths:
- Approve & Activate the modification
Click Approve & Activate. The flow status is
Approved. The business status of the record isActive. The process has ended. Now the modifications that were done to the user are active. The user will no longer be displayed in the grid Active settings, but only be displayed once in the Current Modifications List with the statusActive.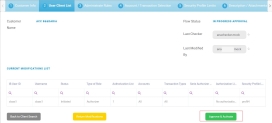 IMPORTANT!
All the records in the Current Modifications List with the statusInitiatedbecomeActivewhen the checker clicks the button Approve & Activate.or
- Reset Modifications.
Click Reset Modifications. This button sends the record back to the maker to modify. The flow status is
Initiated. From this point, the maker does the modifications necessary and can, then, click Continue to Activation and the flow is the one described above.
- Approve & Activate the modification

Inactivating a User
In Online and Mobile Banking it is not possible to delete a user. However, it is possible to inactivate a user. Additionally, a user who was inactivated and be added again to the same customer by following the steps documented in Adding a User to Online and Mobile Banking.
If you are trying to inactivate a user who has a modified version, you must first reset the modifications or approve them, otherwise, the user cannot be inactivated.
To inactivate a user, two flows are in place. The maker must:
- Open the FintechOS Portal.
- Click the button Search Users.
- Type a value in one of the columns: User name, first name, last name, mobile phone number, email address, personal ID number, Core Banking Unique Id, System User Id.
- Select the user needed for the modification from the grid.
- On the page Edit IB User, in the grid Associated Customers, select the customer. The User Client List page is displayed.
- In the grid Current Modifications List, select the active user by clicking once on the entry in the grid.
- Click Inactive.
 IMPORTANT!
You cannot inactivate a user from the grid Active settings (before current modifications). A toast message is displayed. Firstly, click Rest the modifications or Activate & Approve, then turn the user inactive.The record is saved automatically. The user is displayed in the grid Current Modifications List with the business status
To Be Inactivated.

From here, it is the checker who finishes the inactivation.
The checker must:
- Log in the FintechOS Portal with the given credentials.
- From the grid Requests sent for Approval, double-click the record with the business status
To Be Inactivated. The User Client List opens. - Click the Pick Up button. The page reloads.
- Click Approve & Activate. The business status is
Inactive.
3 Administrative Rules
For details, see Signature Engine & Administrative Rules.
4 Account/Transaction Selection
This section tab displays the list of usernames and their rights on accounts & on transactions under the following format: User x One Bank Account x Transaction(s) to which they have rights. What can be configured here are the rights to execute certain types of transactions on bank account for each user. From here a maker cannot delete the access of a user to a bank account, only delete the right to a type of transaction in the name of that customer.
![]()
When there is no signature rule defined, then a single rule is used.
The types of transactions in place are:
-
Account Balance & Details
See in the FintechOS Portal the funds in the account and the account information.
- Account Statement
See the list of transactions that were executed from the account, the credited and debited amounts.
- Initiate payments
Create a payment to a beneficiary.
- Own account transfers
Transfer funds to and from accounts of the same customer.
- Domestic Payments
Payments done to a beneficiary with local clearance system payments.
-
Budget Payment
Can be a local currency small value payment or a high value or urgent payment.
- Foreign Currency payments
Payments done in a currency different from the local currency.
- Bulk Payments
Multiple Payments done from a file type txt, xlx, xlxs, cvs that may have multiple beneficiaries.
- Open New Products.
The user can acquire new services & products offered by the bank.
Depending on the rights given to a user in The grid Current Modifications List for each of the users of a customer, the users are displayed with the associated bank accounts:
|
Role |
Default Rights |
|---|---|
| Viewer | can only view account information such as Account balance & Details, Account statements |
| Initiator | can view and input payments, but not to authorize any payments. An initiator can see Account balance & Details, Account statements, and initiate payments |
| Authorizer | can authorize payments: Account balance & Details, Account statements, Initiate payments, Own Account transfers, Domestic payments, Budget Payments, Foreign currency payments, Bulk payments, Open New Products |
Each user can be modified to fit new rights. To do so, edit the section tabs Administrative Rules and Account/Transaction Selection.
In the second tab named The grid Current Modifications List, when selecting a user, the fields Accounts and Transaction types are read-only and have the default value All. From this tab named Transactions, clicking the button on the end of the row for each bank account edits the values from All to Selected in The grid Current Modifications List depending on what was ticked or un-ticked here.

Modifying a User's Rights on Bank Account
The maker does the following:
- The checkboxes from the grid are read-only. To modify, click Edit on the end of the row for each username x account type.
- Tick or un-tick the boolean, then click Save or Cancel depending on what you wish to achieve. The record has the status
Modifiedin the first grid and the statusActivein the second grid displayed below. The modifications have to be approved by a checker for them to becomeActivein the system. - To send the modifications to the checker, click User Client List and click Continue to Activation.
Approving a modification to a user's bank account
A checker does the following:
- Open the Innovation Studio.
- Navigate to the grid named Requests sent for approval.
- From the grid, select the record which was sent. The User Client List page is displayed.
- The section tab User Client List, click Pick up. The Pick Up button saves the value of the current admin user in all records that have flow status
Sent to Approvaland triggers the system to automatically change the flow status for all records inSent to ApprovaltoIn Progress Approval.In the field Last checker, the name of the checker is filled in. The flow status is
In progress approval.Click Account/Transaction selection to see the modifications.
From here there are two possible paths:
- Approve & Activate the modification on the user-bank account
Click Approve & Activate. The flow status is
Approved. The business status of the record isActive. The process has ended. Now the modifications which have been done to the user- bank account are active. The user will no longer be displayed in the second grid, but only be displayed once in the first grid with the statusActive.or
- Reset Modifications.
Click Reset Modifications. This button sends the record back to the maker to modify. The flow status is
Initiated. From this point, the maker does the modifications necessary and can, then, click Continue to Activation and the flow is the one described above.
- Approve & Activate the modification on the user-bank account
5 Security Profile Limits
This section tab displays the exceptions to the security profiles of the users, i.e., one limit or more can be modified here and the modification is valid for one day/a week/a month.
Under the label User Temporary Financial Limits, there are displayed the temporary limits set for a user:
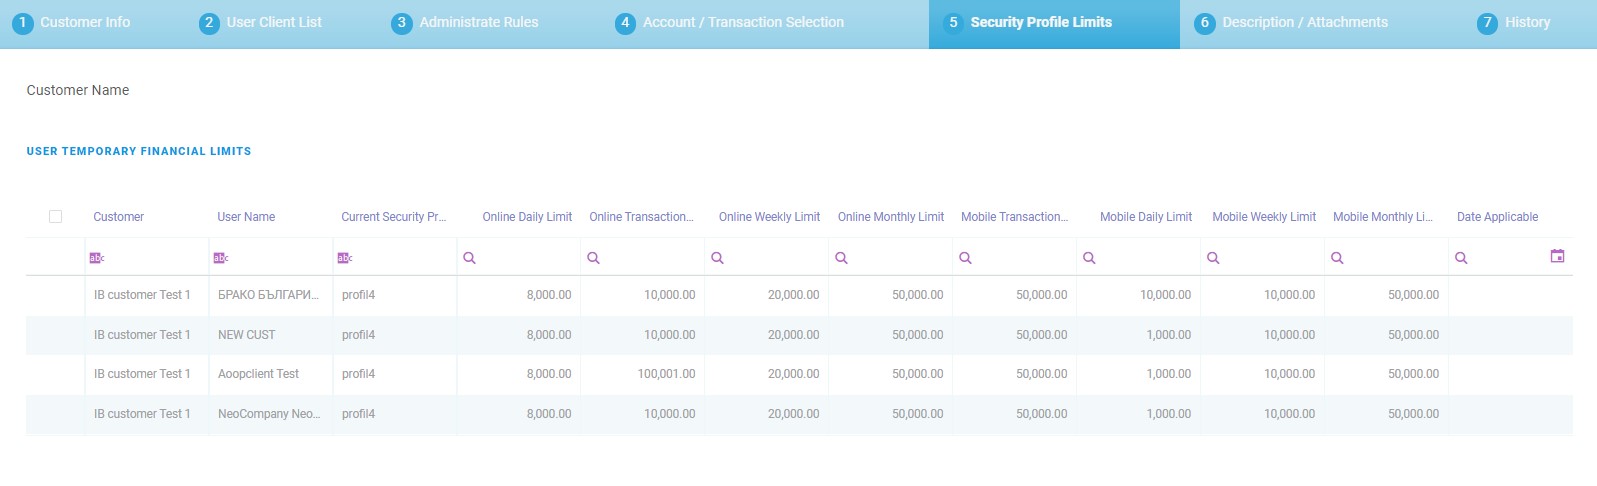
- today
- this week
- this month
- not this week.
These four grids open the page Edit IB USER_Customer Financial Limit. Depending on the time limit records are displayed in one of the four grids.
The page Edit IB User_Customer Financial limit has the fields:
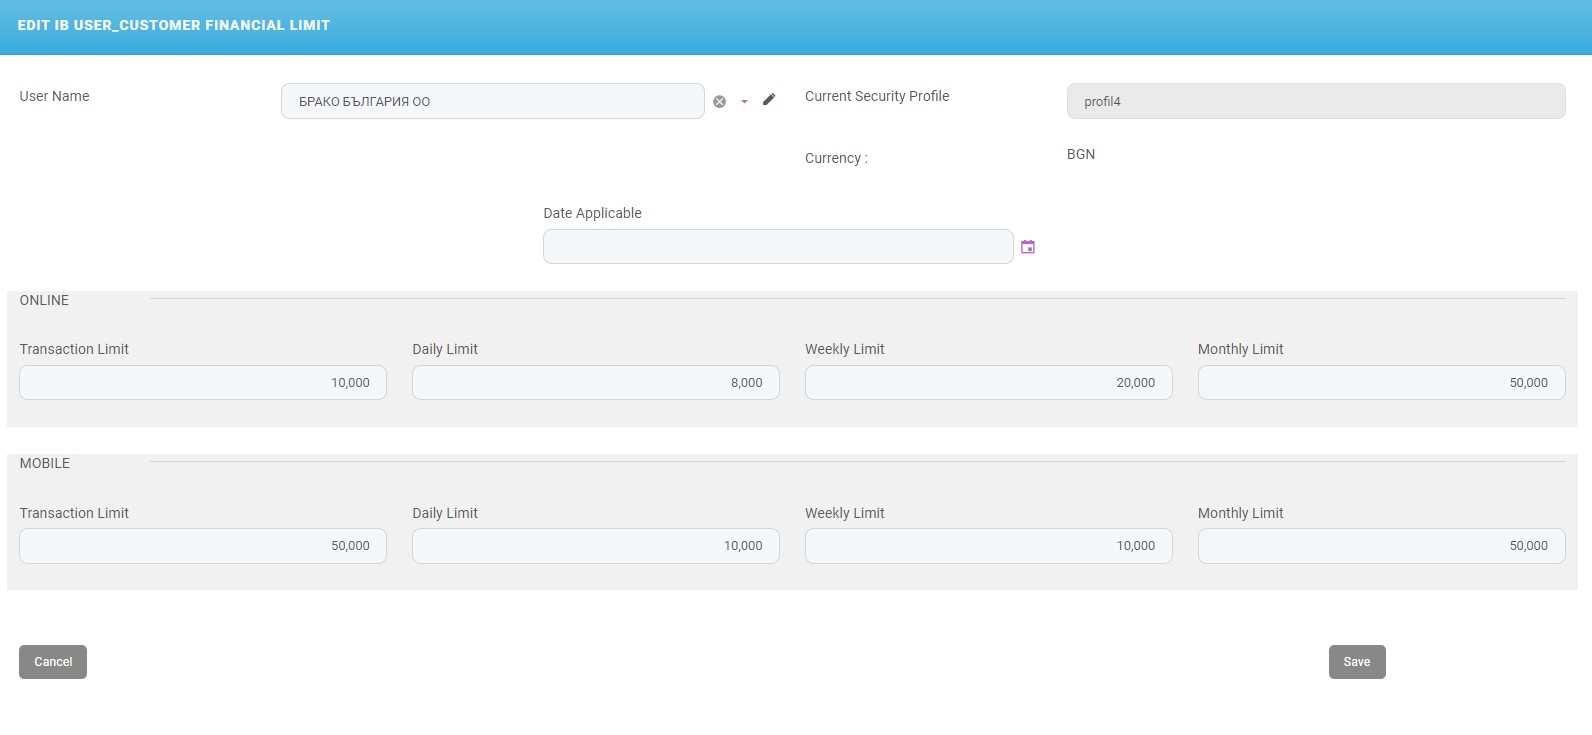
| Field | Data type | Description |
|---|---|---|
| Name | Text | Insert a suggestive name for the limit. |
| Bank Account User | Option set | Select from the list the name of the user. |
| Date Applicable | Date | Select the starting date for the limit to apply to the user. |
| Security Profile Modified | Lookup | Select from the list the security profile which applies to the user selected beforehand. |
| Online | ||
| Transaction Limit | Numeric | Insert the amount that servers as the maximum amount allowed to be paid through a single payment through online banking channel for that security profile. |
| Daily Limit | Numeric | Insert the amount that servers as a maximum daily amount allowed to be transferred through all payments done using the online banking channel for that security profile. |
| Weekly Limit | Numeric | Insert the amount that servers as a maximum weekly amount allowed to be transferred through all payments done using the online banking channel for that security profile. |
| Monthly Limit | Numeric | Insert the amount that servers as a maximum monthly amount allowed to be transferred through all payments done using the online banking channel for that security profile. |
| Mobile | ||
| Transaction Limit | Numeric | Insert the amount that servers as the maximum amount allowed to be paid through a single payment through mobile banking channel for that security profile. |
| Daily Limit | Numeric | Insert the amount that servers as a maximum daily amount allowed to be transferred through all payments done using the mobile banking channel for that security profile. |
| Weekly Limit | Numeric | Insert the amount that servers as a maximum weekly amount allowed to be transferred through all payments done using the mobile banking channel for that security profile. |
| Monthly Limit | Numeric | Insert the amount of money that servers as a maximum monthly amount allowed to be transferred through all payments done using the mobile banking channel for that security profile. |
When a modification takes place here, then the field named Authorization limit from The grid Current Modifications List > Edit Associated CUSTOMER has the value Temporary Transaction Security Profile.
For each user, these limits can be set depending on the security profile selected. A legal entity can set multiple transaction limits to each user it has: financial direct, accountant, financial controller, bid manager, administrator.
Click Save to return to the Security Profile Limits page or click Cancel to cancel the modifications.
6 Descriptions/Attachments
There is the attachments grid where documents (such as agreements, contracts, papers from the General Meeting of Shareholders, etc.) can be added.

To add a document:
- Fill in the following from the Account Documents grid:
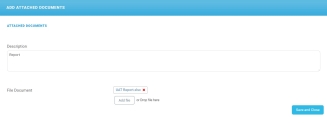
Field Data type
Description Description Text area Insert a suggestive description. File Document File Add the file from the device, e.g., the General Meeting of Shareholders document. - Click the Save and close button to return to the Descriptions/Attachments section tab.

7 History
This section tab has no developments done. The bank can choose what data to display on this page.