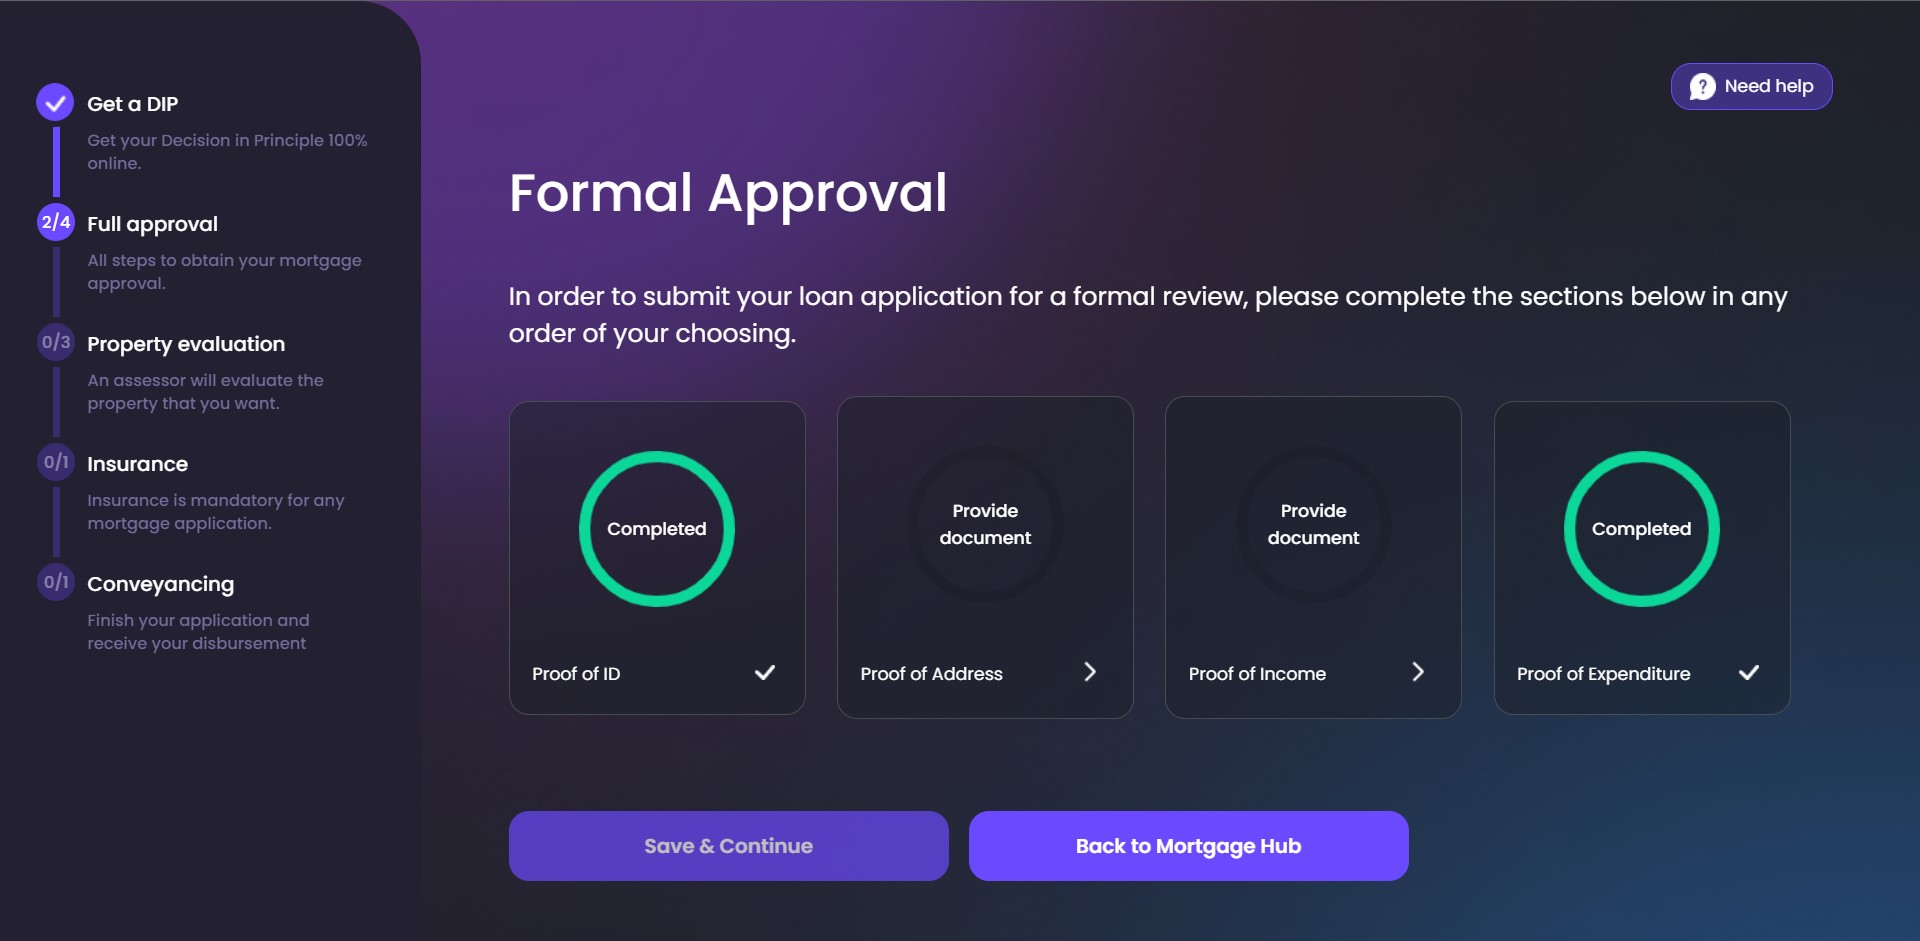
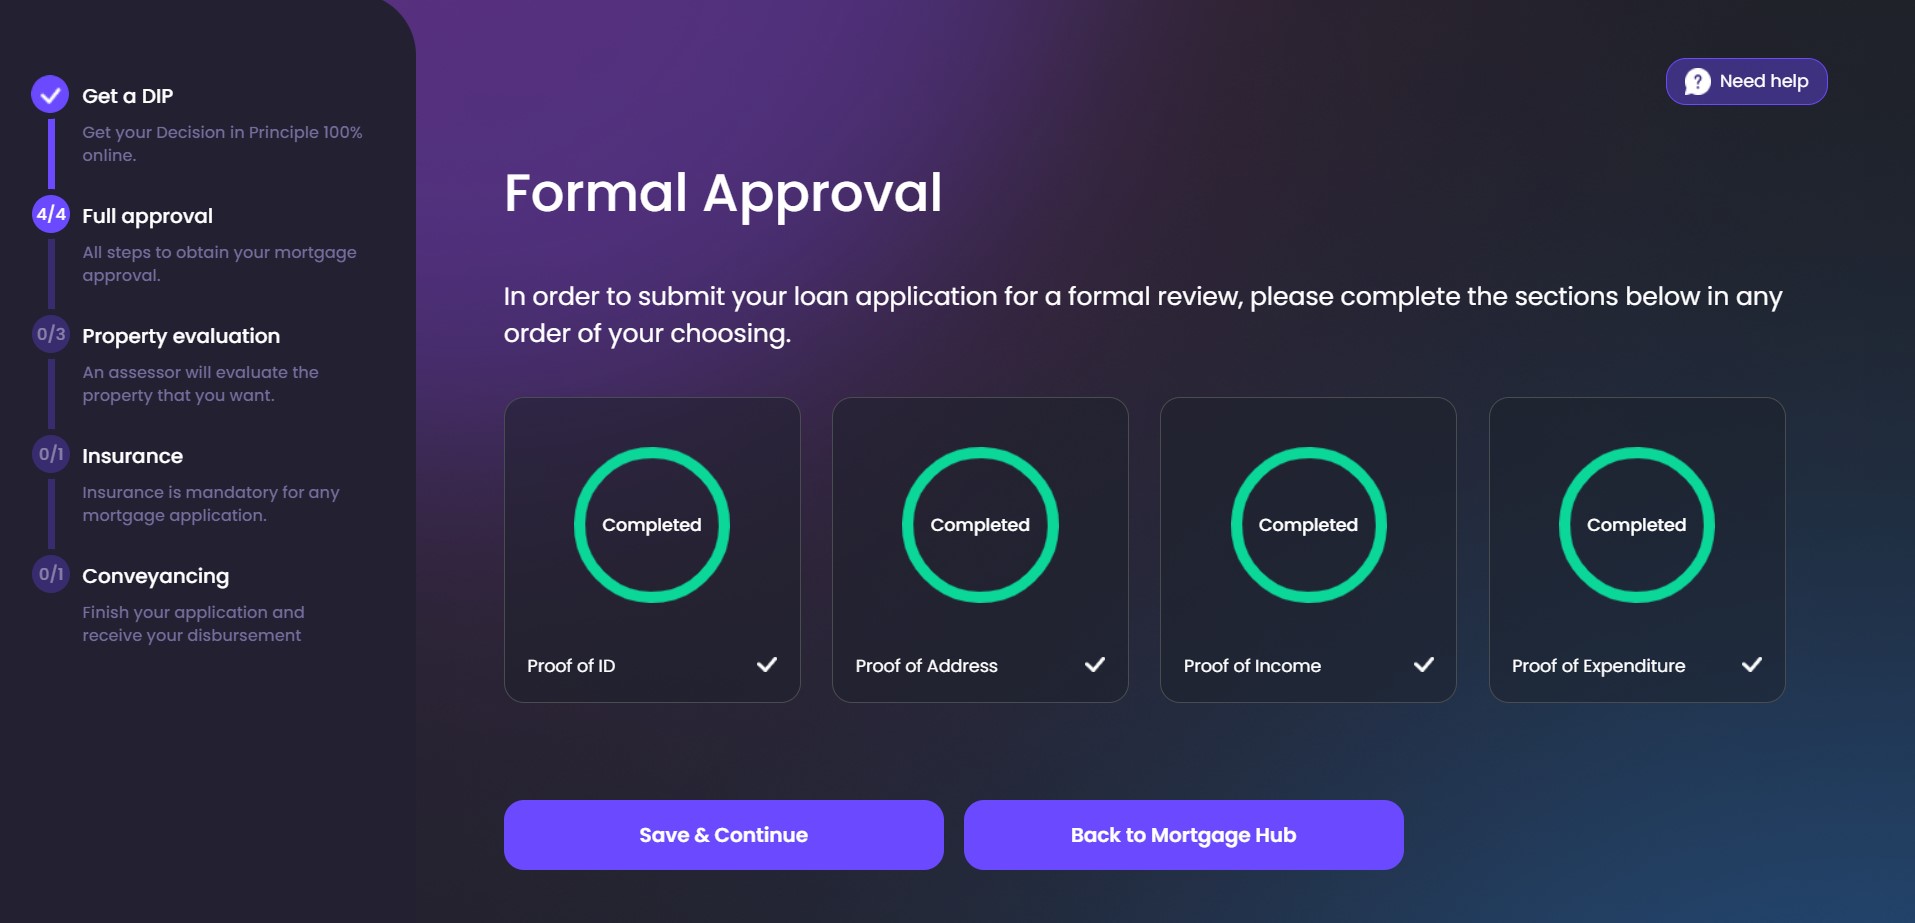
Formal Approval
The journey is an end-to-end mortgage solution, therefore, it includes the stage following the decision in principle, where you and the co-borrower, if applicable, must validate the information inserted in the DIP. For each type of information, you must provide documents to verify what was declared earlier. For the financial institution to offer the mortgage, the identity, address history, income, and expenses must be certified. The Formal Approval page depicts the following mandatory stages you must complete. There is no hierarchy or co-dependence between stages. You can access the stages in no particular order. The system does not ask you to complete a stage 100% before starting another one.
The identity of a borrower must be verified by the financial institution by scanning an ID document and taking a selfie. The name and other details must be proven using a document. After these steps, you return to the Formal Approval page. When the scanning is done, on the Formal Approval page the graphic displays 50%, after the selfie the stage is 100% complete.
This requirement is specific to the United Kingdom market. It requires proof of occupation on the current residence. After each document is uploaded, you are redirected to the Formal Approval step where there is a graphic displayed: for one document uploaded equals 50%, 2 documents uploaded equals 100.
The income sources and values from the decision in principle must be verified by using the Credit Kudos integration or by manually uploading the documents. The income is important because the bank needs to verify whether or not you can afford the mortgage. After each document is uploaded/the bank account from Credit Kudos is linked, you are redirected to the Formal Approval step where there is a graphic displayed: if you select open banking or if you select to manually upload documents, the process is 100% done.
From the income you have, there may be expenses paid for other loans, overdrafts, and more. To validate the expenses declared earlier, the system needs to view the documents with the existing spendings. By declaring the income and expenses, the system can determine the debt-to-income, then, it can determine whether you qualify for the mortgage. After each document is uploaded/the bank account from Credit Kudos is linked, you are redirected to the Formal Approval step where there is a graphic displayed: if you select open banking or manual upload, the process is 100% done. By default, the open banking page is displayed first, but you can click Add documents manually to skip the Credit Kudos integration.
After each of these four categories is completed, you are directed to the Formal Approval page to select a new step. The text from inside the chart reloads to inform you what action you need to take to complete the process.
Select one of the four categories and click Save & Continue to proceed. This button becomes available only when one of the categories has been selected. To return to the previous step, click Back to Mortgage Hub. This button redirects you to the page My Mortgage Hub.
In the form FTOS_BNKAP_Mortgage_FullApproval > step Step1 > After Events several things are configured, including calling the script FTOS_BNKAP_GetMortgageFullApprovalStatus.
Proof of ID
The identity of the customer must be verified as part of the legal standard for this process. Therefore, you must complete two steps for the bank to validate your identity: provide an identity document and take a selfie. The photo from the selfie is compared with the photo from the ID, if they match the identity is confirmed. Otherwise, you fail this step.
For more details on how this step was configured, see Mortgage_OCR_ID and Mortgage_OCR_DL and Mortgage_OCR_Passport.
Scanning an Identity Document
This accelerator accepts multiple documents allowing you a wider variety of options:
- scanning a driving license
- scanning a passport
- scanning a national personal ID.
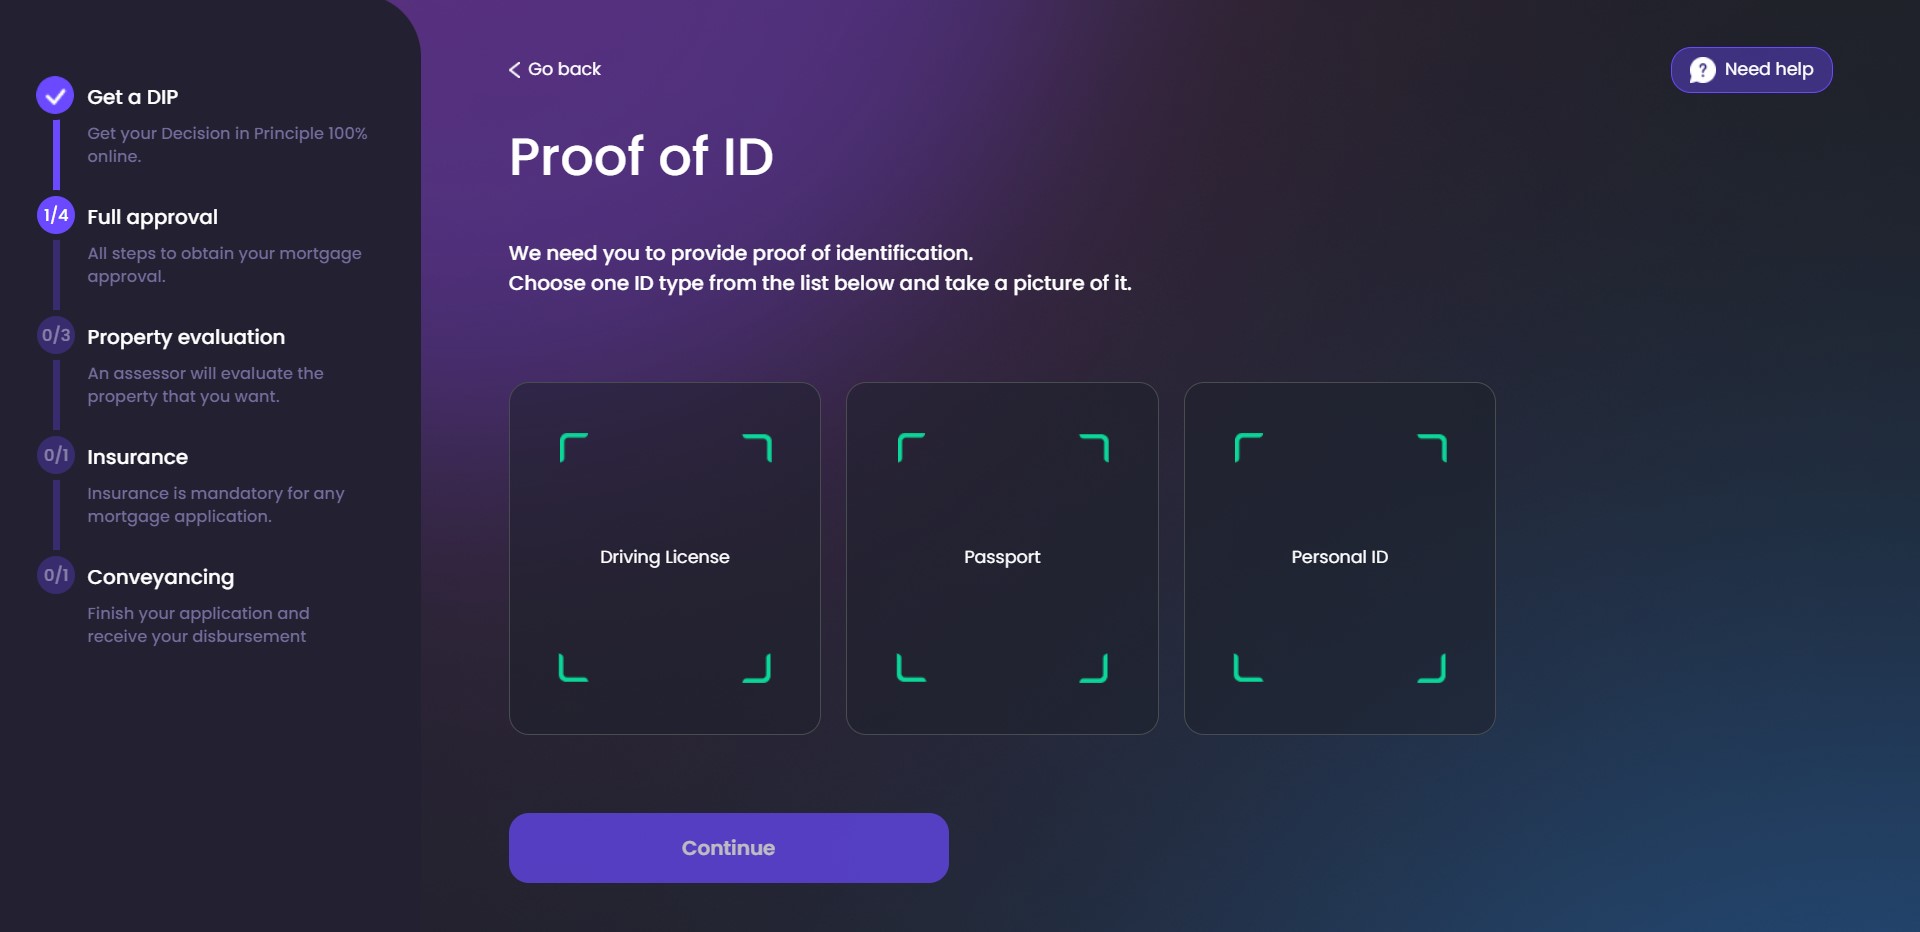
Choose one of the options by clicking it and then clicking Continue. The Continue button becomes available only after you have made your choice.
On the form FTOS_BNKAP_MortgageScanOCR, there are several steps configured for each scenario of this stage of the process. In the step selectDocumentType > Advanced > After Events, the script FTOS_BNKAP_GetMortgageFullApprovalStatus is called, as well as the processors Mortgage_OCR_ID and Mortgage_OCR_DL and Mortgage_OCR_Passport. In the same step in Advanced > After Section Save, the custom flow FTOS_DFP_Mortgage_OCR is triggered with the opening of the camera for the scanning of the document.
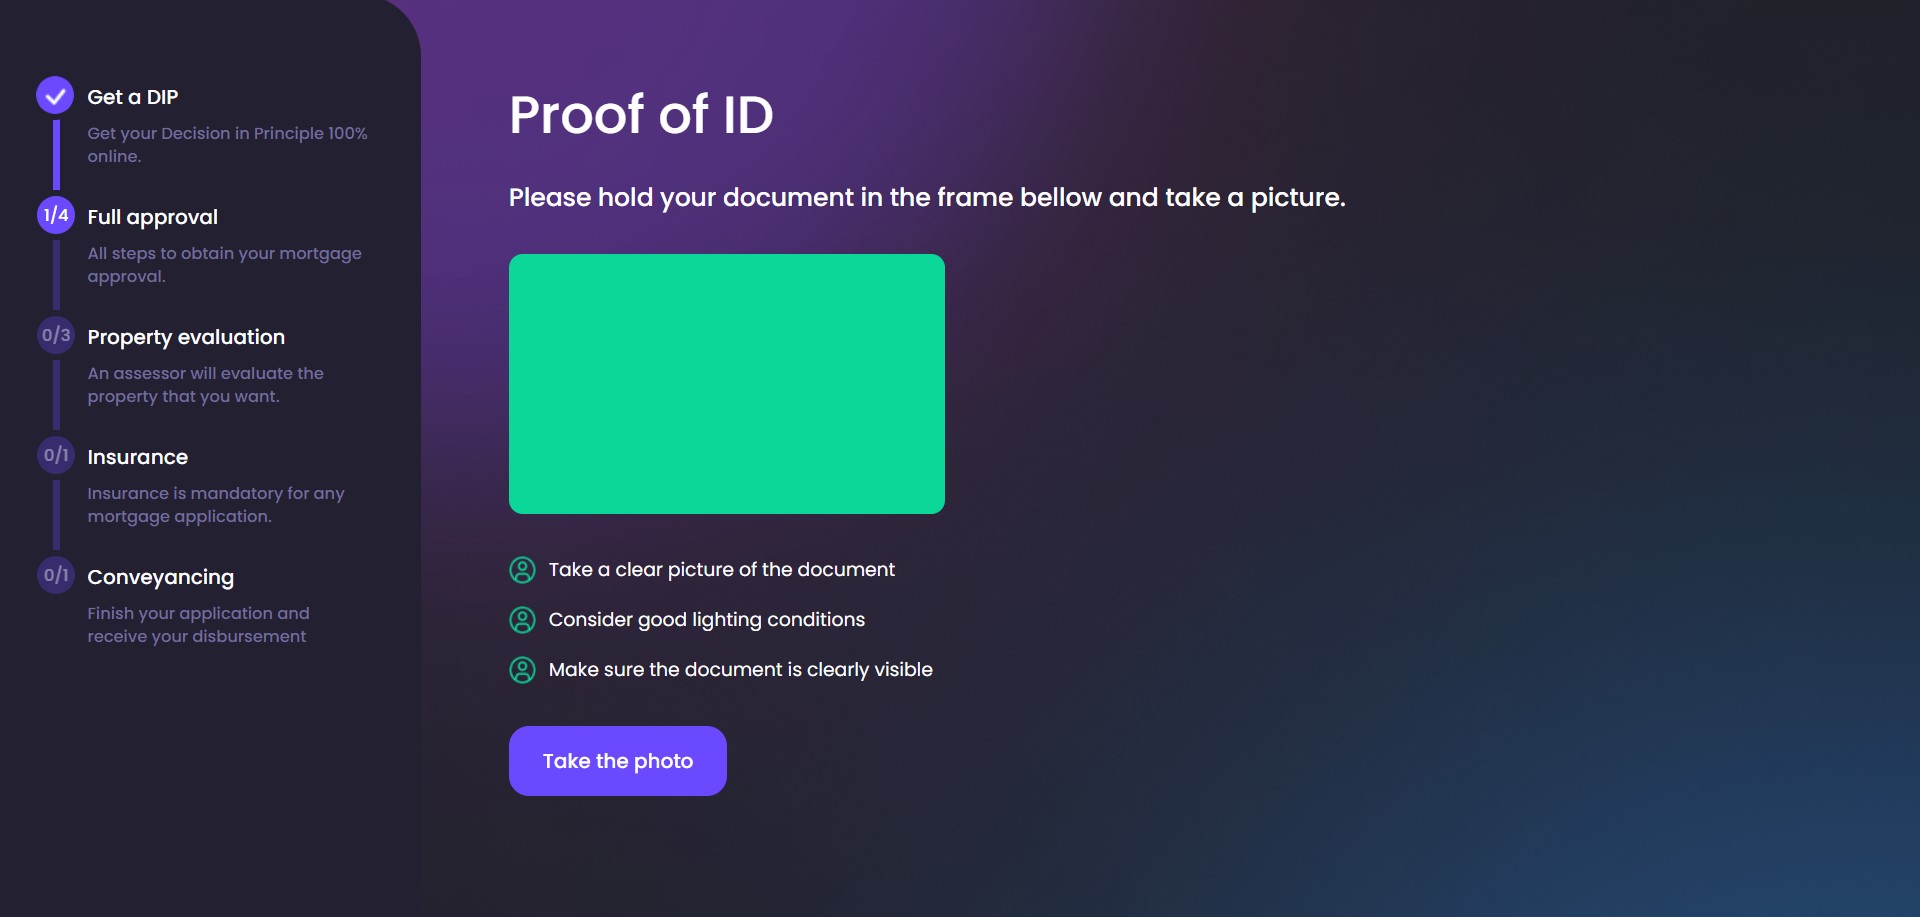
A new page is displayed where the image of the camera is shown. Frame your document and click Take the photo. Then, click Process file to proceed or Retake photo to frame again the ID and take a new photograph.
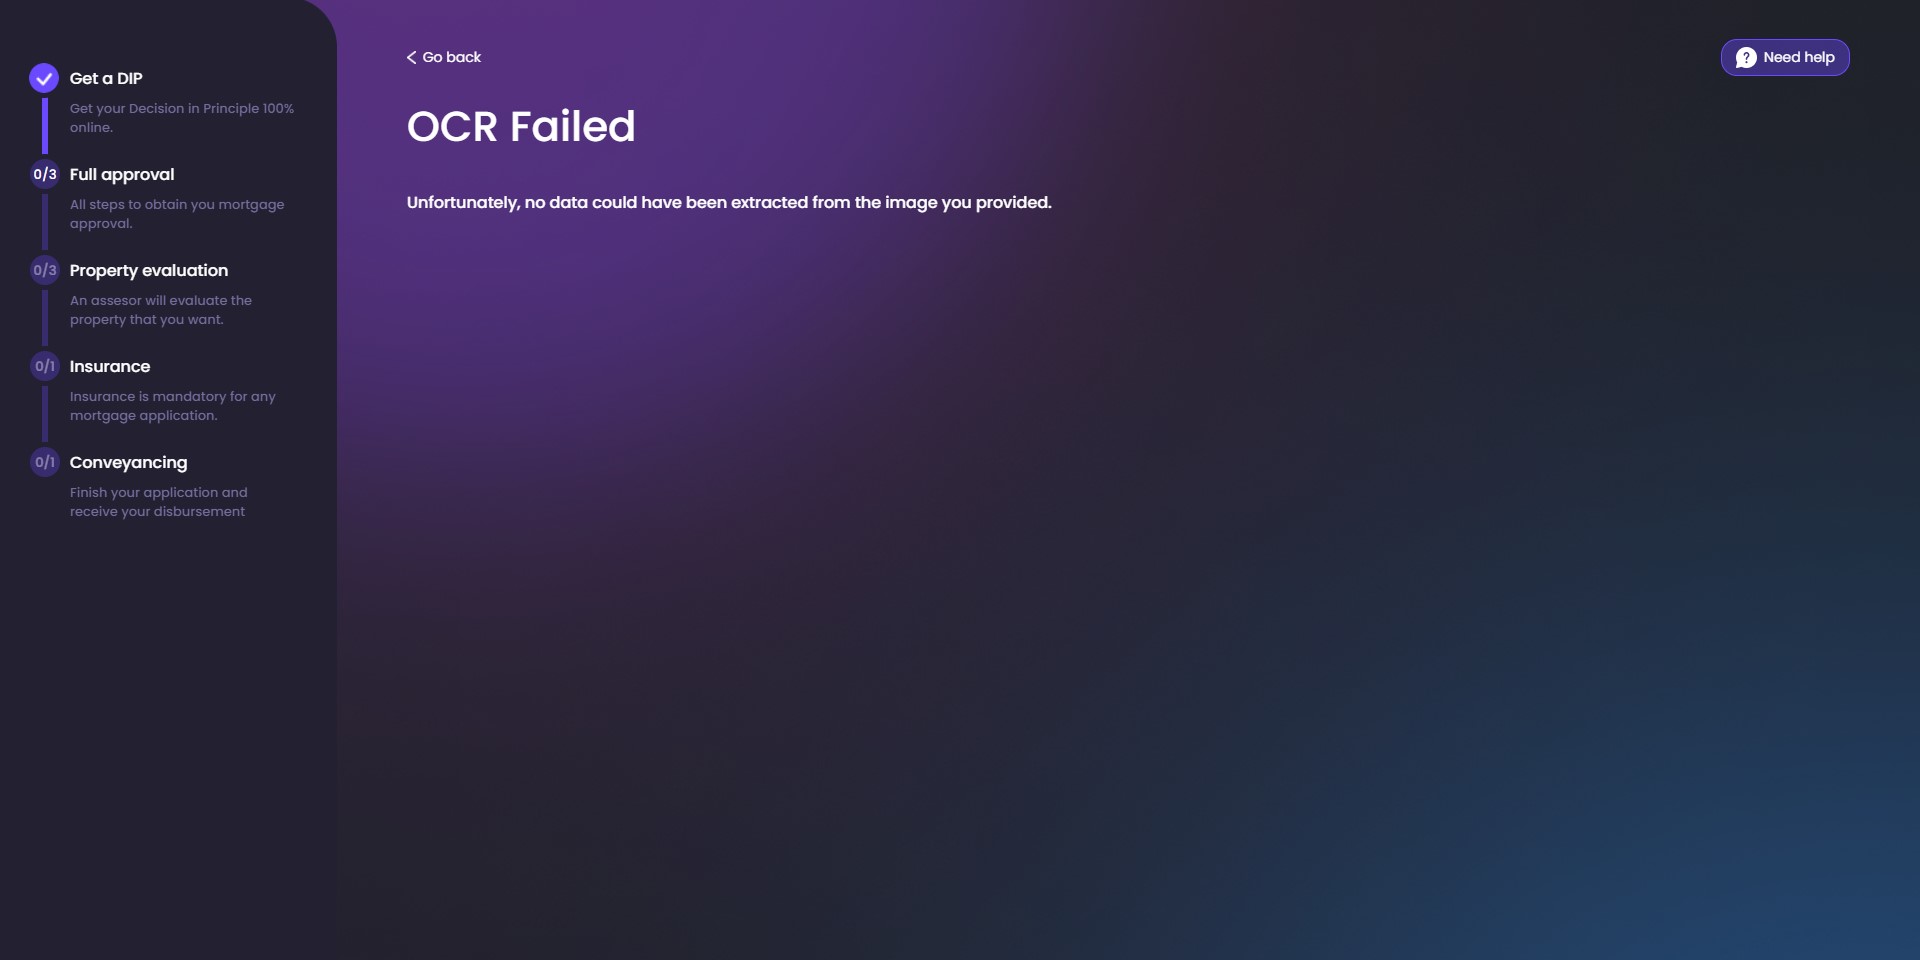
If the scanning process is successful, then the system loads the review information page. If the scanning is not successful, you have five retries to re-take the photo. The system displays a toast message to inform you that the photo could not be processed. Once the maximum number is reached, the system loads the fail page informing you that you cannot continue the flow.
Review the Information
This is a subsequent step to the successful scanning of the document. Under the heading Personal Details, the system displays the data taken from the document allowing you to edit it if it was collected wrongly:
In the form FTOS_BNKAP_MortgageScanOCR > step reviewInfo > Advanced > After Events, the code validates the date format for the ID card issue and expiration date, and for the other fields to not be empty.
- Last name
- Given name
- Issued at
- Issued until
- Issued by
- Address.
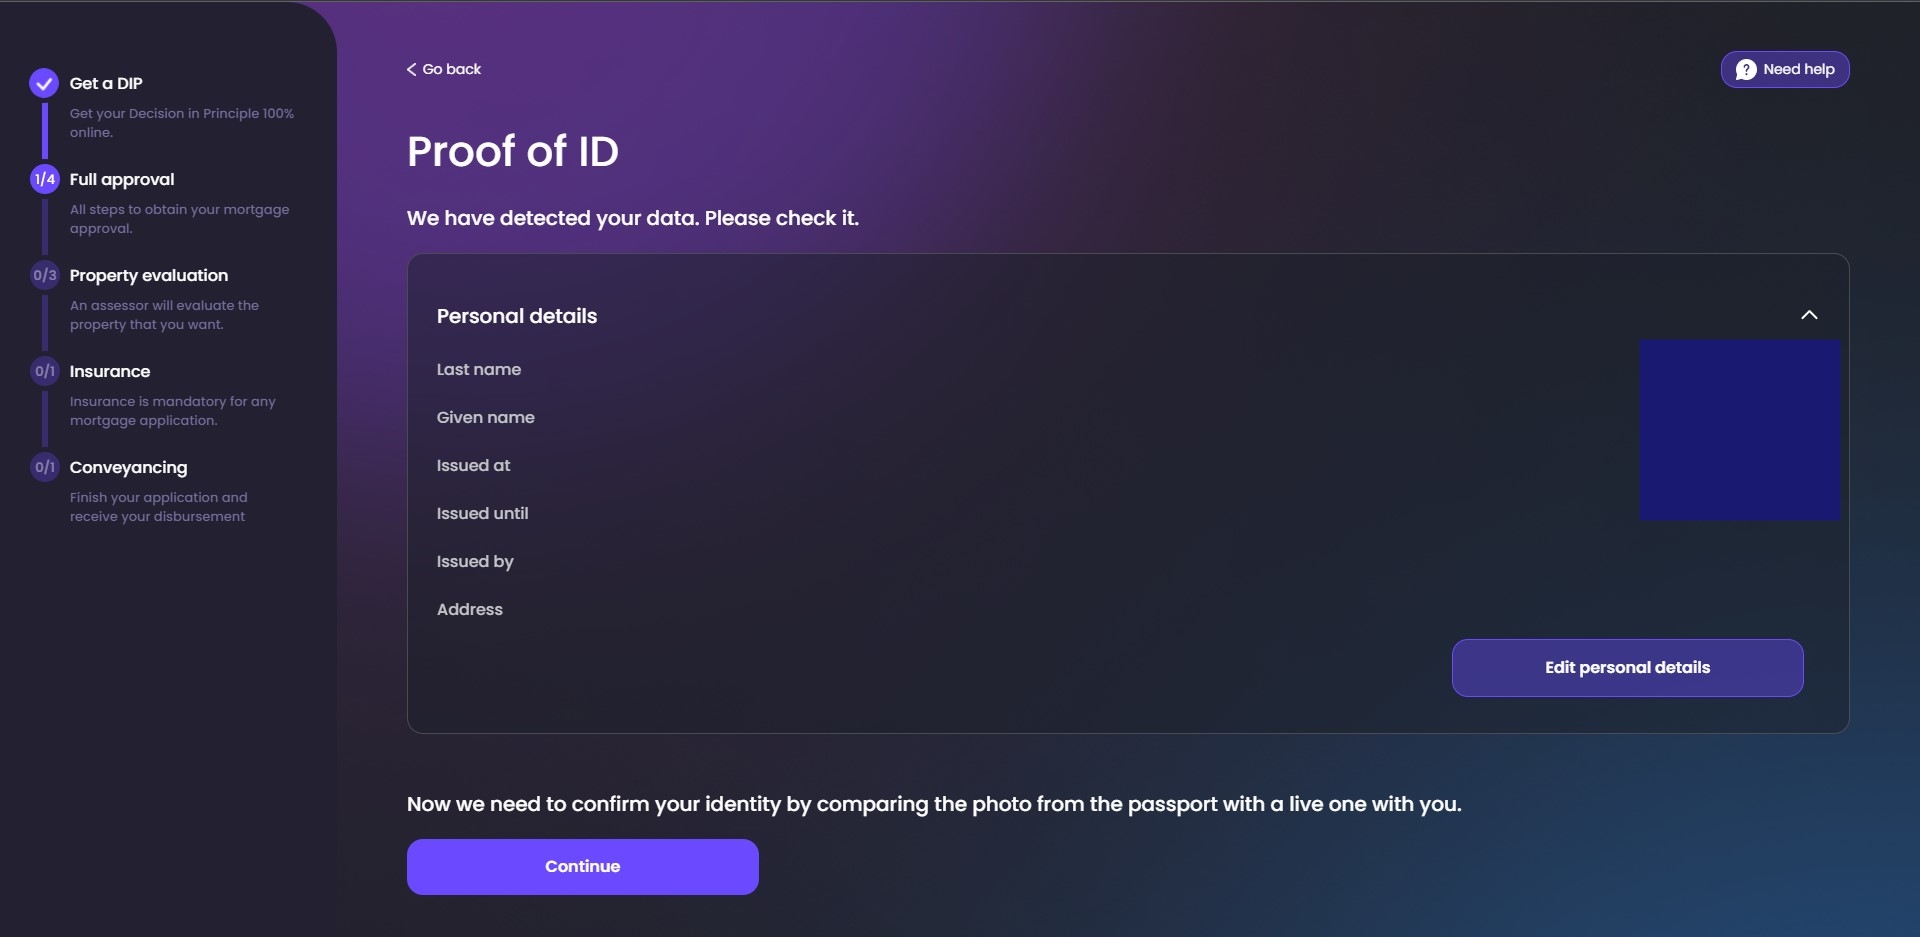
Click the Edit personal details button to modify the data collected. Click the Continue button to proceed.
The page Proof of ID reloads with the information about the selfie.
Click Continue to trigger the selfie processor.
Take a Selfie
If the scanning of an identity document is achieved, the page loads the selfie step to display the image from the camera for you to take a photo of your face. This is needed to confirm your identity and prevent fraud.
To start the process click I'm ready. Follow the instructions from the automation processor. You have five retries to pass the liveness check. If the maximum number is reached and you could not pass the selfie check, the system loads the fail page informing you that you cannot continue the flow.

For more details on how this step was configured, see Processor Setting for Liveness and the flow FTOS_BNKAP_MortgageSelfie.
Proof of Address
This step asks you to upload two documents from a list of existing possible documents:
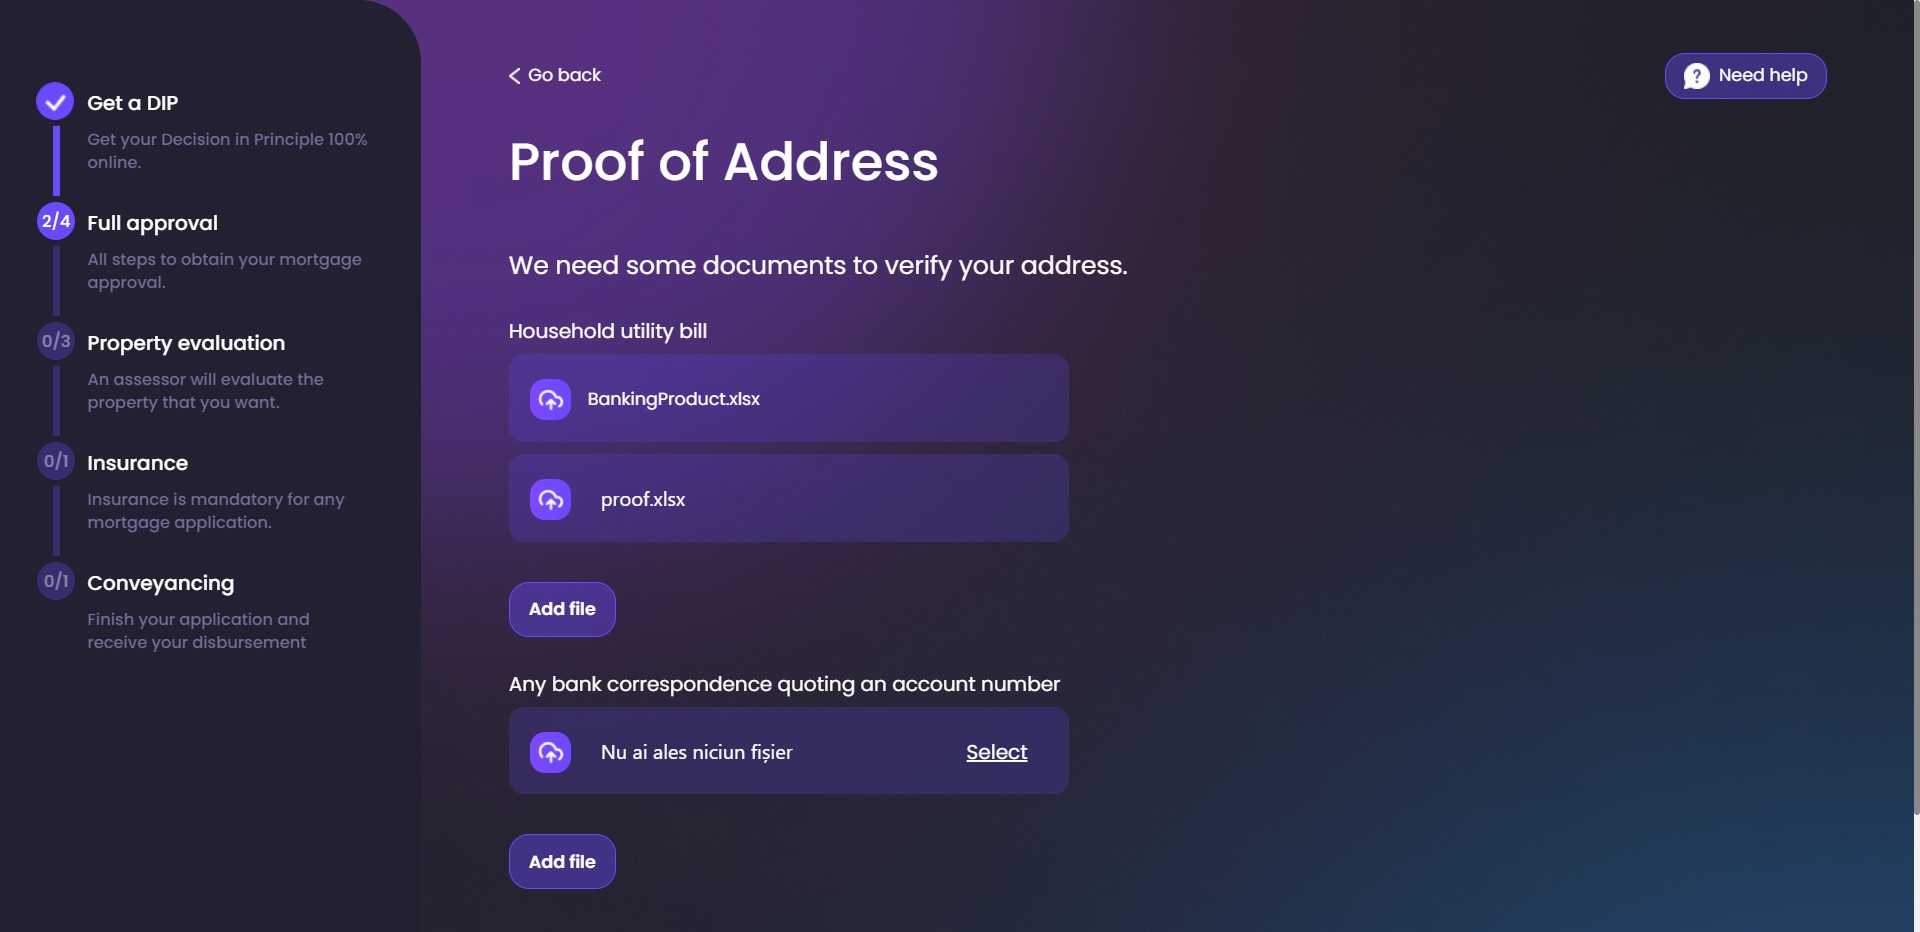
- Household utility bill
- Any bank correspondence quoting an account number
- Any revenue correspondence
- Social welfare document quoting the policy number
- Littlewood's correspondence quoting an account number.
You can upload more than two documents, which is the minimum number required to continue the flow. If the minimum number of documents is not reached, you cannot continue the flow. You must insert as well the Any bank correspondence quoting an account number file to complete the stage.
If you do not select at least one document, a pop-up message is displayed asking you to choose a document type.
To modify the minimum number of documents needed and the document types, see Mortgage_DocumentType. This processor is called on the form driven flow FTOS_BNKAP_ProofOfAddress > Advanced > Before Events. On the form driven flow FTOS_BNKAP_ProofOfAddress > step ProofOfAddress > Advanced > After Events, the code validates the minimal number of documents inserted and saves the category of the document selected.
Tick the checkbox for the two documents you wish to upload. Then, click the Continue button. If no selection is made, the Continue button is not available.
Upload Documents
The page Proof of address reloads with the fields where to upload the documents from the local drive. The system takes the documents chosen from the first page and displays them on this page.

In the form driven flow FTOS_BNKAP_ProofOfAddress > step ProofOfAddressUpload > After Events, the script FTOS_BNKAP_GetApplicantSelectedDocuments is called.
Click Select to choose from the local drive the file. Once uploaded, the name of the file is displayed. Click Add file to add an additional document.
To proceed, click Continue. If there are no documents inserted, an error message is displayed to inform you of the requirement.
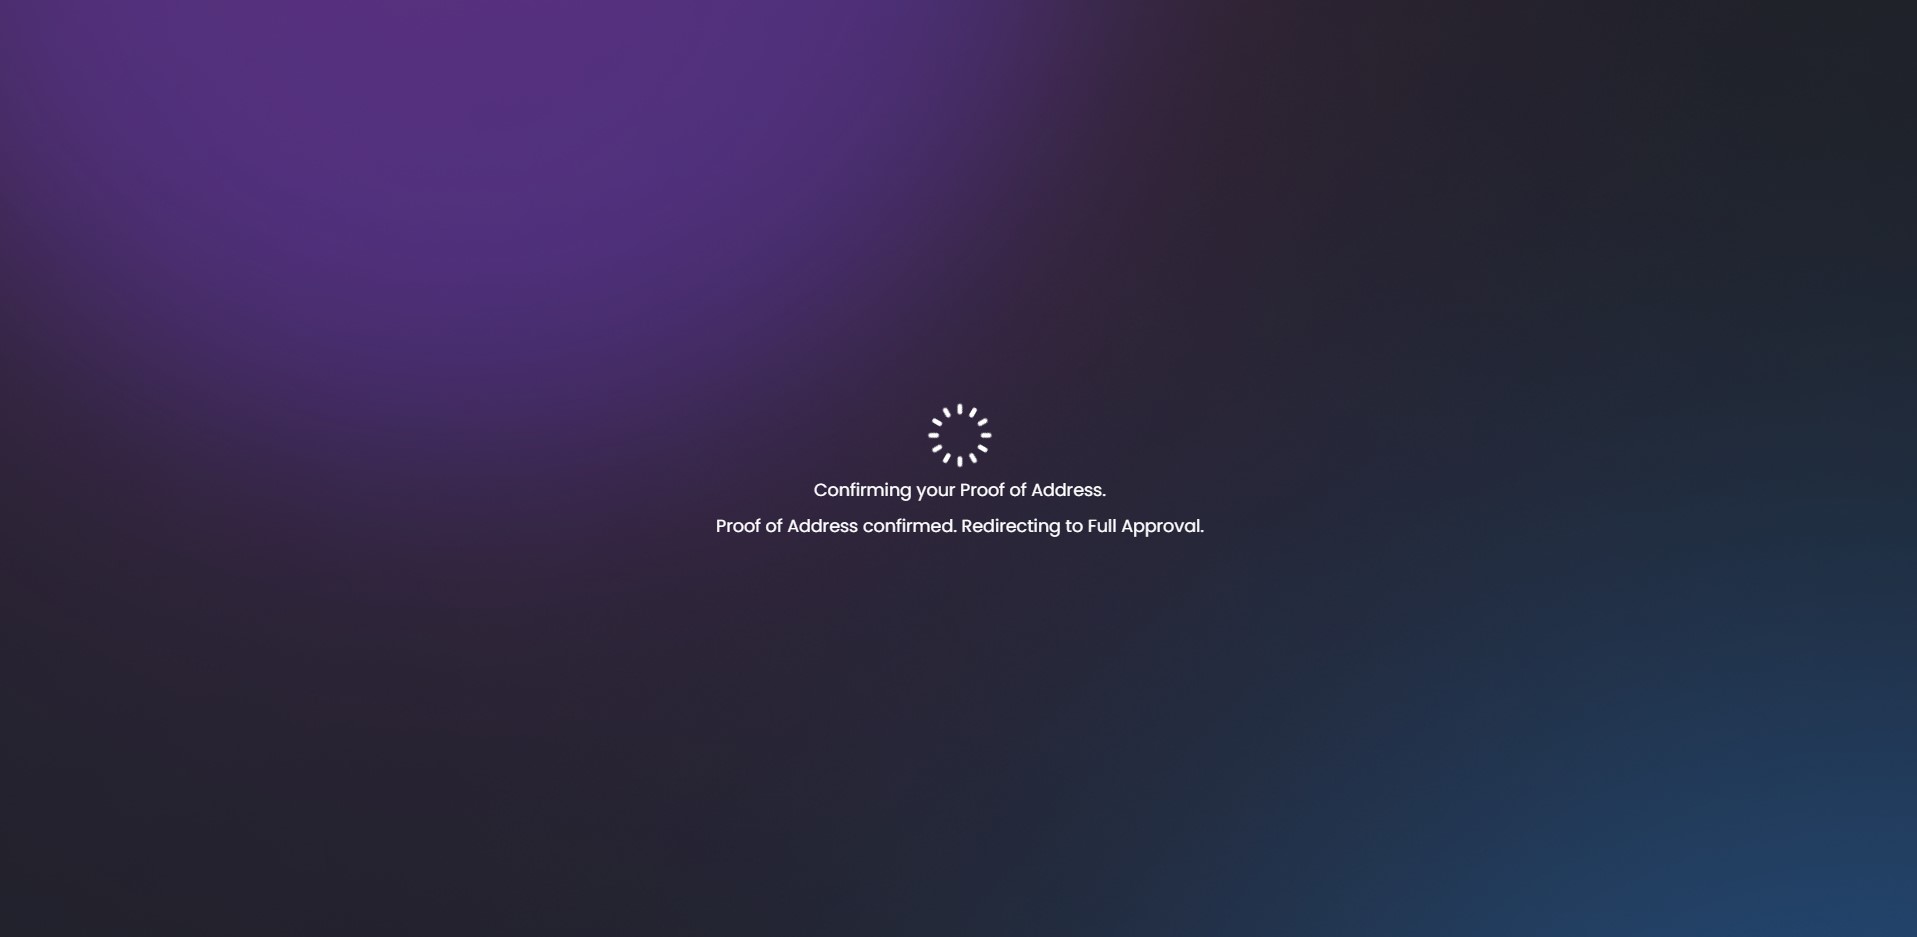
A loading page is displayed with the message Proof of address submitted, redirecting you to the Full Approval screen.
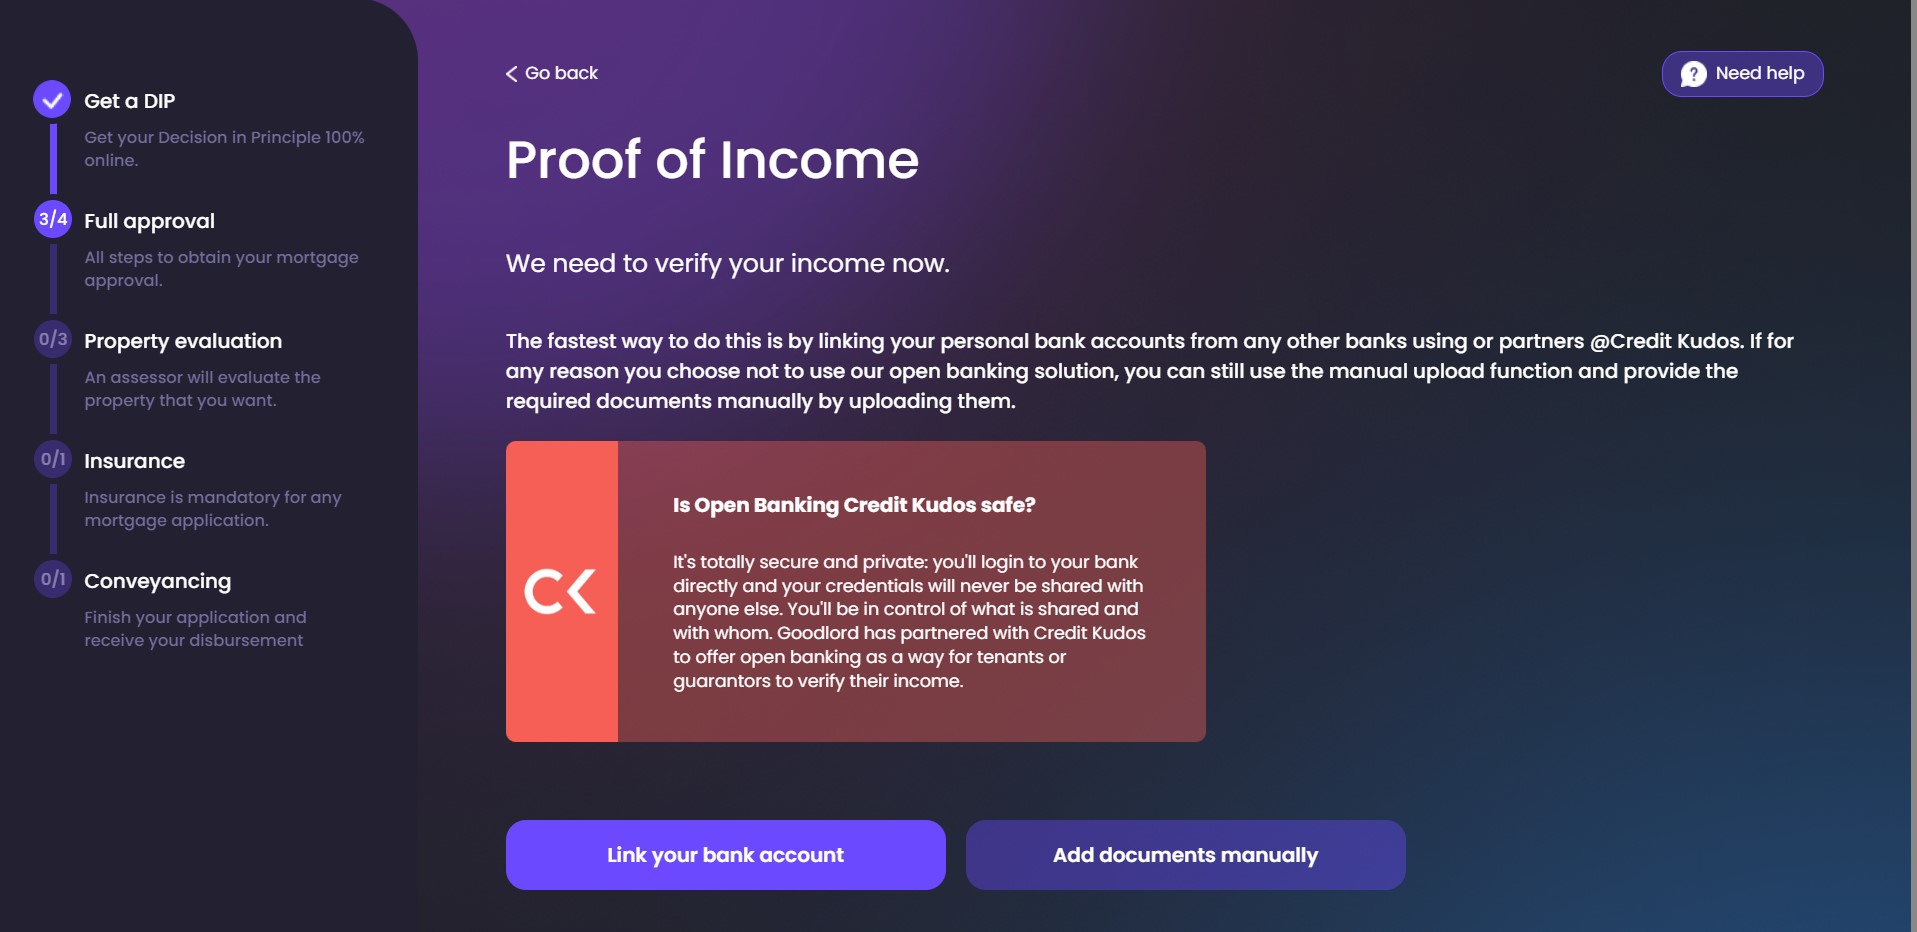
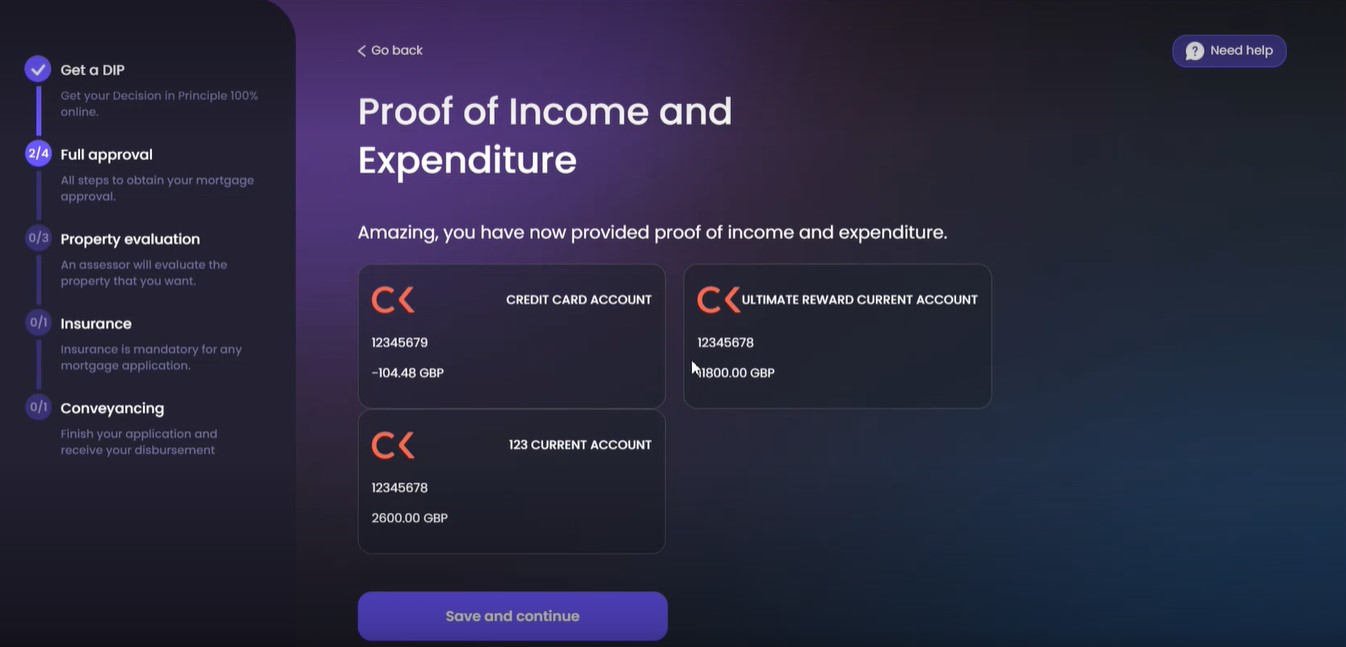
Proof of Income
This step verifies the income you earn. This validation is needed by the financial institution because any loan requires verification of the source of income. This is done using the open banking![]() Open banking connects banks, third-parties and technical providers to securely exchange data. integration with Credit Kudos
Open banking connects banks, third-parties and technical providers to securely exchange data. integration with Credit Kudos![]() Credit Kudos’ products enable businesses to leverage Open Banking to enhance affordability and risk assessments. The products help lenders streamline underwriting, improve accuracy in decision-making, and support customers after acquisition through our engagement tools.. This is a suggestion FintechOS has. However, any third-party platform can be integrated.
Credit Kudos’ products enable businesses to leverage Open Banking to enhance affordability and risk assessments. The products help lenders streamline underwriting, improve accuracy in decision-making, and support customers after acquisition through our engagement tools.. This is a suggestion FintechOS has. However, any third-party platform can be integrated.
Every customer must have at least one account linked.
The page explains the process within Credit Kudos. Click Link Your Bank Account to start the process using the integration or click Add documents manually if you do not wish to use open banking solution or if you do not have a bank available on the Credit Kudos platform.
The information taken from the third-party integration is:
From the Report Details, the information used is:
- Predicted monthly income amount: income value and currency
- Predicted monthly income with transfers: incomeWithBankTransfers value and currency
- Predicted monthly essential expenditure: essentialExpenditure value and currency
- Predicted monthly affordability threshold: affordabilityThreshold value and currency
From the Accounts Report, Studio gets the bank name.
From the Indicators Report Predicted, the information used is: gamblingExpenditure and ratioToIncome.
When selecting to link a bank account, you are directed to a flow within the Credit Kudos platform. If the account is linked successfully, then you are redirected back to the flow in this solution with the logo of the bank displayed as a confirmation.
Multiple banks can be linked, but for each bank account, you need to repeat the process. Click Add another account to add a new account and follow the steps from Credit Kudos (choose the bank, log in the platform, view the accounts).
Once the account(s) is/are added successfully, click Save and continue to proceed. The system takes the expenditures as well and you do not need to go through that step. However, subsequently, you can add the expenditures manually.
Add the Documents Manually
There are several options depicted in the interface. Choose at least one document from the list:
- Current account statement
- Pay Slip
- Salary cert
- Statement of earnings.
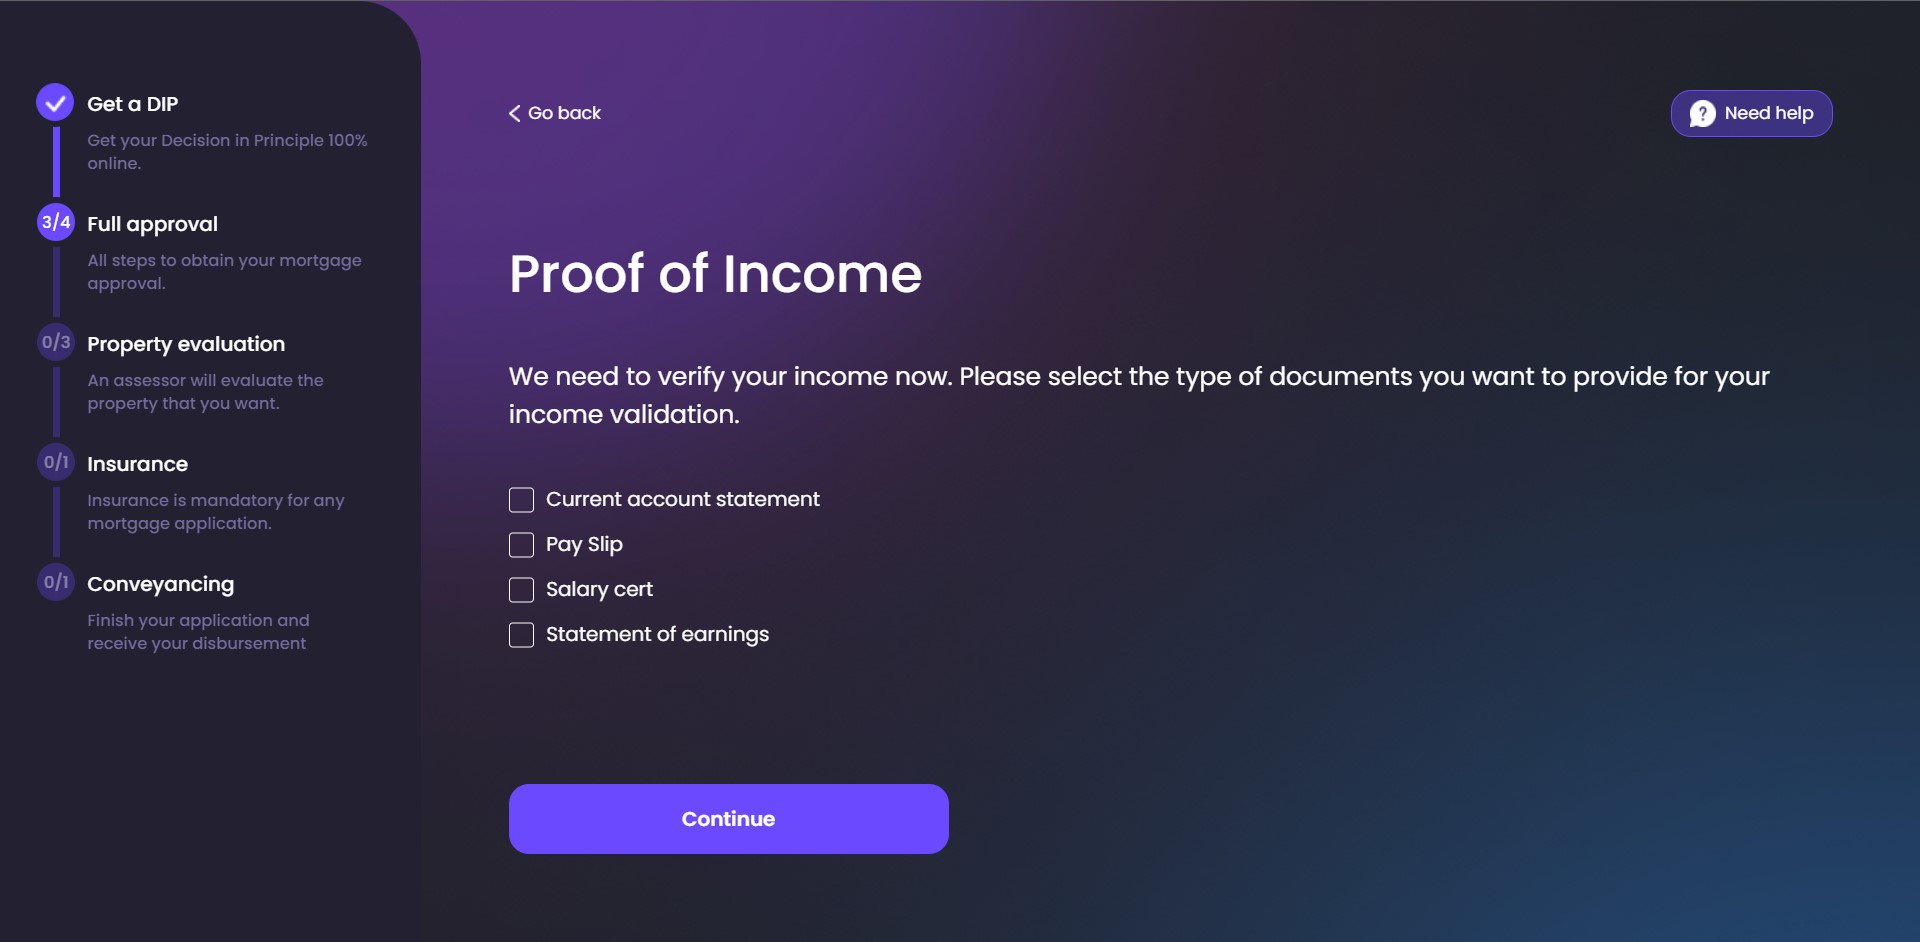
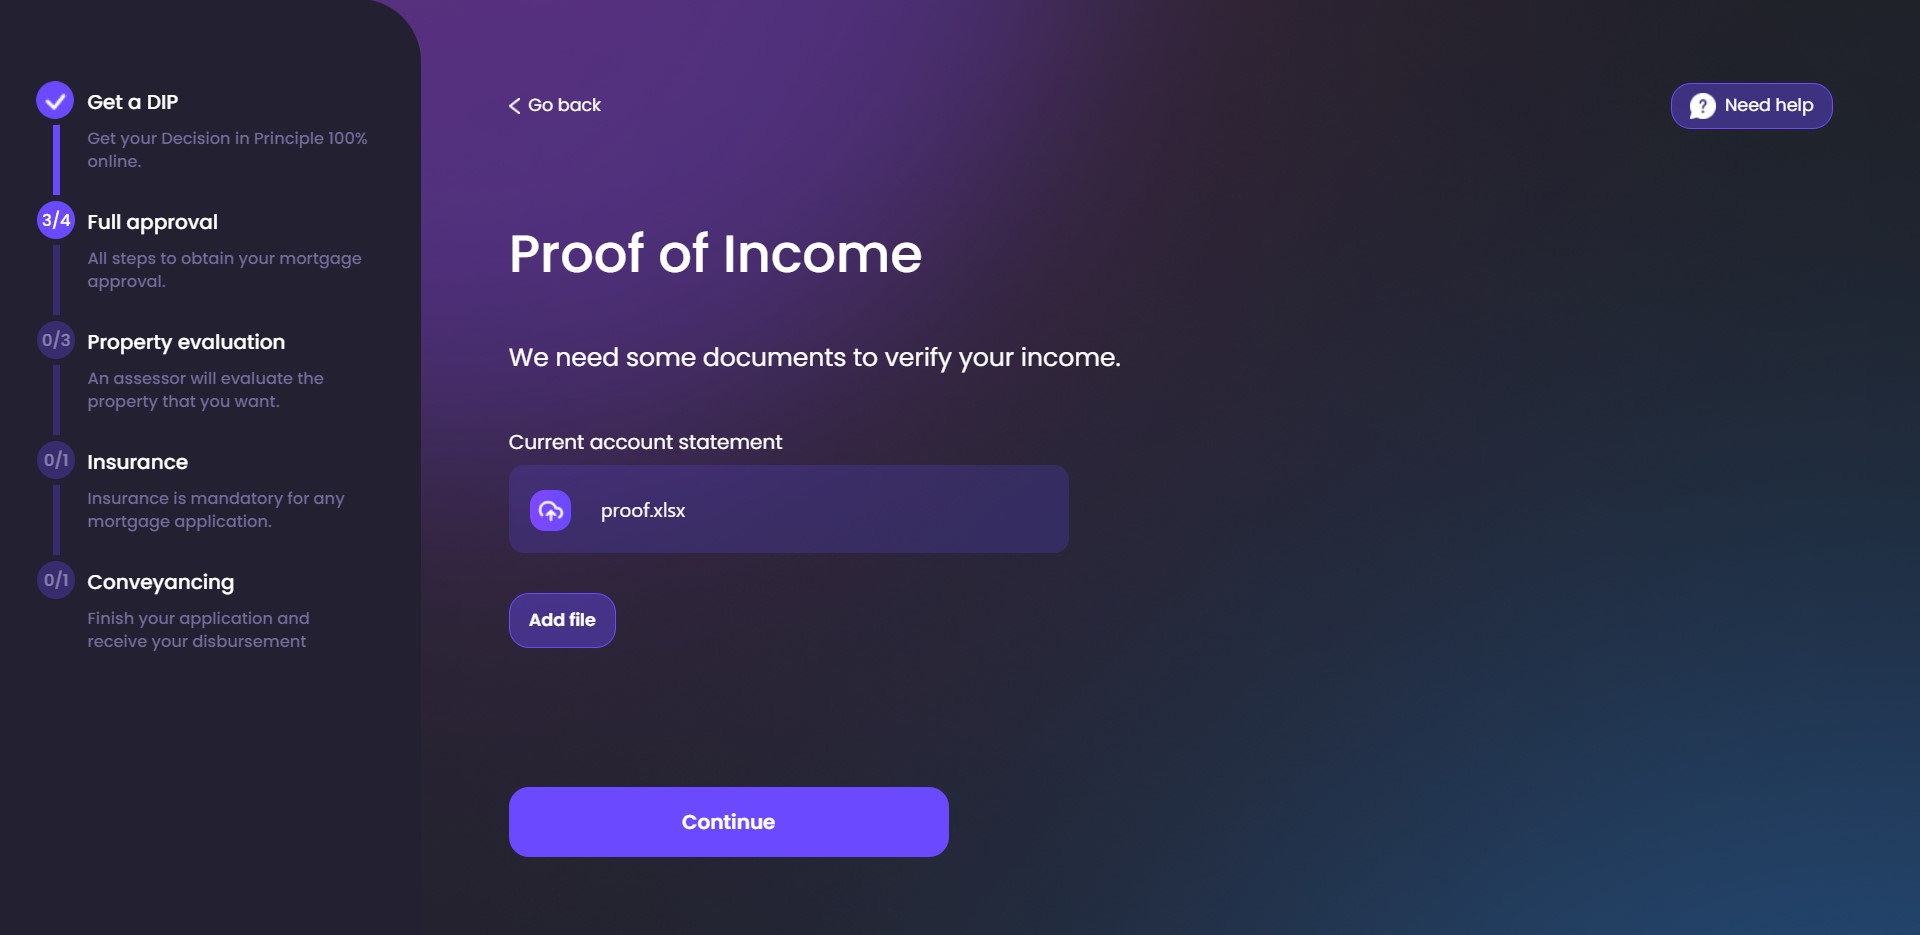
After the selection is made, the Continue button is available. The step refreshes the page with the fields for the documents selected previously to be added. You can add multiple documents for a single category.
Click Select to add the document from the local drive. Click Add file to upload more documents. When all the documents were added, click Continue to display the Formal Approval page.
Proof of Expenditures
This step verifies the spendings you have. This validation is needed by the financial institution. This is done using the open banking![]() Open banking connects banks, third-parties and technical providers to securely exchange data. integration with Credit Kudos
Open banking connects banks, third-parties and technical providers to securely exchange data. integration with Credit Kudos![]() Credit Kudos’ products enable businesses to leverage Open Banking to enhance affordability and risk assessments. The products help lenders streamline underwriting, improve accuracy in decision-making, and support customers after acquisition through our engagement tools.. FintechOS recommends using Credit Kudos, but any other third-party platform with APIs can be used.
Credit Kudos’ products enable businesses to leverage Open Banking to enhance affordability and risk assessments. The products help lenders streamline underwriting, improve accuracy in decision-making, and support customers after acquisition through our engagement tools.. FintechOS recommends using Credit Kudos, but any other third-party platform with APIs can be used.
Upload Manually the Documents
- You must select at least one document from the list and upload it: Ongoing loan documents or Other recurring expenditures.NOTE
In the flow FTOS_BNKAP_ProofOfExpenditures > Advanced > After Events, the processor settings Mortgage_DocumentType is called. - Tick the checkbox for the document(s) you wish to upload.
If you do not select any type of document, and click Continue a toast message is displayed informing you that you need to select at least one document.
- Click the Continue button. If you do not have expenditures to add, click I don't have anything to declare to proceed directly to the Formal Approval page.
Additionally, the documents that prove the expenditures can be uploaded from the local drive without the use of open banking.
- Click Select to add from the local drive the document.
- Click Add file to upload more documents.
- When all the documents were added, click Continue to arrive at the Formal Approval page.
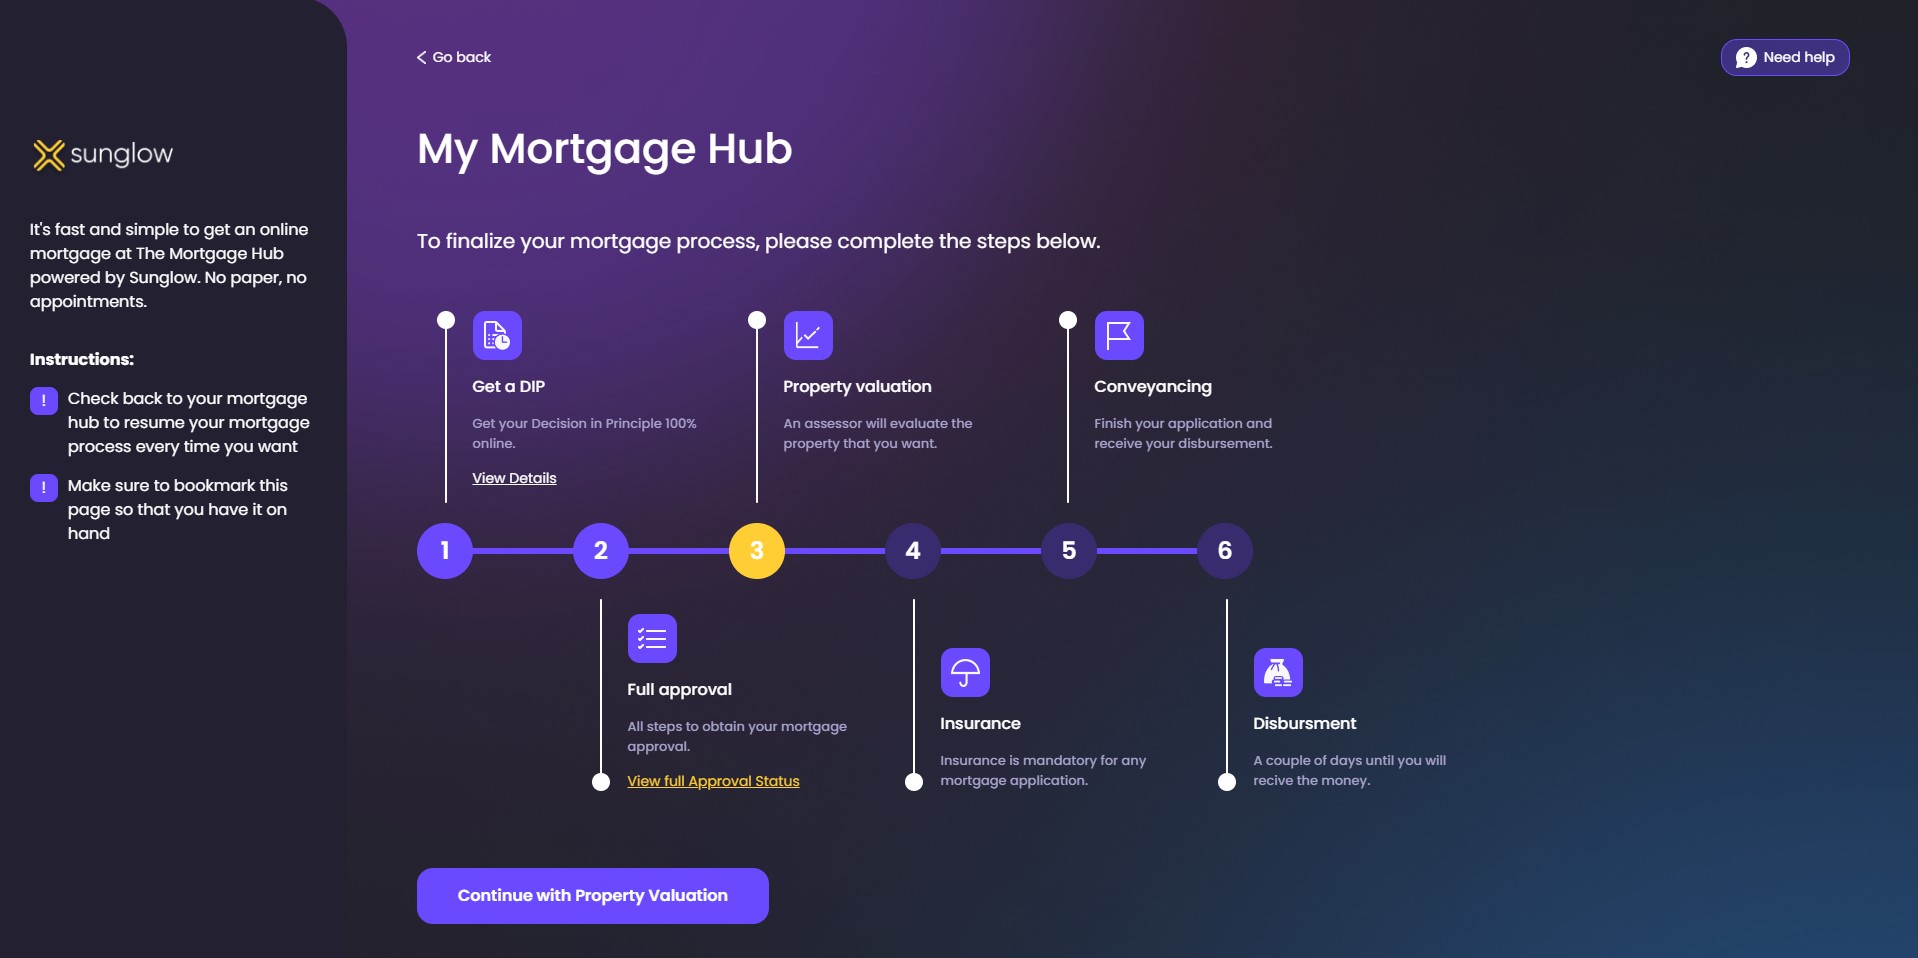
Reaching the Formal Approval Page
When all the steps are completed, the flow redirects you to the Formal Approval page. Click Save & Continue from the Formal Approval page to continue to My Mortgage Hub.
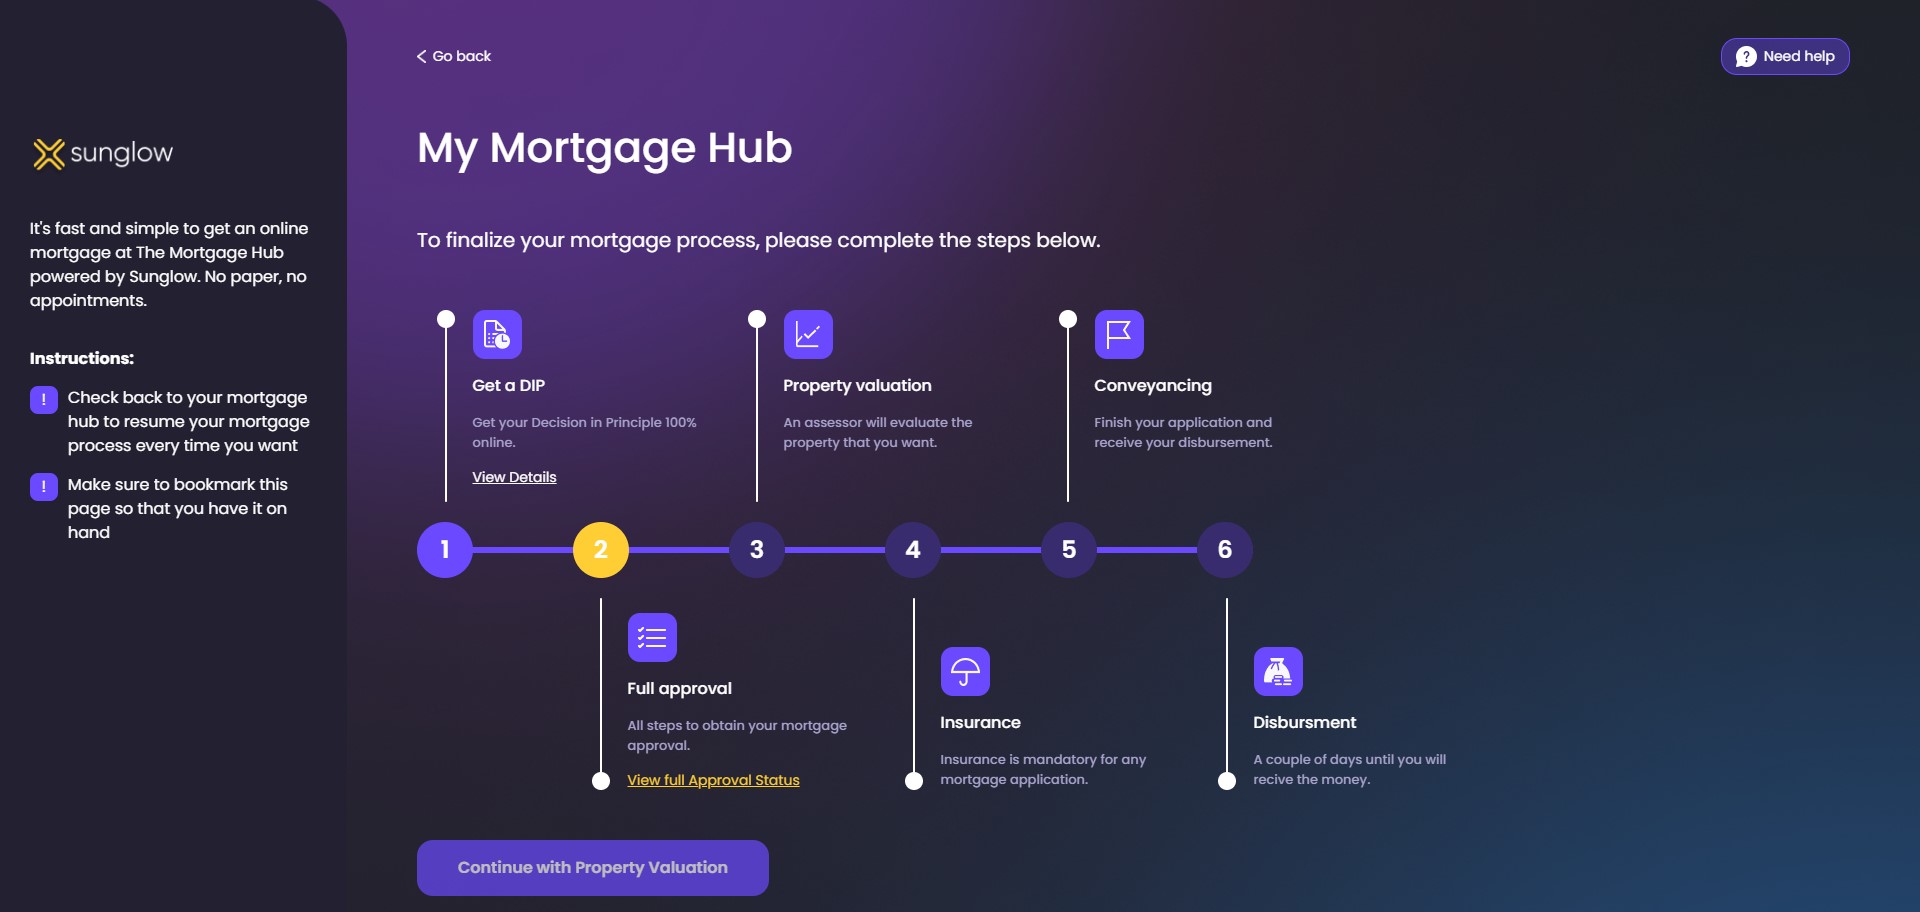
From My Mortgage Hub, click View full Approval Status to display the status page of your mortgage request.
Click Back to My Mortgage Hub to return to the previous step.
Full Approval Co-Applicant Status
If the application has a co-applicant as well, this page is displayed to inform the main applicant the status of the other applicant. The yellow color represents the fact that the co-applicant did not finish the progress. Once the circle becomes green, you can continue the flow. Otherwise, you must wait for them to complete their journey.
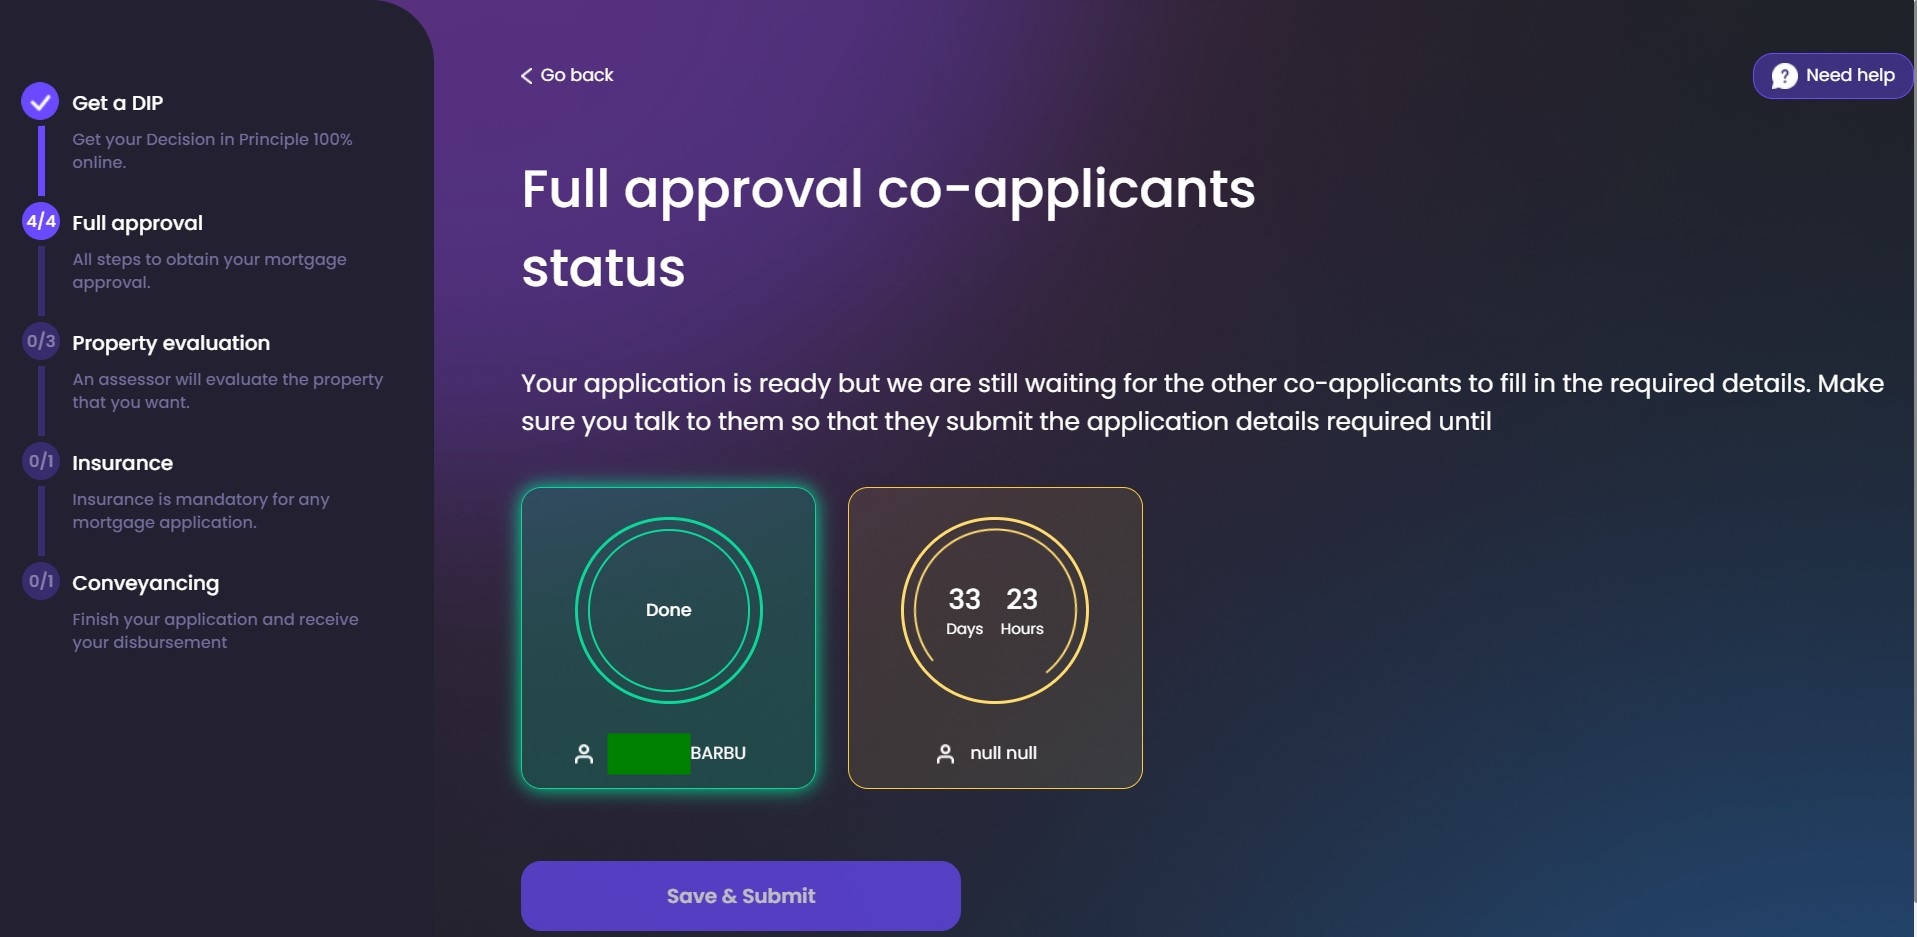

Once the co-applicant finished adding their ID card and selfie, proof of address, income, and expenditure, you can click Save &Submit.
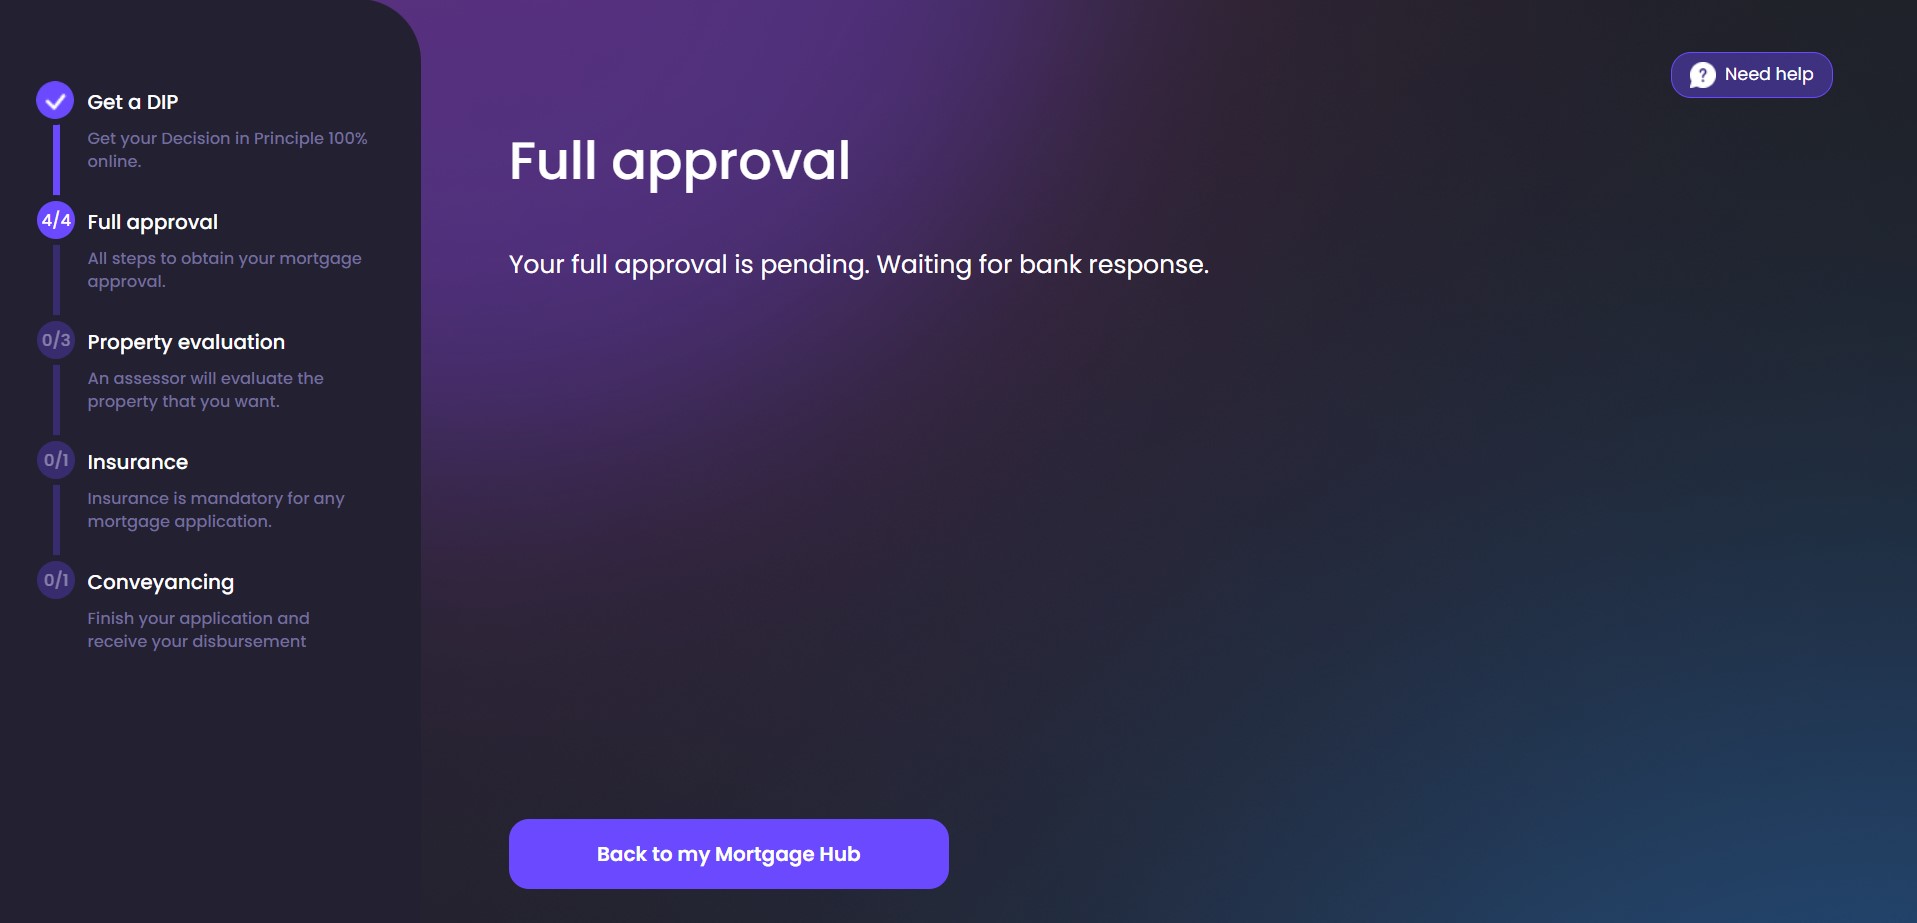
Submitting Your Request
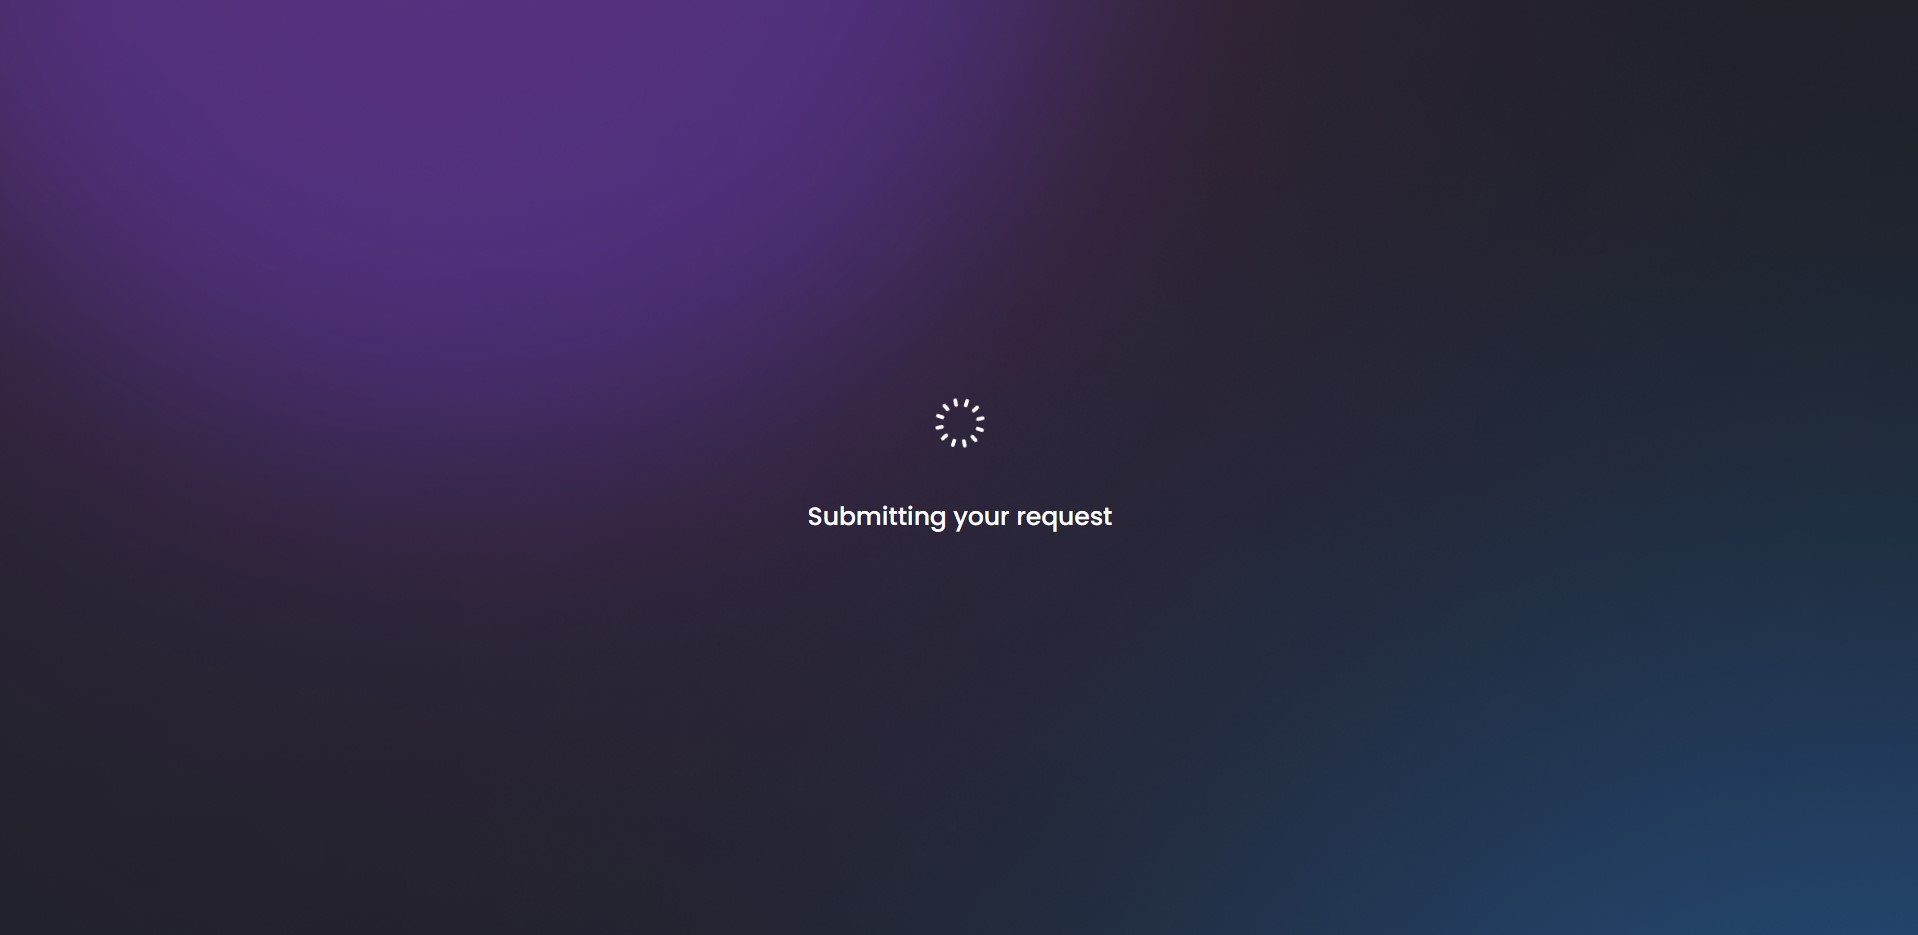
A loading page is displayed while the system runs the Loan Underwriting steps.
Formal Approval Passed
If the approval and the automatic loan underwriting are passed, you return to the My Mortgage Hub.
Once the manual underwriting process is passed, where the bank employee approves your mortgage request in the back-office dashboard, you can access the property details page by clicking Continue with Property Valuation on the page My Mortgage Hub.
More Documents Needed
The bank employee can ask you to upload more documents to fully evaluate your mortgage request. they can add the names of the documents or add questions to which you must answer. An email is sent to you with the requirement to upload more documents or complete some information.
This page displays the name(s) of the document(s) needed. To add a document, click Upload. If the file was uploaded successfully, a green checkmark is displayed. Once inserted into the system, you can delete the wrong file that was uploaded. If the bank needs you to answer questions, this page displays the question and the textbox where to write your answer.
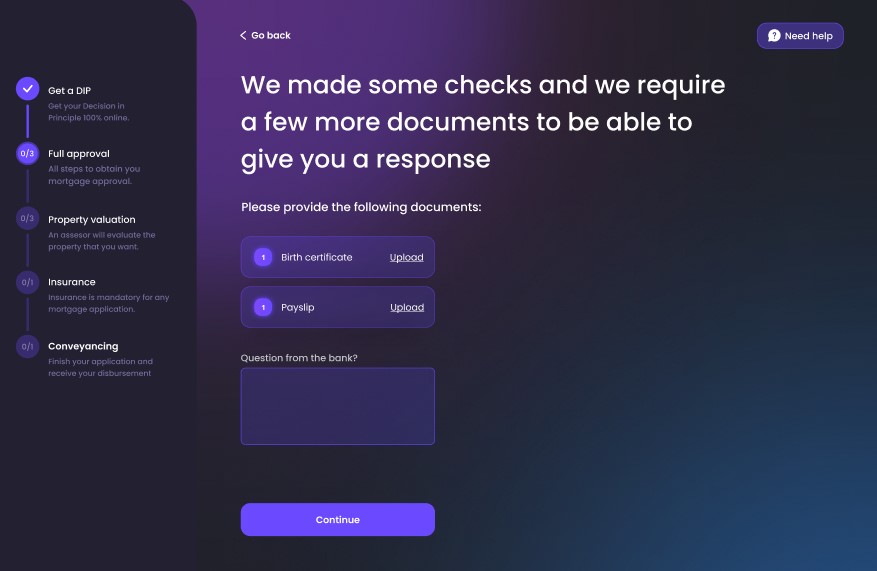
In the form driven flow FTOS_BNKAP_UploadMortgageDocs > step UploadMortgageDocs > After Events, the scripts FTOS_BNKAP_GetApplicantSelectedDocuments and FTOS_BNKAP_LoadUWQuestions and FTOS_BNKAP_SaveUWQuestion are called.
When you are done, click Continue. You cannot proceed without the documents/answers to questions filled in.
In the form driven flow FTOS_BNKAP_UploadMortgageDocs > step UploadMortgageDocs > After Section Save, the scripts FTOS_BARET_ChangeApplicationStatusMortgage and FTOS_BARET_NotifyMortgageUW are called.
The back-office employee receives an email with the application ID to review the documents/answers.
Rejection
The page Unfortunately, we are not able to approve your request for a mortgage is displayed to those applicants that do not qualify for the mortgage. The page displays a list of branches the bank has if you wish to contact the bank. There is a map incorporated with pins. Click on a pin and the address of the bank branch is highlighted.
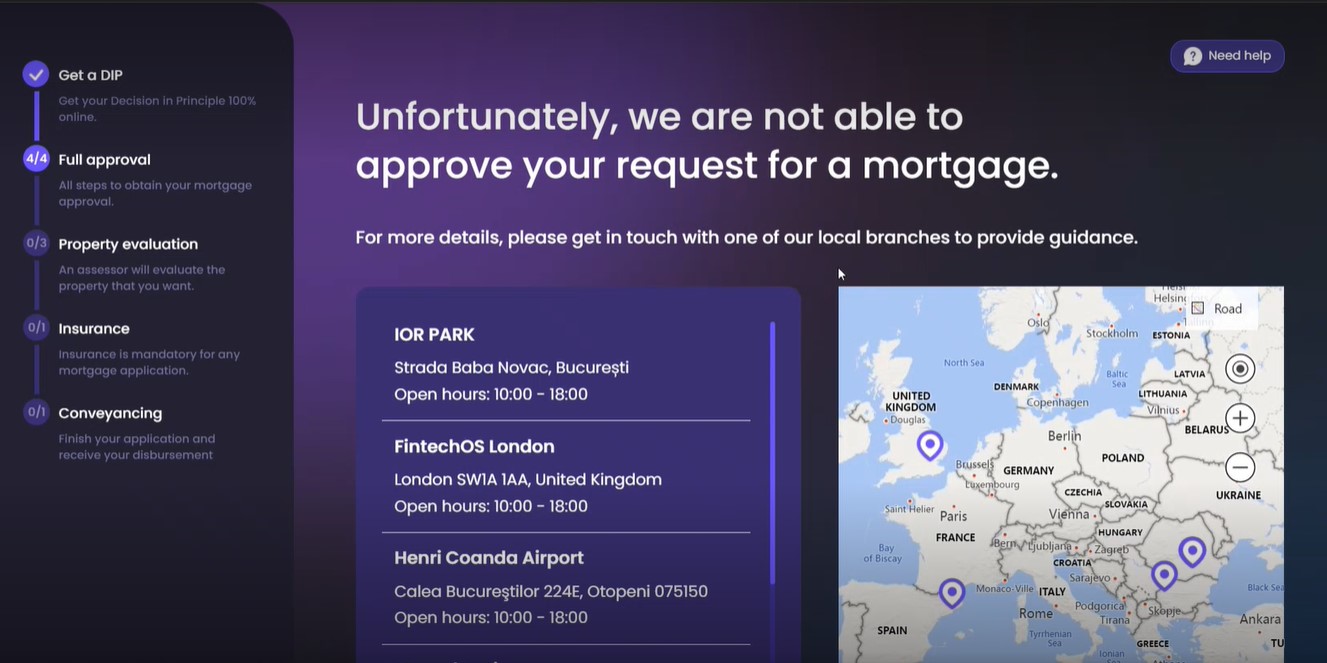
You can scroll the list with the branches and click Show all locations to view the entire list. The list shows the name of the branch, the address, and the office hours.
Click Go Home to access the Welcome page.