Create a First Notification of Loss
The Core Claims Admin solution for registering a new claim record starts from the First Notification of Loss (FNOL) page. You must log into the FintechOS Portal, go to the main menu on the left side of the screen, select the Core Claims Admin solution and double-click to open it. After launching the new solution, use the FNOL menu to insert information about the policy, the notifier, the people involved, and upload the requested documents.
Register a new FNOL record using the following steps:
Inside the Core Claims Admin window, select First Notification of Loss.
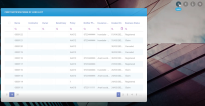
The FNOL List page is displayed. Click Insert to add the a new FNOL for a policy.
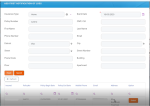
Fill in the following general information:
| Field | Description |
|---|---|
| Name | It is the first notification of loss number. |
| Contractor | It is the notifier's name. |
| Owner | It is the owner of the policy. |
| Beneficiary | It is the person who benefits of the money. |
| Policy | It is the policy number. |
| Notifier Phone | It is the phone number of the person to call. |
| Insurance risk | It is the risk from the policy . |
| Created on | The date when the FNOL was made. |
| Business Status | It is the status the FNOL has. |
In addition, complete the fields with the details about the policy.
| Filed | Type | Description |
|---|---|---|
| Insurance Type | Option set | It is the type of insurance for which the FNOL is opened. |
| Policy Number | Text | It is the policy number. |
| First Name | Text | it is the first name of the owner. |
| Phone Number | Text | It is the contact number. |
| District | Text | It is the district where the asset is located. |
| Street | Text | It is the street where the asset is located. |
| Postal Code | Text | It is the postal code where the asset is located. |
| Floor | Text | It is the floor where the asset is located. |
| Event Date | Date | The Event Date field is mandatory. |
| CNP/ CUI | Text | It is a unique number for fiscal enrollment (CUI). |
| Last Name | Text | It is the last name of the owner. |
| Text | It is the email of the owner. | |
| City | Text | It is the city where the asset is located. |
| Street Number | Text | It is the street number where the asset is located. |
| Building | Text | It is the building where the asset is located. |
| Apartment | Text | It is the apartment where the asset is located. |
Click Search to display the existing policies based on the parameters from fields that you previously filled in.
After clicking Search, you see a list of policies matching the data you introduced in the previous step. From this list choose the policy that you want to process and click Select. The next two tabs of the FNOL become available - Notify and Event.
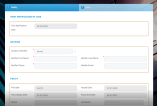
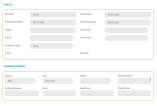
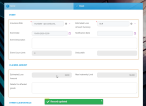
Go to the Notify tab and click on it. The Notify window is displayed. Here you find the following sections: First Notification of Loss, Notifier, Policy and Insured Address.
Check if there are any empty fields and complete those.
In the Notify tab, if you select the Insured option in the Quality of Notifier field, all the other Notifier fields become populated with data extracted from the policy. Also, the fields in the Policy section become automatically populated with the information extracted from the policy.
Here is a description of the four tables in the Notify tab:
| Field | Type | Description |
|---|---|---|
| FIRST NOTIFICATION OF LOSS | ||
| First Notification Id | Text | It is read-only. |
| First Notification Date | Date | It is read-only. |
| NOTIFIER | ||
| Quality of Notifier | Option set | It is the role of the person who notified the FNOF. |
| Notifier First Name | Text | It is the name of the notifier. |
| Notifier Phone | Text | It is the notifier's phone number. |
| Request Number | Text | |
| Notifier Last Name | Text | It is the notifier's name. |
| Notifier Email | Text | It is the notifier'snumber. |
| POLICY | ||
| PolicyNo | Text | It is read-only. |
| Policy Begin Date | Text | It is read-only. |
| Status | Text | |
| Owner | Text | It is read-only. |
| Insurance Type | Text | It is read-only. |
| Policy | ||
| Issued Date | Text | It is read-only. |
| Policy End Date | Text | It is read-only. |
| Contractor | Text | It is read-only. |
| Beneficiary | Text | It is read-only. |
| Wording | ||
| INSURED ADDRESS | ||
| District | Text | It is read-only. |
| City | Text | It is read-only. |
| Street | Text | It is read-only. |
| Street Number | Text | It is read-only. |
| Building Number | Text | It is read-only. |
| Floor | Text | It is read-only. |
| Apartment | Text | It is read-only. |
| Postal Code | Text | It is read-only. |
Click Save and reload and proceed to the next tab.
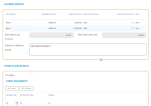
Click the Event tab. The Event window is displayed with the following sections: Event, Claimed Amount and Other Claim Details.
Check if there are any empty fields and complete those.
Below is a description of the three tables in the Event tab:
| Field | Type | Description |
|---|---|---|
| Event | ||
| Insurance Risk | Option Set | Depending on the type of policy, the risks for each individual policy is shown. |
| Event Date | Date Time | It is the date of the event. |
| Event Description | Text Area | Here the operator can describe the event. |
| Event Count Limit | Whole number | It is the maximum number of risks the policy has. It is read-only. |
|
Estimated Loss Amount Currency |
Option Set | It is the currency. |
| Notification Date | Date | The date when the notification was made. |
| Deductible | Number | The deductible is the amount the client pays out of pocket in case of damage. |
| Claimed Amount | ||
| Claimed Amount | Number | It is the amount of money the beneficiary wants. |
| Estimated Loss Amount | Number | It is the maximum amount of money the beneficiary can be given. |
| Estimated Loss | Number | It is the total amount of money the beneficiary wants. |
| Max Indemnity Limit | Number | It is the maximum amount of money to be given. |
| Details for affected goods | Text area | It is the description of the state of the goods. |
| Other Claim Details | ||
| TP Liable | Bool | Third-party liability. |
| TP Liable Known | Bool | Check the box if the Third-party liability is known by the notifier. |
| Event Documents | You can attach documents sent by the notifier. It opens a new table. | |
| Additional Comments | Text Area | For any details regarding the event. |
In the Claimed Amount table, click View to open the pop-up table for the Claimed Risk.
Here is a description of the Claimed Risk view:
| Field | Type | Description |
|---|---|---|
| Claim | Option Set | It is read only. |
| Policy Insured Risk | Option Set | It is read only. |
| Claimed Amount | Number | It is read only. |
| Claimed Currency | Option Set | It is read only. |
| Current Count Limit | Number | It is read only. |
| Current Value Limit | Number | It is read only. |
| Loss Amount | Number | It is read only. |
| Claim Currency | Option set | It is read only. |
| Indemnity Amount | Number | It is read only. |
| Indemnity Currency | Number | It is read only. |
| Indemnity Limit | Number | It is read only. |
| Risk Currency | Option Set | It is read only. |
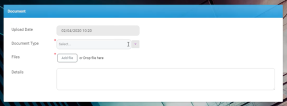
In the Other Claim Details table, click to upload the necessary documents.
After upload, two buttons become active: Create Claim and Cancel Notification.
