Create a Claim
FintechOS Core Claims Admin can be configured anytime after the FNOL is initiated. Go to the FNOL list page and select the desired FNOL. Go to View Claim to open the Core Claims Admin wizard and create a new claim record. The wizard has eight steps to help you complete the processing of the claim. Proceed with the tabs from left to right, in the following order:
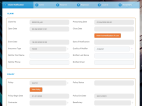
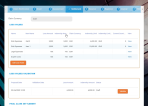
Go to the Claim Notification tab and click it. The Claim Notification window is displayed with the following sections: Claim, Policy and Status.
Check if there are any empty fields and complete those.
Below is a description of the three tables in the Claim Notification tab:
| Field | Type | Description |
|---|---|---|
| Claim No | Text | It is read-only. |
| Open Date | Date time | It is read-only. |
| Event Date | Date Time | It is read-only. |
| Insurance Type | Option set | It is read-only. |
| Notifier First Name | Text | It is read-only. |
| Notifier Phone | Number | It is read-only. |
| Prescribing Date | Date Time | It is read-only. |
| Close Date | Date Time | It is read-only. |
| View First Notification Of Loss | It opens the FNOL. | |
| Date of Notification | Date time | It is read-only. |
| Quality of Notifier | Option Set | It is read-only. |
| Notifier Last Name | Text | It is read-only. |
| Notifier Email | Text | It is read-only. |
| Field | Type | Description |
|---|---|---|
| Policy | Option set | It is read-only. |
| Policy Begin Date | Date | It is read-only. |
| Contractor | Option set | It is read-only. |
| Account Insured | Number | |
| Policy | Look up | |
| Policy Status | Look up | It is read-only. |
| Policy End Date | Date | It is read-only. |
| Beneficiary | Option set | It is read-only. |
| Owner | Option set | It is read-only. |
| Wording | File |
| Field | Type | Description |
|---|---|---|
| Loss Value | Number | It is read-only. |
| Payments | Number | It is read-only. |
| Reserves | Number | It is read-only. |
| User | Option set | It is read-only. It is the account with which the user logged into the Portal. |
Click Save and reload and proceed to the next tab.
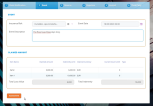
Click the Event tab. The Event window is displayed. Here you find the following sections: Event and Claimed Amount .
Check if there are any empty fields and complete those.
Below is a description of the two tables in the Event tab:
| Field | Type | Description |
|---|---|---|
| Insurance Risk | Option set | It is read-only. |
| Event Date | Date time | It is read-only. |
| Event Description | Text Area | You can add more details here. |
| Field | Type | Description |
|---|---|---|
| Total Loss Value | Number | It is read-only. |
| Total Indemnity | Number | It is read-only. |
Click Assessment and proceed to the next tab.
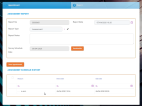
Click the Assessment tab. The Assessment window is displayed.
Click Insert to open a new assessment page.
Below you find the following sections: Assessment Report and Assessment Schedule .
Check if there are any empty fields and complete those.
Below is a description of the two tables in the Assessment tab:
| Field | Type | Description |
|---|---|---|
| Report No | Text | The number of the registered report. It is obtained using sequencer functionality. |
| Report Date | Date time | It is the time when the report is done. |
| Report Type | Option set |
It is the type of assessment. It can take the following values: Assessment or Self-Assessment. |
| Report Notes | Text area | Provide details that help asses the event. |
| Survey Schedule Date | Date time | It is mandatory to be filled in. It is the time when the assessment was done. |
When you click Save Appointment, the appointment history becomes visible underneath.
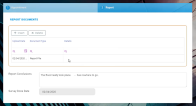
On the Reportsection click Insert to upload the assessment report. If ever necessary, you can also erase a report, by pressing Delete.
When you click Insert, a new table becomes visible.
| Field | Type | Description |
|---|---|---|
| Upload Date | Date time | It is read-only. It is automatically filled. |
| Document Type | Option set |
It is mandatory. You can opt for uploading: Other Documents, Pictures, Report files or Invoices. |
| Files | Add the file here. | |
| Details | Text area | Describe if necessary. |
Click Save and close. The Report Conclusions and Survey Done Date fields become visible.
Complete the conclusions and the date.
Click Close report, click Save and close and then click Settlement to move to the next tab.
Click the Settlement tab. The Settlement window is displayed with the following sections: Loss Values, Loss Values Validation and Final Claim Settlement.
Click Add Loss Value. The page loads again and you can insert the values. Choose the currency with which to pay the policy holder. Also, insert the amount of money for each item that the policy holder makes a claim for.
In the Loss Values Validation section, click Validate to launch the request for validation from a Core Claims Admin super user.
In the Final Claim Settlement section, click Insert to upload more files, when needed. You can upload the following types of files:
-
Repair Quote
-
Ownership Documents
-
Other Documents
-
Event Pictures
-
Payment
-
Invoices
-
Authorities Documents
-
ID Copy
After this step, click Risk Covered if you need to view the covered risk.
Click Save and reload and then click Reserve to go to the next tab.
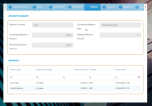
When you click Reserve, the Reserve window is displayed with the following sections: Reserve Summary and Reserves.
Below is a description of the two tables in the Reserve tab:
| Field | Type | Description |
|---|---|---|
| Reserve Currency | Option Set | It is read-only. It is the currency of the reserve. |
| Constituted Reserve Amount | Number | It is read-only. |
| Remaining Reserve Amount | Number | It is read-only. |
| Constituted Reserve Date | Date time | It is read-only. |
| Released Reserve Amount | Number | It is read-only. |
| Field | Type | Description |
|---|---|---|
| Claim | Lookup | Read-only. The ID of the claim. |
| Reserve Date | Date time | Read-only. The date when the reserved amount is processed. |
| Reserve Type | Option Set | Read-only. The type of reserve agreed for the policy. |
| Reserve Value Type | Option Set | Read-only. |
| Currency | Lookup | Read-only. The currency of the reserve. |
The next step of the Core Claims Admin digital journey is to create a Payment Proposal. Click Payment.
