Business Rules
To create a rule:
- Access the FintechOS Studio main menu, select Fintech automation, select Business Workflow and then, Business Rules.
- Click the Insert button.
- Fill in the following fields:
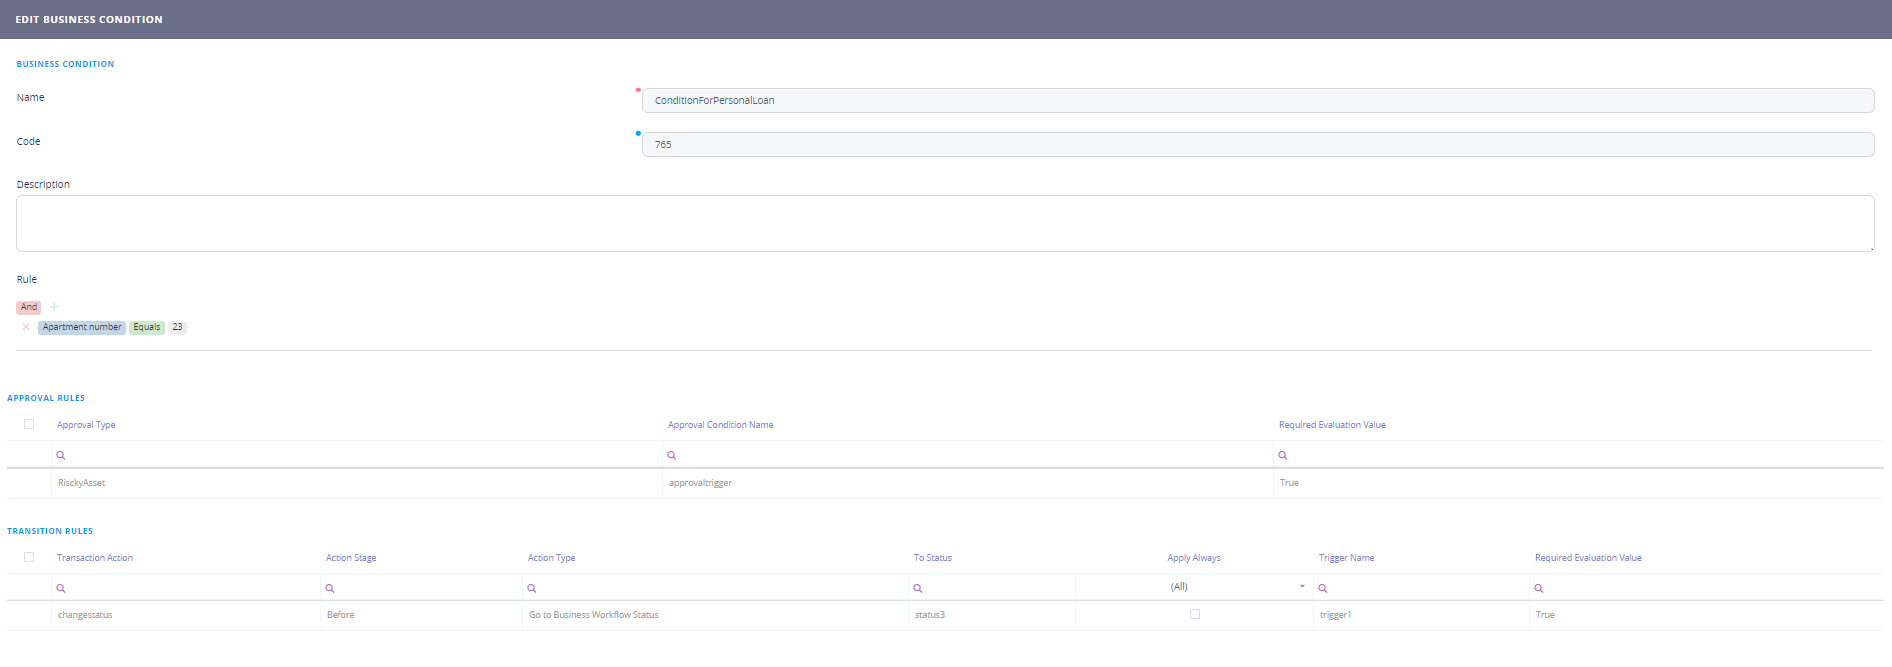
Field Required Description Name Yes Insert a suggestive name. Code No Insert a unique code for the rule. Description No Insert a description for it. Rule No Configure the proper rule. Define rule expression uses the logical operators:
- And
- Or
- Not and
- Not or (XOR)
When adding a condition, it is possible to add a Checking with Custom Processor as well.
When adding a condition, first select the attribute on which the condition will apply.
IMPORTANT!
It is not possible to create a condition with virtual attributes added using the data model extension.For some attributes if you click on the little black arrow on the left of the attribute itself it will open a new set of options such as:
- minutes since
- minutes until
- hours since
- hours until
- days since
- days until
- day of
- weekdays of
- days until anniversary
- has anniversary today
- months since
- months until
- month of
- years since
- years until
- year of
- date of
The following choice is to select the rule. Based on the type of attribute a set of possible rules will be shown:
- contains
- does not contain
- starts with
- ends with
- equals
- does not equal
- is blank
- is not blank
- equals
- does not equal
- is less than
- is greater than
- is less than or equal to
- is greater than or equal to
- is blank
- is not blank
- is in between
or
For attributes such as ''user'' it is possible to set:
- equals
- does not equal
- is blank
- is not blank
- is in Persona
- is not in Persona ( see Customer Persona)
- is in Audience ( see Audience management)
- is not in Audience
- Business condition is fulfilled
- Business condition is not fulfilled After selecting the two fields enter a value. For example, add a condition for the age of a client to be greater than 18 years old.
- Click the Save and reload button.
- The Approval Rules and the Transition Rules will appear. Click on each to open their grid.
 HINT
HINT
The Approval Rule opens the EDIT APPROVAL TRIGGER page. See Define Workflow Transition ApprovalsHINT
The transition rule opens the EDIT ACTION TRIGGER page. See Edit Workflow Transition Configuration.Both grids will display the two triggers added after the creation of the Business Condition. To modify one, double click on it and the Edit approval trigger or the Edit action trigger page will open.