Transaction Type
Any transfer of funds between two bank accounts is recorded as a transaction. There are different types of transactions used in the financial world.
The transaction types are associated with banking products within the Associated Transactions tab during product definition, either automatically or manually. The Transaction Type menu holds the accounting model and the item configuration. It is used for inserting the financial data transactions.
For using transaction types in conjunction with Core Banking, see Transaction Types Used in Core Banking.
You can insert, update, or delete records if you have the associated role of Banking Product Admin.
To manage transaction types, follow these steps:
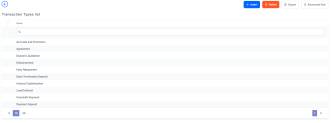
- In the main menu, click Product Factory > Banking Product Dictionaries > Transaction Type, and the Transaction Types List page opens.
-
On the Transaction Types List page, you can add a new transaction type record or search, edit, and delete existing ones.
Creating Transaction Types
-
To create a new transaction type, click the Insert button on the Transaction Types List page.
-
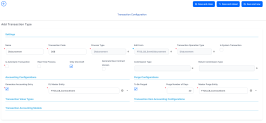
In the Add Transaction Type > Settings section, fill in the following fields:
-
Name: Enter the name of the transaction type.
-
Transaction Code: Enter the code of the transaction type.
-
Process Type: This field associates the process type with the transaction operation type, which makes the connection with the transaction motor of bank accounts. Select one of the processes defined within the system.
NOTE
There is no integration at this point with a payment gateway. -
Edit Form: The form used to edit this transaction type. The lookup only shows forms defined on the Contract Event entity.
-
Transaction Operation Type: The transaction operation type makes the connection with the transaction motor of bank accounts. Select one of the transaction operation types defined within the system.
-
Is System Transaction: This checkbox marks the transaction as being neither a credit of the account, nor an allocation of funds, but a transaction that does not influence other transactions within the account. System transactions are meant to be used only for accounting. It is used when there's a need for a transaction for the sole purpose of generating accounting entries (accruals, provisions).
-
Is Automatic Transaction: This checkbox marks the transaction as automatic. If selected here, then you cannot select it within the contract operations.
IMPORTANT!
If a transaction type is marked as an automatic transaction (Is Automatic Transaction = True), then that transaction type cannot be selected in the Events page when closing contract events. -
Real Time Process: This checkbox marks the transaction as being processed in real-time. If you select the checkbox, then the transaction is processed right away. If you don't select it, then the transaction is inserted as a bank account transaction queue record.
-
Only One Draft: If you select this checkbox, there can be only one record of this transaction type in
Draftstatus created at the contract level. -
Generate New Contract Version: This checkbox allows you to specify if a new contract version should be generated by this transaction type.
-
Commission Type: Select the commission type applicable for this transaction type. Return fee commissions are filtered out and can't be selected.
-
Return Commission Type: The return fee commission type applicable for this transaction type. Only return fee commissions can be selected.
-
Is Clawback Transaction: If selected, this checkbox marks the transaction as generating a clawback commission. The transaction type is to be used in third-party management invoicing activities. Default value:
False.
-
-
In the Add Transaction Type > Accounting Configurations section, fill in the following fields:
-
Generates Accounting Entry: Select this checkbox to create an entry in the Operational Ledger. It generates records in the
Accounting Entryentity. -
OL Master Entity: Select the entity referenced by the accounting systems.
-
-
In the Add Transaction Type > Purge Configurations section, fill in the following fields:
-
To Be Purged: This checkbox marks the transaction as purgeable. If selected, it allows you to purge or archive records in
Draftstatus. -
Purge Number of Days: Enter the default number of calendar days that a record can be kept in
Draftstatus before it is purged. For additional information, see the Core Banking System Parameters page. This field is displayed only whenTo Be Purged = True. -
Master Purge Entity: Select the master purge entity under which the draft records are. This field is displayed only when
To Be Purged = True.
-
-
Click the Save and reload button.
If a transaction type is marked to automatically generate accounting entries (
Generates Accounting Entry = True), then the following sections are displayed: Transaction Value Type, Transaction Item Accounting Configuration, and Transaction Accounting Models.Transaction value types are defined as header items or detail items. Header items are the general details of a transaction (for example date, customer, currency, and so on). The detail items are grouped into numeric or text information.
In this section, you can create and determine the values calculated for each transaction. The additional data from here is used in the Transaction Accounting Models section.
To add a new transaction value type, click the Insert button under the Transaction Value Type section. The Add Transaction Value Type page opens.
Fill in the following fields:
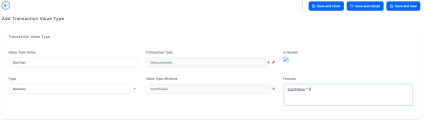
Value Type Name: Enter the name of the value type.
Transaction Type: Select the transaction value type.
Type: Select the type of the transaction. The following options are available: Numeric or Text.
Value Type Attribute: Select the value of a specific attribute from the source entity. It is a list of all the attributes defined in the SourceEntityId field from the
FTOS_GL_TransactionTypeentity.Is Header: When selected, it defines the header items of the transaction.
Formula: Supports only basic math operations: addition (+), subtraction (-), multiplication (*), and division (/). Input a specific formula based on the Value Type Attribute chosen.
Click the Save and close button.
When a transaction value type is marked as a header item, (Is Header = True), the transaction values are set into the attribute values of the Operation Transaction entity. If the Value Type Name field is not an attribute of that entity, then an error is displayed.
A JSON file with default values is sent when using the function for setting the operation transaction values. The JSON file has the following form:
[
  {
    attributeName: 'DescriptionText',
    value: 'Disburse 1500'
   },
   {
    attributeName: 'ProvisionAmount',
    value: '15.00'
   }
]
The JSON file checks if there is any default value for the attributeName, from the Value Type Name field. If no values are returned, the Formula field is checked. When neither field returned any values, the source entity of the attribute from the Value Type Attribute field is checked.
The Transaction Item Accounting Configuration section holds the configuration of each transaction. It helps define an account from the Accounting Chart.
This section holds the configuration for an item with the respective chart account. It represents the listing of the names of the accounts for the company inserted in the Legal Entity menu.
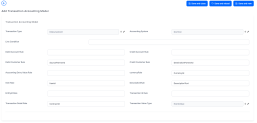
To add a new transaction item accounting configuration, click the Insert button under the Transaction Item Accounting Configuration section. The Add Transaction Item Accounting Config page opens.
Fill in the following fields:

Accounting System: Select the accounting system.
Accounting Scope: Select the accounting scope.
Chart Account: Select the accounting chart.
Operational Item: Select the item of operations.
Currency: Select the currency of the accounting entry line.
Take From Product: If selected, then the configurations for each transaction are inherited from the banking product level.
Click the Save and close button.
This section holds the accounting models, all the rules used in order to generate accounting entries for each transaction.
The details from the Debit Account Rule and the Credit Account Rule are defined by the information from the Transaction Item Accounting Configuration section. All other details are defined by the information from the Transaction Value Type section.
To add a new transaction accounting model, click the Insert button under the Transaction Accounting Models section. The Add Transaction Accounting Model page opens.
Fill in the following fields:
Transaction Type: The transaction type. It is auto-filled.
Accounting System: The accounting system.
Line Condition: Enter the condition applied in order to post the accounting entry line.
Debit Account Rule: Enter the accounting entry value of the debit account. It is auto-filled.
Debit Customer Rule: Enter the rule to save the partner transaction in the debit-credit relationship. It is auto-filled.
Accounting Entry Value Rule: Enter the posted accounting entry value.
Item Rule: The transaction item of the accounting entry line. It is auto-filled.
EntityId Rule: Enter the internal status of the record.
Transaction Detail Rule: Enter the rule to identify and post the ID of the operational transaction detail.
Credit Account Rule: Enter the credit account of the accounting entry line. It is auto-filled.
Credit Customer Rule: It is auto-filled by the destination partner ID.
currencyRule: The accounting entry line currency. It is auto-filled.
DescriptionRule: The description of the generated accounting entry. It is auto-filled.
Transaction Id Rule: Enter the related contract ID of the transaction.
Transaction Value Type: Select the value type of the transaction. It is defined in the Transaction Value Type section.
Click the Save and close button.