Vonage
Capability: Notifications
Market: US, UK, CEE
SMS for client communications. Includes Verify Service (multi-channel OTP).
Environments
UAT: https://dci-uat.ondisplayftos.com
PROD: https://dci.fintechos.com
Exposed Endpoints
SendSms
https://<env>/dcs/message3/sendSms
 Request
{
  "Body": "string",
  "ToAddress": "string",
  "FromAddress": "string",
  "CorrelationId": "string"
}{
"IsSuccess": true,
"ErrorMessage": "string",
"ExternalErrorMessage": "string",
"ExternalErrorCode": "string",
"CorrelationId": "string",
"Status": 2,
"ExternalId": "string",
"ProviderStatusCode": "string",
"ProviderErrorDetail": "string",
"FragmentMessages": [
{
"CorrelationId": "string",
"ProviderStatusCode": "string",
"ProviderErrorDetail": "string",
"ExternalId": "string",
"Status": 2
}
]
}
SendOcbSms
https://<env>/dcs/message3/sendOCBSms
Request
[{
    "FromAddress":"CityHall", //Sender address
    "ToAddress":"+<country_code><phone_number>", //Receiver addess
    "Subject":"salut", //Subject of the sms
    "Body":"helloo", //Body of the sms
    "CorrelationId":"0aa0aa0a-0000-000a-0a0a-0aaaa0aaaa00" //Id from FintechOS, not mandatory
}]{
"EmailStatuses": [
{
"CorrelationId": "0aa0aa0a-0000-000a-0a0a-0aaaa0aaaa00", //ID sent in the initial request
"StatusCode": 200, //Status of the sms sending as received from Vonage
"ErrorMsg": null, //Error field populated with error string, in case of error
"ExternalId": "101111000000" //Unique id given by Vonage
}
],
"IsSuccess": true,
"ErrorMessage": null
}
CreateVerification
https://<env>/dcs/message3/createVerification
Request
{
  "locale": "string",
  "channel_timeout": 0,
  "client_ref": "string",
  "code_length": 0,
  "code": "string",
  "brand": "string",
  "workflow": [   //Vonage supports chaining/fallback multiple channels in case one is unsuccessful (ex: poor GSM coverage sms not received, fallback to email)
    {
      "channel": "sms", //sms, email, whatsapp
      "to": "string",
      "from": "string",
      "reuse_code": true
    }
  ]
}{
"isSuccess": true,
"errorMessage": "string",
"externalErrorMessage": "string",
"externalErrorCode": "string",
"request_id": "string"
}
VerifyCode
https://<env>/dcs/message3/verifyCode
Response
{
  "isSuccess": true,
  "errorMessage": "string",
  "externalErrorMessage": "string",
  "externalErrorCode": "string",
  "request_id": "string",
  "status": "string"
}
CreateVerificationStandard
https://<env>/dcs/message3/CreateVerificationStandard
Standardized REST to easily integrate with Keycloak.
Request
{
  "Channel": "sms", //sms, email, whatsapp
  "To": "string",
  "Brand": "string",
  "Locale": "string",
  "ChannelTimeout": 0,
  "CustomCode": "string"
}{
"IsSuccess": true,
"ErrorMessage": "string",
"ExternalErrorMessage": "string",
"ExternalErrorCode": "string",
"SessionId": "string"
}
VerifyCodeStandard
https://<env>/dcs/message3/VerifyCodeStandard
Standardized REST to easily integrate with Keycloak.
Response
{
  "IsSuccess": true,
  "ErrorMessage": "string",
  "ExternalErrorMessage": "string",
  "ExternalErrorCode": "string",
  "SessionId": "string",
  "Status": "string"
}
Vonage SMS
Vonage supports sending transactional SMS.
These SMS should be transactional and informational such as “your payment is due in x days” and not OTP/MFA/SMS Verification. For these cases see Vonage Verify Service (MFA/OTP) below.
There are two use cases supported by the connector:
-
SendSms (fire and forget, no delivery receipt, configuration is done in Vault)
-
SendOcbSms (uses MessageQueue and JobServer, can support delivery receipts, must configure a Channel Provider in Omnichannel Communications). This is useful when reminding end-users of the interest rate increasing or that a payment is due, thus ensuring and keeping evidence that the customer indeed received the notification. Can also be used for marketing SMS.
Send Transactional SMS directly from automation script
-
Create a ticket to Support, requesting access to Vonage SMS with no webhooks
-
Go to Vault → Portal / B2C Portal / or your custom portal from where your script will be executed at runtime (journey) → AppSettings and add the following key and value:
-
FtosApiSmsProvider
-
Copy
{
  "from":"SenderID", // do not use @ or other special characters
  "serviceUrl":"endpoint",
  "subscriptionKey":"subscription key"
}-
You can register your SenderID (lease) with a Telco company so that the end-user receives sms from the senderId you define. In some countries like Ireland, this is mandatory. Otherwise, depending on the country and regulations, your senderId will be ignored and sms will be received by the end-user from a short-code number as supported by the Telco companies.
-
serviceUrl should be Vonage SendSms as instructed in the support ticket
-
subscription key will be the one received from the support ticket.
-
-
-
-
In your automation script that will send the sms, call the ftos server sdk function sendSms as described here Server SDK Reference Guide, and specify the “provider” parameter as “FtosApiSms”.
Send Transactional or Marketing SMS using the MessageQueue (JobServer)
This is not suitable for using with
ftos.messaging.sendSMS.-
Create a ticket to Support, requesting access to Vonage SMS with or without webhooks (depending on your use case).
-
In Studio, go to Menu > Admin > Omnichannel Communication Automation > Channel Providers.
-
Select FtosApiSms or create your own custom sms channel provider:
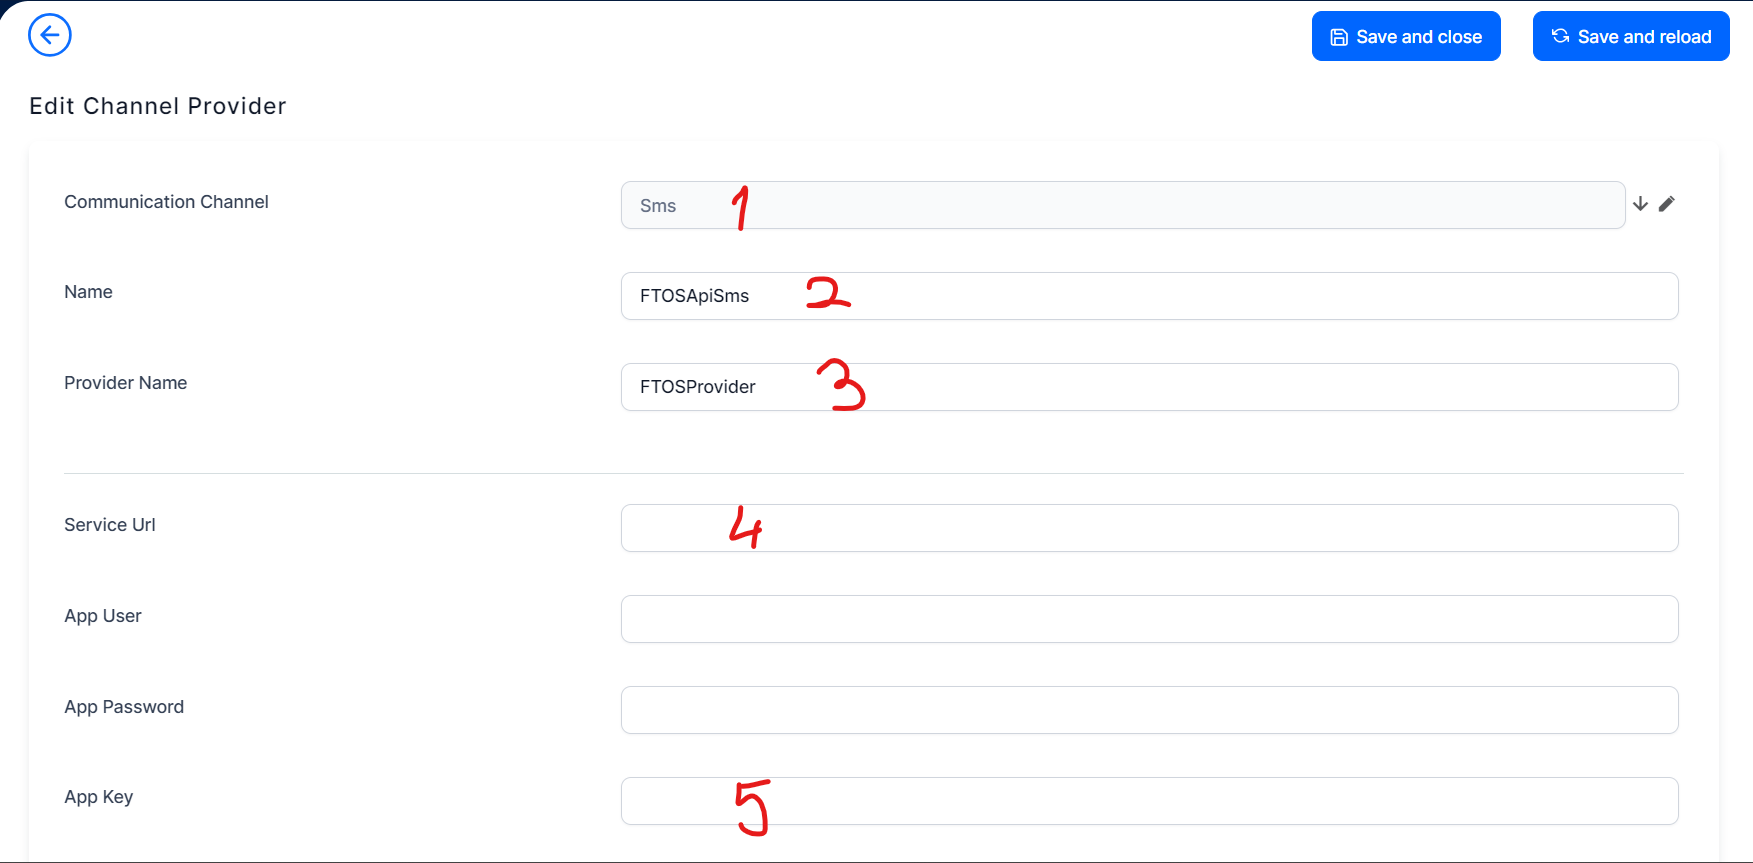
-
Set Communication Channel to SMS (1)
-
Set Name (if not already created) (2)
-
ProviderName = FTOSProvider (3)
-
Set the Service URL to Vonage SendOcbSms according to the instructions received in the support ticket (4)
-
Set the subscription key, provided to you via ticket (5)
-
-
Configure From. Make sure you don’t set something that has @ in it. Depending in which countries you will be sending your SMS, some carriers may block / reject / hard bounce messages that have an email address in the “From” field.
-
Scroll down to the final section (Channel Provider Statuses) and add all Channel Provider Statuses shown in this picture (really important) & assign proper Message Status IDs to each Status
.png)
In Progress: 200, 202, bounce
Sent: delivered
Error: 400, 401, 403, 404, 405, 413, 415, 429, 500, 503, dropped
-
Go to Vault → JobServer-PlatformServices and add the sms channel provider to the Services config (add this json config object in the Services configuration list)
Copy{
"execParams": "provider=ftosProvider;providerSetting=FTOSApiSms",
"Assembly": "FintechOS.Jobs.MessageDelivery.ScheduledServices",
"Class": "FintechOS.Jobs.MessageDelivery.ScheduledServices.SendMessagesService",
"Method": "",
"Name": "FTOS.SendMessagesServiceSMS",
"SendNotification": null,
"Type": "class"
} -
Also here, modify the Triggers config to add the scheduler for handling the smtp channel provider (add this json config object in the Triggers configuration list).
Copy{
"Async": false,
"Calendar": null,
"EndTime": "03.11.2080 11:02",
"Expression": "0/30 * * * * ?",
"Name": "FTOS.SendMessagesServiceSmtp",
"PoolTime": null,
"RepeatCount": "-1",
"RescheduleAfterRun": false,
"Services": [
"FTOS.SendMessagesServiceSmtp"
],
"StartTime": "02.11.2020 11:00"
} -
Restart JobServer-PlatformServices so it can load the newly configured settings.
-
Add your message in the message queue with the configured channel provider by using the server sdk functions described here Server SDK Reference Guide that can insert messages to MessageQueue and specify the channel provider parameter as “FtosApiSms” or your custom defined channel provider.
Verify Service (MFA/OTP)
Vonage offers the possibility of handling MFA/OTP integrations via the Verify Service.
The service has a 2-step operational flow:
-
Create a verification - sends a verification code to the end-user via the specified communication channel and the platform receives a sessionId
-
Verify Code - end-users input their code in the platform, the platform sends the code & sessionId to the Verify service in order to validate
Vonage Verify supports chaining/fallback of multiple communication channels. For example, if you chain sms and email, the code will go first as sms, but if the end-user has poor GSM coverage and the OTP is not received, the service automatically falls back to the next channel and proceeds to send an email with the code.
There are two important use cases inside the platform where MFA/OTP/Verification can be used:
-
Inside the Journey
-
At Studio/Portal user login
Verify Service inside the journey
-
Create a ticket to Support, requesting access to Vonage Verify.
-
Go to Vault Portal/B2C where your journeys will be run by the end-users and add the following keys:
-
FTOSServicesVonageVerifyAppId= the subscription key received in the ticket -
FTOSServicesVonageVerifyEndpoint= the endpoint received in the ticket
-
Install/Deploy FTOS Verify Processor
You can use the Vonage Verify Processor settings (Studio Menu/Workflows/Digital Flow Processing and open Vonage Verify Processor Settings) along with the Verify widget example provided in the installed package, or you can assemble the payload yourself inside an automation script as described in the CreateVerification section of this page.
Example of implementation, using processor settings and widget:
var element = document.getElementById("widgetContainer");
    var options = {
        hideTitle: false,
        skipJavascript: false,
        context: {
            ProcessorSettingsId: procSettingsId,
            Service: service,
            Debug: true
        }
    };

    ebs.generateHtmlWidgetAsync("Verify", element, options)
        .then(function () {
            console.log("widget generated");
        })
        .catch(function (err) {
            console.log(err);
        });
Verify Service at Studio/Portal login via Keycloak
-
Create a ticket to Support, requesting access to Vonage Verify.
-
Open your Keycloak admin panel and make sure you have fintechOSrealm selected.
-
Navigate to Authentication and open OTP Verify Services (or create your own custom authentication flow).
.png)
-
Inside the flow, edit the OTP Verify Authentication step:
.png)
.png)
-
OTP Verify Base Url:
https://<env>/dcs/message3where environment is Vonage Environments, should be received in the ticket; -
OTP Verify Auth Header Value: subscription key as received from the ticket;
-
Brand: your SenderId;
-
Channel timeout: the expiration of the OTP;
-
Allow Email/SMS/WhatsApp: allow the user to select between the various supported channels.
-
-
Then go to Clients, and select the service account under which the required platform section is running (Studio/Portal). Go to Advanced and scroll all the way down to Authentication Flow Overrides, and select your flow for Browser Flow.
.png)