Creating Third-Party Invoices
Third-party invoices are the invoices that track the incomes and expenses resulted from contracts based on the bank or financial institution's agreements with third-party entities (agents, brokers, etc.) . You can allow Core Banking to create the invoices automatically, or you can create invoices manually. When a disbursement event is approved at the contract level (for pricings with For Disburse = True), or when the contract itself is approved (for pricings with For Disburse = True), the commission information is placed in a queue. From this queue, the commissions are automatically calculated by the system as pre-invoice details. These calculated pre-invoice details are later attached to invoices, either automatically or manually.
Core Banking automatically creates invoices for approved third-party agreements, using a dedicated scheduled job, both for PaymentOut and for PaymentIn. The automatic invoices contain the same information as the manually added ones, with the difference that Start Period = End Period = current system date. The job runs once each night and creates third-party invoices, for the combination of third-party entity/ agreements currency, during the validity of the agreement, on the Payment Day of each agreement, as defined in the third-party agreement's Payment Periodicity (daily, monthly, or weekly). The job also creates invoice detail records.
To prevent losing profits, there may be situations when the financial institution claims back all or some of the commission already paid out to third-party entities, due to the fact that the affected contracts were closed before their due date. Core Banking automatically identifies the contract events that determine the clawback (for example, Early Repayment events). To make use of the clawback settings, make sure that you mark the desired transaction types with Is Clawback Transaction = True, and those transaction types are selected at the banking product type level or at the banking product level, depending on your agreement pricing definition. Core Banking calculates the clawback commission for each contract and inserts a corresponding invoice detail for the invoice generated for the third-party entity. If no invoice was yet generated for the third-party entity, a new invoice is created, and the invoice details are included there.
If a contract is marked as blocked for further agreements after performing a clawback payment (
Block After Clawback = True), when a clawback commission is paid for this contract, no other third-party commission found on the contract can be invoiced by the system, hence, for the same agreement pricing, no future invoice details are generated.For any type of transaction performed on the contracts subject to agreements that have Has Clawback = True, if the Clawback Period covers the date of the transaction and the contracts are closed, then the system automatically generates an invoice so that the broker is charged.
Let's say you have a transaction that has Has Clawback = True, it is included in the product that is captured in the Agreement Pricing Object section of the agreement, and it is also captured in the Clawback Settings' Clawback transaction types field. When a contract is created for one of these products including the specified transaction, Core Banking commissions the third-party entity as defined within the agreement. If the transaction targeted for clawback happens within the time frame resulting from clawback period type and period, Core Banking automatically generates an invoice for the clawback commission.
For a setup like the above, if all the conditions are met and a contract for a Buy Now Pay Later product type is included in the invoice for the agreement and if an Early Repayment transaction is performed within the first 3 months from creating the contract/ generating the initial commission, then Core Banking triggers the clawback automatically.
Using Core Banking's user interface, you can create third-party invoices from a dedicated menu item, or directly from an approved agreement's page, with a few differences for each method, as follows:
Follow these steps to create new third-party invoice records for any approved agreement:
-
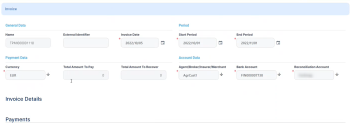
In the FintechOS Portal, click the Insert button on the top right side of the Invoices page. The Add Invoice page is displayed.
-
In the General Data section of the newly displayed page, fill in, view or modify the following fields:
-
Name - Automatically filled in with the name of the invoice record, after saving the record. You can't modify this field.
-
External Identifier - Enter an external identifier for the invoice, if needed.
-
Invoice Date - Automatically filled in with the current date of the system. You can modify this date.
-
-
In the Period section, fill in the following fields:
-
Start Period and End Period - Select the starting and the ending date of the interval during which Core Banking filters the contracts that are subject to invoicing. The
Start Periodmust be<= End Period.
-
-
In the Payment Data section, fill in or view the following fields:
-
Currency - Select the currency in which the invoice is to be paid.
-
Total Amount To Pay and Total Amount To Recover - The total amounts to pay to and to recover from the third-party, expressed in the selected currency. You can't modify these fields. T hey are automatically calculated by Core Banking based on the invoice details entered later, after saving the invoice record.
-
-
In the Account Data section, fill in the following fields:
-
Agent/ Broker/ Insurer/ Merchant - Select the third-party entity for whom you are creating the invoice.
-
Bank Account - Select the third-party entity's settlement account. You can only choose from the list of the entity's accounts opened in the selected currency.
-
Reconciliation Account - Select the financial institution's reconciliation account. You can only choose from the list of the accounts opened in the selected currency.
-
-
Click the Save and Reload button.
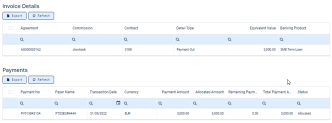
After saving the invoice record, the Invoice page also displays the Invoice Details section, containing a list with all the invoice details attached to the invoice, and the Payments section, containing information about the payments performed by Core Banking.
-
Continue by adding an invoice detail to the invoice in Draft status. Click Insert within the Invoice Details section on the Invoice page.
The Invoice Detail page is displayed. -
On the Invoice Detail page's General Data section, select the Pre Invoice Detail you want to use for the invoice from the list of pre-invoice detail records created for the selected agreement. All the other fields are automatically filled in after selecting the pre-invoice detail and you can't modify them.
-
On the Invoice Detail page's General Data section, view the following automatically filled in fields: Invoice and Agreement.
-
In the Settings section, view the following automatically filled in fields: Detail Type, Contract, and Contract Event.
-
In the Payment Data section, view in the following automatically filled in fields: Commission, Currency, and Exchange Rate, the exchange rate for Commission Currency to Invoice Currency valid on the date of the invoice, or the latest exchange rate recorded for Commission Currency to Invoice Currency.
-
In the Values section, view in the following automatically filled in fields: Value, the calculated commission value, and Equivalent Value, commission's equivalent value in the invoice's currency, calculated by Core Banking as (
Exchange Rate * Value).NOTE
Equivalent Valueis summed up toTotal Amount To PayifDetail Type = Payment Out.Equivalent Valueis summed up toTotal Amount To RecoverifDetail Type = Payment In. -
Click the Save and Close button.
-
Change the status of the invoice record to Approved to allow Core Banking to automatically process the payments.
You can create as many invoice details as needed for an invoice, but you can create only one invoice detail for the combination between a contract, a commission and a detail type. Core Banking prevents you to create duplicate invoice detail records containing the same combination of
Contract, Commission, and Detail Type values.Follow these steps to create new third-party invoice records directly within the Agreement page of an approved agreement record:
-
Open an agreement in Approved status and scroll to its Invoices section. Here you can insert, delete or export invoices for the selected agreement.
The section displays information about the invoice: name, third-party, currency, start and end period, total amount to pay to the third-party and to recover by the financial institution, record's business status.
-
Click Insert to display the Add Invoice page:
-
In the General Data section of the newly displayed page, fill in, view or modify the following fields:
-
Name - Automatically filled in with the name of the invoice record, after saving the record. You can't modify this field.
-
External Identifier - Enter an external identifier for the invoice, if needed.
-
Invoice Date - Automatically filled in with the current date of the system. You can modify this date.
-
-
In the Period section, fill in the following fields:
-
Start Period and End Period - Select the starting and the ending date of the interval during which Core Banking filters the contracts that are subject to invoicing. The
Start Periodmust be<= End Period.
-
-
In the Payment Data section, fill in or view the following fields:
-
Currency - Select the currency in which the invoice is to be paid.
-
Total Amount To Pay and Total Amount To Recover - The total amounts to pay to and to recover from the third-party, expressed in the selected currency. You can't modify these fields. T hey are automatically calculated by Core Banking based on the invoice details entered later, after saving the invoice record.
-
-
In the Account Data section, view or fill in the following fields:
-
Agent/ Broker/ Insurer/ Merchant - Automatically filled in with the third-party entity for whom you are creating the invoice. You can't modify this field.
-
Bank Account - Select the third-party entity's settlement account. You can only choose from the list of the entity's accounts opened in the selected currency.
-
Reconciliation Account - Select the financial institution's reconciliation account. You can only choose from the list of the accounts opened in the selected currency.
-
-
Click the Save and Reload button.
After saving the invoice record, the Invoice page also displays the Invoice Details section, containing a list with all the invoice details attached to the invoice, and the Payments section, containing information about the payments performed by Core Banking.
-
Continue by adding an invoice detail to the invoice in Draft status. Click Insert within the Invoice Details section on the Invoice page.
The Invoice Detail page is displayed. -
On the Invoice Detail page's General Data section, select the Pre Invoice Detail you want to use for the invoice from the list of pre-invoice detail records created for the selected agreement. All the other fields are automatically filled in after selecting the pre-invoice detail and you can't modify them.
-
On the Invoice Detail page's General Data section, view the following automatically filled in fields: Invoice and Agreement.
-
In the Settings section, view the following automatically filled in fields: Detail Type, Contract, and Contract Event.
-
In the Payment Data section, view in the following automatically filled in fields: Commission, Currency, and Exchange Rate, the exchange rate for Commission Currency to Invoice Currency valid on the date of the invoice, or the latest exchange rate recorded for Commission Currency to Invoice Currency.
-
In the Values section, view in the following automatically filled in fields: Value, the calculated commission value, and Equivalent Value, commission's equivalent value in the invoice's currency, calculated by Core Banking as (
Exchange Rate * Value).NOTEEquivalent Valueis summed up toTotal Amount To PayifDetail Type = Payment Out.Equivalent Valueis summed up toTotal Amount To RecoverifDetail Type = Payment In. -
Click the Save and Close button.
-
Change the status of the invoice record to Approved to allow Core Banking to automatically process the payments.
You can create as many invoice details as needed for an invoice, but you can create only one invoice detail for the combination between a contract, a commission and a detail type. Core Banking prevents you to create duplicate invoice detail records containing the same combination of
Contract, Commission, and Detail Type values.Whenever you approve a disbursement at the contract level (for pricings with For Disburse = True), or when you approve the contract itself (for pricings with For Disburse = False), a trigger signals the system to record that event's information in a queue. From here, a specialized job processes each queue record, calculates the third-party commission value applicable to the event, and writes the results as a pre-invoice detail. Later, these pre-invoice details are automatically added to the invoices when the system creates invoices, or you can add them manually to invoices.
To view the list of third-party management queue records that were not processed yet by the specialized job, follow these steps:
-
In FintechOS Portal, click the main menu icon and expand the Admin Configurations menu.
-
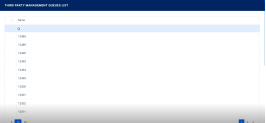
Click the Third-Party Management Queue menu item to open the Third-Party Management Queues List page.
- Double-click a record to open it for viewing. You can't perform any other operation on a queue item.
-
On the newly displayed Edit Third-Party Management Queue page, view the following information about a record that has to be processed by the system to calculated the value of the commission:
-
Name - the number of the contract that is the object of the third-party agreement.
-
Process Details - any details after the processing of the record by the specialized job.
-
Record - the id of the contract or of the contract event whose approval triggered the placing of this record in the queue.
-
Transaction Type - the type of transaction that triggered the placing in the queue.
-
Agreement Pricing - the name of the agreement pricing applicable to the contract.
-
Processes - a checkbox that signals whether the record was already processed by the specialized job (for
Truevalue) or not.
-
-
After the specialized job processes the queue record, you can see it marked as processed.
The commissions are automatically calculated as pre-invoice details after the system processes the third-party management queue records. These pre-invoice details are automatically added to the invoices when the system creates invoices, or you can add them manually to invoices.
To view the list of pre-invoice detail records that are not associated to an invoice yet, follow these steps:
-
In FintechOS Portal, click the main menu icon and expand the Core Banking Operational menu.
-
Expand the Third-Party Agreements menu and click the Pre-Invoice Detail menu item to open the Pre-Invoice Details List page.
- Double-click a record to open it for viewing. You can't perform any other operation on a pre-invoce detail record.
-
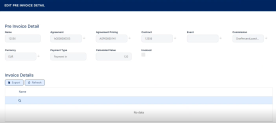
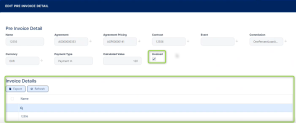
On the newly displayed Edit Pre-Invoice Detail page, view the following information about a calculated commission:
- Name - the name of the third-party management queue record processed for the calculation of this pre-invoice detail record.
-
Agreement - the number of the agreement on which this record is based.
-
Agreement Pricing - the name of the agreement pricing applicable to the contract.
-
Contract - the number of the contract that is the object of the third-party agreement.
-
Event - the number of the contract event whose approval triggered the calculation of the commission.
-
Commission - the third-party commission used for commission calculation.
-
Currency - the currency code of the calculated commission.
-
Payment Type - the type of payment to be performed:
Payment Infor payments from the third-party's settlement account, orPayment Outfor payments into the third-party's settlement account. -
Calculated Value - the calculated value of the commission, to be applied to the invoice.
-
Processes - a checkbox that signals whether the record was already processed by the specialized job (for
Truevalue) or not.
-
In the Invoice Details section of the same page, you can see the number of the invoice to which this pre-invoice detail record was attached, for example after running the TPM Invoices job. In that case, the
Invoicedcheckbox is also selected.NOTE
If an invoice is canceled, all the pre-invoice details attached to it are marked withInvoiced = False, so that they can be attached to another invoice.

