Digital Solutions Packages
To manage digital solutions packages, you need the Release Manager security role. For more information, see Security Roles.
Digital solutions packages allow you to export and import entire Digital Solutions in one go, enabling easy deployment of complex solutions. A digital solutions package is a deployment package associated with a specific digital solution and contains all the digital assets that are part of that solution.
On digital solutions imports, package integrity validations check for incompatible platform versions or digital assets, to ensure that the local data is not corrupted.
Create Digital Solutions Packages
- In FintechOS Studio, go to Main Menu > Configuration Management > Digital Solutions Packages.
- Click Insert.
- Fill in the Name field, and select the source Digital Solution from the corresponding field.
- Click Save and Reload. The new digital solution package is now created.
- The Digital Solution Package Items grid is populated, allowing you to check the digital assets that you want to be included in the package.
Add security configuration to the digital solution package
- In Settings tab, tick the box for Include Security Configuration to export the security configuration of the digital assets included in the package.
- From the Deployment Scenario drop-down, choose the action that occurs when importing the digital solution package in another environment:
- Append: the security configuration is added on top of the destination configuration.
- Overwrite: the destination configuration is replaced with the one on the digital solution package.
-
Check the Include Extended Security Configuration box to include security configurations that relate to items external to your package but are linked to the same security roles.
NOTE
Items attached to the following default security roles are not exported: Debugger, Developer, Release Manager, Observability, JobServer, User Management. Default security roles must not be used for securing business solutions. - When done, click Save and reload.
Configure the custom files mappings
To configure the mappings between digital assets files and portal profiles for custom and custom on-demand files, follow the below steps:
- In the Setting tab, click the Configure button to open the Configure Custom Files Deployment page.
- In the Configure Custom Files Deployment, select the portal profiles where you want to deploy the custom files. Perform this step for each digital asset.

-
This configuration when exporting a digital solution package is merely a suggestion, it's one way of doing things. When the digital solution package is imported into the target environment, the link between the custom files in the digital solution package and the portals in that environment is prepopulated (provided that the target environment has the same portals as the source environment). However, you can choose any combination before importing.
-
The meaning of the Apply to All Portals Without Profile checkbox is that, during import, the respective files are copied to all environments that do not have a portal profile defined (“anonymous” environments). This means they will also be copied to the default Portal and B2C Portal (provided that no portal profile has been assigned to them). If, at any point, other “anonymous” portals are created, these files will be copied there as well.
- Click Save to keep your selected choices.
- When finished, click Save and reload.
Please take into consideration:
Once you configure the mappings, you can export the package.
Include identity provider UI themes
The Settings tab of a digital solution package comes with two options in the Identity Provider UI Themes section:
-
Include UI Themes: tick to include the UI theme associated with the Portal Profile in the package. The UI theme stored in FintechOS IDP must have the same name as the Portal Profile.
-
Stop Package Generation on Themes Retrieval Error: tick to stop the UI theme export if the environment cannot communicate with the FintechOS IDP.
Click Save and Reload after ticking the above boxes for the changes to take effect.
The UI theme should fit the branding or specifications of the project that you are working on. At import, the theme is automatically deployed on the environment based on the portal profile name.
If the package contains 3 portal profiles ("profile1", "profile2", "profile3") and the FintechOS IDP has 2 custom themes ("profile1", "profile2"), when the package is generated it will automatically include the themes named "portal1" and "portal2". The portal profile named "profile3" will not bring a theme into the package as there is no theme named "profile3".
Export Digital Solutions Packages
- In FintechOS Studio, go to Main Menu > Configuration Management > Digital Solutions Packages.
- Select the desired package.
- Click Export Digital Solution Package.
- Choose the save location of the package. The digital solution package is exported in a .zip file.
The export includes only the security configuration of the digital assets added in the package.
Import Digital Solutions Packages
Starting with v24.3.2, the size of digital solution packages is restricted at import to the default of 50MB. Navigate to Configuration Manager > Studio > app-settings > DigitalSolutionPackageMaxSizeInMB key to change the default to another size.
Follow the below steps for an automated import process at digital asset level.
- In FintechOS Studio, go to Main Menu > Configuration Management > Digital Solutions Packages.
- Click Import digital solution package. A window is displayed.
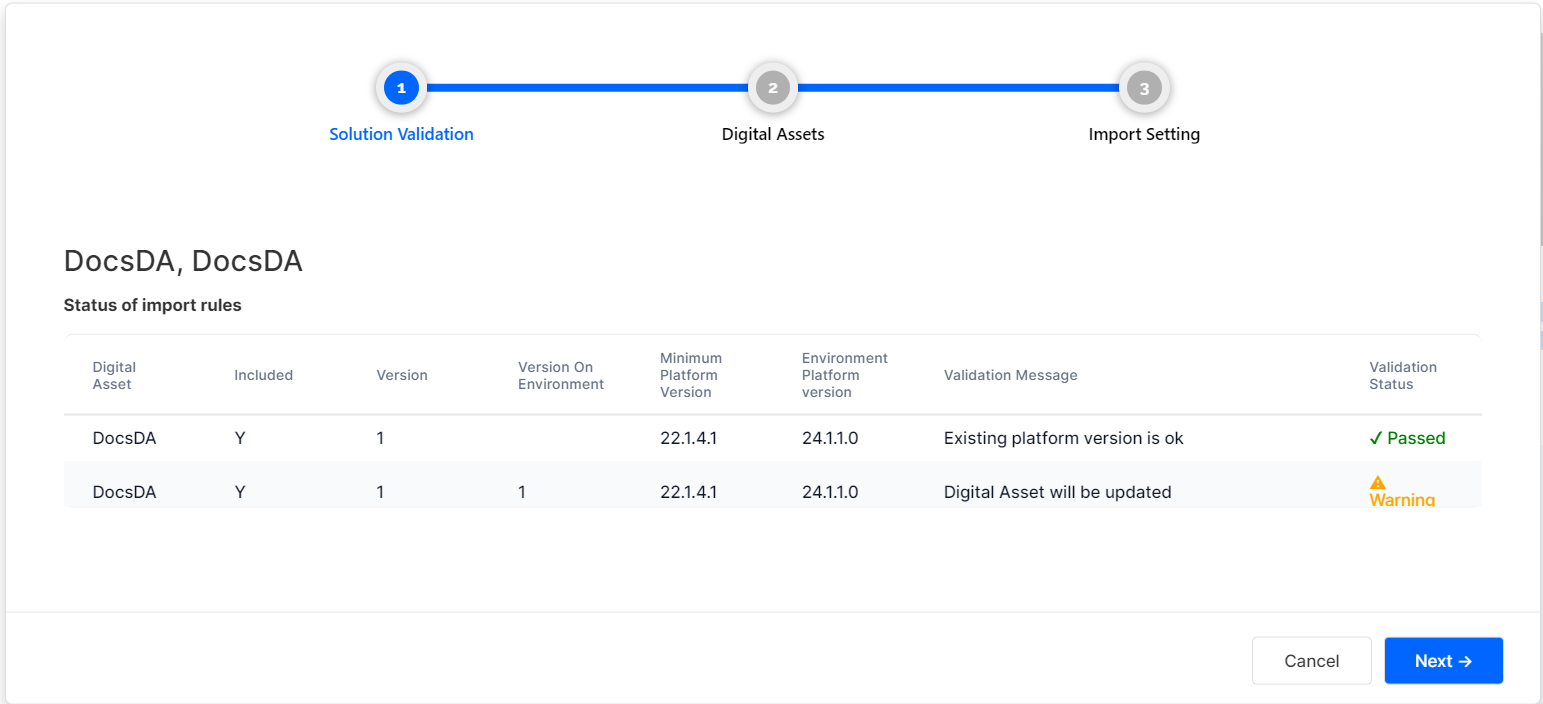
- Locate the .zip file containing the package, select it, and click Import. A wizard window with three tabs displays:
- Solution Validation: shows a summary of the digital assets included in the package.
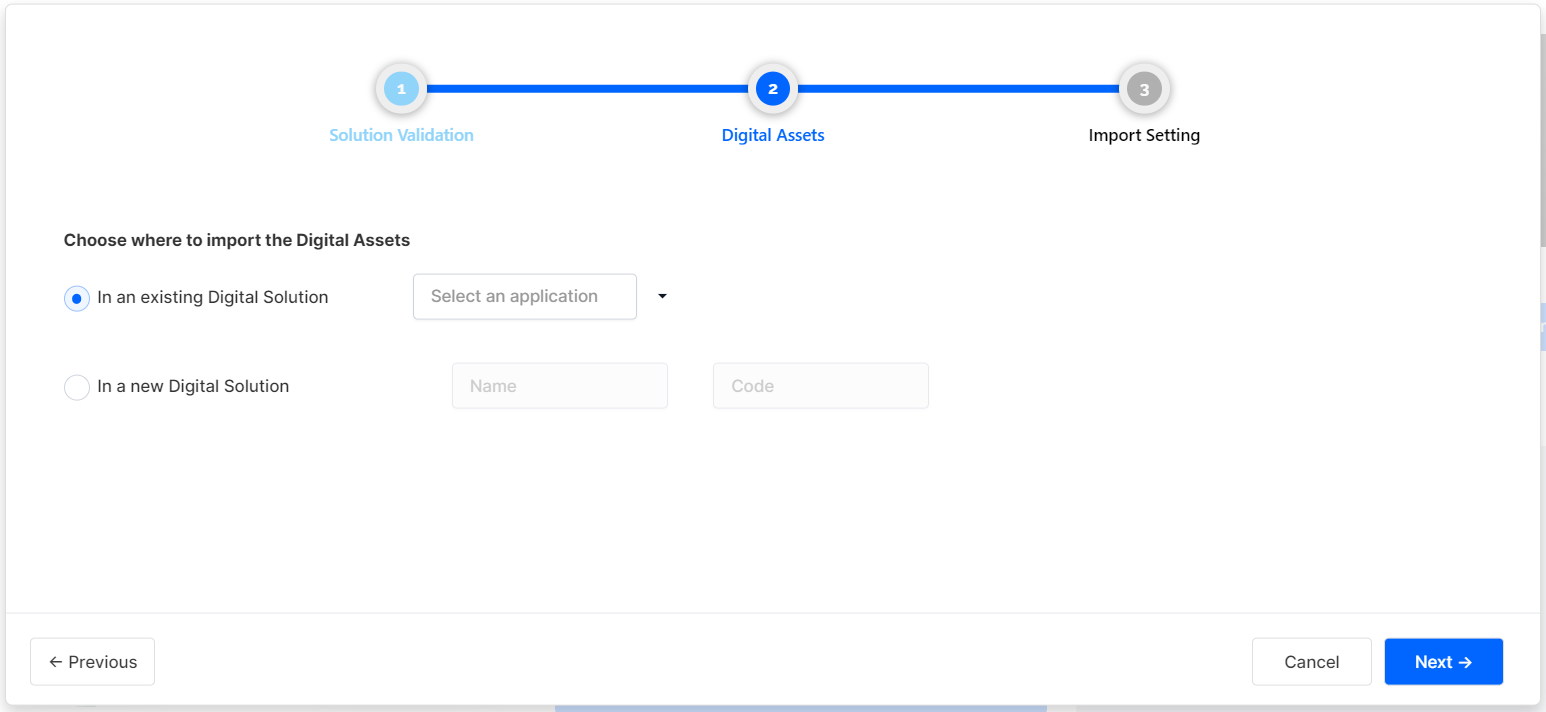
- Digital Assets: specify the destination of the digital assets. Add them in an existing Digital Solution or in a new one. Click Next once done.
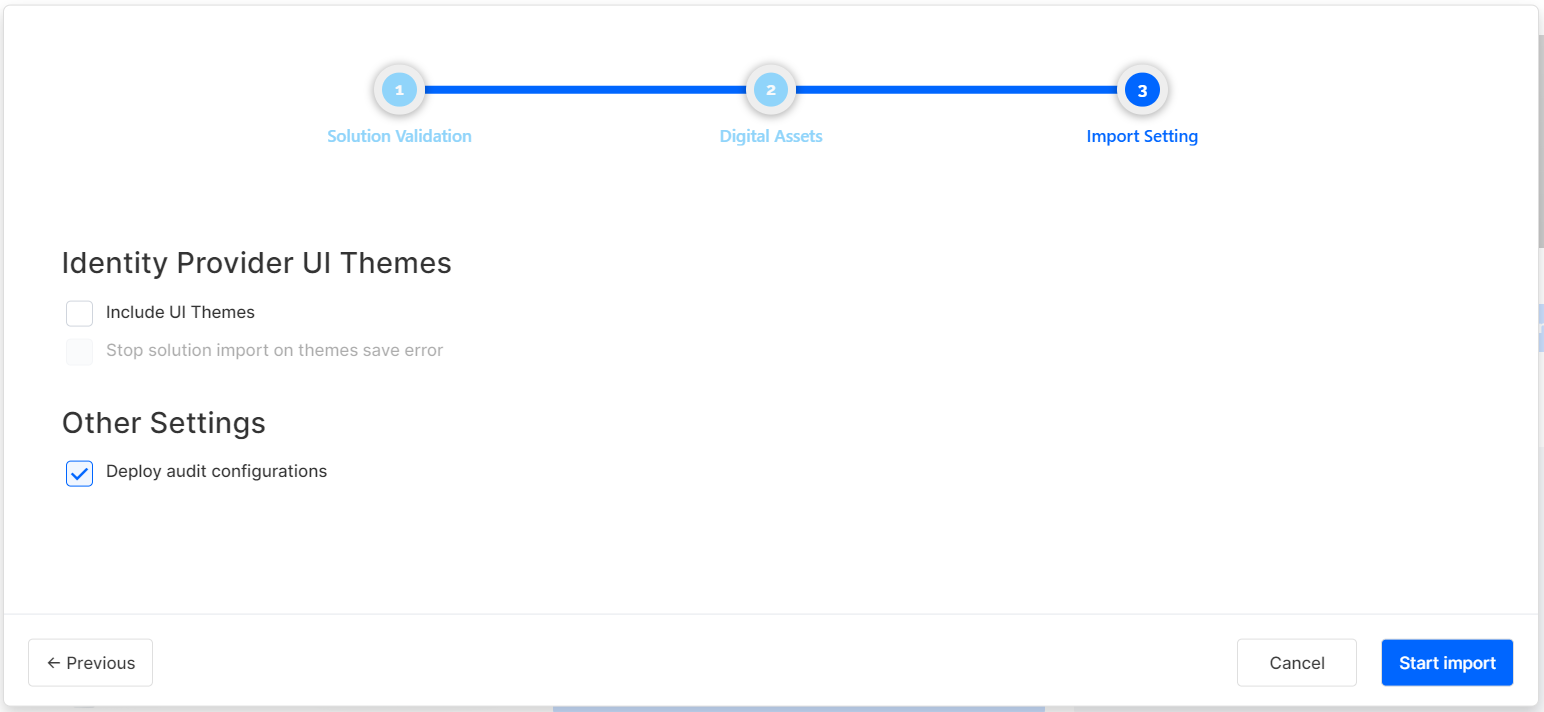
- Import Setting: specify settings:
- tick the Deploy audit configurations box if needed.
if the Include UI theme option is ticked, then all themes present in the package are uploaded to the IDP by overwriting existing themes (if there are theme sharing same name) or new ones are created.
use the Stop solution import on themes save error option to stop the package import if the platform cannot communicate with the IDP.
In order to successfully import Scheduled Service (v22.1.1 or later) Configuration Items, make sure the Scheduled Job and workflow linked to the Schedule Service exist on the destination environment.
When importing Portal Profiles that include a multitenancy business unit, make sure that the business unit exists on the destination environment. Otherwise, the import will fail.
The package is imported and can also be viewed in the Digital Solution Packages List.
1. Manual changes of Digital Solution Packages are not allowed and the platform will reject any corrupted packages.
2. There is a set of import rules which a package must comply with, and which are displayed as a summary before import:
a) Minimum platform version set on Digital Asset (DA) level in the package must be =< platform version of destination environment. The version doesn't necessarily need to be specified in the destination environment.
b) If DA Status on destination = Unlocked and DA version in package >= DA version on destination, then Digital Asset will be updated.
c) If DA Status on destination = Unlocked and DA version in package < DA version on destination, then Import cannot be performed.
d) If DA Status on destination = Locked and DA version in package > DA version on destination, then Digital Asset will be updated.
e) If DA Status on destination = Locked and DA version in package =< DA version on destination, then Import cannot be performed.
Considerations at package import:
-
Because of the differential deploy feature in FintechOS Studio, when reimporting a package with changes, files are marked accordingly with the Update or New status, making it easy to see which files have been changed since the last import.
-
When importing a package that includes an updated entity form into a target environment where an older version of that form already exists, the system checks its child files—such as entity extensions, filtered fields, allowed attributes, and virtual attributes. If these child files haven't changed and match those in the imported package, they won't be re-imported.
-
An error may be triggered after importing a package with a renamed extended model. This is a known issue in the following scenario:
-
on a source environment, create two entities with lookup attribute between them. Create a new extended model of type Related and add the virtual attributes to this extension. Export the package and import it to a destination environment. The import should work.
-
return to the source environment and modify the name of the extended model. Export the package with an updated name and reimport it on the destination environment. The import will fail with an error message.
The workaround implies using a before import script that will map the entity extension before package import:
-
var ee = ftos.data.query.getAlias("entityExtension")

var rows = ftos.data.query.from('entityExtension', ee)
.where(ee.Name.eq('ext_rel'))
.executeAndMapComplex({entityExtensionId : ee.EntityExtensionId})

if(rows.length > 0){
    setMessage(rows[0].entityExtensionId)
    setMessage("Record found. Will update");
    update('entityExtension', rows[0].entityExtensionId, {"name":"ext_rel_update"})
}
else{
    setMessage("Record not found.");
}
Delete a Digital Solution Package
- In FintechOS Studio, go to Main Menu > Configuration Management > Digital Solutions Packages.
- Select the desired package and click Delete. A confirmation dialog is displayed.
- Click Yes to remove the Digital Solution Package.
The package is deleted and can no longer be viewed in the Digital Solution Packages List.
Deployment Scenarios
When exporting digital solution packages from one environment and importing them into another, several use cases may arise, especially when considering the security roles and security role items involved in each environment, entities, as well as the available package export settings in the FintechOS Platform.
In the scenario below, we start from a scenario where the solution package has certain security roles and security role items on certain entities. When importing the package to the destination environment, several things must be taken into consideration:
-
the security role item (SRI) is on the entity 3 (E3) on the source environment, but on the E1 on the destination environment;
-
several SRIs are brought on to existing entities on the destination environment;
-
SRI-35 is on E3 on both environments.
Find below a visual representation of this scenario:
Source Environment
                ├── Security Role: SR1
                │   ├── SRI-11 → E1
                │   ├── SRI-12 → E1
                │   └── SRI-14 → E3
                │
                └── Security Role: SR3
                    └── SRI-35 → E3


                Destination Environment (before import)
                ├── Security Role: SR1
                │   ├── SRI-12 → E1
                │   ├── SRI-14 → E1
                │   ├── SRI-15 → E4
                │   ├── SRI-16 → E3
                │   ├── SRI-24 → E3
                │   └── SRI-25 → E5
                │
                ├── Security Role: SR2
                │   └── SRI-22 → E1
                │
                └── Security Role: SR3
                    ├── SRI-35 → E3
                    ├── SRI-38 → E3
                    └── SRI-39 → E5
Depending on existing settings in the FintechOS Platform, several use cases emerge:
When creating the digital solution package, if the following options are used:
-
Include Security Configuration box is ticked;
-
Include Extended Security Configuration is not ticked.
Then the following are included in the export package:
├── Security Role: SR1
│   ├── SRI-11 → E1
│   ├── SRI-12 → E1
│   └── SRI-14 → E3
│
└── Security Role: SR3
└── SRI-35 → E3If, additionally, we select Append, then when importing to the destination environment, the roles that don't already exist are added, and existing ones are not modified.
The result would be:
Destination Environment (after import)
        │
        ├── Security Role: SR1
        │   ├── SRI-11 → E1
        │   ├── SRI-12 → E1
        │   ├── SRI-14 → E1
        │   ├── SRI-15 → E4
        │   ├── SRI-16 → E3
        │   ├── SRI-24 → E3
        │   └── SRI-25 → E5
        │
        ├── Security Role: SR2
        │   └── SRI-22 → E1
        │
        └── Security Role: SR3
            ├── SRI-35 → E3
            ├── SRI-38 → E3
└── SRI-39 → E5In this use case, the conditions are the following:
-
Include Extended Security Configuration box is ticked;
-
The digital solution is slightly changed:
Copy├── SR1
│ ├── SRI-11 → E1
│ ├── SRI-12 → E1
│ └── SRI-I4 → E3
│
├── SR3 (with or without)
│ └── SRI-35 → E3
│
└── SR6
└── [New security role created outside the Digital Asset context]
If we select Append and keep the Include Extended Security Configuration selected, then when importing to the destination environment, the security configuration is added on top of the destination configuration:
├── SR1
│   ├── SRI-11 → E1
│   ├── SRI-12 → E1
│   ├── SRI-14 → E1
│   ├── SRI-I4 → E3
│   ├── SRI-15 → E4
│   ├── SRI-16 → E3
├── SRI-24 → E3
│   └── SRI-25 → E5
│
├── SR2
│   └── SRI-22 → E1
│
├── SR3
│   ├── SRI-35 → E3
│   ├── SRI-38 → E3
│   └── SRI-39 → E5
│
└── SR6If we select Overwrite and keep the Include Extended Security Configuration selected, then when importing to the destination environment, the destination configuration is replaced with the one on the digital solution package:
├── SR1
│   ├── SRI-11 → E1
│   ├── SRI-12 → E1
│   ├── SRI-I4 → E3
│
├── SR2
│   └── SRI-22 → E1
│
├── SR3
│   ├── SRI-35 → E3
│
└── SR6
-
For SR1 (entities E1 and E3): the security role items associated with these entities will be replaced with those from the exported package. An overwrite is performed using the new information from the package.
-
For SR2 and SR6: no changes will be made, as the exported package does not contain these roles. The definitions from the source package will be retained.
-
For SR3: an overwrite will be performed only for the packages associated with entity E3, since the exported package does not contain security role items defined for E5.
In summary, an overwrite will be performed only for those roles and security role items that are associated with entities present in the exported package.