Custom Reports
Many financial organizations use SQL Server Reporting Services (SSRS) to generate custom reports that comply with financial regulations, and are used for statutory reporting to legal authorities.
FintechOS integrates with SSRS successfully, and addresses to a wide variety of reporting needs including managed enterprise reporting, ad-hoc reporting, embedded reporting, and web based reporting to enable organizations to deliver relevant information, wherever it’s needed.
FintechOS enables you to make these reports available directly within the platform. They can be generated on demand based on the selected time frame and the inclusion/exclusion criteria. The reports can be accessed based on previously defined security roles, or automatically generated on predefined milestones and dates.
You can export the reports to multiple file formats, or deliver them to subscribers by e-mail or to a shared file. Reports can also be generated from the application menu.
Creating a custom report
Prerequisites:
- A SSRS user account with credentials at hand (username and password).
- A report in SSRS.
STEP 1. Add a report
- From the main menu, click Analytics > Reports. The Reports List page appears.
- At the top-right corner of the page, click the Insert icon. The Add Report page appears.
- Fill in the fields.
- At the top-tight corner of the page, click Save and reload. The Edit Report page appears.
| Field | Description |
|---|---|
| Name |
Enter the report name that will be used by the system. |
| Display Name | The name of the report that will be displayed in the Portal. This field is mandatory. |
| Entity Menu Section | Select the entity menu section where users will be able to generate the report. |
| Show In Menu | Select the check box only if you selected the entity menu section where users will be able to generate the report. |
| Scope | Select General or Entity. |
| Type | Select Document, Custom Report or Simple Grid Report. Document is available only for the scope Entity. Simple Grid Report is available only for scope General. |
|
For scope General or Entity, and type Custom Report |
|
| Server Url | Enter the URL of the SQL Server Reporting Services (SSRS). |
|
Domain |
Enter the domain name where you host the SSRS. |
|
Username |
Enter the username associated to your SSRS user account. |
|
Password |
Enter the password of your SSRS user account. |
|
Always Return File |
Tick the checkbox to return the file. Only available for scope Entity. |
|
For scope Entity and type Document or Custom Report |
|
|
Output Method |
Select the output method: Attach to entity or Download file. |
|
Destination Field |
Set the destination field for your report. Only available for Attach to entity output method. |
|
Destination File Name |
Add the destination file name. |
|
Report Document Type |
Only available for type Document. Select a document type from the drop-down: DOCX, PDF, XLSX ((v21.2.2.4 or later). |
STEP 2. Add report items
This section is used for setting the time interval from which the report will select the data. Each insertion of a report item is sort of a template for that report. Hence, it is possible to add more templates the same report with different dates.
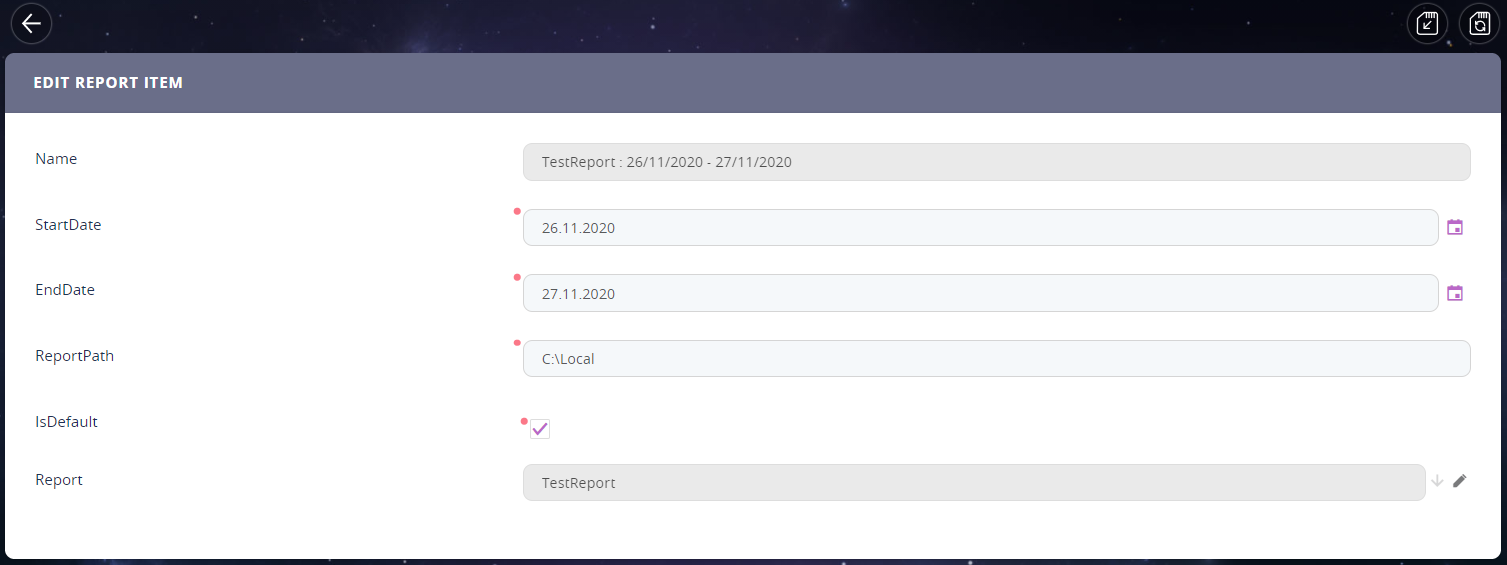
- In the Edit Report page, scroll-down to the Report Items section. At the top of the section, click the Insert button. The Add Report Item page will be displayed.
- The Name field is automatically filled with the name of the report inserted in Step 1.3.
- Select Start Date and End Date. Upon the report generation, it will gather data within the specified time interval (between the start date and the end date).
- In the Report Path set the path for where this report will be stored.
- For the bool IsDefault, tick if you wish this template to be the default for the report. If not, leave empty.
- The Report field is automatically filled in with the name of the report.
- At the top-right corner of the page click the Save and reload icon if you want to add another report item, otherwise, click the Save and close icon.
For the Document report type, the Add a Report Item page also displays the Report Document field ((v21.2.2.4 or later).
Here you can use a Digital Document to have XLSX and DOCX reports generated based on a template.
For more details on how to create your template and how to add a digital document, check the Digital Documents Processor User Guide.
STEP 3. Insert Report Parameters
This section allows setting one or more attributes for the report. This is available only if the scope of the report was set to Entity. Fill in the following fields:
| Field | Data type | Description |
|---|---|---|
| Name | Text | Insert a name for the parameter. |
| Attribute | Option set | Select an attribute for the list. |
| Report | Text | It is automatically filled in with the name of the report inserted at Step 1.3. |
Click the Save and close button. Repeat as many times as needed.
STEP 4. Define who has access to the custom report
If your business case requires that the custom report is available to designated roles within your organization, in the Edit Report page, scroll-down to the Report Security Roles section. Click the Insert existing button, and select the security roles that should have access to report. If no security roles are added here, all users will be able to view the report. For details, see Creating Security Roles.
STEP 5. Save the report
If you want to save and close the report, at the top-right corner of the page click the Save and close icon.
If you want to save the report and continue working on it, click the Save and reload icon.