Attributes
An attribute is equivalent to a column in a table, available for the end-user to input or select data. For example, an entity is the ''Account'' and the attributes are ''name'', ''age'', ''product'', ''no.ofcontract'', ''policyno'', ''address'', ''income''. Attributes include primary keys and foreign keys (type lookup) as well.
FintechOS supports a variety of field types, from usual fields like: text, date, boolean or numeric, to advanced fields like lookup (referencing other entities) or optionset (drop-down list).
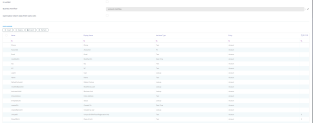
You can access the entity attributes from the Data Model section of the entity.
The buttons at the top left corner of the section have the following functions:
- Insert - Adds a new attribute. For details, see Adding Attributes.
- Delete - Deletes the currently selected attributes.
- Export - Exports the currently selected attributes' metadata in an Excel file.
- Refresh - Refreshes the list of attributes.
System-generated attributes
When you create an attribute, a new column is added within the table corresponding to your entity in the database.
All entities have a set of auto-generated attributes that are used for entity auditing purposes. DO NOT remove them.
This is the list of system-generated attributes:
| Attribute Name | Attribute Display Name | Type | Description |
|---|---|---|---|
| entitynameid | entitynameid | Primary key (PK) | The entity unique identifier, the Name provided when creating the entity name. |
| createdOn | Created On | Date Time | The date and time when the entity was created. |
| modifiedOn | Modified On | Date Time | The date and time when the entity was updated. |
| userId | User | Lookup | The current user or the owner of the entity record. |
| createdByUserId | Created by User | Lookup | The user who inserted that record. |
| modifiedByUserId | Modified by User | Lookup | The user who made the last updates on the entity record. |
| businessUnitId | Business Unit | Lookup | The business unit associated with the attribute userId. It is the business unit of the user. |
| entityStatusId | Status | Lookup | The status of the entity record. |
The PrimaryAttributeName is also generated automatically because it is required to create an entity, but the actual name is chosen by the user.
Types of Attributes
This section describes the types of attributes (fields) you can add in Innovation Studio:.
A basic control that enables the user to type one-line set of characters (text). Use it for short alphanumeric attributes such as names or user IDs.
When adding a text attribute to an entity you need to provide the following specific properties:
| Property | Description |
|---|---|
| Length (only for text) | The maximum number of characters users will be allowed to enter in field. |
| Is localizable (only for text) | If selected, the text fields will be marked as being localizable. For information on how to localize fields, see Localization |
This is how a text field is configured.
Defines a multi-line text input control. Use it when users need to provide large amounts of text that exceeds one line such as descriptions, messages, feedback, etc.
When adding a text area attribute to an entity you need to provide the following specific properties
| Property | Description |
|---|---|
| Length (only for text) | The maximum number of characters users will be allowed to enter in field. |
| Is localizable (only for text) | If selected, the text fields will be marked as being localizable. For information on how to localize fields, see Localization. |
This is how a text area field is configured:
Use this field to insert any integer (whole number) with a value between -2,147,483,648 and 2,147,483,647. Use integers for attributes such as number of children, number of insured persons, number of cars, number of monthly payments for a credit, maximum number of co-debitors, etc.
When you use integers, you can't add decimals. If you need to make very accurate calculations - for example, for calculating interest rates, and you need to utilize decimals, use numeric attributes instead.
When adding a whole number attribute to an entity you need to provide the following specific properties:
| Property | Description |
|---|---|
| Is identity (it will be read-only) | If selected, the whole number attribute is automatically incremented for each record and becomes read-only. It is useful for unique record identifiers, such as: the contract number or the policy number. |
The value inside the whole number fields is by default formatted to the right.
Defines a field to enter numeric values. Use it when for attributes that require very accurate calculations, or if you typically use queries that look for values that are equal or not equal to another value, for example interest rates.
When adding a numeric attribute to an entity you need to provide the following specific properties:
| Property | Description |
|---|---|
| Precision | Specify the number of decimals (up to 9 decimal points of precision) to be displayed in the user interface in case of numeric fields. |
Defines a field which has the format option to display date only. No specific properties need to be provided. Use it for attributes such as birth dates, expiration dates, or issuing dates.
When you click on it, the calendar opens, allowing you to select a date.
This is how a date field is configured:
The date format is as defined on the ApplicationLanguage entity, that is, you can have different date formats per language. For details on how you can format the date field throughout FintechOS per language, see Add a New Language.
Defines a field which has the format options to display the date and time. No specific properties need to be provided. Use it for attributes that need to record the precise date and time, such as registration when an issue was raised or when a fraud was attempted.
The format of the dateTime field is as defined on the ApplicationLanguage entity, that is, you can have different date formats per language. For details on how you can format the dateTime field throughout FintechOS per language, see Add a New Language.
This is how a dateTime field is configured:
Defines an attribute which is a checkbox. It can have one of the following values:
- NULL - it is the default state of the bool attribute. Indicates that no action has been performed on the checkbox yet.
- TRUE - it indicates that the checkbox has been selected.
- FALSE - it indicates that the checkbox has not been selected.
Use it for validations, for instance if the customer is a politically exposed person or if he has a criminal record or not.
Defines a relation between the entity you’re working on and another entity (that is, the parent entity), for example an Asset Owner attribute in an Assets entity that refers to the records in the Customers entity.
When you create a new lookup attribute you are creating a new Many-to-One (N:1) entity relationship between the entity you are working with and the Lookup to Entity defined for the lookup.
All lookup attributes display the primary attribute name of the referenced entity; therefore, you should always provide a value for the primary attribute on the parent entity.
When adding a lookup attribute to an entity you only need to provide the following properties:
| Property | Description |
|---|---|
| Name | The name of the attribute. Make sure that you use the following naming convention: 'the referenced entity' + suffix 'Id', pascal case, no special characters and no blank spaces. For example: a lookup on the 'Contract' entity for the 'ContractType' entity will be named 'ContractTypeId'. |
| Attribute Type | Select Lookup from the drop-down list. The Lookup to Entity (only for lookups) field becomes mandatory. |
| Display Name | The name of the attribute that will be displayed on the data form in the user interface if the Auto-generate data form checkbox is selected on the entity level. |
|
Description |
Insert a proper description for the attribute. |
|
Tooltip |
Insert a proper tooltip to help the user understand what it is about. |
| Table Column Name | The name of the attribute which will be automatically generated in the database. This field is not visible in the end-user interface. NOTE To avoid affecting data integrity and consistency, do not change the value prefilled by the system. |
|
Required level |
Select whether the attribute if mandatory to fill in or not:
|
| Lookup to Entity | The parent entity for the entity you are currently working on. |
|
Lookup relationship type |
Select one from the list:
|
| Lookup Relationship Name | This field is automatically filled-in by the system with the concatenation of the two entity names, following this naming pattern: ChildEntity_PK_ParentEntity. |
This is how a lookup attribute is configured:
The following actions are available on lookup fields:
- Select record: Opens the view with records existing within the referenced entity.
- Edit record: Opens the edit data form of the record selected within the lookup attribute.
Defines a map to be displayed in the application. No specific properties need to be provided. Use it for attributes that display location data like where a business's headquarters is located on a map.
When displayed on a form, the user can scroll to zoom in and out, drag to pan the map, and click on the map to set/unset location markers.
The actual data is saved in the database in the form of a JSON object that stores the geographic coordinates of the location markers and map zoom level.
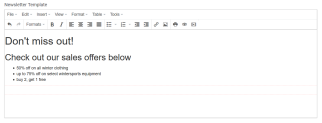
{"markers" : [{"location" : {"lat" : 44.42753573214415, "lng" : 26.08738040542604}}, {"location" : {"lat" : 44.426929932048424, "lng" : 26.1024179417852}}], "zoom" : 15}Defines a HTML block of code. HTML fields allow displaying a rich text editor that can be used to quickly generate the underlying HTML code. It uses tinyMCE which interprets the HTML code.
HTML fields are particularly useful when you want to use customer tailored content, for instance to create newsletter templates to be included in your marketing campaigns.
The underlying HTML code that is stored in the database for the example above is:
<h1>Don't miss out!</h1>
<h2>Check out our sales offers below</h2>
<ul>
    <li>50% off on all winter clothing</li>
    <li>up to 75% off on select wintersports equipment</li>
    <li>buy 2, get 1 free</li>
</ul>Allows selecting and displaying a color. No specific properties need to be provided. Use it for cosmetic customizations, such as user interface themes.
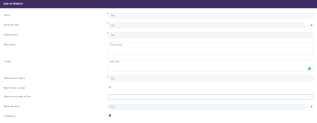
A control that allows end-users to add (upload) an attachment, either by clicking the Add file button or by dragging and dropping the file in the corresponding section. Use when the user needs to upload or download a file attachment such as a contract, agreement, or statement.
The uploaded files are stored in the file upload folder configured on the environment. For details about file storage, see the FintechOS Platform Administration Guide.
When adding the file attribute, a new bool will appear ''restrict files number'' to limit the number of file added to the attribute and a secondary filed ''maximum number of files''.
When the bool is true the automatically filed number of maximum files is one, but you can modify it to accept more files. If the bool is false, the number is unlimited. You can add as many file as you wish.
Security considerations you need to know before using File attributes
The malware detection and the file-type upload verification are available on file upload; however, they are disabled by default.
In order to make sure that the files that you upload are malware-free, you need to enable the malware detection feature. To do so, on the server where the FintechOS installation package resides, go to the web.config file, open it and add the following setting:
<appSettings>
     ....
     <add key="feature.upload.malware-detection" value="true" />
</appSettings>The Antimalware Scan Interface is available starting with Windows Server 2016 and Windows 10; therefore, if you are using prior versions of these tools, you cannot use the malware detection in FintechOS .
JS fields allow usage of JavaScript code on data form level. No specific properties need to be provided. Use it for advanced customizations that you wish to add through the user interface.
Allows you to drag and drop the rows existing in a grid (view). The order index attributes are not displayed on data form level but are used only in views to order attributes by a particular index number.
When adding a text attribute to an entity you need to provide the following specific properties:
| Property | Description |
|---|---|
| Order index attribute reference (only if order index) | The attribute based on which the records in views will be ordered by. |
In order to display optionset items in a particular order in the drop-down list, drag and drop in the order to display them.
An option set attribute allows you to define a list with several options available for selection. Use it when the attribute can take a single value from a limited set of options, such as country, city, currency, etc.
When you add an Option Set field to a data form, you can specify multiple values that will be available for users to select. For more information, see Add an Option Set Attribute.
It defines a price field which has included a thousand separator. No specific properties are required. Use it for monetary values such as credit values, interests, fees, etc.
Allows you to select an icon from the list of available (predefined) icons and display it based on your preference. This type of attribute is currently embedded within FintechOS to allow selection of icons to be displayed on shortcuts that will be pinned on the homepage.
To select an icon, you have to click in the Icon URL field, and select the desired icon from the icons selection pane which will be displayed.
Defines a field which has the format option to display date only. This type of field takes into consideration different timezones, Daylight saving time, winter time or leap a specific day based on year (e.g. February 28). Use it for attributes such as birth dates, expiration dates, or issuing dates.
No specific properties need to be provided.
You can use it to define dates like: Inception Date, Start Date, End Date or Due Date.
This type of attribute is structured with 36 characters from the hexadecimal system (from 0 to F), with four lines.
For example, 43F48DD2-66E7-4ECC-9940-0219F8A5973F.
It renders information from the log file. It is not validated XSS.


