Accounting Models For Transactions
You can enter financial data transactions using the Accounting Models For Transactions menu, which contains the accounting model and item configuration. You can delete, or export Transaction Types tables.
For using transaction types in conjunction with Loan Management, see Transaction Types Used in Loan Management.
Creating Transaction Types
-
In FintechOS Portal, click the main menu > Ledger > Operational Ledger Settings > Accounting Models For Transactions.
-
Double click a transaction type to view and edit it.
-
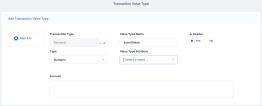
In the newly displayed Edit Transaction Type page’s Main Info, edit in the following fields:

-
Name: Enter the name of the transaction type.
-
Generates Accounting Entry: Select whether or not to create an entry in the general ledger. It generates records in the
Accounting Entryentity.
-
-
Transaction value types are defined as header items or detail items. Header items are the general details of a transaction (for example date, customer, currency, and so on). The detail items are grouped into numeric or text information.
You can create and determine the values calculated for each transaction in the Transaction Value Type section. The additional data from here is used in the Transaction Accounting Models section. In the Transaction Value Types section, click Insert to add a new type and fill in the following:
-
Value Type Name: Enter the name of the value type.
- Transaction Type: Select the transaction value type.
- Type: Select the type of the transaction. The following options are available: Numeric or Text.
- Value Type Attribute: Select the value of a specific attribute from the source entity. It is a list of all the attributes defined in the SourceEntityId field from the
GL TransactionTypeentity. - Is Header: When selected, it defines the header items of the transaction.
- Formula: Supports only basic math operations: addition (+), subtraction (-), multiplication (*), and division (/). Input a specific formula based on the Value Type Attribute chosen.
Click the Save and close button.
When a transaction value type is marked as a header item, the transaction values are set into the attribute values of the
Operation Transactionentity. If the Value Type Name field is not an attribute of that entity, then an error is displayed.A
jsonwith default values is sent when using the function for setting the operation transaction values. Thejsonhas the following form:Copy[
{
attributeName: 'DescriptionText',
value: 'Disburse 1500'
},
{
attributeName: 'ProvisionAmount',
value: '15.00'
}
]The
jsonchecks if there is any default value for theattributeName, from the Value Type Name field. If no values are returned, the Formula field is checked. When neither field returned any values, the source entity of the attribute from the Value Type Attribute field is checked. -
-
You can define an account from the Accounting Chart in the Transaction Item Accounting Configuration section, which holds the configuration of each transaction. The section represents the listing of the names of the accounts for the company inserted in the Legal Entity menu.
To add a new transaction item accounting configuration, click the Insert button in the Transaction Item Accounting Configuration tab. The Add Transaction Item Accounting Config page opens.
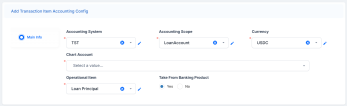
Fill in the following fields:
-
Accounting System: Select the accounting system.
-
Accounting Scope: Select the accounting scope.
-
Chart Account: Select the accounting chart.
-
Operational Item: Select the item of operations.
-
Currency: Select the currency of the accounting entry line.
-
Take From Product: If you select Yes, then the configurations for each transaction are inherited from the banking product level.
Click the Save and close button.
-
-
The Transaction Accounting Models tab holds the accounting models, all the rules used in order to generate accounting entries for each transaction.
The details from the Debit Account Rule and the Credit Account Rule are defined by the information from the Transaction Item Accounting Configuration section. All other details are defined by the information from the Transaction Value Type section.
To add a new transaction accounting model, click the Insert button under the Transaction Accounting Models section. The Add Transaction Accounting Model page opens.
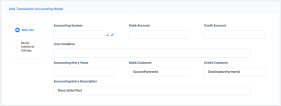
Fill in the following fields:
-
Accounting System: Select the accounting system.
-
Debit Account: The accounting entry value of the debit account.
-
Credit Account: Enter the credit account of the accounting entry line. It is auto-filled.
-
Line Condition: Enter the condition applied in order to post the accounting entry line.
-
Accounting Entry Value Rule: Enter the posted accounting entry value.
-
Debit Customer: The rule to save the partner transaction in the debit-credit relationship.
-
Credit Customer Rule: It is auto-filled by the destination partner ID.
-
Accounting Entry Description: The description of the generated accounting entry. It is auto-filled.
Click the Save and close button.
-
-
In the Model Additional Settings, add the following:
-
EntityId: Enter the internal status of the record.
-
Item: The transaction item of the accounting entry line. It is auto-filled.
-
Currency: The accounting entry line currency. It is auto-filled.
-
Transaction Id: Enter the related contract ID of the transaction.
-
Transaction Detail: Enter the rule to identify and post the ID of the operational transaction detail.
-
Transaction Value: Select the value type of the transaction. It is defined in the Transaction Value Type section.
-