Creating the Organizational Structure
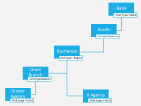
See the example below for a better understanding of how to define the organizational structure.
To create the organizational structure, log into the FintechOS Portal and follow the steps below:
Unit types represent a way of organizing branches, departments, and sales areas into smaller groups based on the activity scope, the organizational chart position, or the geographical location. To define the units type:
-
Go to Single Customer View > Single Customer Configurations > Units Type and add the unit(s) type.
-
For each unit type provide the following attributes:
-
Name: Select the name of the unit type: bank, branch, department, head office, market area or region.
-
Last Level: Select this checkbox if a unit type is the last one in the hierarchical structure.
NOTEWhen a unit type is marked as last level, all other unit types are automatically marked with Last level = false and all business lines and business unit branches associated to them are deleted.
-
By default, the following business lines are available in the system:
| Business Name | User Journey | Type of customers |
|---|---|---|
| Corporate | Banking SME | SME Customers |
| Individuals | Banking Retail | Banking Retail Customers |
| Insurance | Insurance | Insurance Customers |
| WM | Wealth | Wealth Customers |
Currently if there is more than one division using the same business line, replicate the business lines:
-
Add the desired business line by clicking Single Customer View > Single Customer Configurations > Business Lines > Add.
-
Select a different division:
-
Name: Enter the name of the business line.
-
Division: Possible values are taken from the Division entity. This attribute is optional; however, if you need a business line across multiple divisions, we recommend you to fill-in the division.
-
A division, sometimes called a business sector or business unit (segment), is one of the parts into which a business, organization or company is divided. You can add divisions from the Business Line Configuration page:
-
Click the down-arrow next to the Division attribute. A pop-up is displayed (listing all defined divisions).
-
Click the Insert button. The Add Division page is displayed.
-
Enter the Division Name. For example: Retail, Corporate.
-
Click the Save and close button. The division is displayed in the list of defined divisions. Add as many divisions as you need.
-
Once you’ve finished adding divisions, double-click the division and the business line is linked to the selected division.
A branch office is a location, where a business is conducted other than the main office. To define the business unit branches, follow the steps below:
-
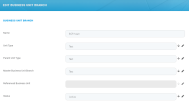
Go to Single Customer View > Single Customer Configurations > Business Unit Branches and add the business unit branches based on your organizational structure.
NOTE When creating a new business unit branch, a business unit is automatically inserted in the system (and also linked to the parent business unit).
-
Name: Enter the name of the branch.
-
Unit type: Select the unit type of the record. Possible values are taken from the Unit Type entity.
-
Parent Unit Type: Select the type of the parent of the current record. Possible values are taken from the Unit Type entity.
-
Master business unit type: Filtered, displaying only Business Unit branches with
Unit Type = Parent Unit type. -
Referenced business unit: Business unit from
business unitsystem entity. It is automatically filled in. -
Status: Select the status of the record:
Draft, ActiveorInactive.
The Business Lines section is available only for records that have a Unit Type marked as
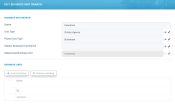
Last level.If you selected a unit type marked as last level, you can also allocate one of the existing business lines. To do so, at the top right-corner of the page, click the Save and reload button. The Add Business Unit Branch page is replaced by the Edit Business Unit Branch page, and the Business Lines section is unlocked.
In the Business Lines section, click the Insert existing button. A pop-up listing all existing business lines is displayed. Double-click on the desired business line. The pop-up is closed and the business line is displayed in the Business Lines section.
Click the Save and close button.
Account types represent a way of segmentation of the customer portfolio into smaller groups based on customer types.
Follow these steps to add new account types:
-
Click Main menu > Foundation > Account Types, and Account Types List page is displayed.
-
Click the Insert button to open the Add Account Type page.
-
Fill in the following fields:
-
Status: Select the account type status: Draft, Active or Inactive.
-
Name: Enter the name of the account type.
-
Form: Select the account type form: Private Individual or Legal Entity.
-
Has Fiscal Number: If you select this checkbox, then this account type has a fiscal registration number (UTR).
-
Is Person: If you select this checkbox, then this account type has a personal identification number (PIN).
-
-
Click the Save and close button.
Define the account functionalities based on your needs (for example, Customer). To do so, follow the steps below:
-
Go to Single Customer View > Single Customer Configurations > Account Functionalities.
-
Provide the following attributes:
-
Enter the Name, Code and Description of the functionality.
-
Applicable Account Type: Possible values are taken from the Account Type entity.
-
-
Click the Save and close button.


