Registering Contracts
For registering a new record in your Reinsurance Admin database follow the steps below:
-
At the top left corner of your FintechOS Portal, click the main menu icon to open the main drop-down list.
-
From the main list, click Reinsurance Admin. A second drop-down opens.
-
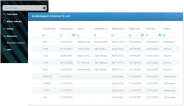
Next, click Reinsurance Contracts to access the Reinsurance Contracts List - this being also the repository of all the records that exist in your database.
-
In the Reinsurance Contracts List page, at the top right corner, click Insert to insert a new record. This launches the Reinsurance Contract form, which is a dynamic form - meaning that some fields become available as you introduce your data.
Consequently, you must fill in the details about the new reinsurance contract in the following order: General Data section, Contract Details section, Insurance Type Grid section.
General Data Section
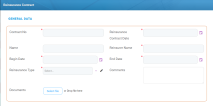
Inside the Reinsurance Contract tab, you can see the General Data section, at the top.
Start by filling in the following initial information about the new reinsurance contract:
| Field | Description |
|---|---|
| Contract No. | The number of the reinsurance contract. |
| Reinsurance Contract Date | The date of the reinsurance contract. |
| Name | A descriptive name for the reinsurance contract - for example, "Motor QS". |
| Reinsurer Name | Name of the reinsurance company. |
| Begin Date | The date when the reinsurance coverage becomes active. |
| End Date | The end date for the reinsurance coverage. This date cannot be set to an earlier date than the Reinsurance Contract Date. |
| Reinsurance Type | The options that you can select are the following: 1. Quota Share (QS) - for proportional reinsurance contracts. 2. NAT-CAT Excess of Loss (XL) - for disproportional severity exposure (such as natural catastrophes) reinsurance contracts. |
| Comments | General field for contract related comments. |
| Documents | For inserting documents that are part of or relevant to the current reinsurance contract. |
Contract Details Section
The Contract Details sections is displayed dynamically, according to the choices you make when you use the Reinsurance Type option set (see details above).
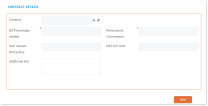
When you choose to register a Quota-Share (QS) contract type, the following Contract Details section is displayed.
Continue your registration by filling in the following information:
| Field |
Description |
|---|---|
| Currency |
From the list, select a currency for the contract and click Ok. |
| QS Percentage Ceded | The ceded percentage, for the current contract. |
| Reinsurance Commission | The percentage of reinsurance commission - integer, up to 100. Percentage sum of objects sum insured (e.g. Building + content). |
| Sum Insured Limit/ Policy | The limit of the sum insured per policy. |
| NAT-CAT Limit | Max. indemnity limit for NAT-CAT events. |
| Additional Info | General field for additional info. |
After completing the Contract Details section, the Insurance Type Grid becomes available.
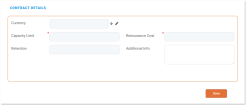
When you choose to register a NAT-CAT Excess of Loss (XL) contract type, the following Contract Details section is displayed.
Continue your registration by filling in the following information:
| Field | Description |
|---|---|
| Currency | From the list, select a currency for the contract and click Ok. |
| Capacity Limit | The value of the capacity limit for NAT-CAT Excess of Loss. |
| Reinsurance Cost | The cost for NAT-CAT type of Reinsurance. Sum of objects sum insured (e.g. Building + content). |
| Retention | Max. indemnity limit for NAT-CAT events |
| Additional Info | General field for additional info |
After completing the Contract Details section, the Insurance Type Grid becomes available.
Insurance Type Grid Section
Continue your registration by filling in the following information:
-
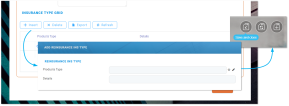
Inside the grid, click Insert in order to attach one or more Insurance Types that are to be covered by the new reinsurance contract.
-
The Add Reinsurance Ins Type pop-up window opens.
-
From the drop-down list, select the desired Insurance Types to be attached and click Ok. If needed, in the Details field, you can introduce some details regarding the Insurance Types selection you made.
-
Next, click Save&Close, at the top right corner of your screen, to return to the Insurance Type Grid.
-
If you need to add more Insurance Types, click Insert inside the Insurance Type Grid and repeat the previous steps.
-
When you finish adding all the Insurance Types, click Save, at the bottom of the form. Your new reinsurance contract is registered! You can also see at the top left corner of your screen that your record moved from Draft to the Registered business status.
However, there are cases when you might need to edit your record right away. For more details, check the page about editing your Reinsurance Admin records.
